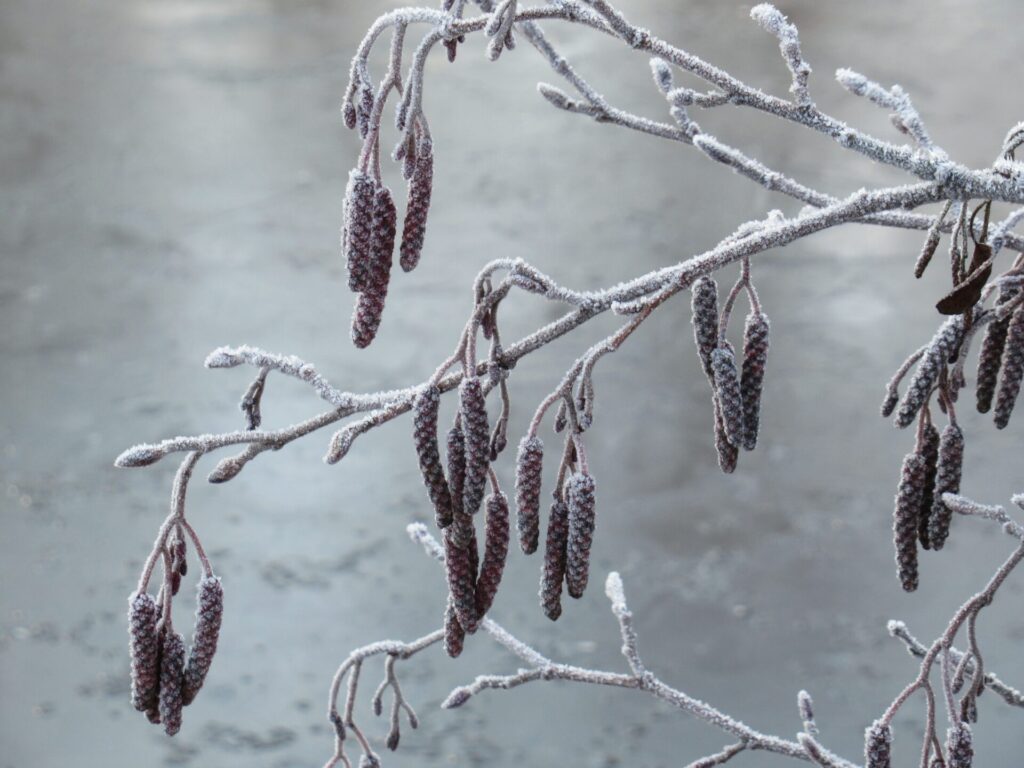
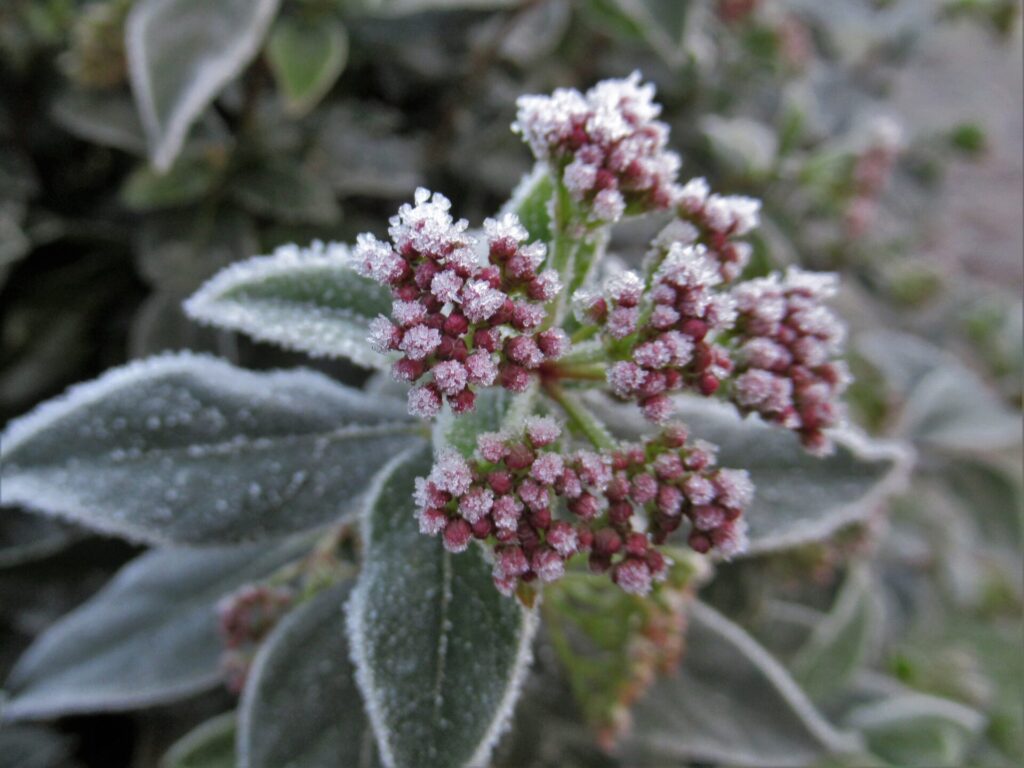
Hello! I was only going to write a short post today, about colour dominance in stranded knitting, but I seem to be incapable of writing short posts somehow. Looking through my photos I realize that there is much more to share. We’ve had some beautiful, clear, frosty mornings this past week, and I just have to show you a few pictures.
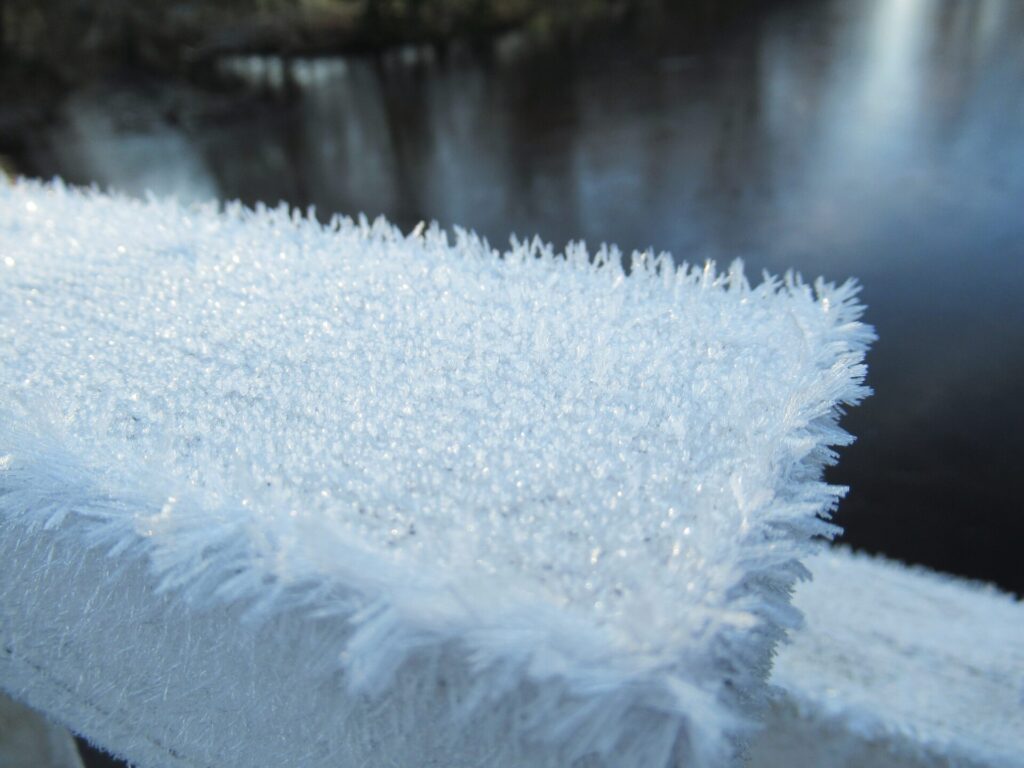
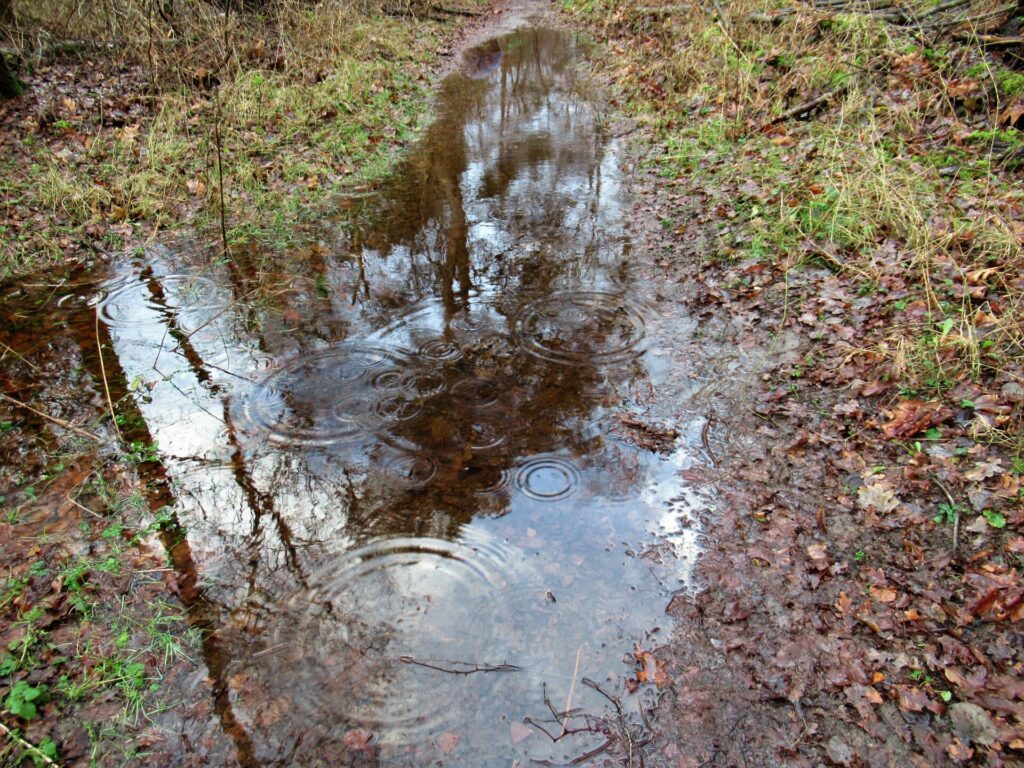
The railings of a bridge we crossed on one of our walks were covered in a furry white coat of ice needles.
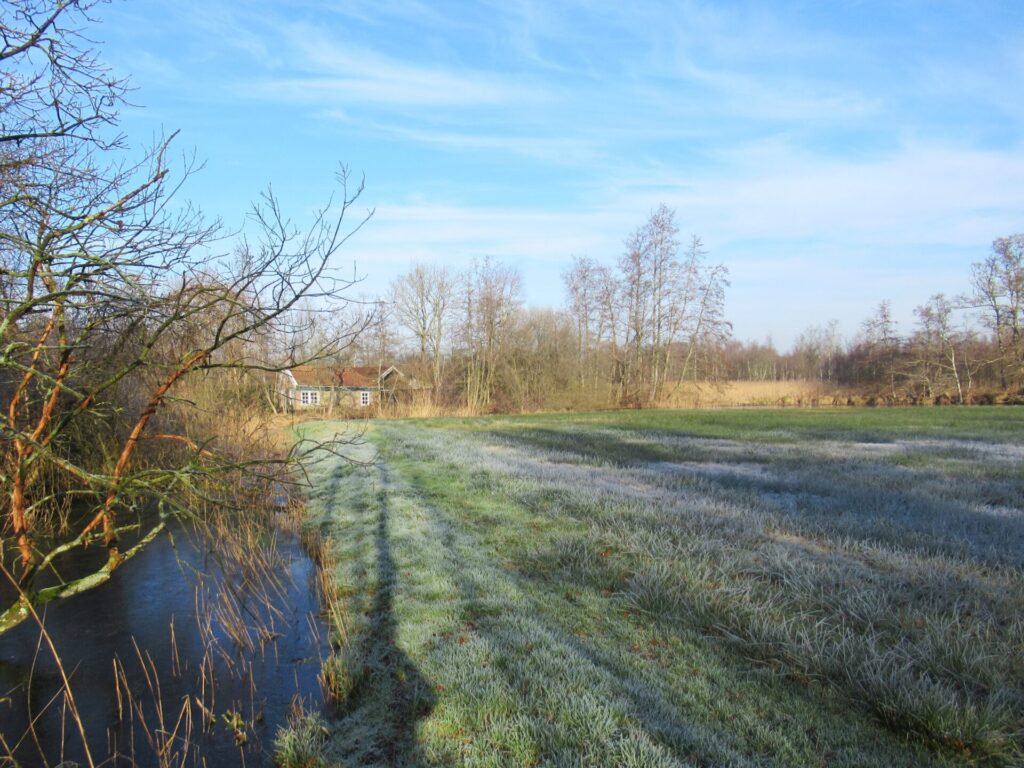
There is a wafer-thin layer of ice on the smaller waterways. Daytime temperatures are far too high for a safe ice floor for skating on to grow.
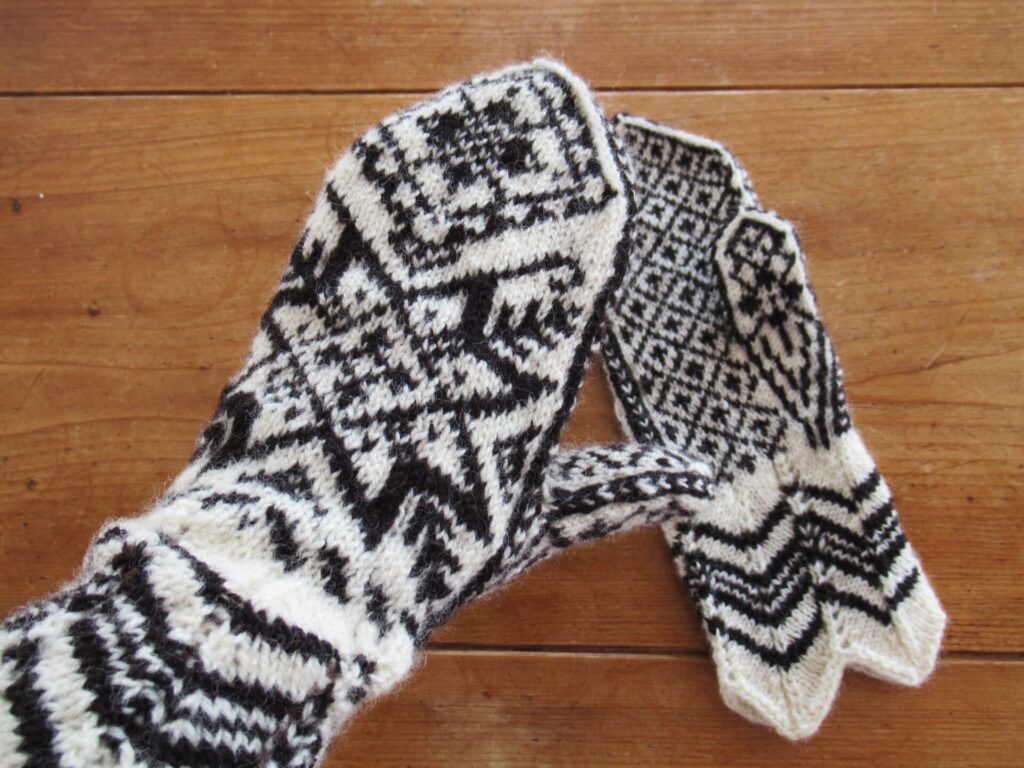
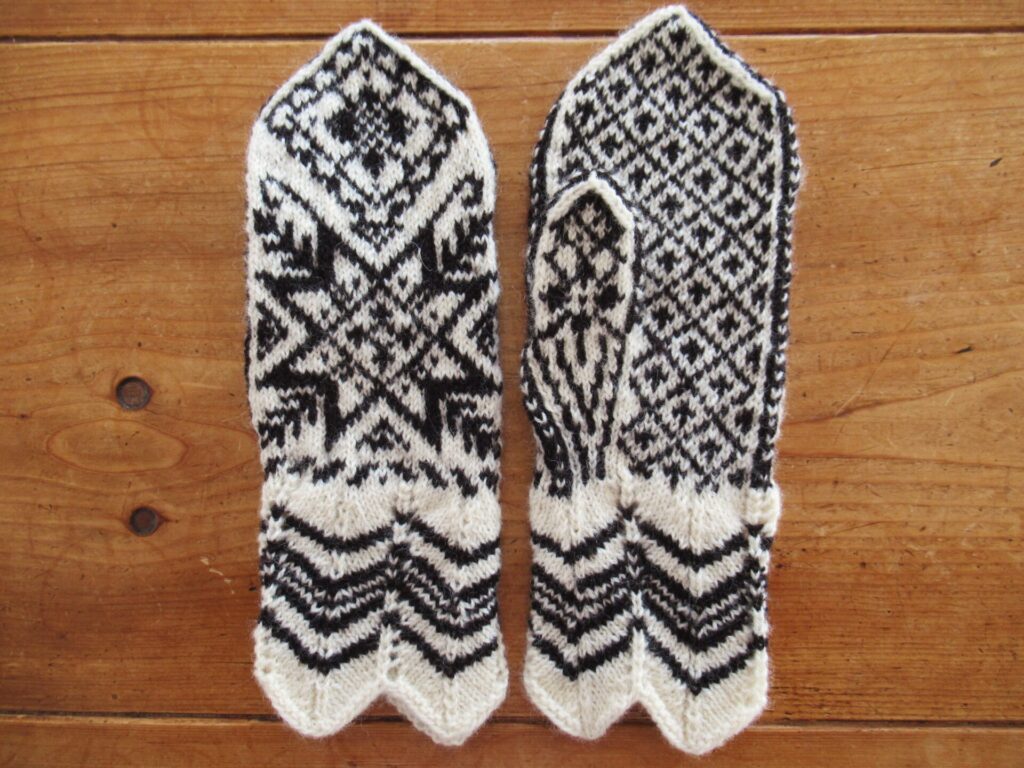
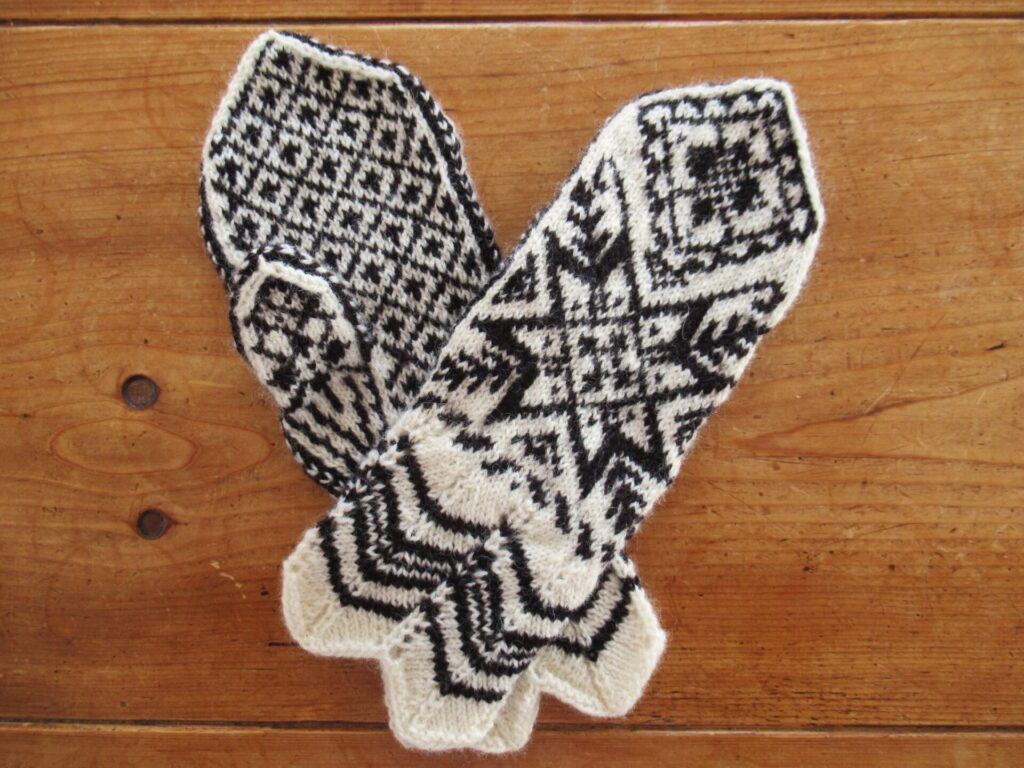
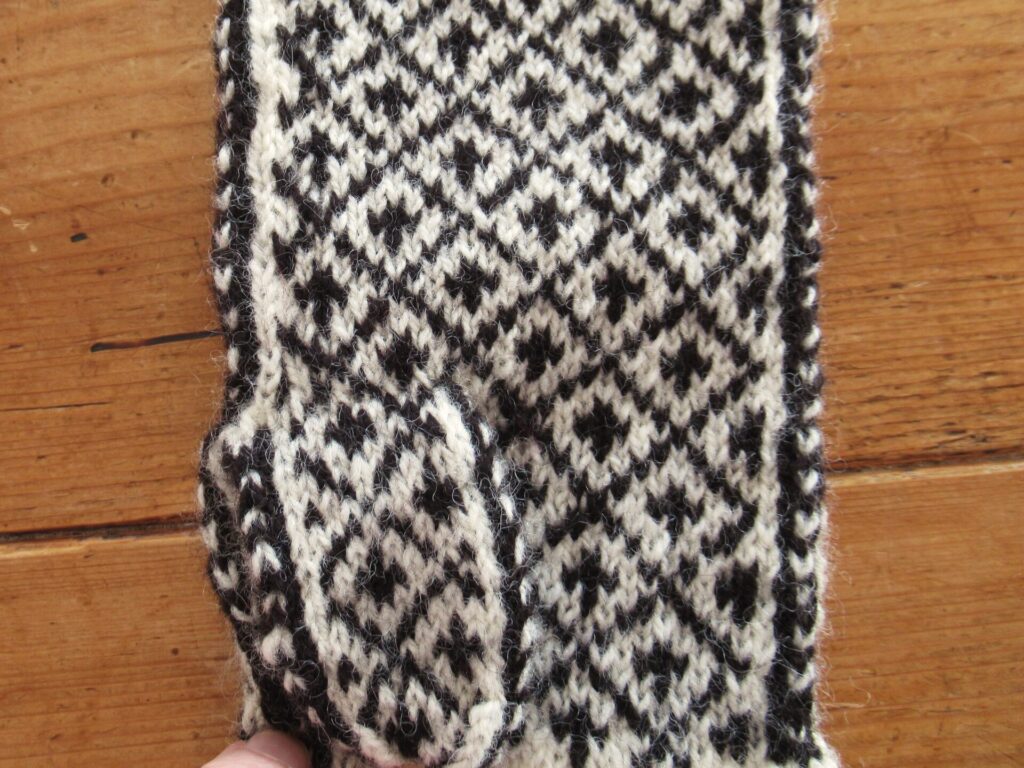
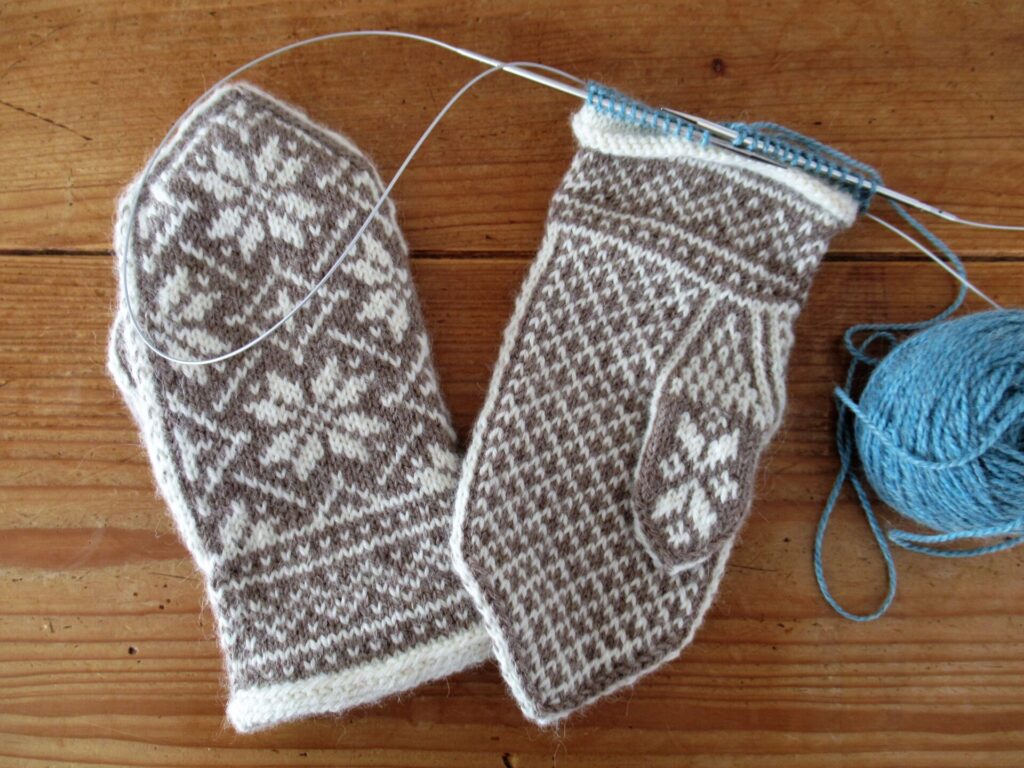
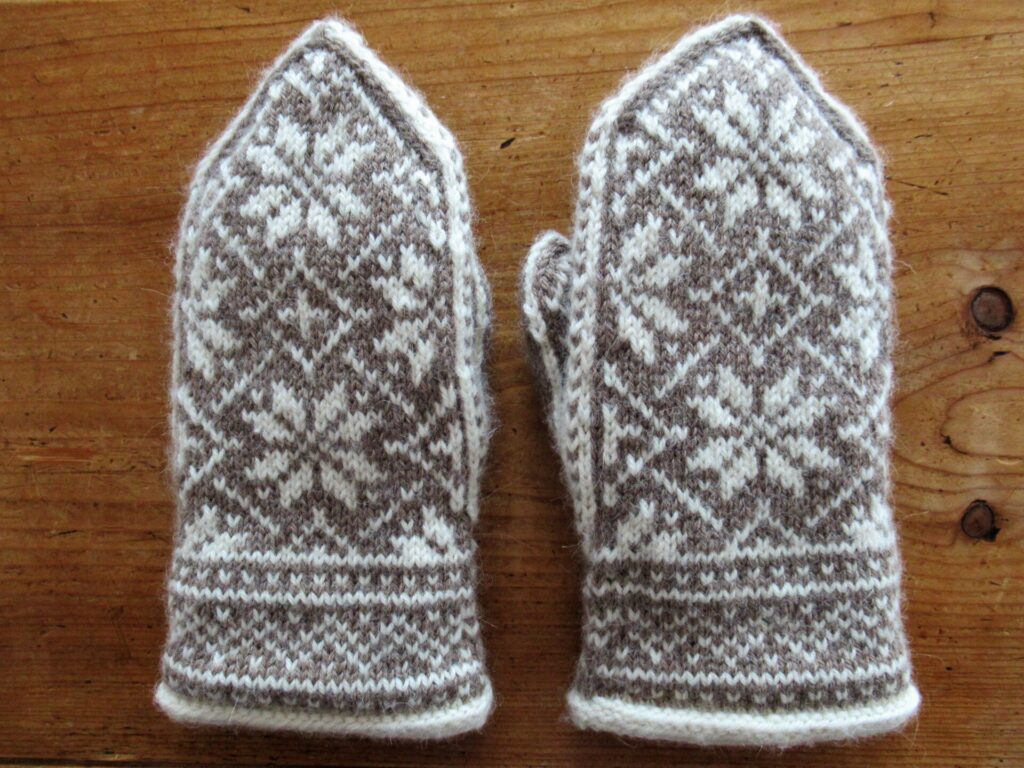
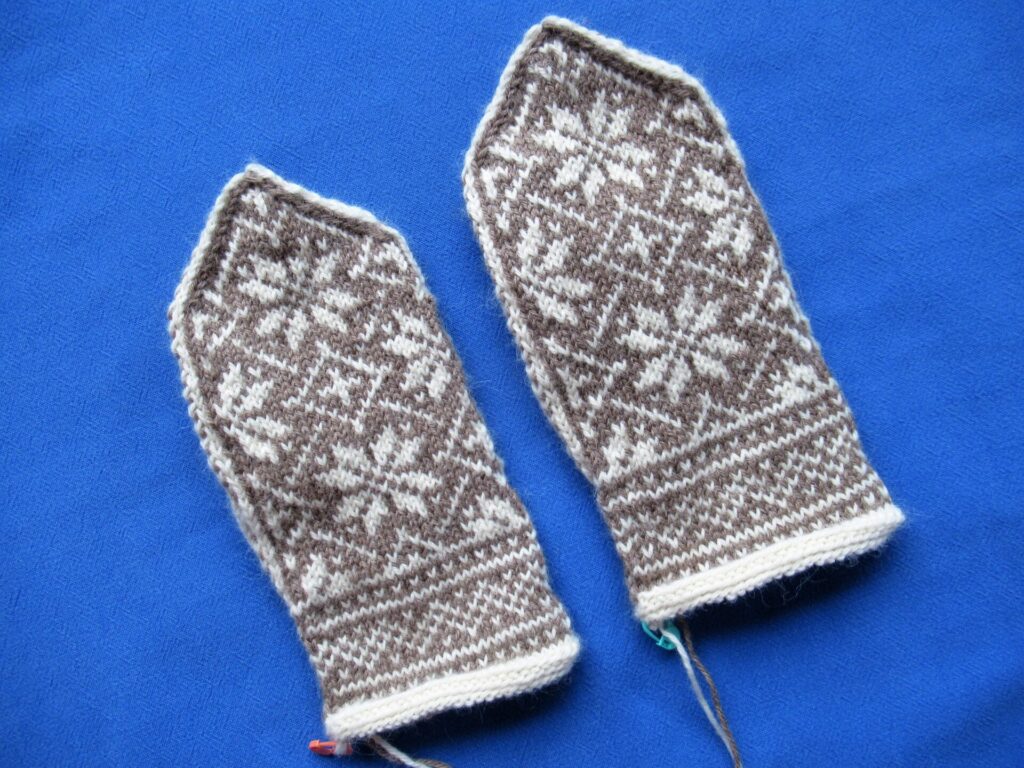
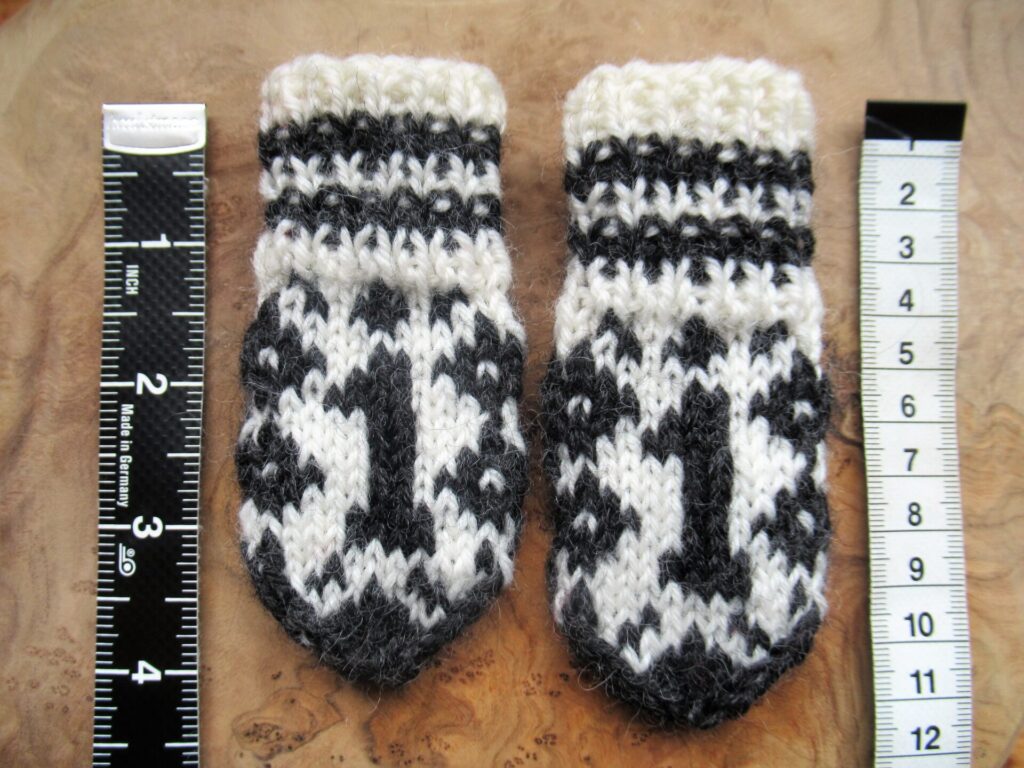
But temperatures are low enough throughout the day for wearing mittens, and the Selbu mittens I’ve just finished come in handy.
Colour dominance in stranded knitting
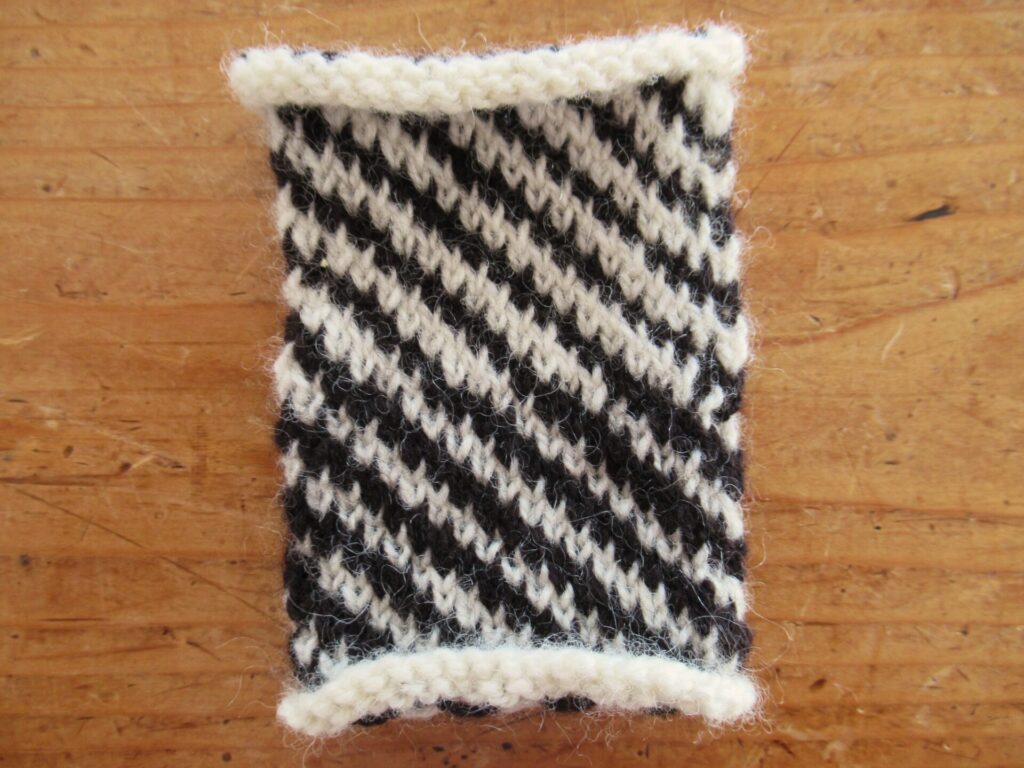
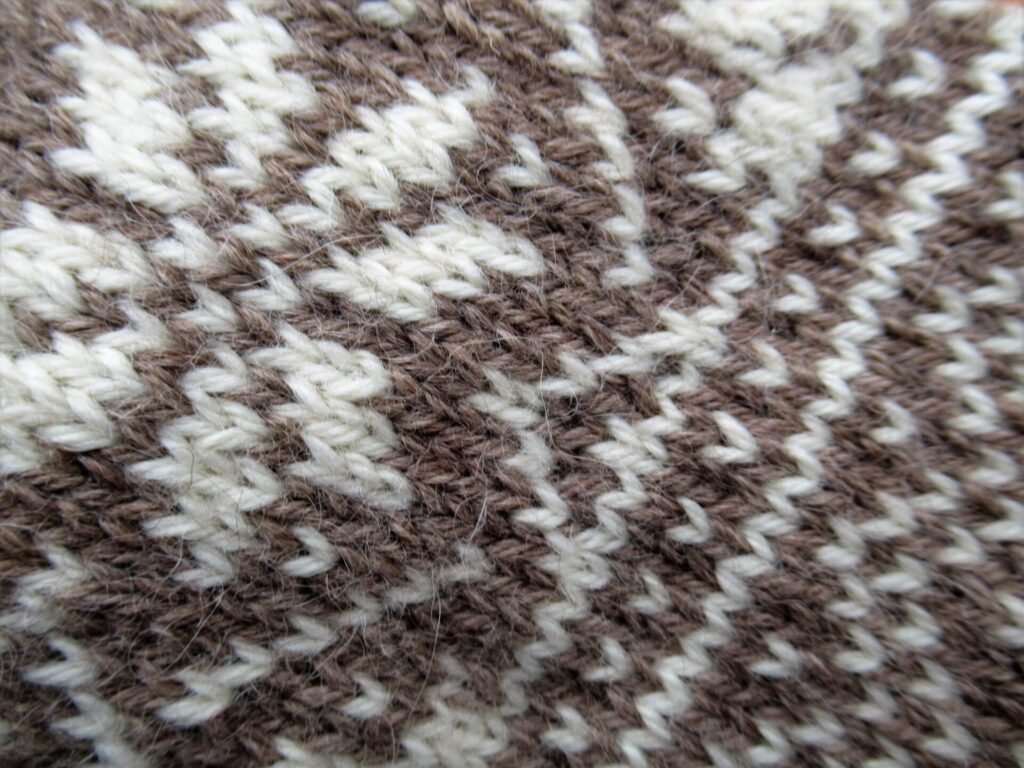
The first time I knit a similar pair of mittens was long before the internet, and I didn’t have anyone to tell me how to go about it. While I was knitting them I discovered that it makes a difference how you hold your two yarn colours. I always hold one thread in my left hand and one in my right hand. I found out that the colour I hold in my left hand pops out/is dominant, while the one in my right hand forms the background.
I’ve knit a small swatch to show you what I mean. In the bottom half of the swatch below I held black in my left hand and white in my right hand. And in the top half it was the other way around, with white in my left hand and black in my right hand.
Makes quite a difference, doesn’t it?
So how does this work? Looking at the back of two-colour knitting, you can see that there is always one colour that takes the shortest route, while the strands or floats of the other colour sort of come up from under that and take a longer route. It’s the colour that takes the longest route that is dominant. Recapping:
If you’re holding one colour in your left and the other in your right hand, the left-hand colour will be dominant.
If you’re holding both of your yarns in one hand, the thing to do is look at the floats at the back of your knitting and find out which one takes the longest route – that’s the dominant one.
Keep the same colour in the same hand/position throughout your stranded knitting project for a consistent result.
For my Selbu Mittens, I wanted the black to really pop out, and held that in my left hand.
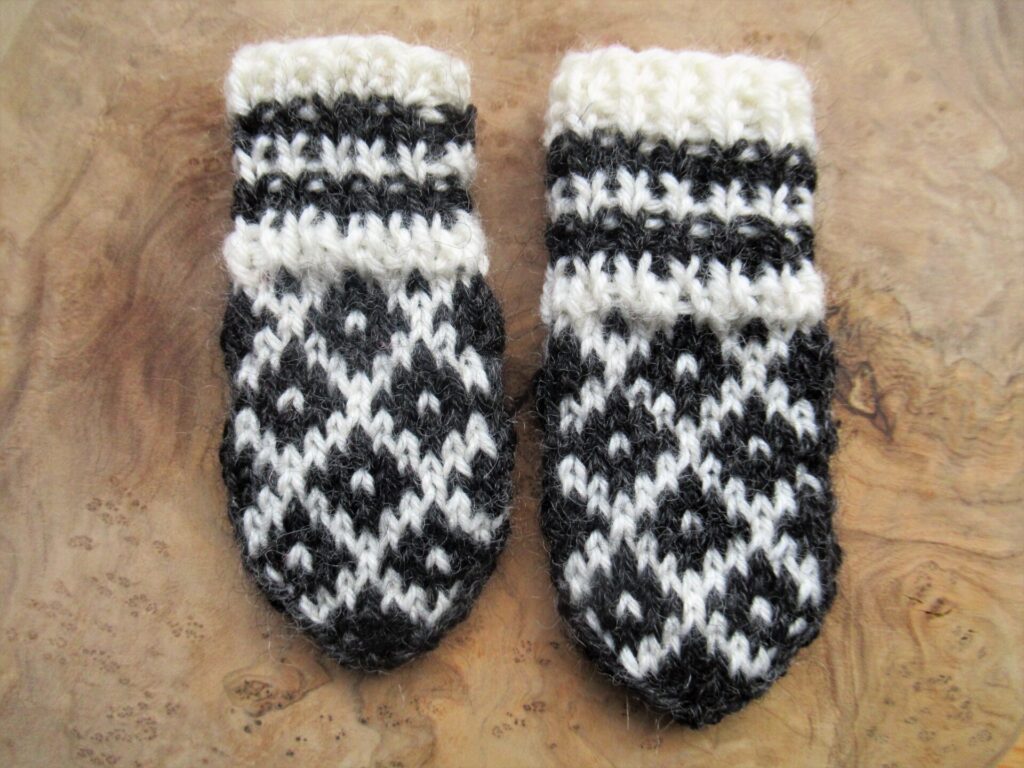
Different cuffs for men and women
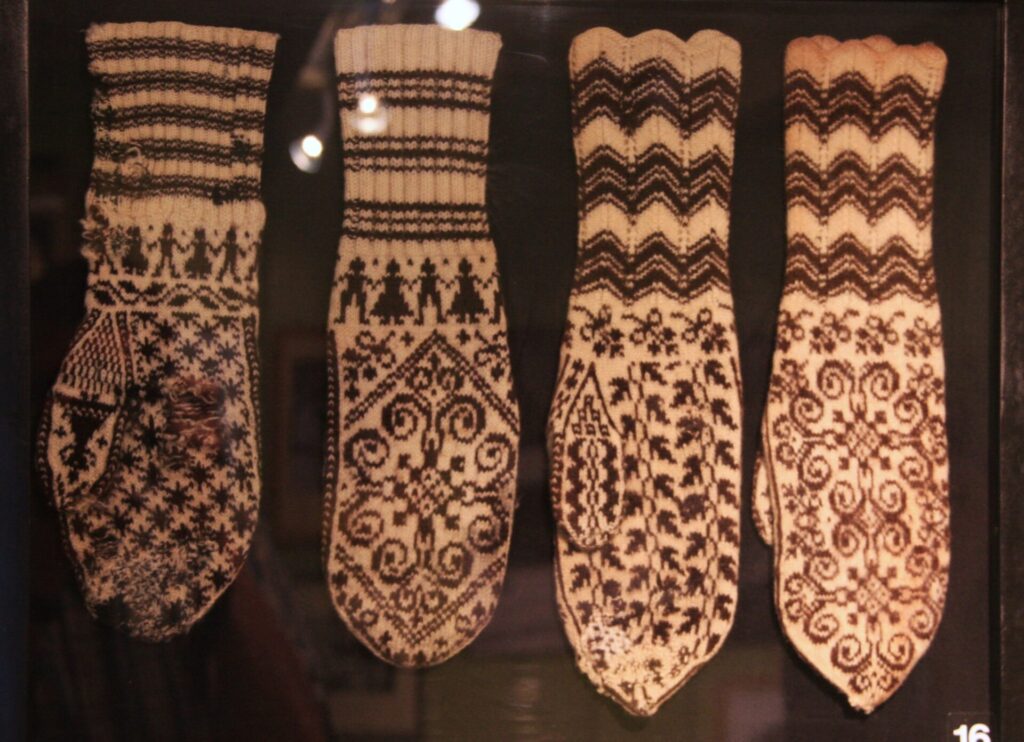
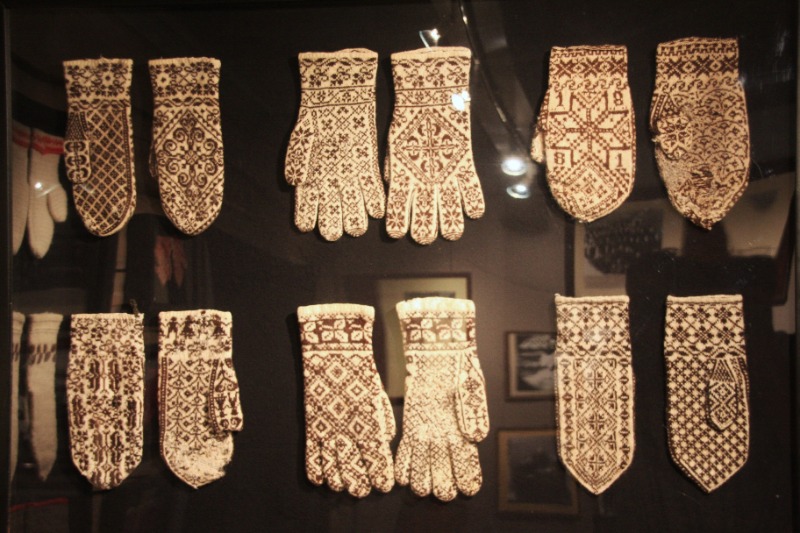
Traditionally, Selbu mittens for men had cuffs with colourwork similar to that on the hands, whereas women’s mittens had either the zigzag cuffs I used or striped ribbed cuffs. Below, two pairs of women’s mittens in Selbu Bygdemuseum:
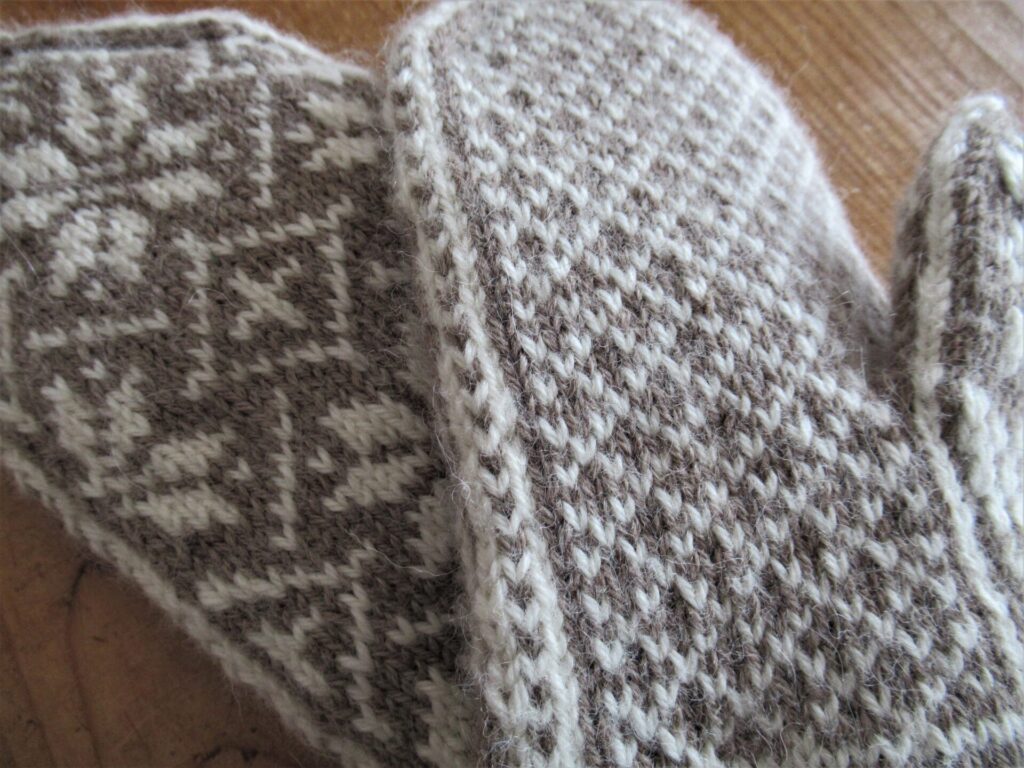
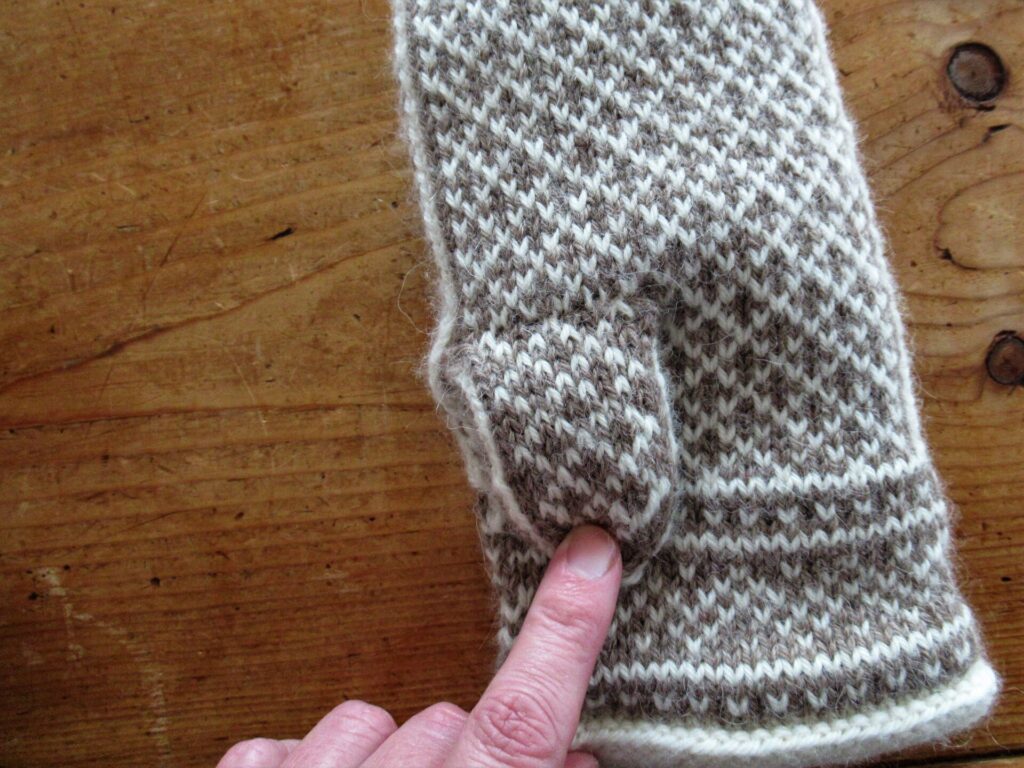
Which float to pick up for increases
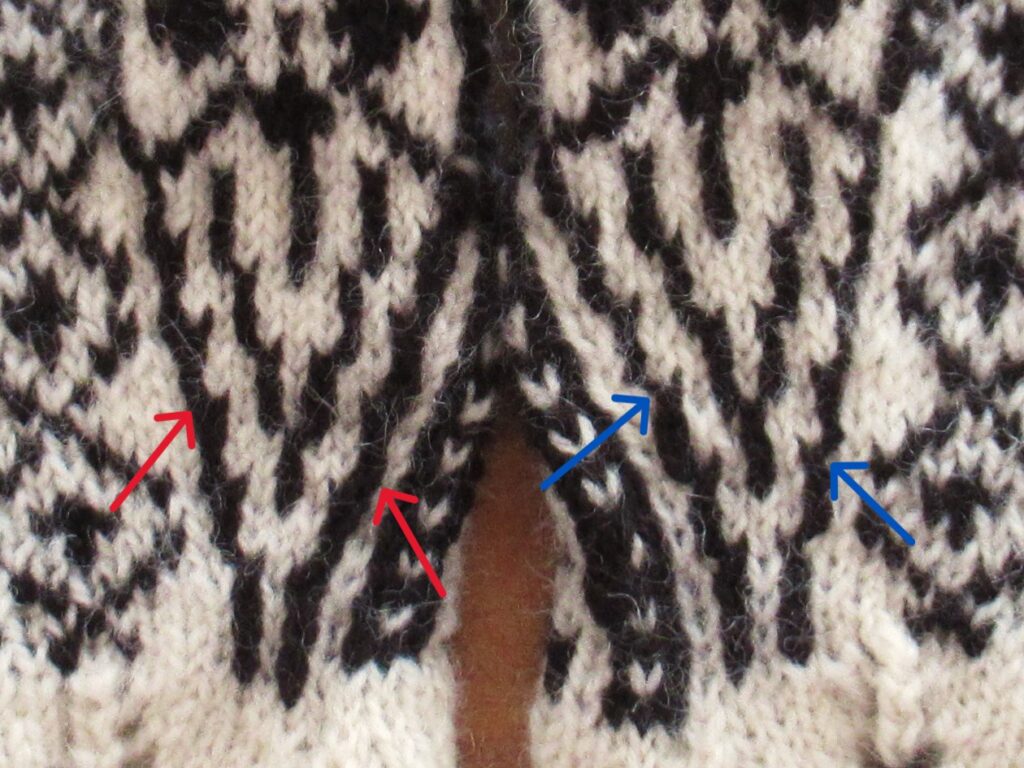
While knitting these mittens I made another discovery – it makes a difference which float you pick up when increasing (M1L or M1R). For the thumb gusset below right, I picked up white floats for making a stitch, and for the thumb gusset below left, I picked up black floats. I don’t know if it’s very clear in the photo, but picking up white floats results in a kind of steps along the sides of the gusset (blue arrows), while picking up black floats gives a smoother line (red arrows).
What I’d do differently next time
This time, I used the same needles throughout. Next time I’d go down one or two needle sizes for the cuffs.
What I’m inordinately proud of
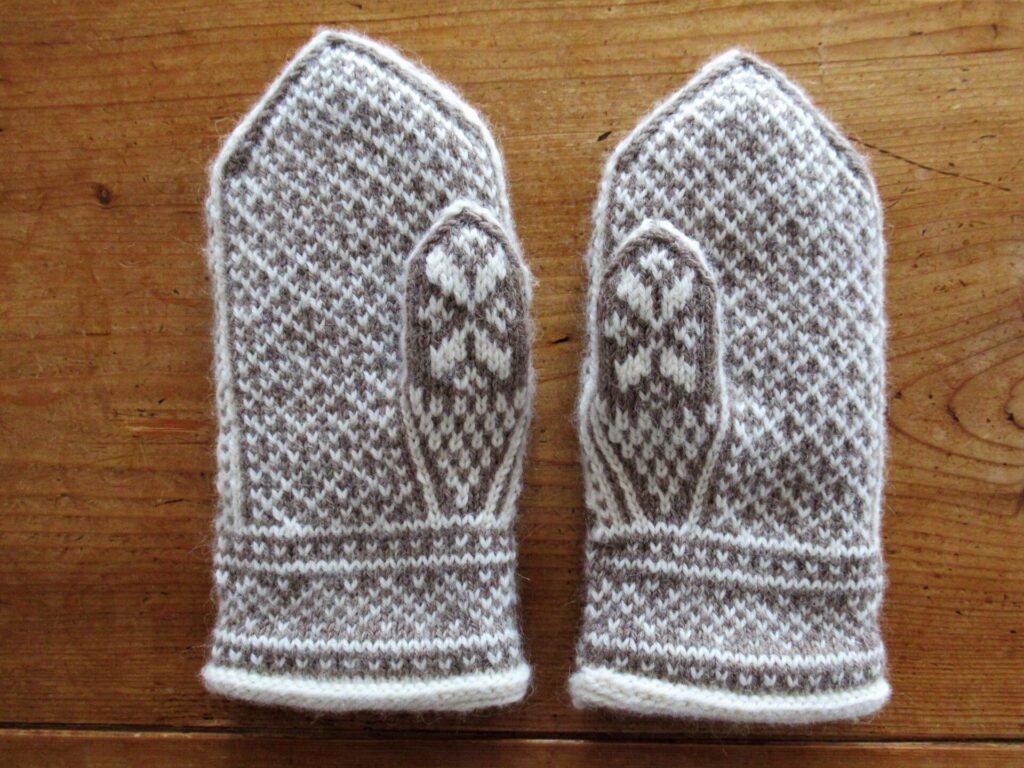
How the all-over pattern on the palm of the hand continues on the thumb, so that you can hardly see where I picked up the thumb stitches.
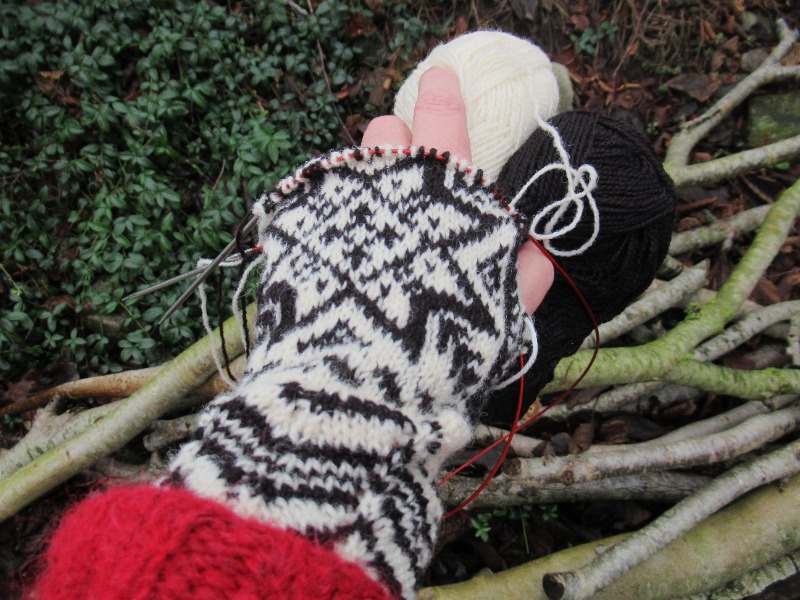
Hello! After a false start – with a mitten turning out too small – my Selbu mittens are now well under way. They have a star on the top and an all-over diamond grid pattern on the palm of the hand.
I’ll tell you more about them when they’re finished. First, I’d like to take you along to the Norwegian region where these black-and-white mittens originated. We visited Selbu during one of our many travels in Scandinavia, camping on the local campsite for a couple of nights, eating outside no matter what the weather.
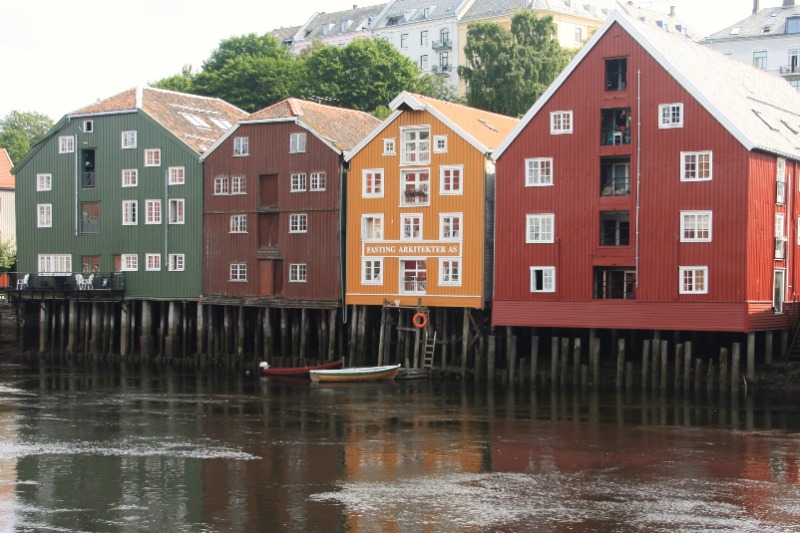
Selbu is a community with about 4.000 inhabitants, some 70 kilometres south-east of Trondheim, the city with these colourful warehouses along the Nidelva river:
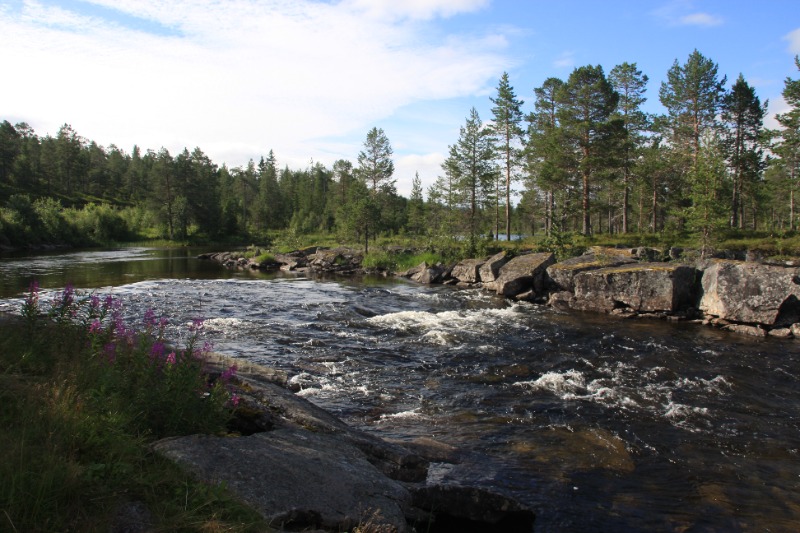
I love the rugged Norwegian landscape, with its wild rivers…
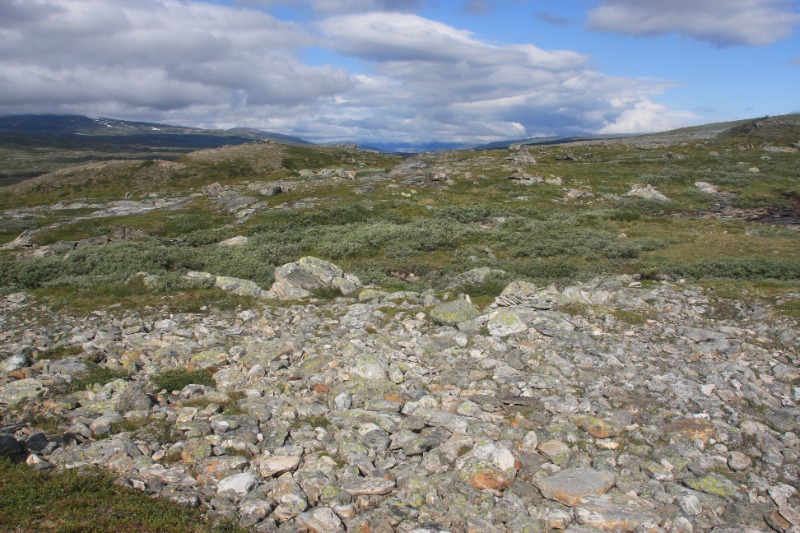
… and wide open spaces.
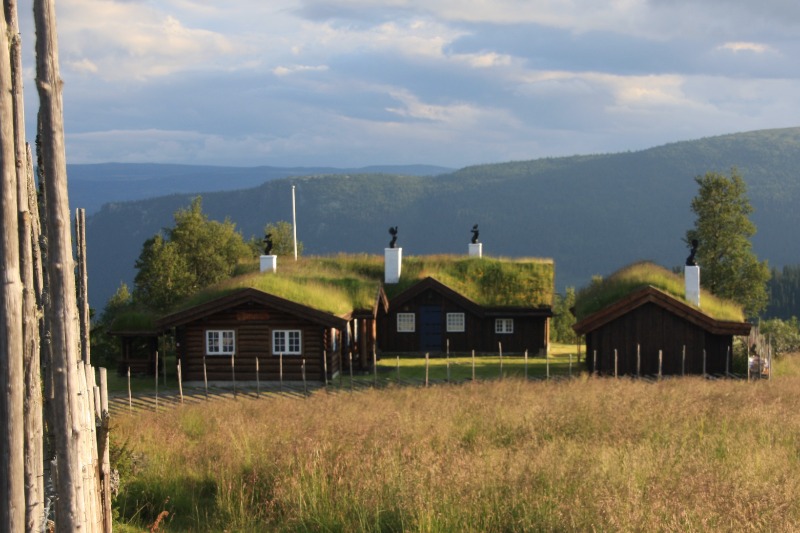
We pass many interesting dwellings…
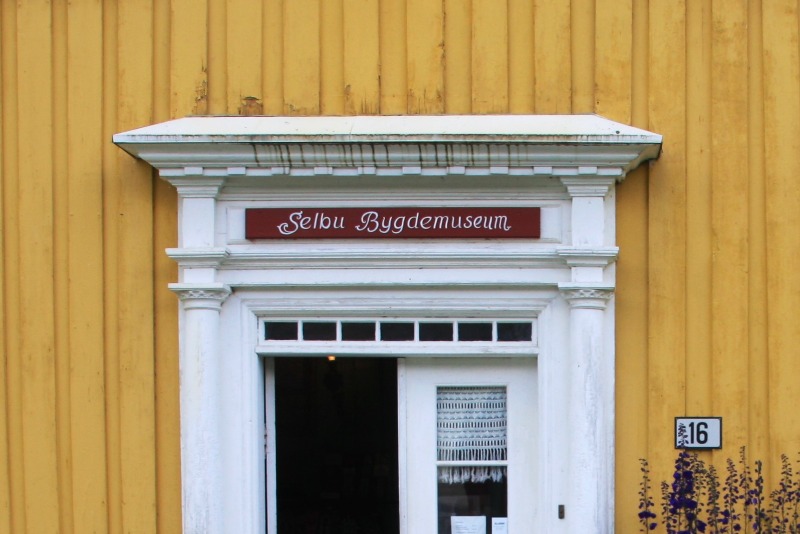
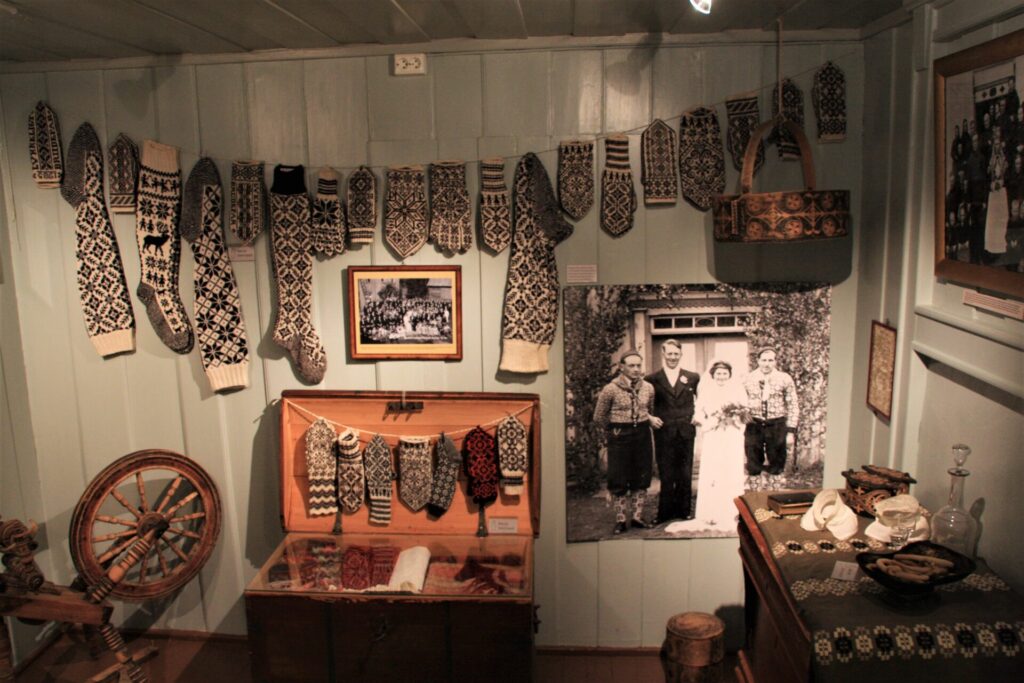
…before arriving at the old rectory that houses Selbu Bygdemuseum.
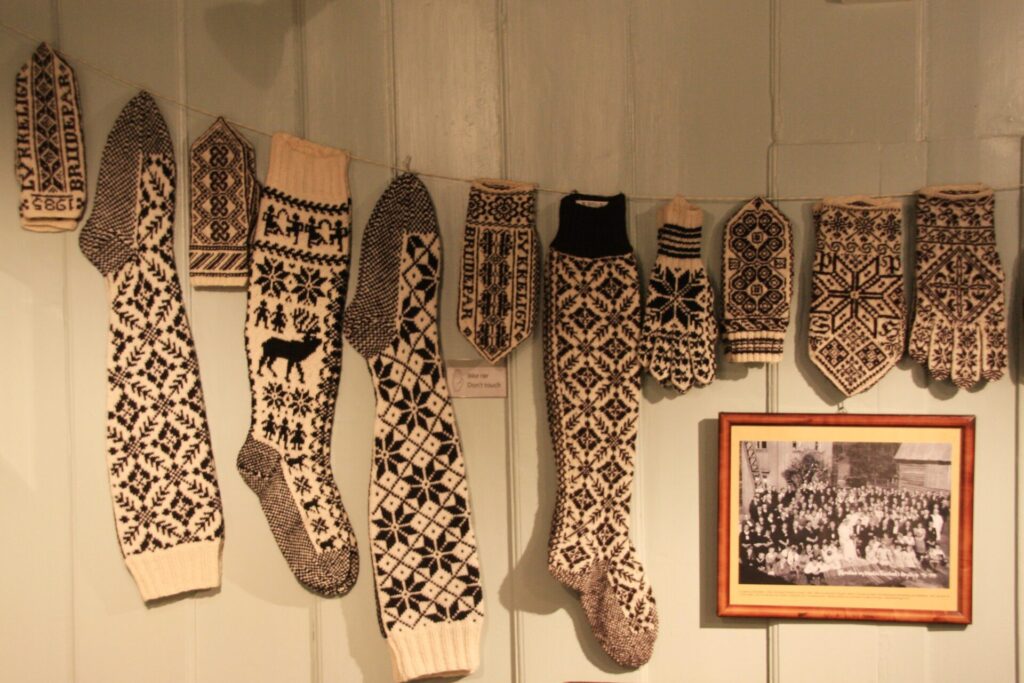
The museum shares its premises with Selby Husflidscentral, that runs the shop, and organises tours of the museum as well as workshops and talks on Selbu knitting. The museum has a fabulous collection of knitted accessories,
including a large number of gloves and mittens.
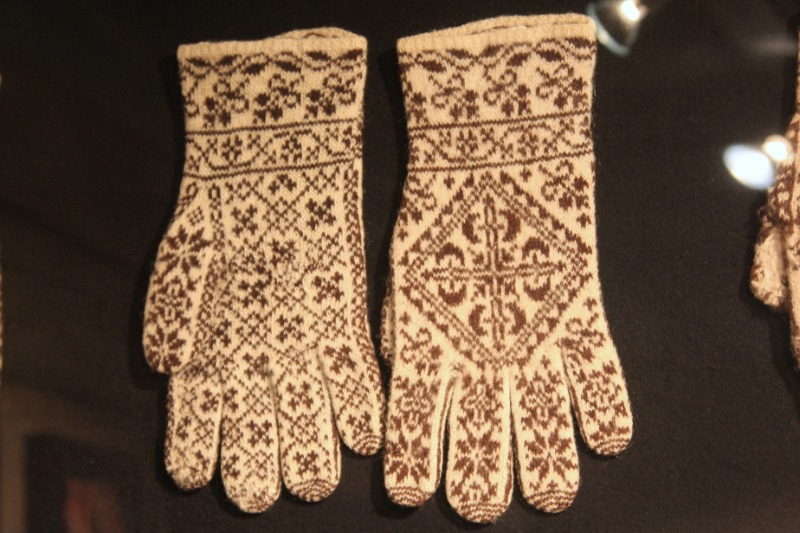
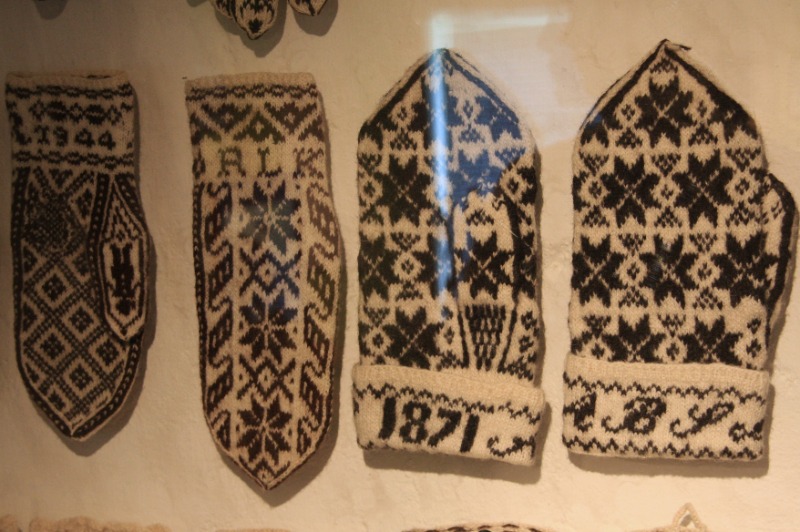
Almost all of them are in black and white, and many (but not all) of them have star and/or diamond patterns.
I am talking of star patterns, but the Norwegians call them eight-petal roses, or also Selbu roses. No pair is the same, and some pairs have dates and/or initials knit into them.
Some of the mittens have very intricate patterns knit on very fine needles, while others are simpler and knit at a larger gauge. The ones I am knitting are something in between. There is much more to write about these wonderful mittens, but I’ll leave it at this for now.
If you ever have the opportunity, Selbu Bygdemuseum is definitely worth a visit. Until then, here are some links for further reading:
Hello, and thank you so much for all your kind well wishes! For those of you with a similar bug: I hope you’ll get well soon. I’m not exactly brimming with energy yet, but grateful to be feeling much better, and glad to be able to pick up the thread of my blog, too.
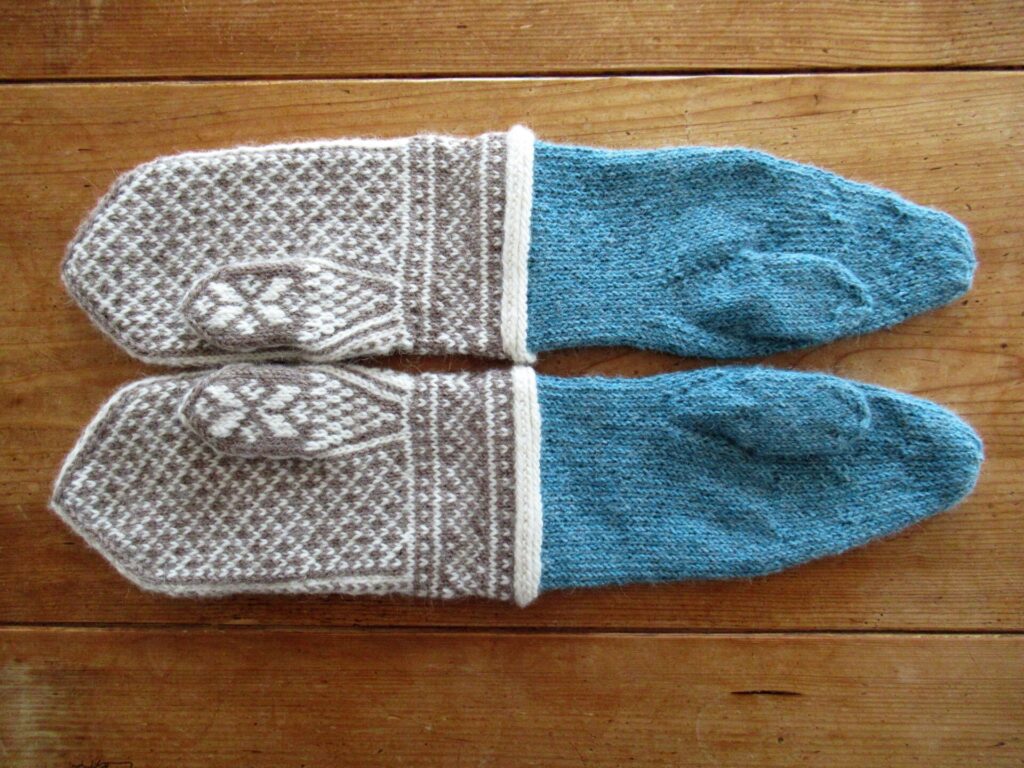
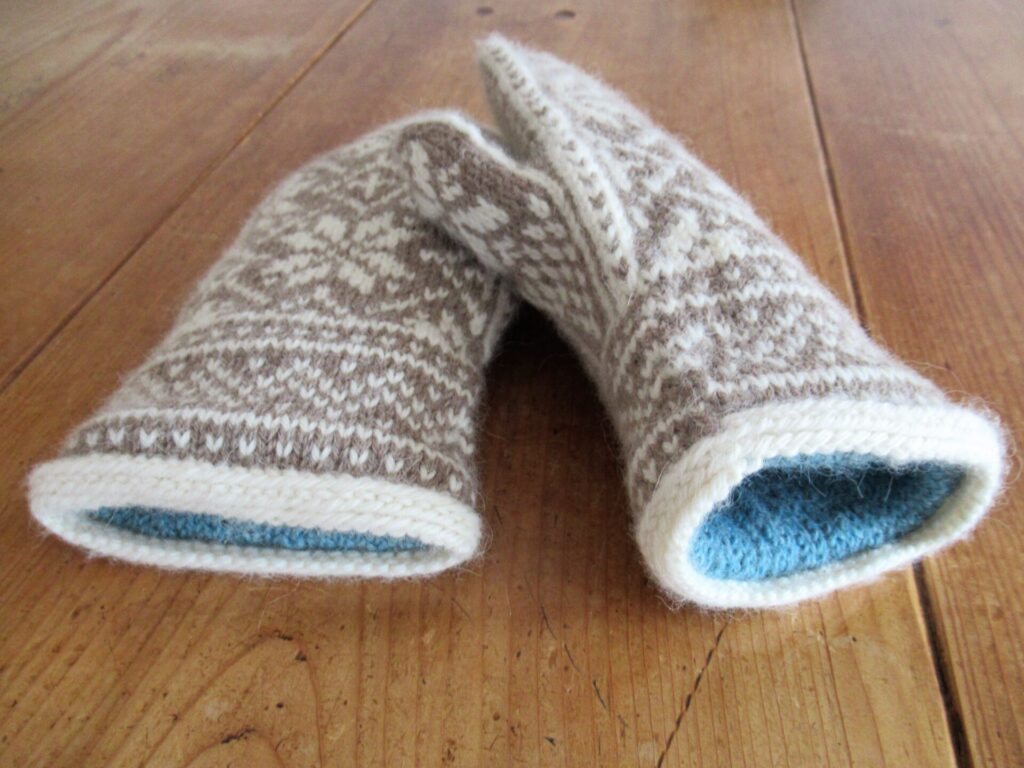
So, here is the post I’d planned to write before I fell ill, about a pair of mittens I’ve knit for our daughter and the lessons I’ve learnt from them. The first reason I chose these mittens is their beautiful design details. Nice braids and a zigzag pattern on the cuffs and 8-point stars on the top.
A diamond pattern on the palm and a lovely motif on the thumbs.
The funny thing is that these mittens have a decidedly Norwegian look, but were designed by someone from Sydney, Australia, of all places. Do Australians need mittens at all? I’ve only ever heard my Australian relatives talk about the heat. Google teaches me the first lesson.
Lesson 1: Australians rarely need mittens, but sometimes they may (some parts of Australia even get snow!)
Around the entire mittens there is a decorative 3-stitch edge. I was afraid holes would form along the sides and at first pulled the threads tight. This made the stitches pucker and the brown Vs disappear in the white background – not nice at all.
Lesson 2: Gently does it – do not pull the threads tight when changing from one needle to the next on the sides of colourwork mittens, but gently guide one colour behind the other.
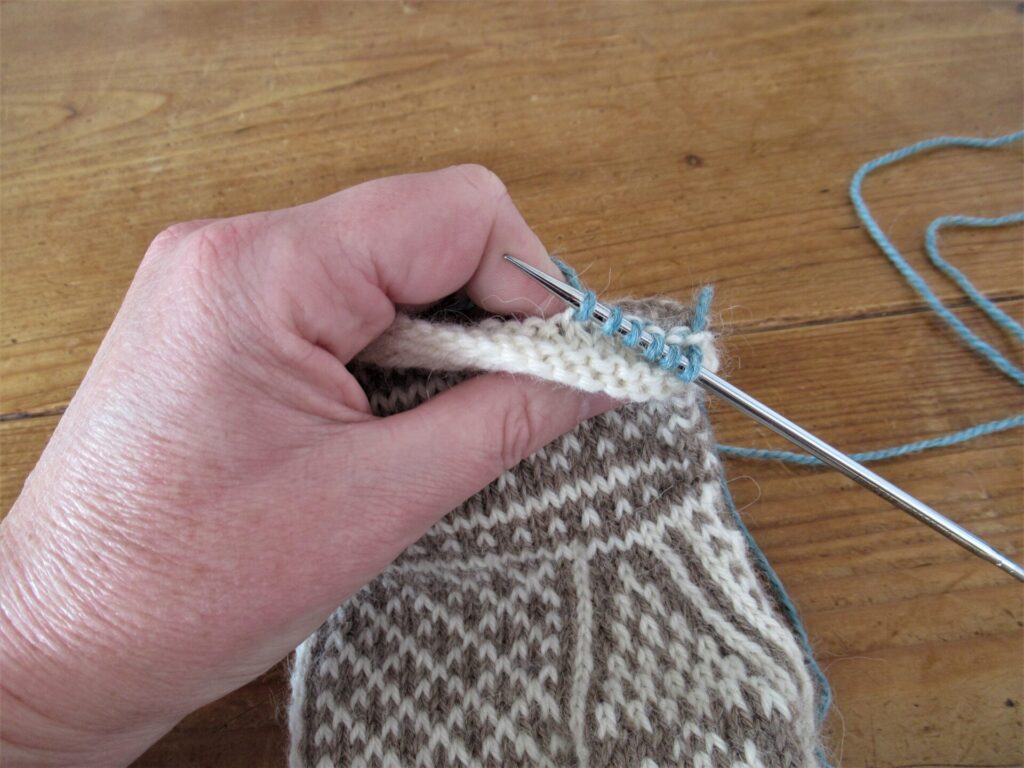
After finishing the hand of the outer mittens, stitches need to be picked up on one side of the thumb hole. For the first thumb, I just used my knitting needle. The result was okay, but not great. For the second thumb I tried something different.
Lesson 3: Picking up stitches for the thumb works best with a crochet hook – look how neat:
My second reason for choosing these mittens was that they are lined and therefore extra warm. For the outer mittens, the pattern had been perfectly clear. But when it came to picking up stitches for the linings I couldn’t make head nor tail of it. I spent a lot of time looking at other knitters’ Ravelry notes for clues, but couldn’t find anything helpful. And that brings me to the next lesson.
Lesson 4: When stumped, use your own common sense
The pattern said to pick up stitches ‘with right side of mitten facing’, but I couldn’t see how or where and picked up stitches on the inside. That worked out fine.
The instructions for the linings are not great. You need to turn the mittens inside out from time to time to check the length.
Following the instructions for the width and top, the linings became far too bulky and didn’t feel nice at all. So, I ripped them out and went down a needle size… Ripped them out again and made them shorter… Ripped them out again and tried a pointy top like the outer mittens. Nothing felt right… Ripped them out again and tried making the entire finger section of the linings narrower… Yes, finally they fit! They looked ugly and irregular, though…
Should I rip them out yet again and try different decreases? No! Nobody will ever see the linings. The most important thing is that they fit and feel nice.
Lesson 5: Not everything has to be perfect – sometimes good enough is good enough!
All in all, a great pair of mittens, and knitting them was an interesting process.
Knitting 24 tiny Norwegian Advent mittens and a pair of normal sized ones, has made me put ‘more Norwegian knitting’ on my list for 2023. That doesn’t necessarily mean more mittens, but looking for inspiration, I first of all pulled several Norwegian mitten books from my bookshelves. I thought you might like to look along with me.
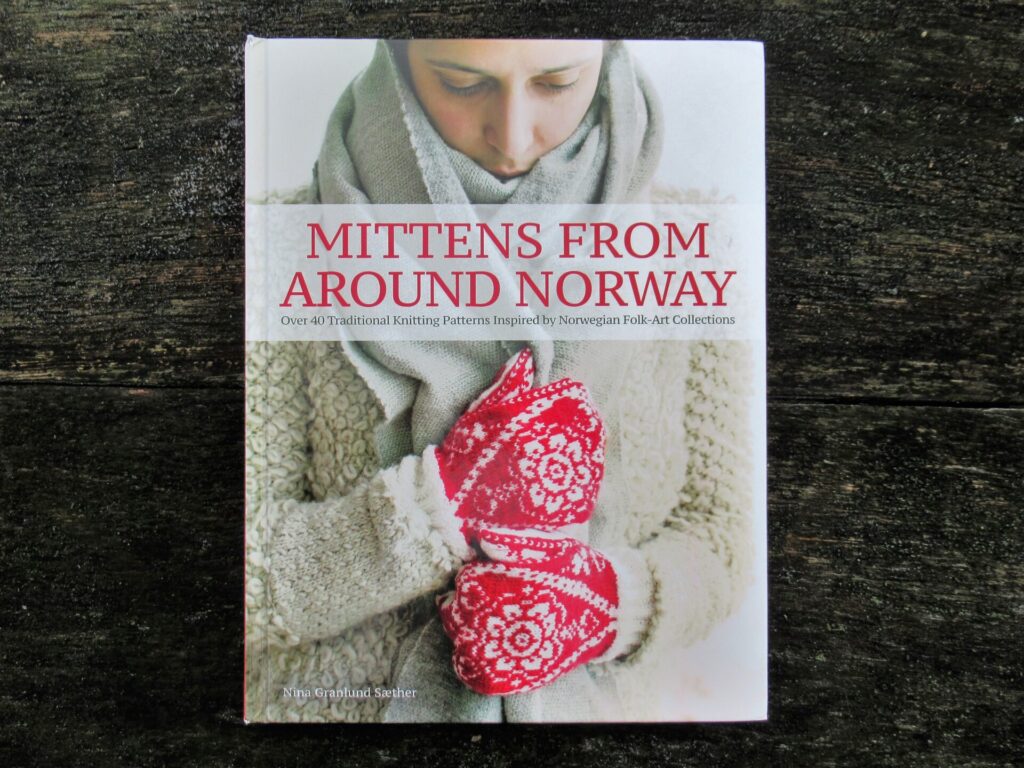
The first one is Mittens from around Norway, by Nina Granlund Sæther:
This English translation of an originally Norwegian book contains 43 mitten patterns from many different parts of the country. There is obviously a lot of colourwork, but also some cables, knit-and-purl patterns, and a little lace.
There are large and clear photographs of the finished mittens and also photos of the museum pieces they were inspired by. With one or two exceptions, the mittens have been knit in widely available Norwegian yarns.
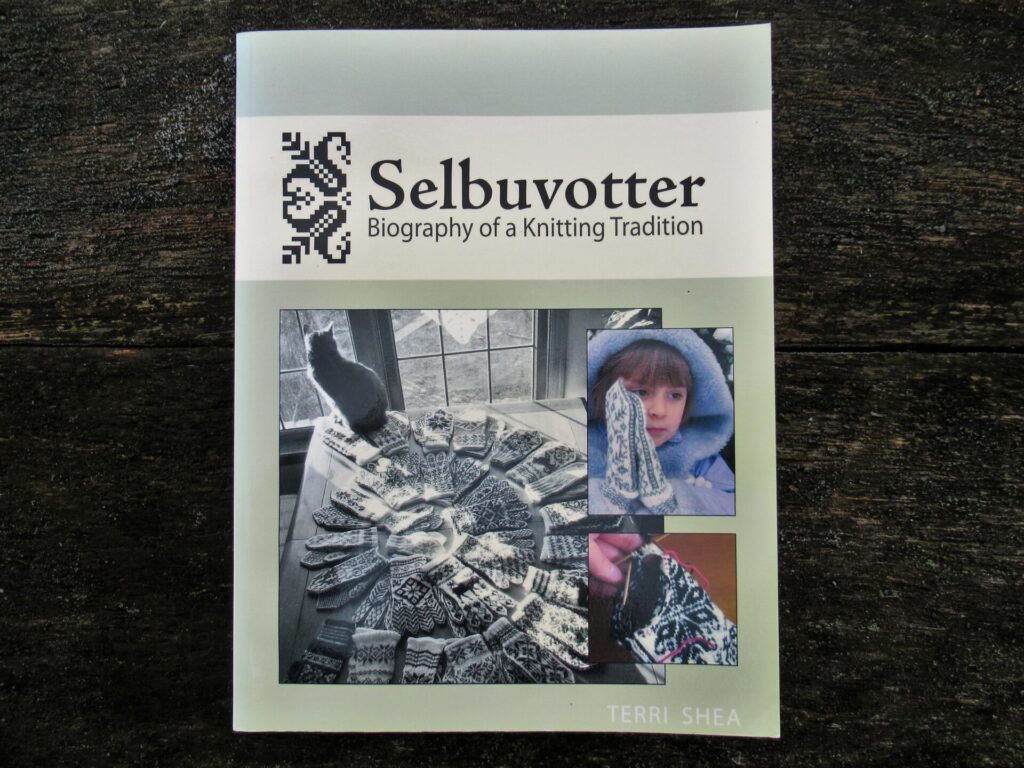
The next book is Selbuvotter: Biography of a Knitting Tradition by Terri Shea, also in English:
This is solely about black-and-white mittens (and gloves) in the Selbu tradition. The author has researched and reproduced part of the mitten collection of The Nordic Heritage Museum in Seattle as well as mittens from a private collection.
This book provides quite a bit of historical information and also goes into special techniques. It contains patterns for 31 pairs of mittens and gloves. Shea used Norwegian yarns for many of them, but also Shetland as well as some other yarns.
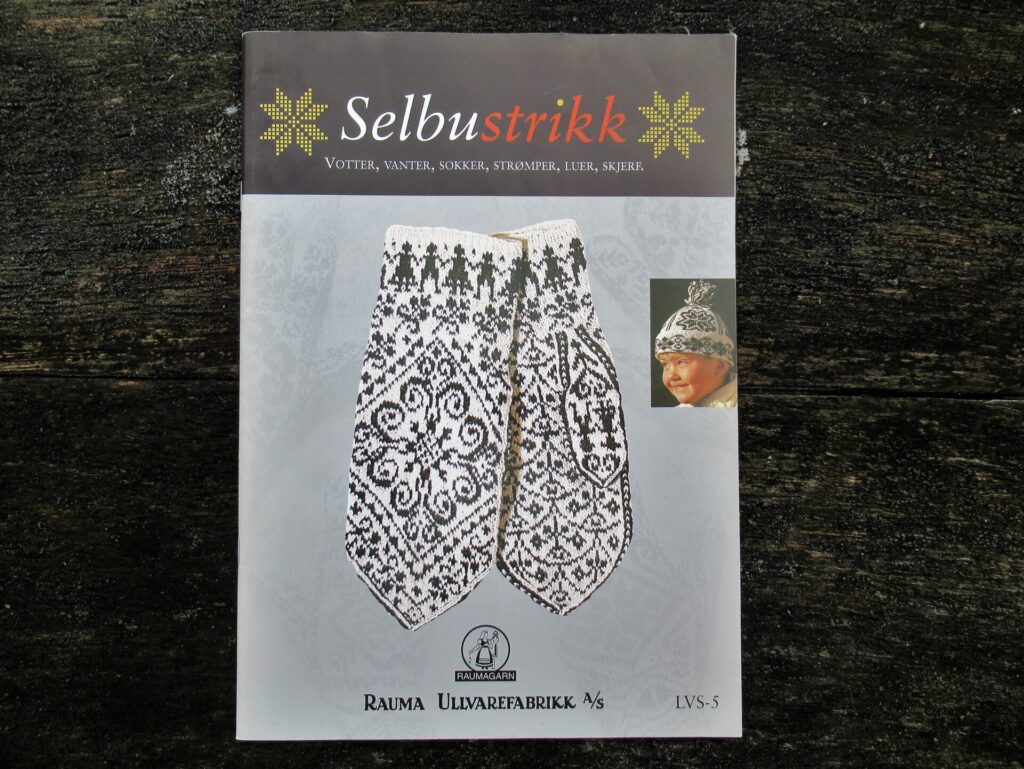
I brought the next publication home from a visit to Selbu (about 70 km south-east of Trondheim) – Selbustrikk:
This is only a thin booklet, but it contains a wealth of inspiration for mittens and gloves, as well as socks, hats and a few scarves. Again, everything in traditional black-and-white. It is in Norwegian, but the diagrams speak a universal language. By far the most of the patterns use Rauma Gammelserie yarn, and some of them Rauma Finull garn.
A must-see if you ever get the opportunity to visit this part of Norway is the Selbu Folk Museum, or Bygdemuseum. The museum has a lovely collection of mittens and other knitwear. My husband took the photo at the top of this post during our visit there. Here is a closer look:
Awe-inspiring, all those finely knit, beautifully patterned mittens and other knits, don’t you think?
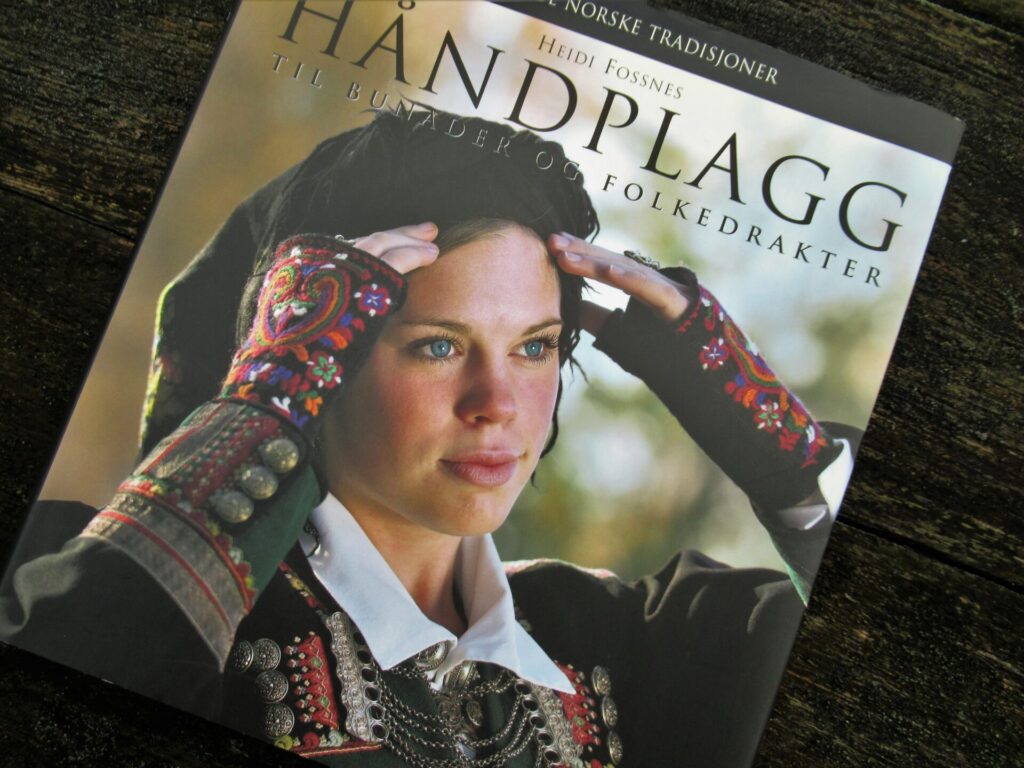
Zooming out again to the entire country, here is one of the most beautiful knitting books on my shelves: Håndplagg til Bunader og Folkedrakter:
This 300-page tome (in Norwegian) is crammed with mittens, gloves and wrist warmers in all kinds of different knitting techniques. Many of them are embellished with embroidery or beads. The photography is stunning, and I don’t think I’ll ever tire of leafing through this book. So inspiring!
All of the above is inspiration FOR Norwegian mittens But why not take inspiration FROM Norwegian mittens as well?
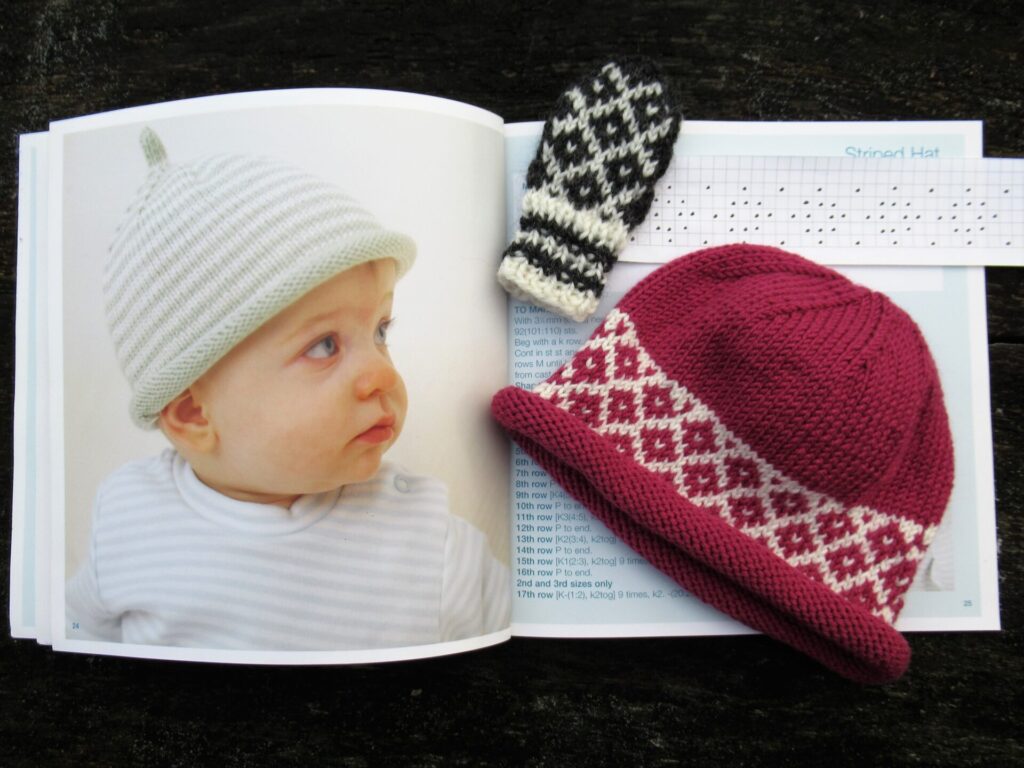
Our next-door neighbours are expecting their first grandchild any day, and I thought I’d knit her a wee hat. I took the striped hat from Debbie Bliss’ Baby Cashmerino 2 booklet as a starting-point. But instead of knitting stripes, I looked at my Advent mittens for inspiration and came up with this:
A simple Norwegian-mitten-inspired baby hat – a satisfying little knit.
After looking through all these amazing mitten books, I still have no idea what my next Norwegian or Norwegian-inspired project is going to be. More mittens? Gloves or wrist warmers? Socks? A hat? Or even an entire sweater? Whatever it’s going to be, I’ll keep you posted!
Links:
If you’d like to read more about Norwegian mittens and can’t get hold of any of the books I’ve described, there is always the internet, of course.
I’ve compiled a list of Norwegian(-inspired) mittens on Ravelry here.
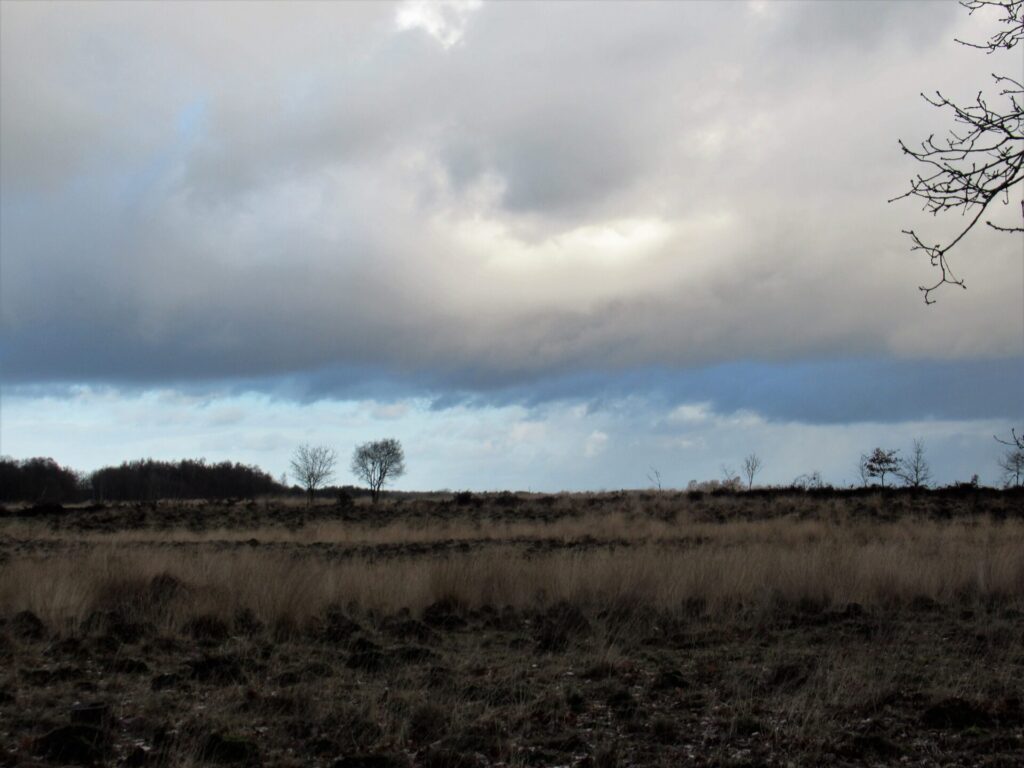
It’s Sunday morning, 4˚C. Rain and hail storms are accompanied by strong gusts of wind. Fancy a walk? If you do, make sure to wear warm wind-and-waterproof clothes. And wellies, too, because the path will be flooded in places.
It can get quite busy here with walkers and cyclists, but today we seem to be the only ones. Why would that be?
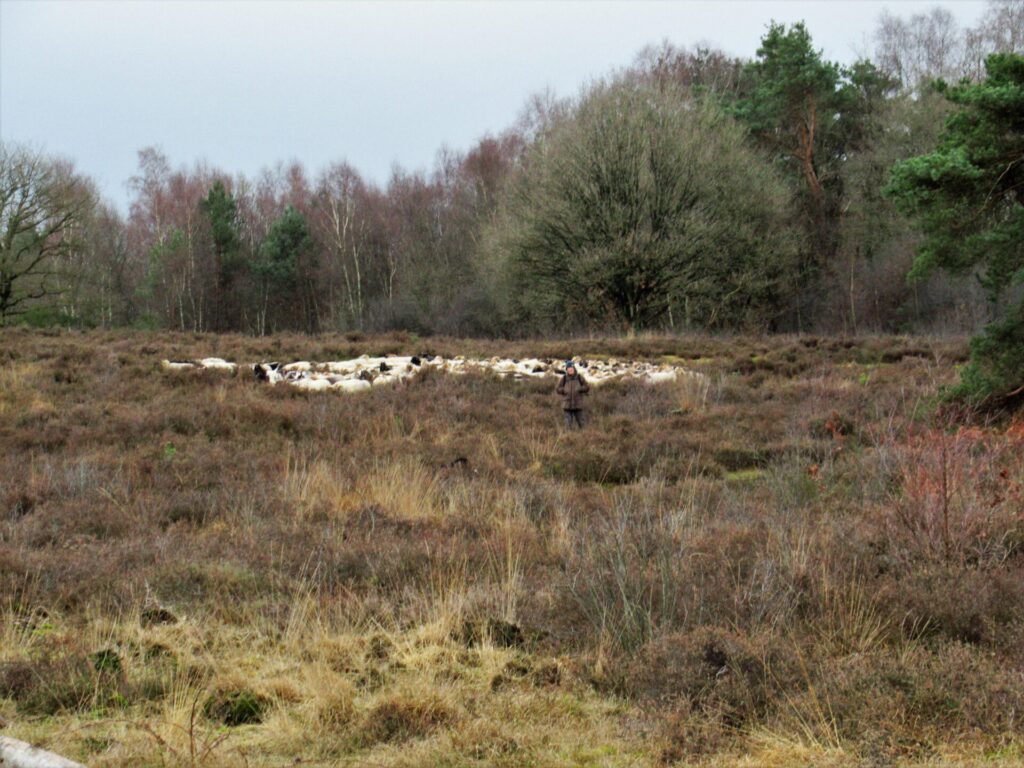
No wait, there is someone there in the distance. It’s one of the shepherds with her two dogs and part of the flock. They are out in all weathers.
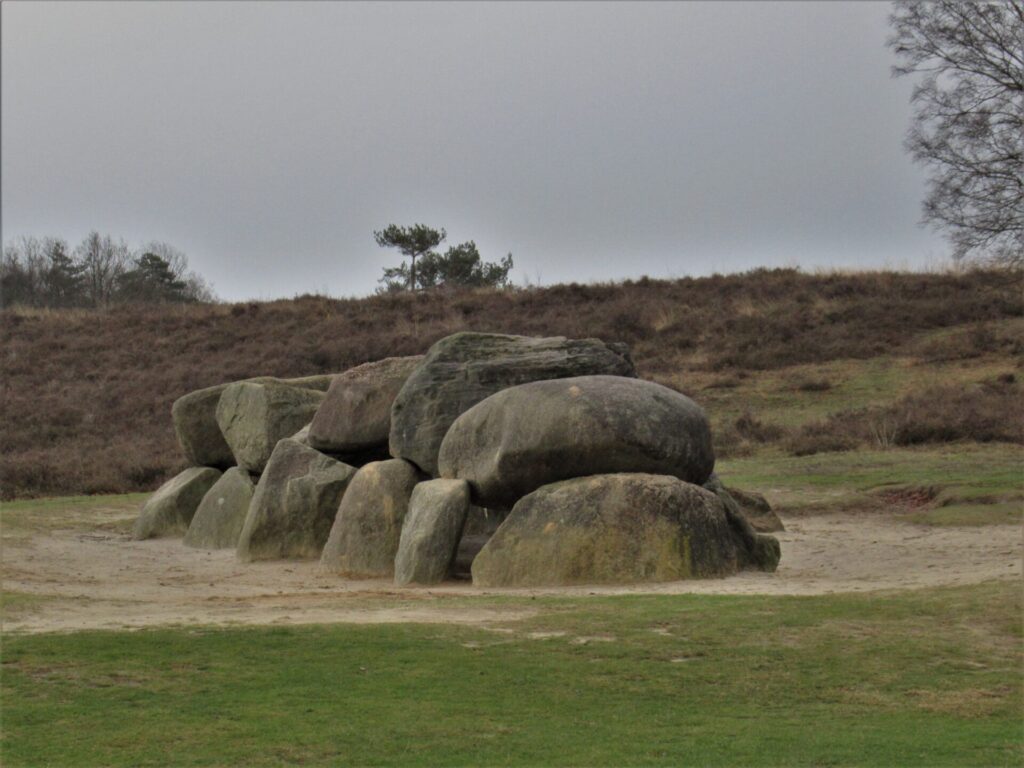
Walking here, I often think of the people who built these burial monuments.
How did the landscape look in their time? What was it like living here then? And what would they think, seeing us in our colourful synthetic outdoor clothing?
I am wearing a hand-knit woolly hat and cowl. But underneath my bright red polyamide rain jacket I’m wearing a polyester and elastane fleece sweater, and my hands are kept warm by fleece-lined machine-knit gloves. Fie! As a dedicated knitter, I really need to do something about that.
First the Northman mittens for our daughter and a few other things, though. I’ve started them again and have made quite a bit of progress. The first attempt was on the small side.
Going up a needle size, from 3.5 mm (US 4) to 3.75 mm (US 5), makes them slightly wider and longer. They’ll be the right size now, I think.
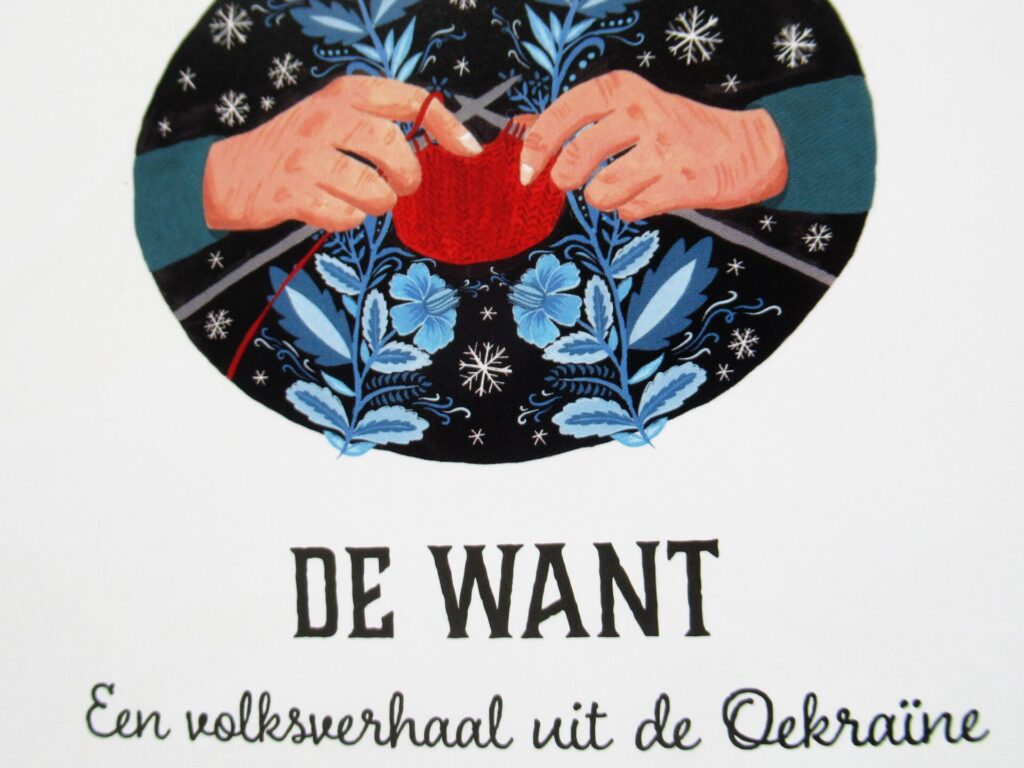
Writing this, I’m thinking of the book of Winterverhalen / Winter Tales, written by Dawn Casey and illustrated by Zanna Goldhawk. One of the stories is about a grandmother whose needles go clickety-click, clickety click…
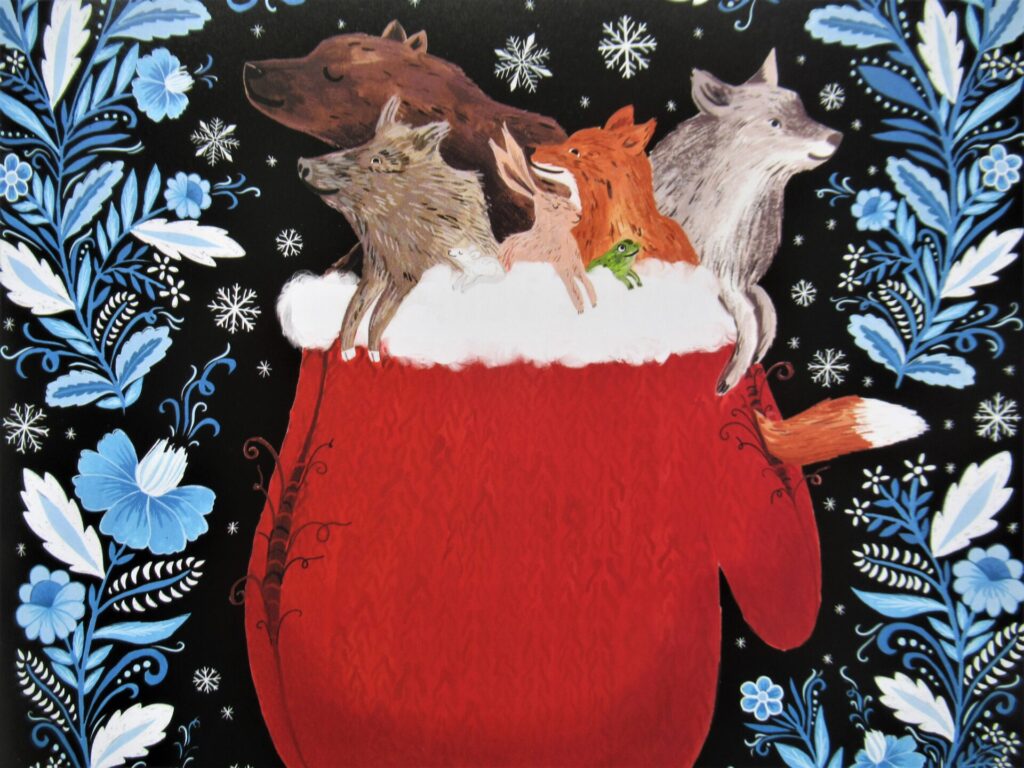
… and a very special mitten, welcoming all animals seeking refuge from a storm.
A wonderful image, and a great book for both children and adults.
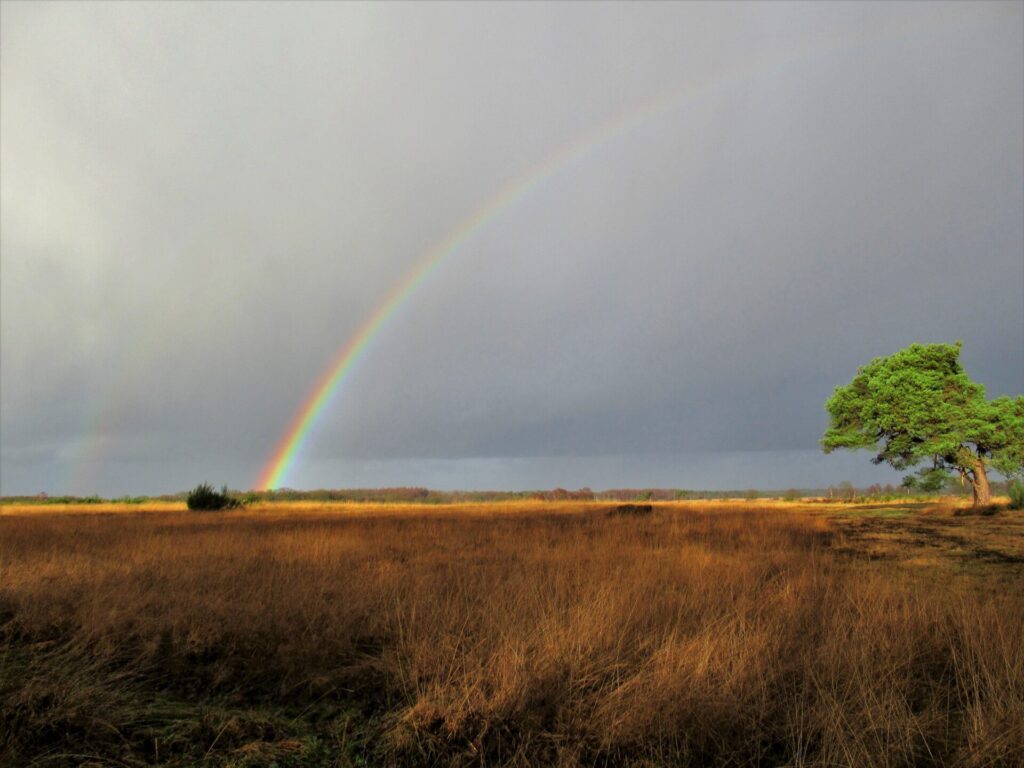
Well, time to close off. There is just one last thing. Towards the end of our walk the sun peeks through, and LOOK!
Gelukkig Nieuwjaar! May 2023 be filled with happiness for you and your loved ones. I hope you’ve had a great time over the Holidays and a good start to the New Year.
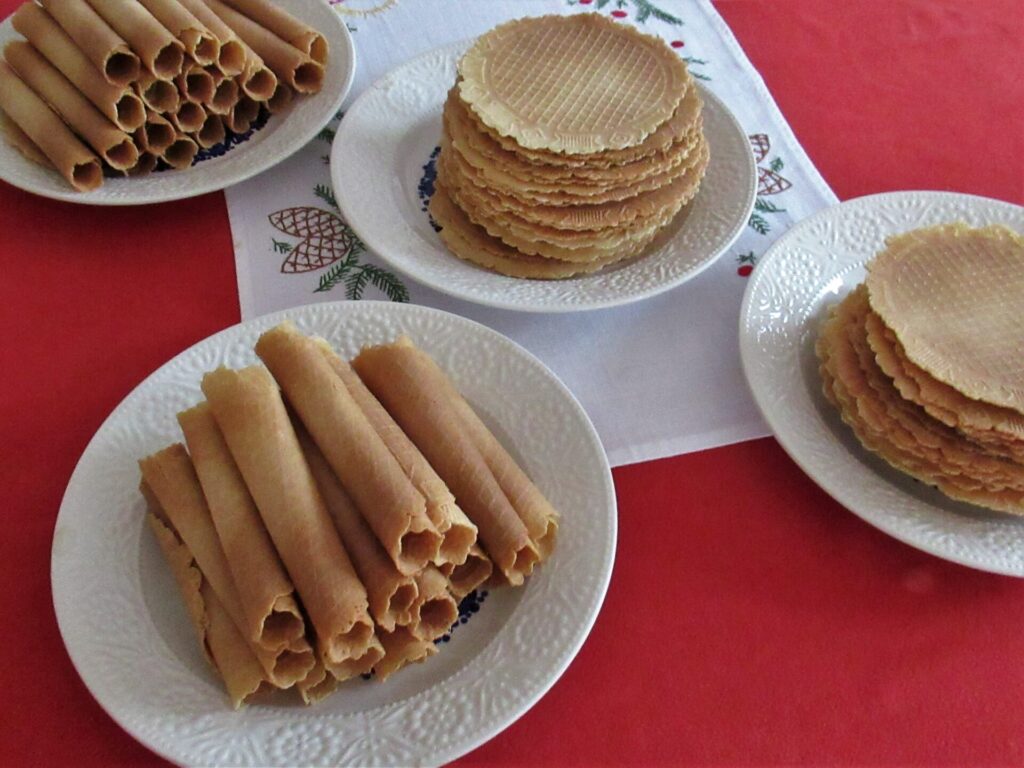
As for me, I spent part of the last day of the old year baking a big batch of knieperties (recipe here).
Keeping a few back for ourselves, I filled several bags with knieperties, closed them with cheerful ribbons, put them in a basket and distributed them among our neighbours. We don’t see much of each other at this time of the year, and it was nice to catch up on their news.
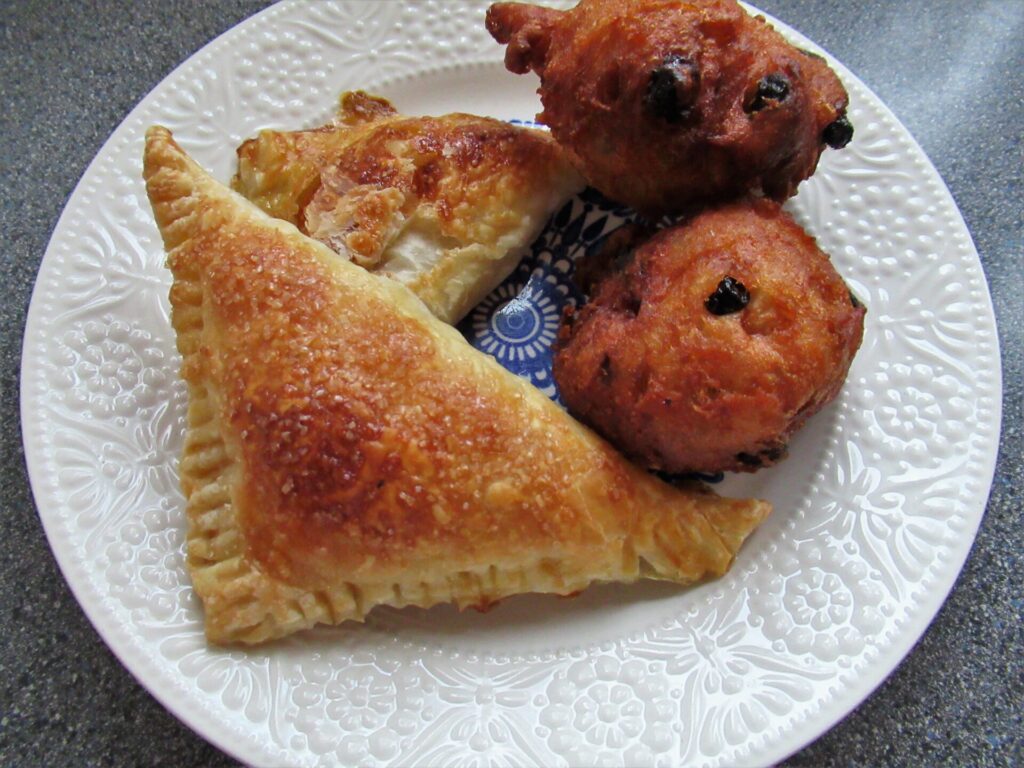
In exchange for the knieperties, some of them gave us home-made oliebollen and appelflappen. Yum!
When the clock struck 12 and the fireworks started, it was 15 ˚C (32 ˚F) – a nice temperature for a sunny day in May, not the middle of a night in December! Reading about the terrible snow storms and torrential rain some of you have had, I wish things could have been distributed a bit more evenly across the globe. I hope all is more or less back to normal now where you live.
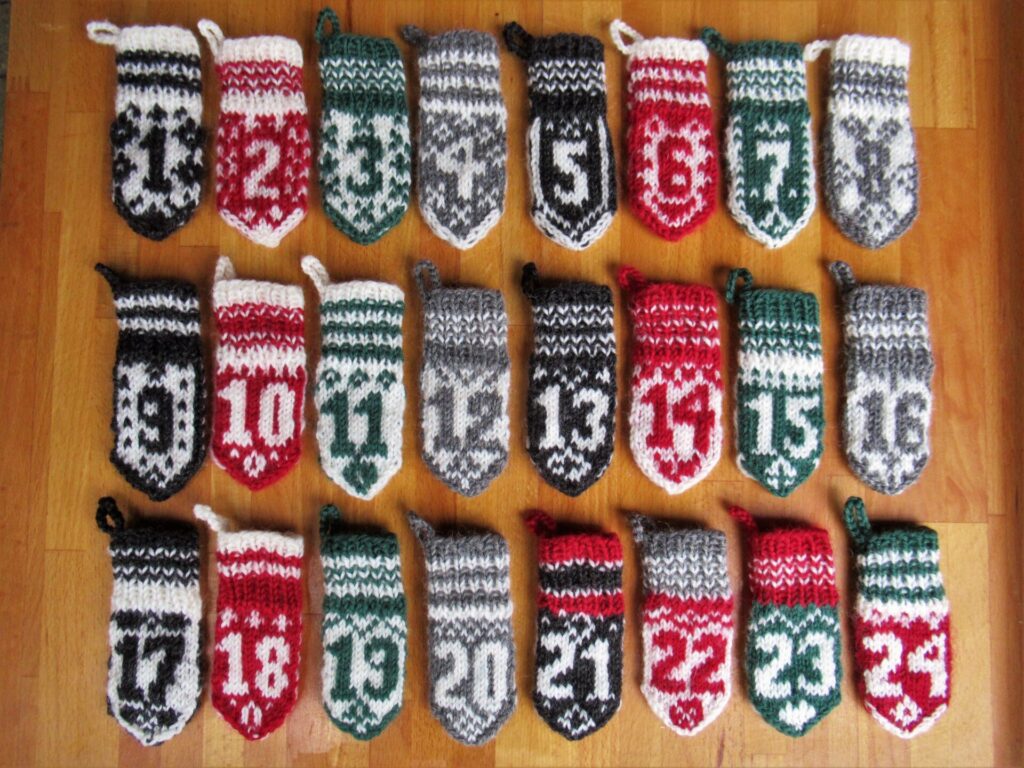
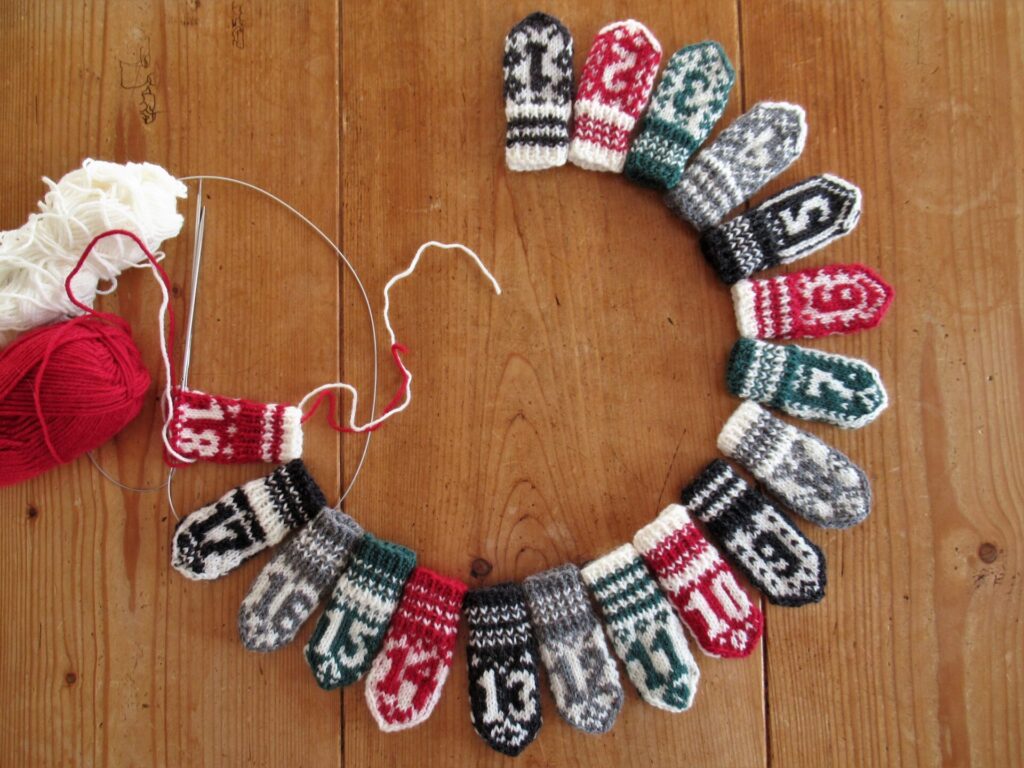
Our Holiday break was uneventful, and I’ve been knitting quite a bit, finishing the Advent calendar mittens.
They were getting neater and neater as I went along – practice makes perfect (or at least improves skills). Taken together the backs make a lovely sampler of Norwegian colourwork that could be used for all kinds of other projects (description of how to download the pattern at the end of this post).
I’ve put them away now, moth-free in plastic, and made notes in my planner here and there to remind me of finding small gifts, poems and quotes to put inside. And especially to remind me of gifting them before December 1, 2023.
The life-size mittens I’ve also been knitting were less of a success, turning out a wee bit too small, and will have to be re-knit. More about those if/when I’ve found the courage to start anew.
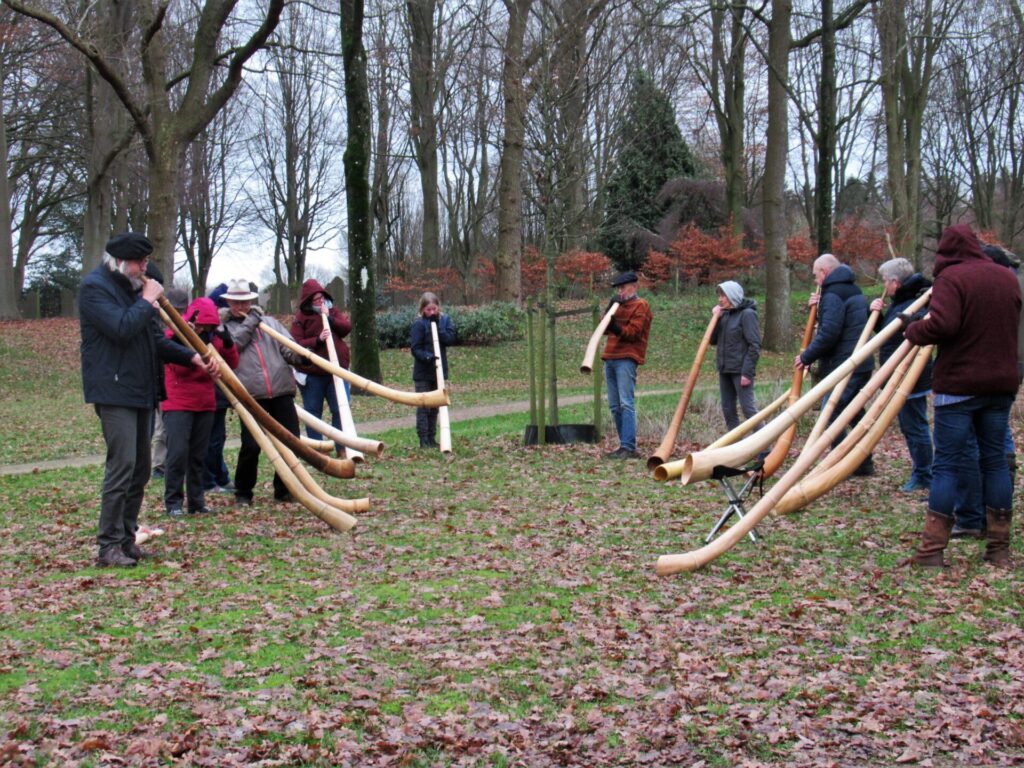
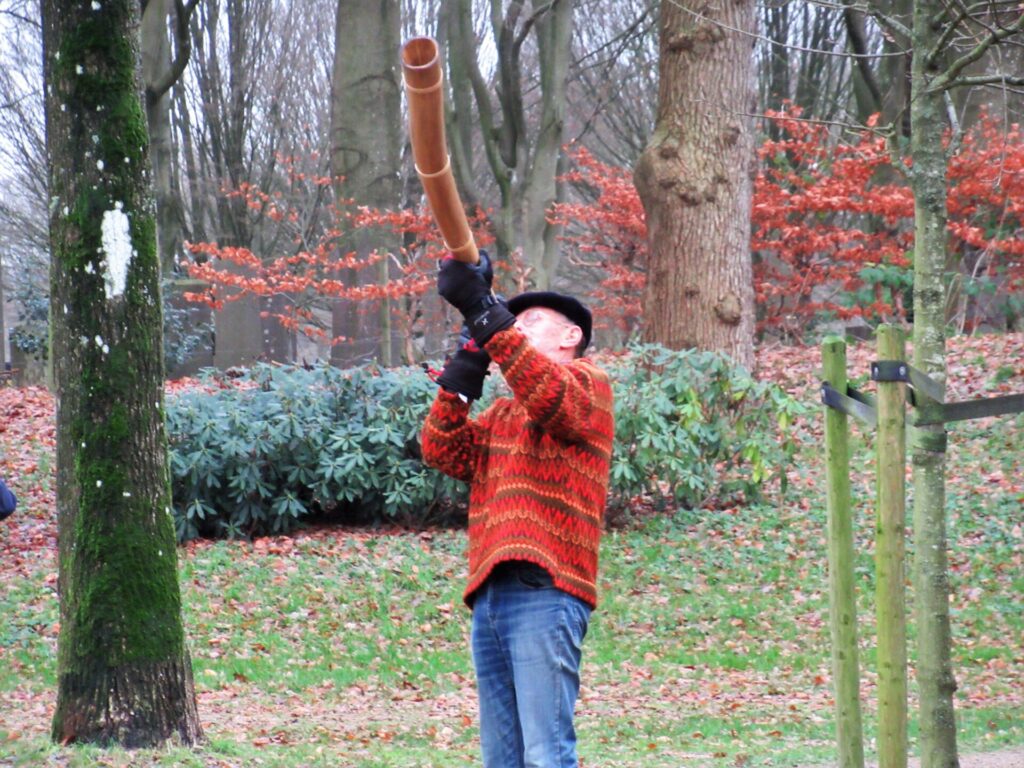
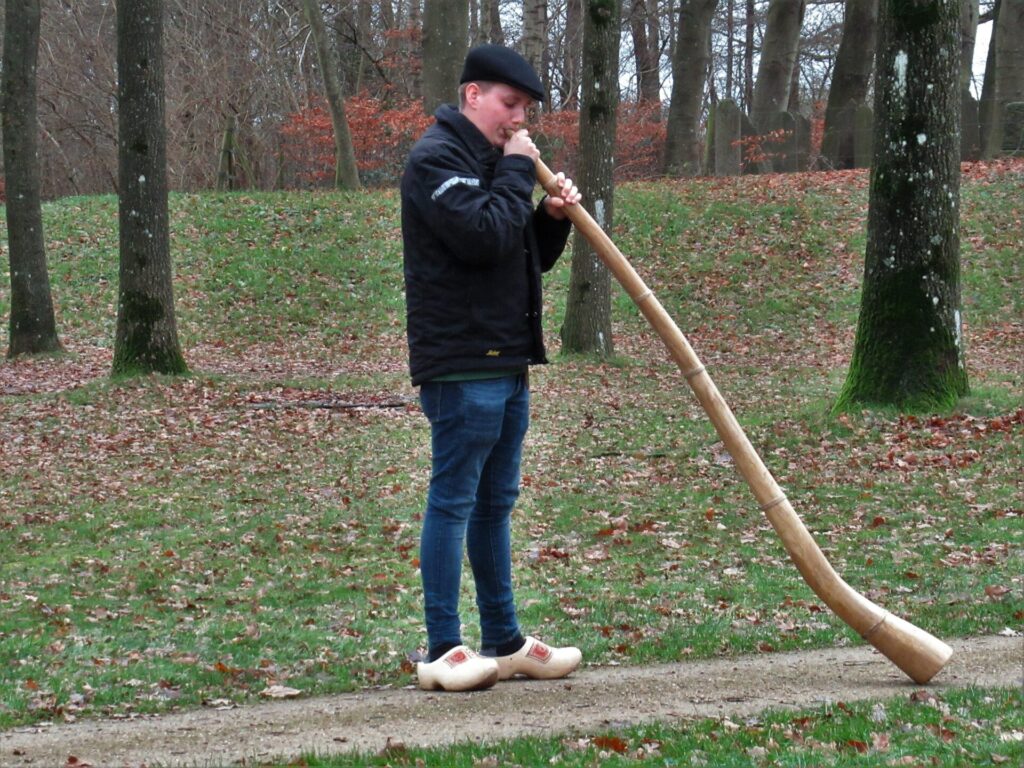
Beside a few walks and a great family get-together, we also enjoyed a concert of a group of midwinter horn blowers. They called it An Ode to Peace through Connection.
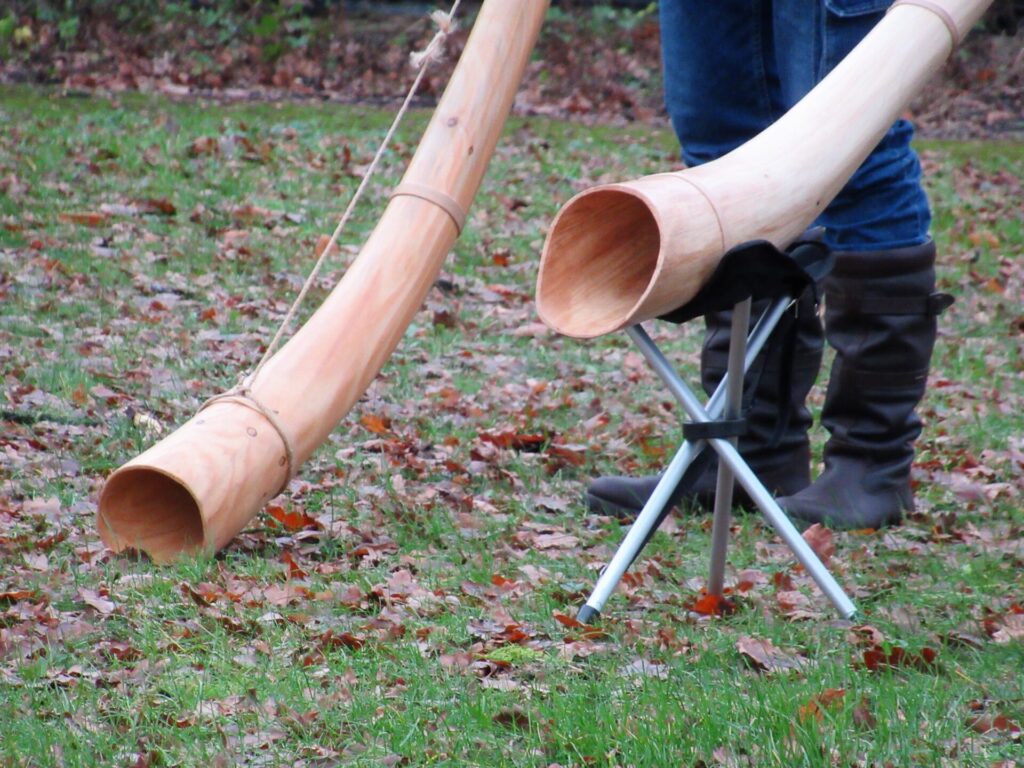
It was great fun, seeing and hearing these strange traditional wooden horns, made by the players themselves.
The concert lasted all of 15 minutes, with each of the players doing a solo first, and finally all of them ‘making a lot of noise together’, as they themselves put it. The group has members aged from 7 to 70+ and each player has their own technique, resting the end of the horn on the ground or holding it high up in the air.
They’re an elusive bunch, these people, playing their horns from late November through the first week of January in a dozen or so villages around the area. Excepting this afternoon concert, you never know where they will pop up. Their announcements say: You’re most likely to hear us somewhere around 6 pm.
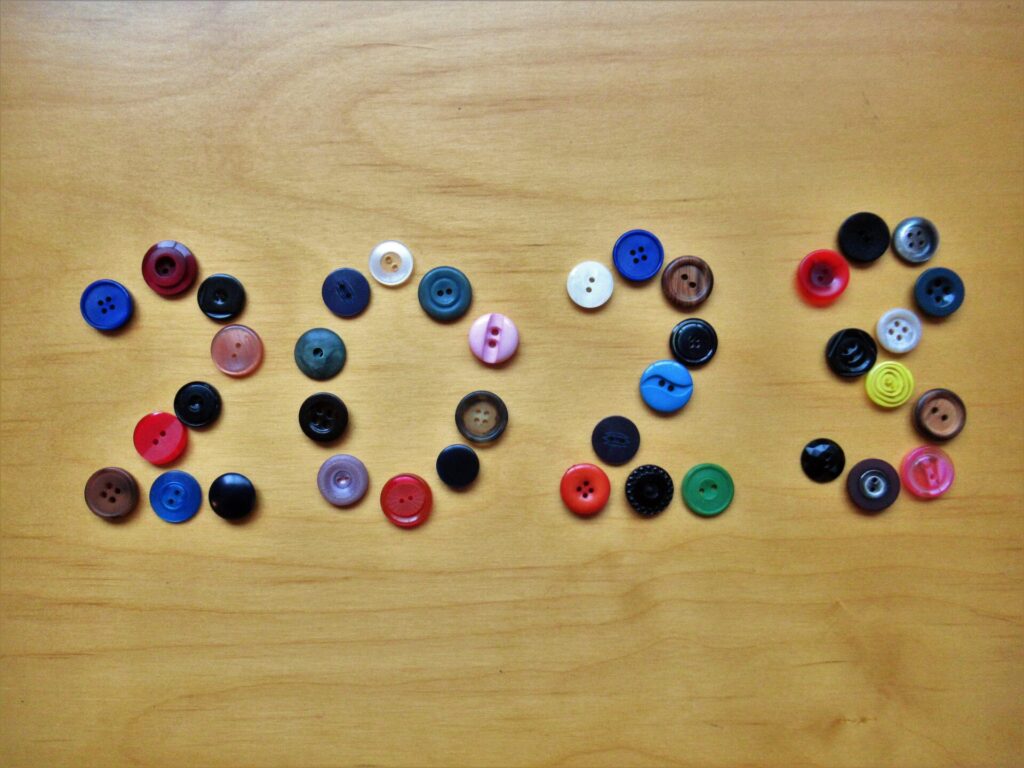
Did you notice the 2023 from buttons at the top? Well, I’ve also been rummaging through my button box. If I can get my act together, I’ll tell you more about that next week. Hope to see you then!
PS. If you’d like to hear the weird and wonderful sound of midwinter horns, there is a video on YouTube here. This isn’t ‘our’ group, but the sound is similar.
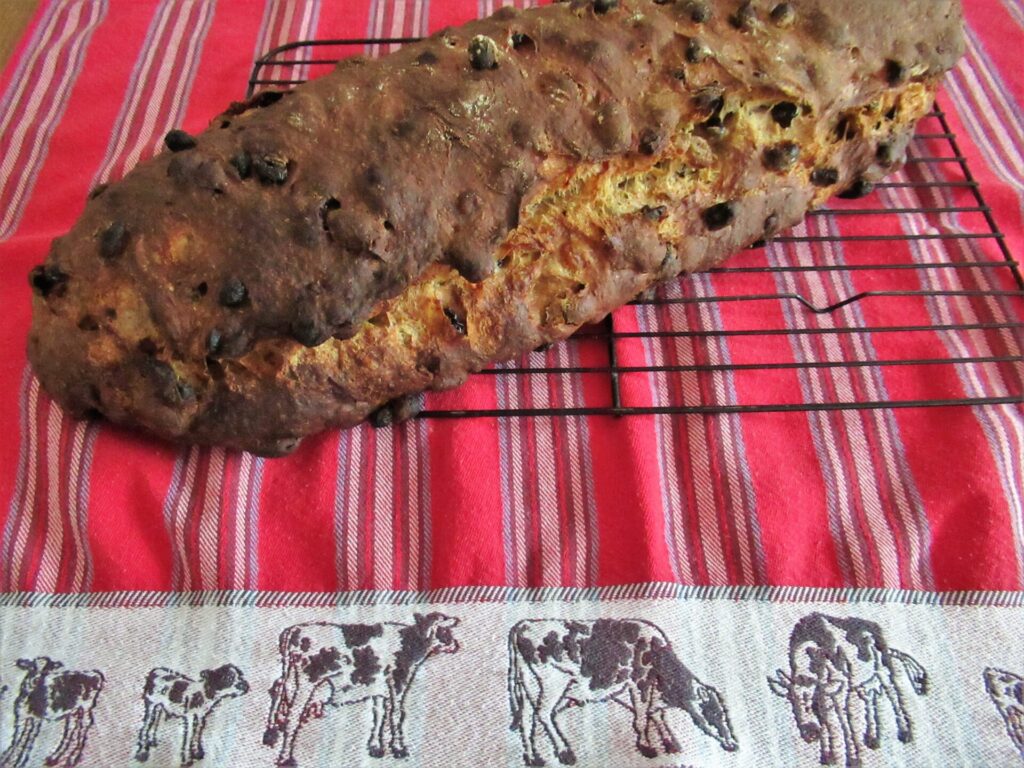
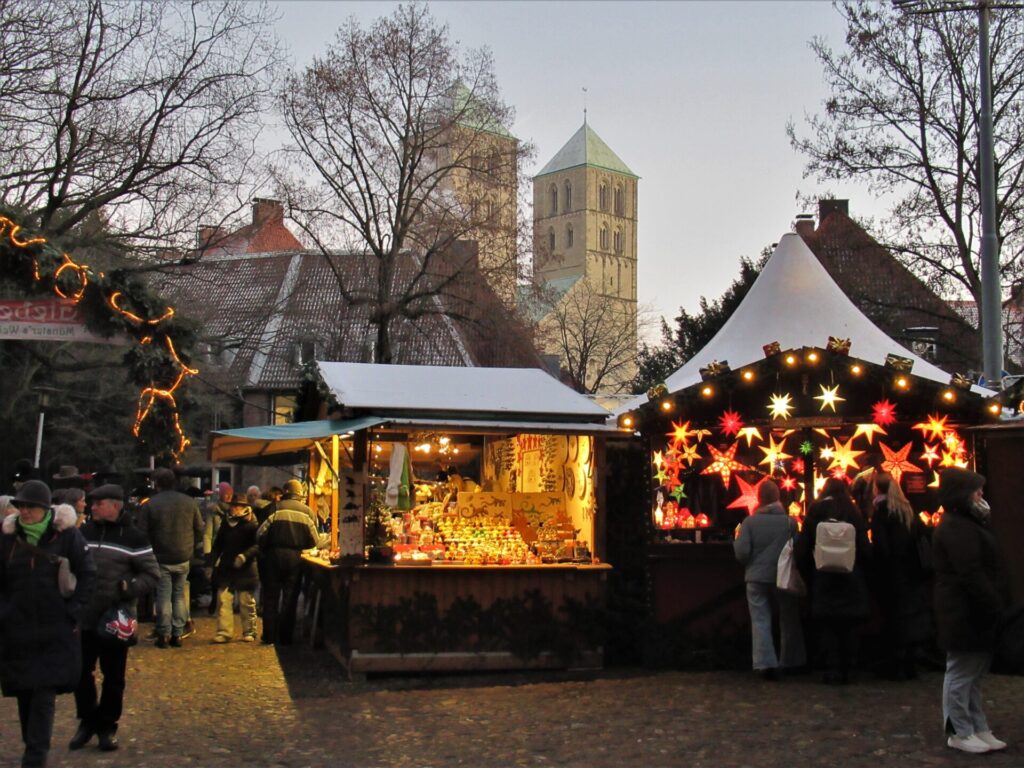
Hello, and welcome to my last blog post for 2022. While I am typing this, the Christmas stollen my husband has baked is cooling on a wire rack in the kitchen, filling the house with its delicious warm smell.
We do not celebrate Christmas in a big way, but there are certain traditions we hold dear. Like the above stollen, a Christmas tree with the same baubles every year, and a Christmas dinner prepared and shared with love and attention.
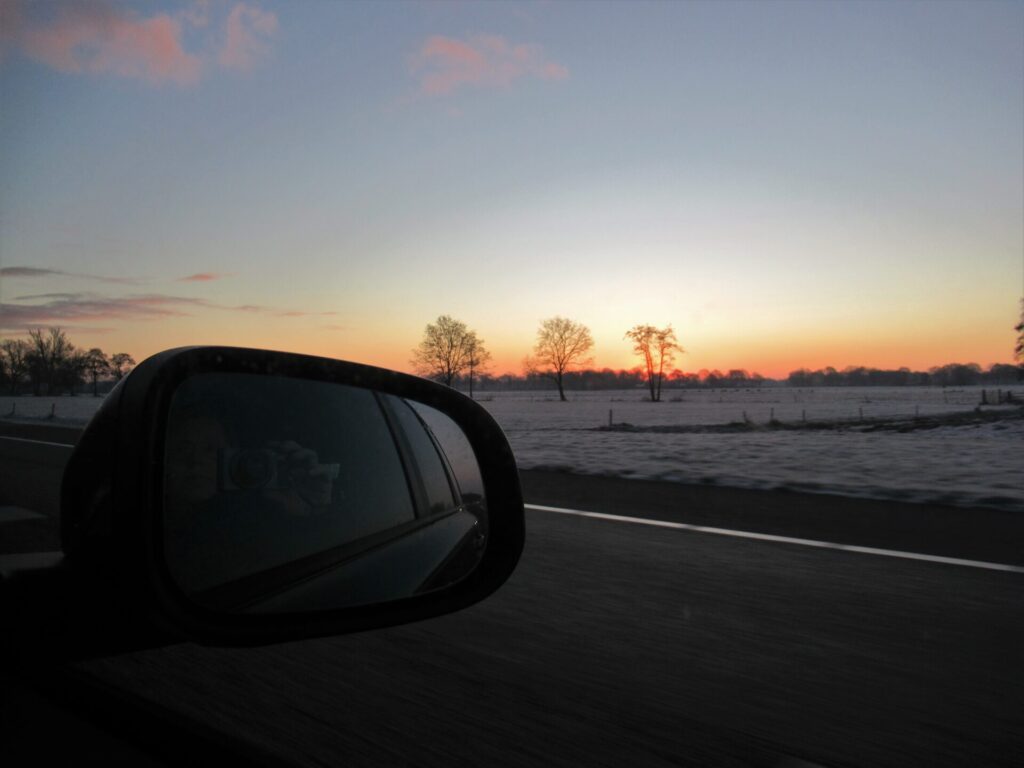
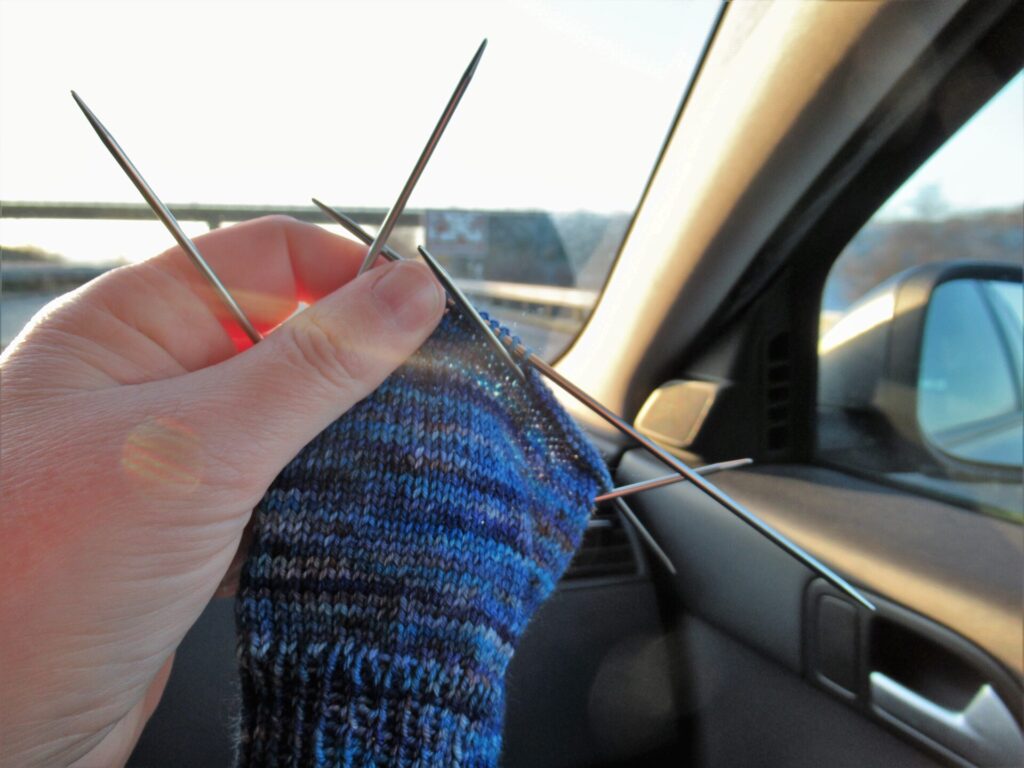
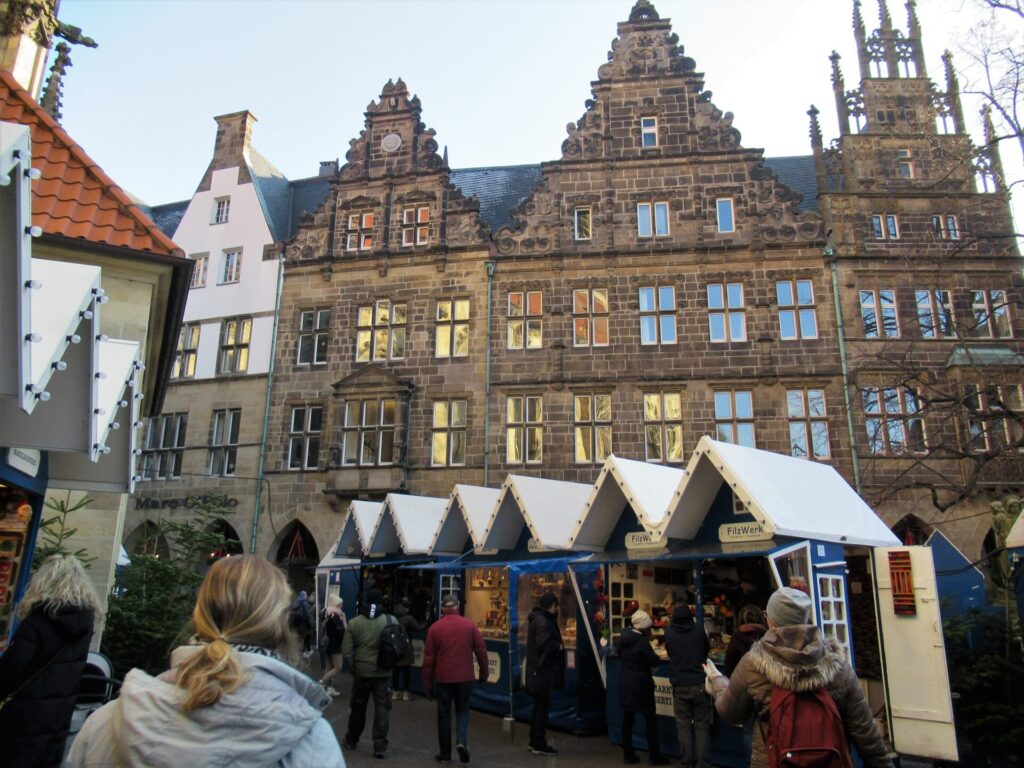
We also enjoy visiting a Christmas market in Germany when we can. So on a frosty morning, just before the sun came up, we set off for Münster.
On the way there, I knit a few rows on a simple sock in a lovely hand-painted yarn, the only suitable knitting project to take along – everything else was either too complicated or nearly finished.
Actually there isn’t a Christmas market in Münster but six, on various squares around the beautiful old city centre.
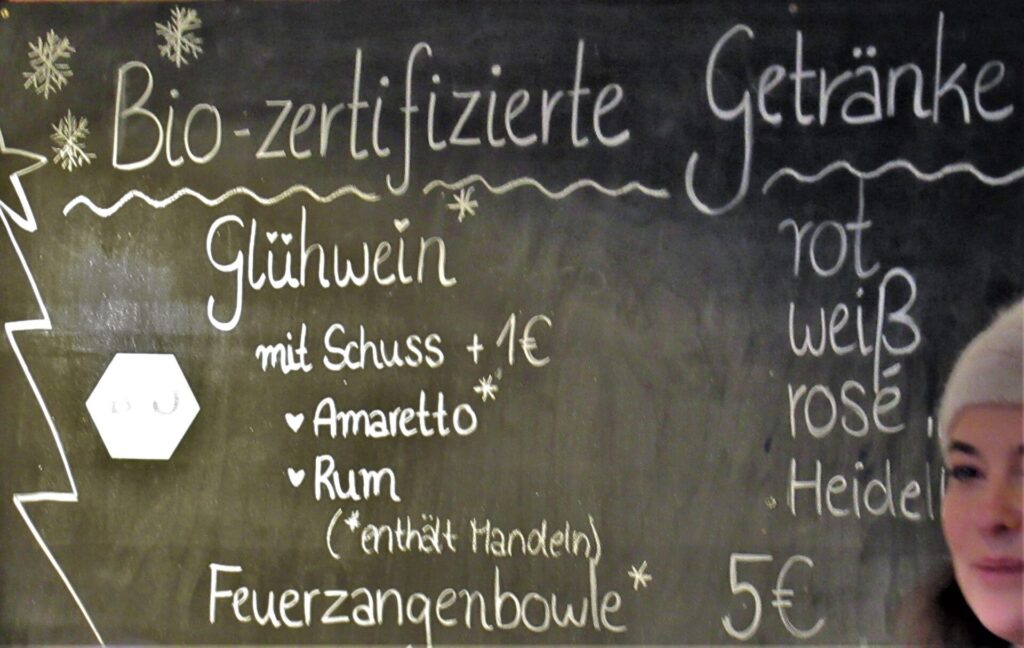
They are all slightly different. Some are more food-oriented, some more about gifts and handmade things. And one small new one was focused on organic, sustainable and fair-trade products. Even the mulled wine was certified organic.
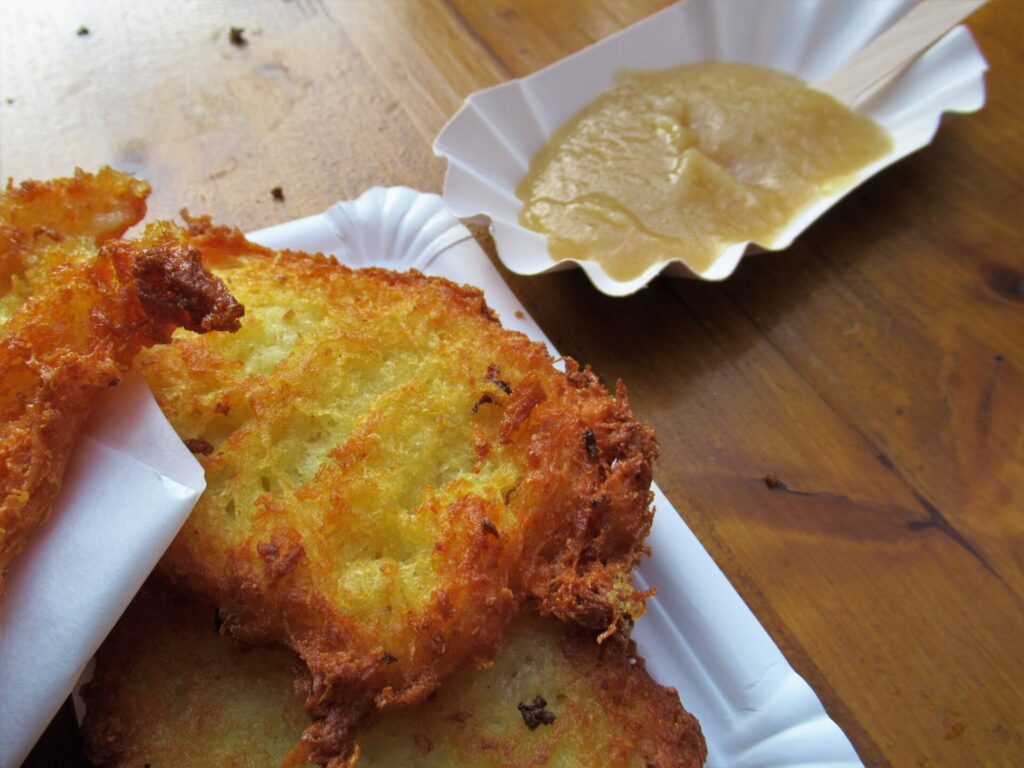
As our gift-giving moment is already behind us, we didn’t need to shop for gifts and were free to stroll around, enjoy the sights and each other’s company, and have a bite to eat here and there. I love the traditional hot and golden Reibekuchen mit Apfelmus (potato fritters with apple sauce).
I also quickly popped into the yarn shop in the city centre, thinking it might be nice to write about, but popped out just as quickly – nothing to write home about there. Well, never mind, there was enough to enjoy without yarn.
To be honest, I have mixed feelings about this time of the year. I really love Christmas. And no matter what, how, or where we’re celebrating, I think we can all do with a message of peace and light.
But I can also relate to newspaper columnist Doortje Smithuijsen, who recently wrote, ‘… it’s the time of year again when we feel that at the end of the month the world is coming to an end – the time when everything needs to be finished NOW […] The time of year when you’re feeling vulnerable, looking for something to hold on to.’ (De Volkskrant, V2, 15 December 2022, my translation).
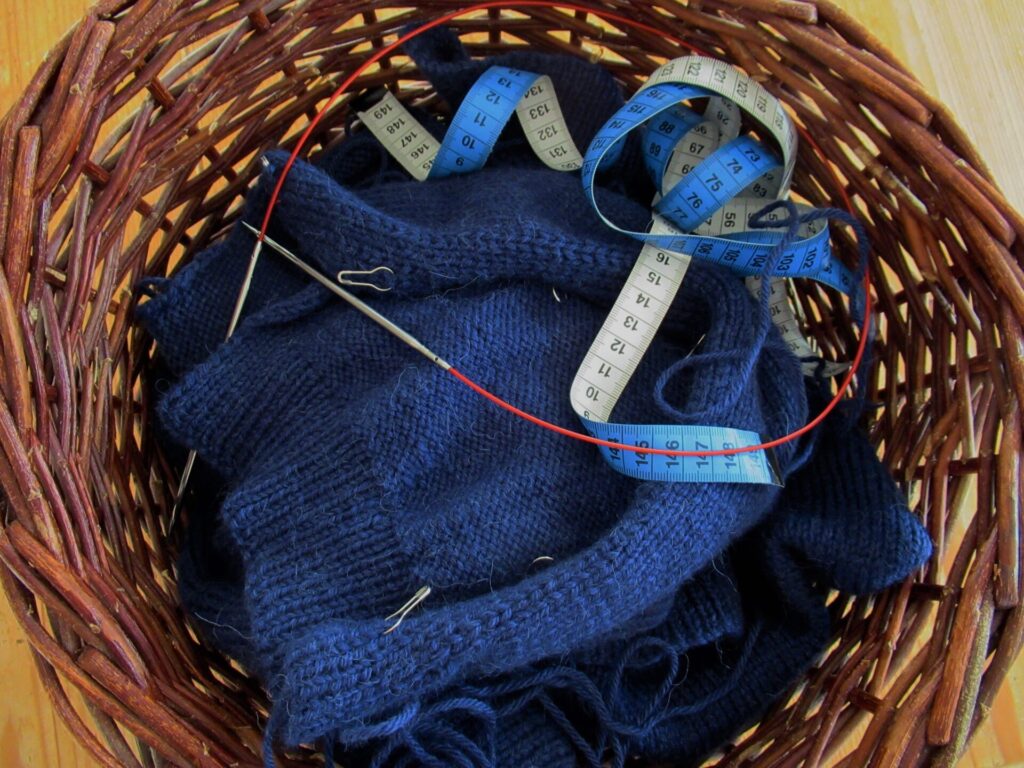
Unlike Doortje, I’m not joining MyInnerHealthClub. I don’t need to look far for something to hold on to – I have my knitting needles. Like her, I feel the urge to finish things, and I try to have all my knitting projects finished before the end of the year/world. My navy blue cardigan is nearly finished.
I also hope to finish my Advent calendar mittens soon. I am really, really enjoying knitting these, and if the world doesn’t stop turning at 12 pm on December 31, I’d love to do more Norwegian knitting in the new year.
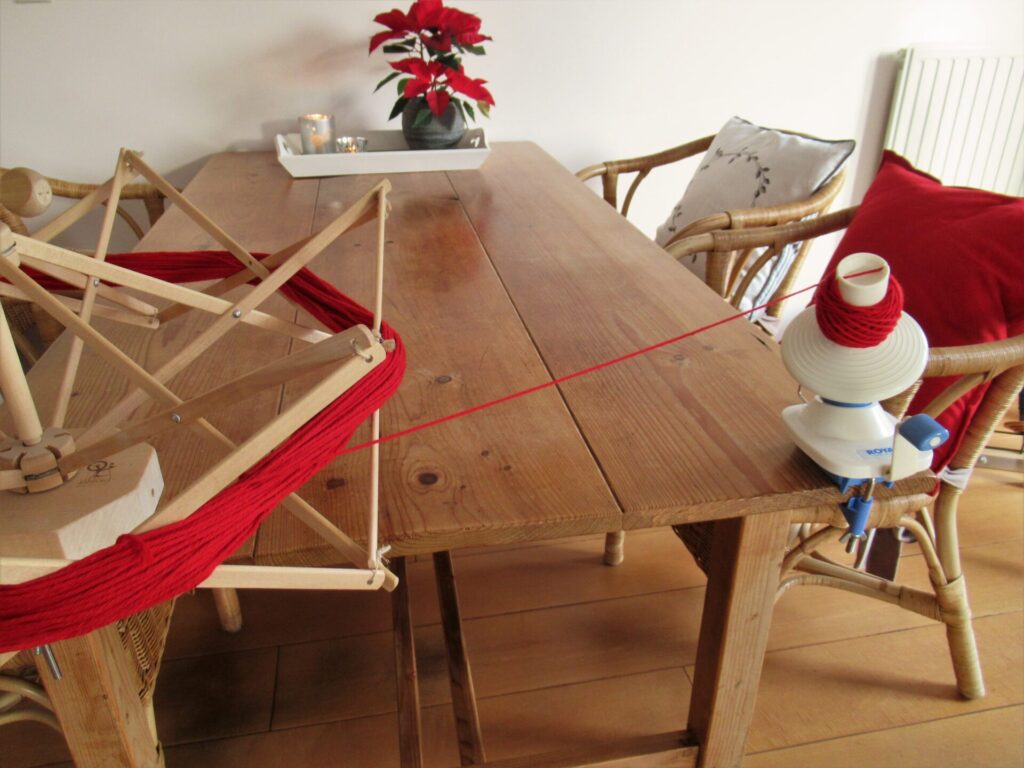
I’d also love to knit more for our grandson, more socks (not just simple ones) and more things designed by myself, and to write about what I’m learning along the way. I won’t be able to finish my new shawl pattern before the year is out, but I’ve already wound the yarn for the final version. I hope to be able to tell you more about it in January or February.
I’m taking a break from blogging now to spend time with my loved ones, knit, read and go for walks. Thank you so much for reading my blog over the past year. It’s been lovely hearing from some of you now and then. I hope to ‘see’ you again in 2023, and wish you and yours a happy and relaxing festive season!
Hello! No big projects or FOs today, but 7 small things that have made me happy over the past week.
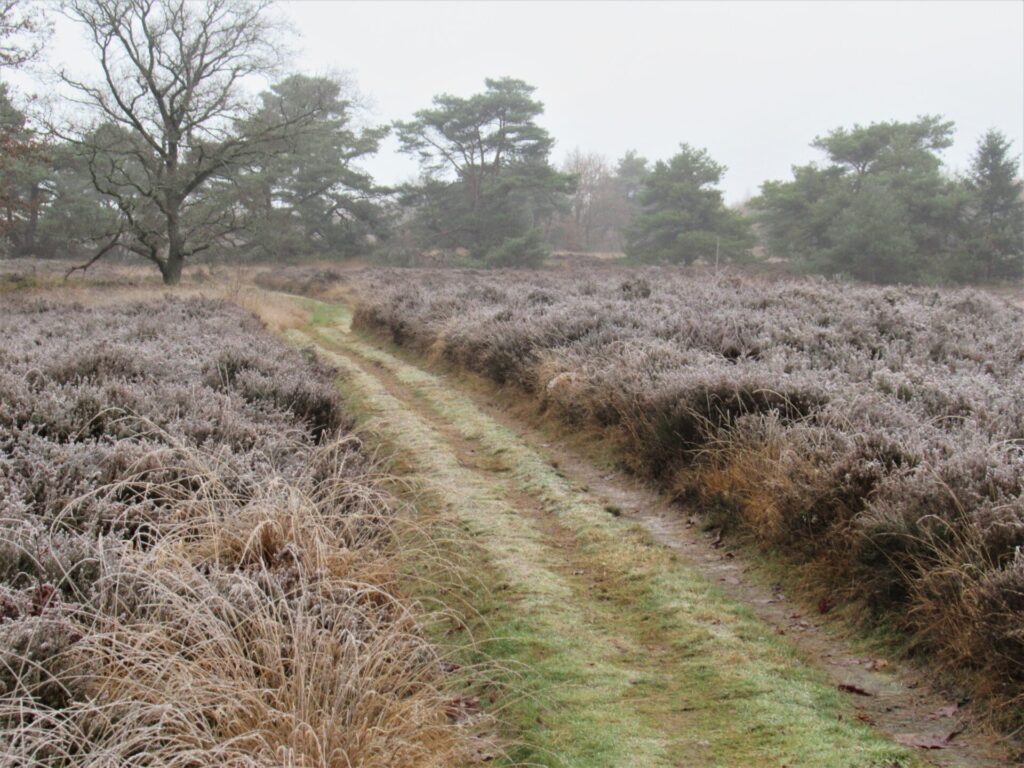
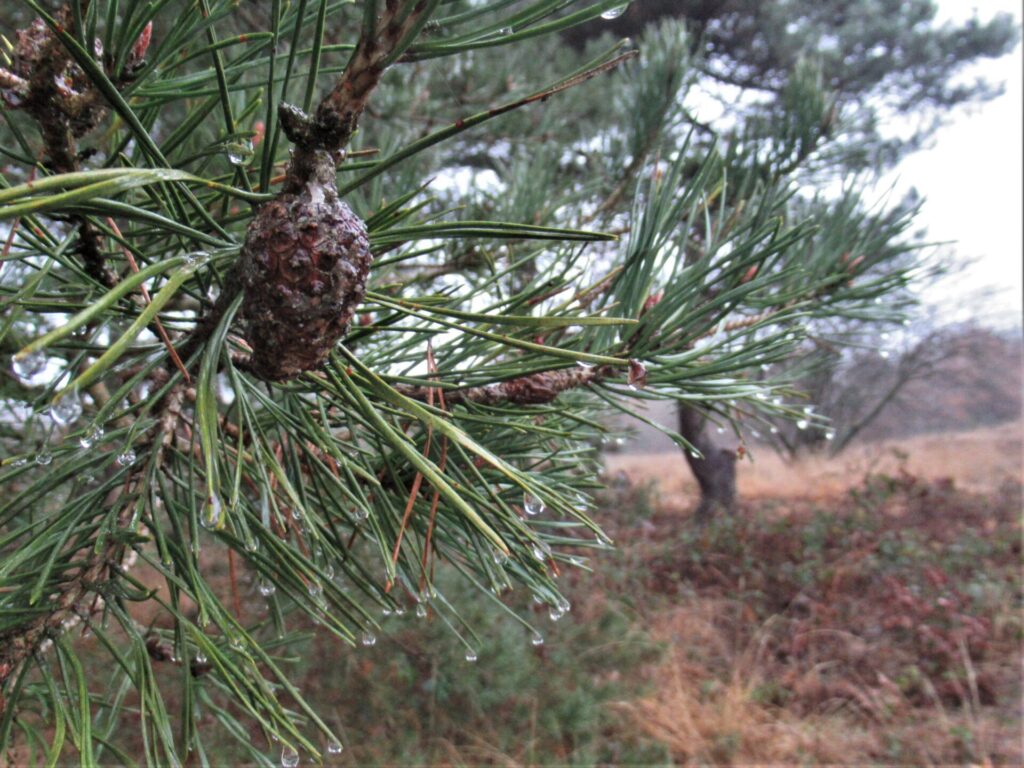
1. A walk The nights have been frosty this week, with temperatures just above zero during the daytime. On Sunday morning it was dark, cold and foggy, and I didn’t feel much like going for a walk. We went anyway. The heather and grasses were still white and frozen.
But the trees were already dripping.
It was cold, it was wet, it was gloomy. And it was lovely.
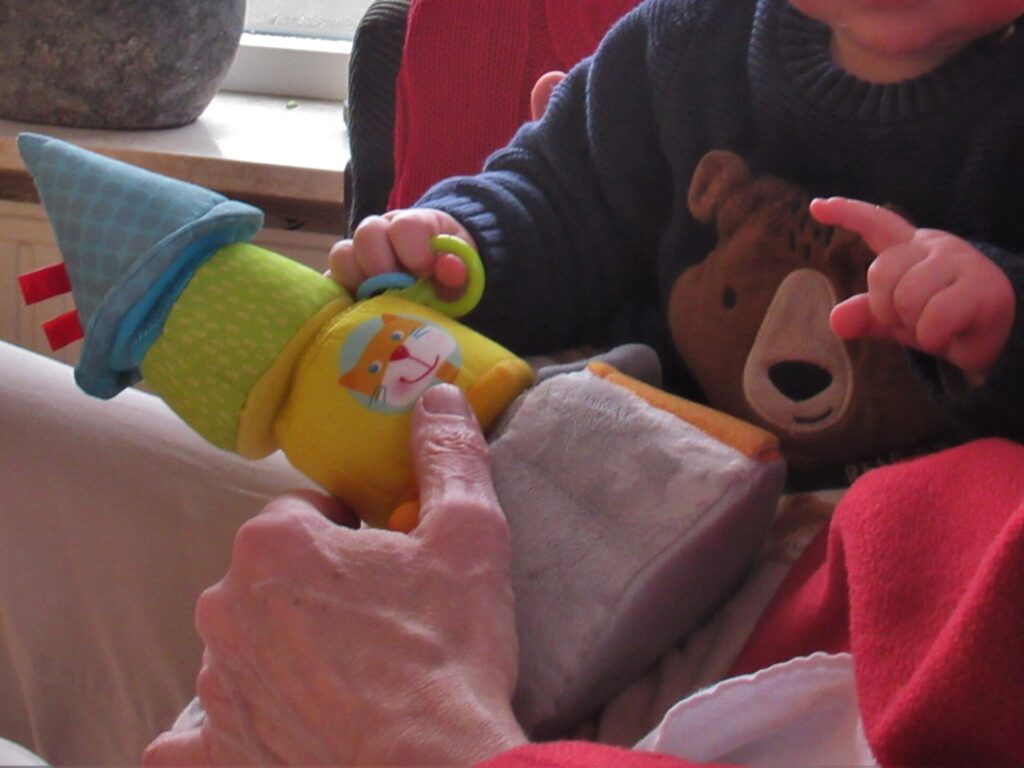
2. Small hands, big hands Our grandson and his parents came to celebrate Sinterklaas last Saturday. At 8 months, he was more interested in the wrapping paper than in the gifts inside them. His small hands next to my husband’s big ones made me sigh a sigh of happiness.
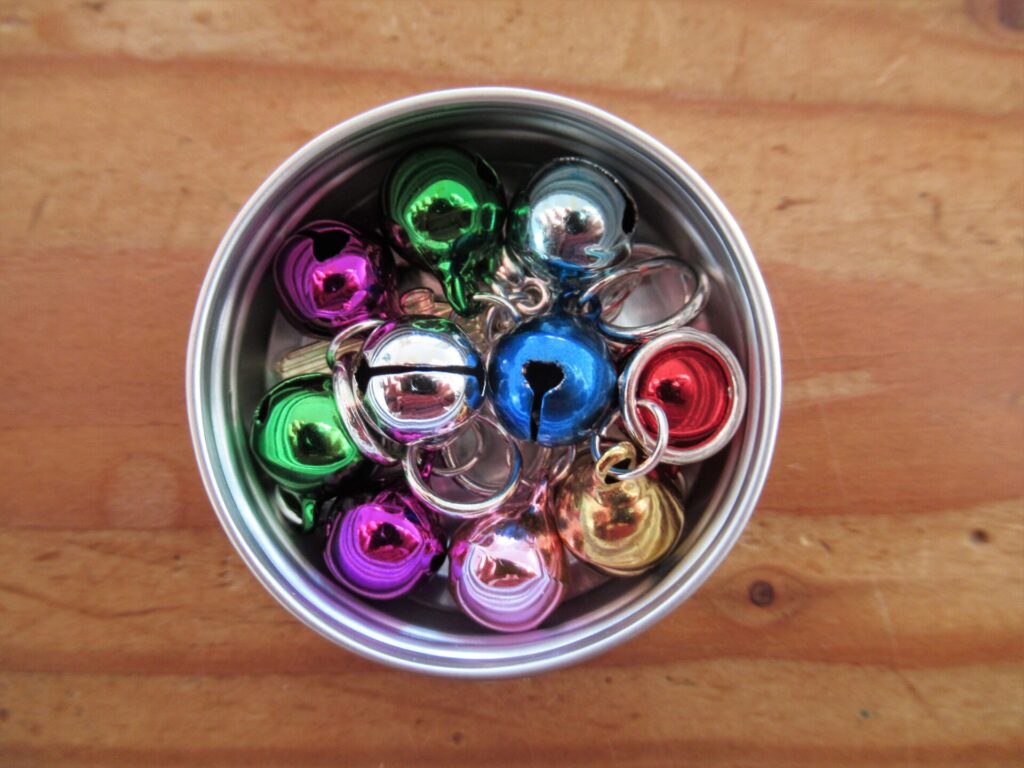
3. Jingle bells Sinterklaas brought me a few gifts, too. One of them was a small tin filled with jingle bell stitch markers.
4. Small bird feeder A dear friend came on a very belated birthday visit bearing gifts. One of them was a new bird feeder, hand-made from willow. Too small for woodpeckers and too difficult to hold on to for house sparrows and finches, it is specifically for great and blue tits. I asked them if I could post a picture of them eating pieces of peanut from it on my blog, but they said: uh-uh, we value our privacy! So here is just the feeder.
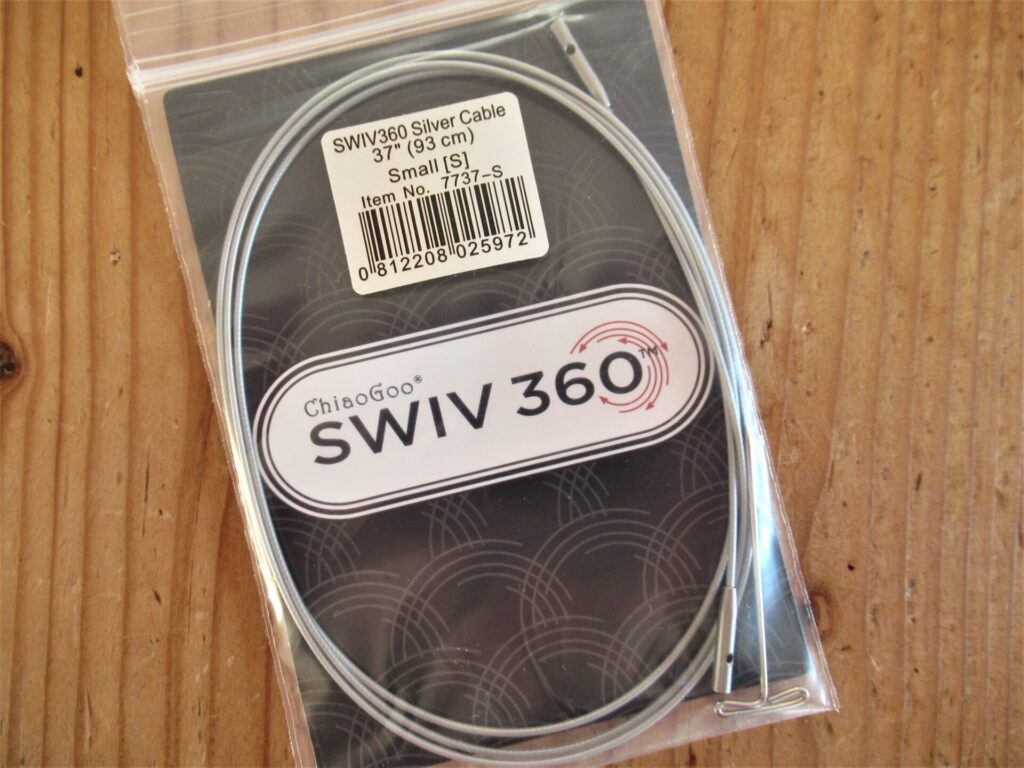
5. Small cable The same friend also gave me this:
Only a fellow-knitter would know how happy that would make me. It’s a new type of cable for my Chiaogoo circular knitting needles. I am trying it out on the small Advent mittens I’m knitting with the magic loop technique.
What can I tell you about it? Well, the Swiv 360 cable is quite a bit thinner than the original red cables, and it is also a lot more flexible – very nice! These cables are attached to the ends that screw onto the needle tips in such a way that they can rotate freely – a tremendous improvement.
The only downside of these new cords is that there is a slight hitch where the cable is attached to the ends, which makes sliding the stitches from left to right over them towards the tip (when moving from one needle to the next with the magic loop method) a little more difficult. But, all in all, I’m very happy with it!
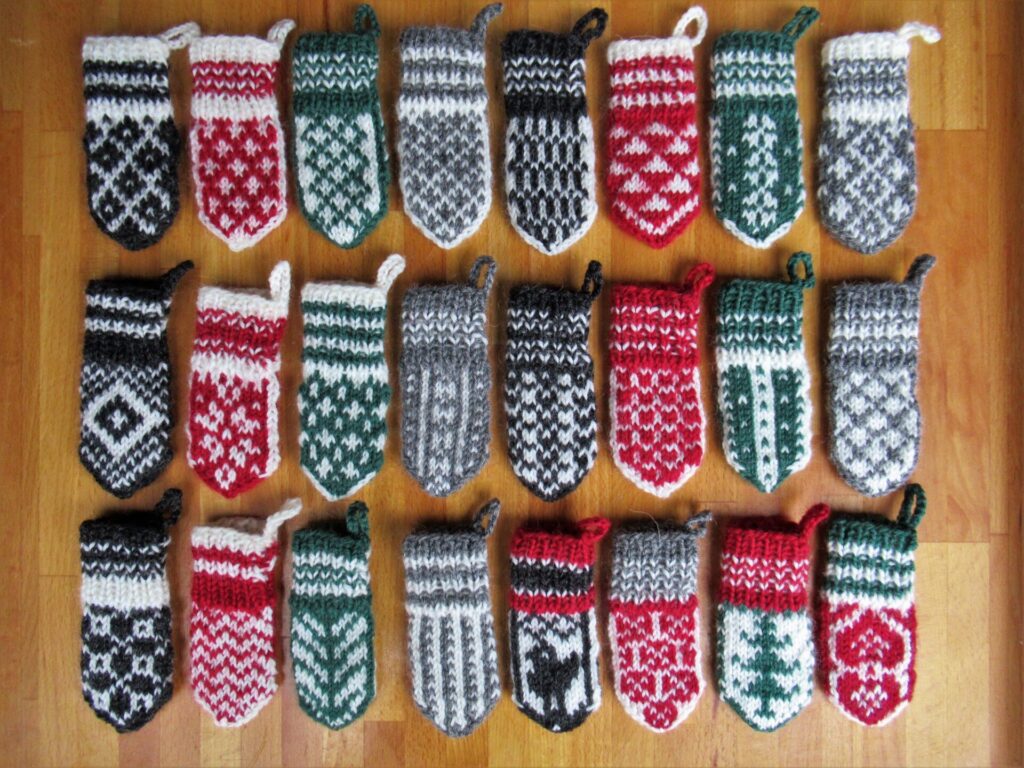
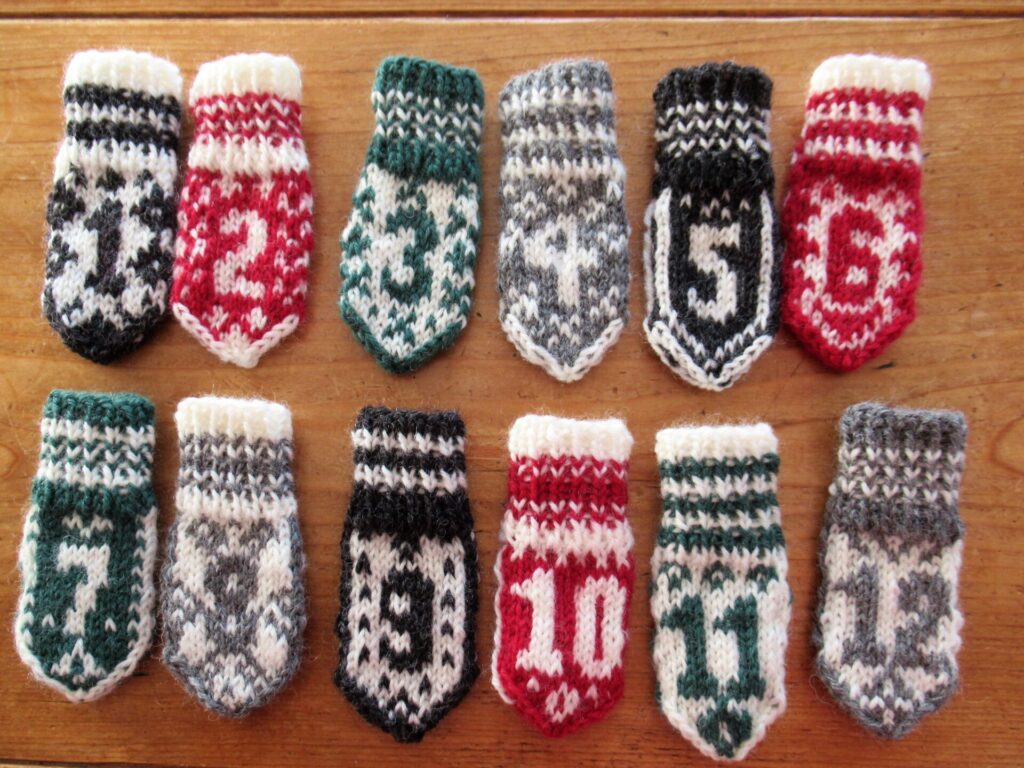
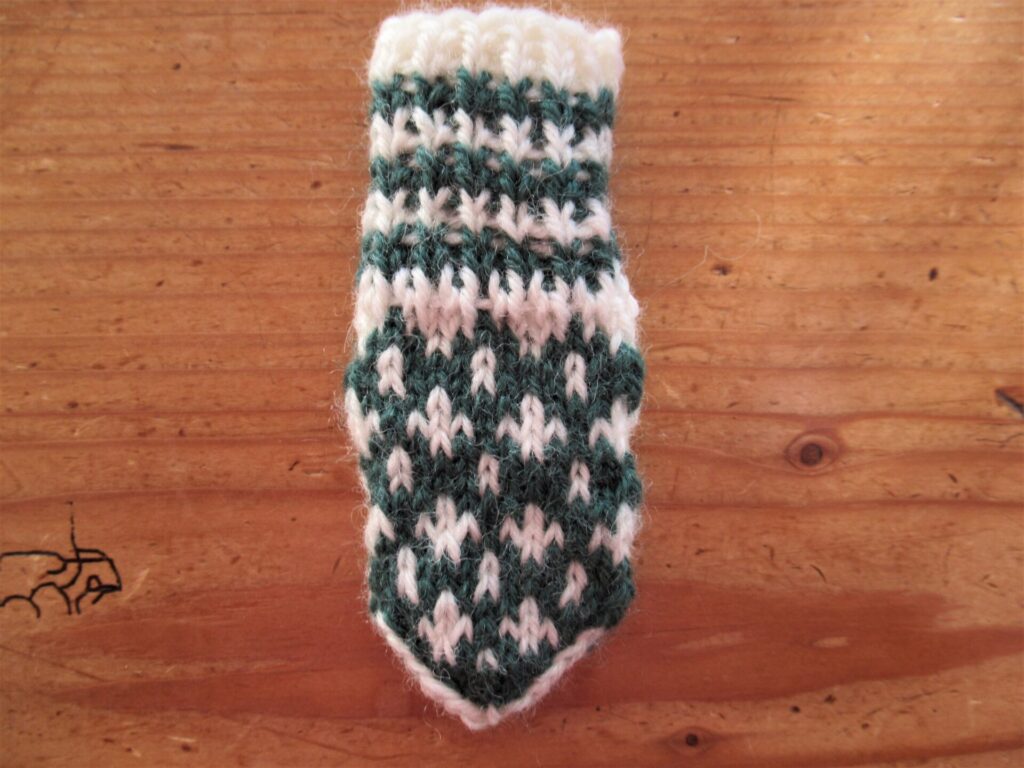
6. Mini-mittens I’m not quite but almost on schedule with the Norwegian mini-mittens I’m knitting for an Advent calendar to gift next year. Number 13 has just slid off my needles.
It’s great fun, knitting these. My idea was to spend some quiet, contemplative time burning a candle and listening to music while knitting one of these every day. In real life it’s more like 15 minutes here, 20 minutes there, sometimes with, sometimes without music, often forgetting to light a candle or to be quiet and contemplative.
Still, I’m getting there and enjoying these knitting moments. The only thing I’m not quite happy with is the bumpiness of the sides of some of the mittens and the irregularity of some of the stitches. But let’s look at it from a positive side: I still have things to learn – yay!
7. Mini-sock The first Christmas card arrived accompanied by a small gift – a mini-sock. No, actually it wasn’t a Christmas card but a New Year’s card. The friend who sent it explains why on her wonderful blog about her life, knitting, walks with her dog and music. It is in Dutch, but Google does a fairly decent job of translating it. You can read about and see all of the mini-socks she knit here.
I’m happy and honoured to be the recipient of one of these sweet little socks. I’ve attached it to the zipper of my babysitting bag, so that it will travel with me every time I’m looking after our grandson.
May your weeks be filled with small things that make you happy, too.
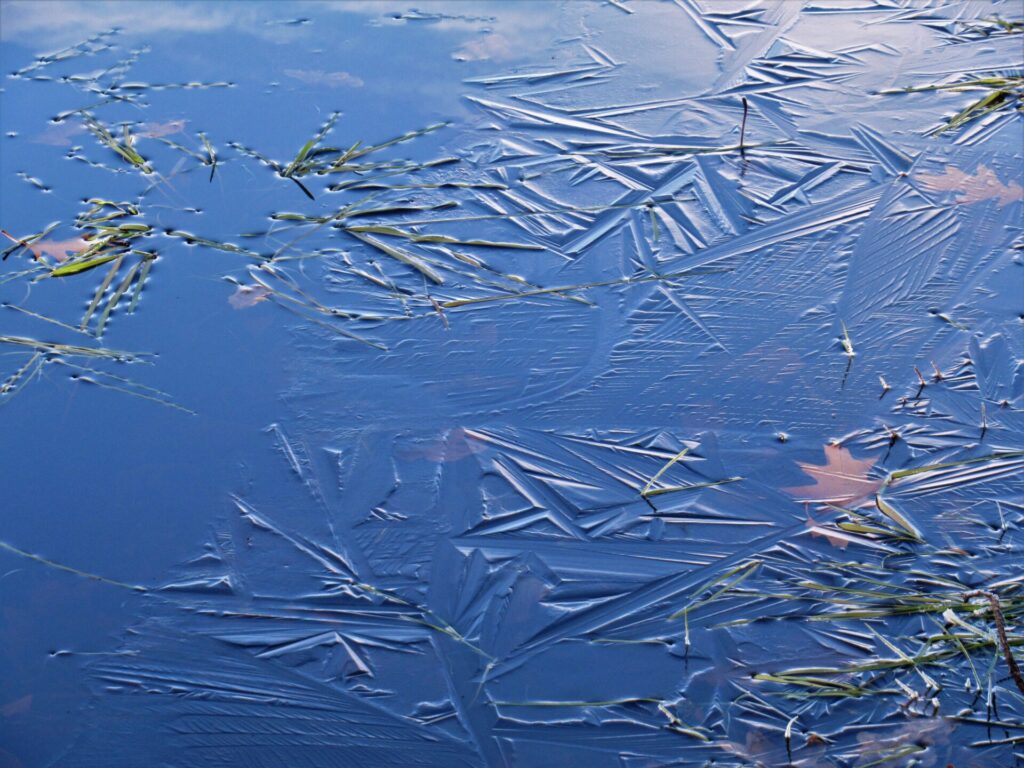
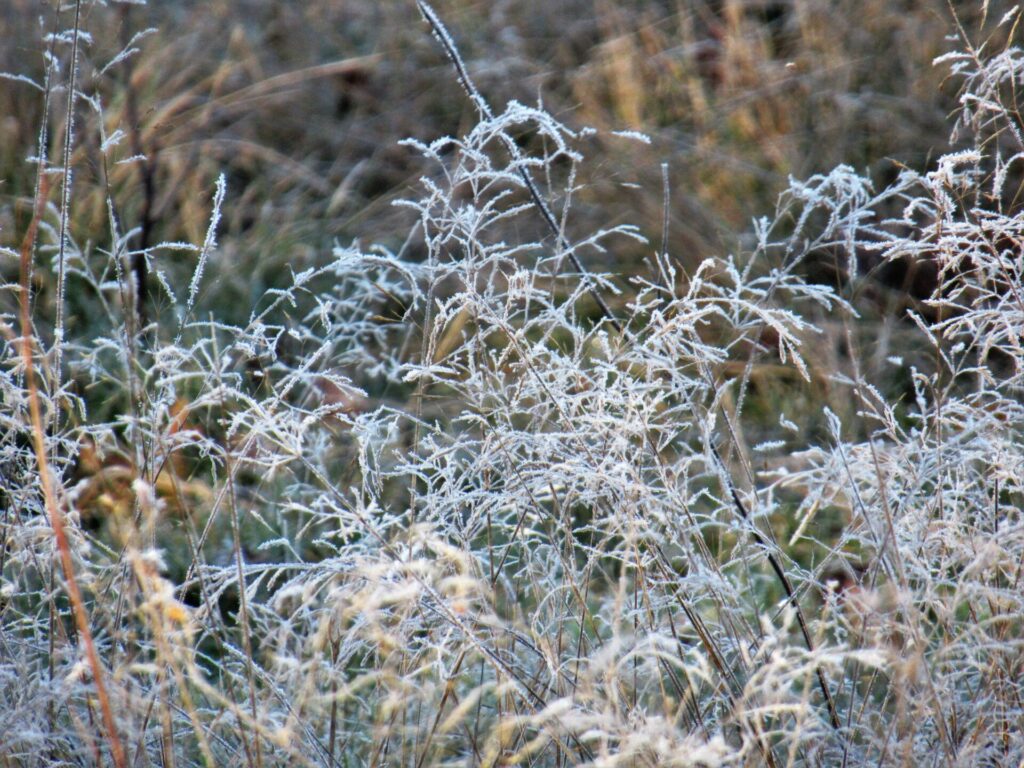
For two nights and a day-and-a-half it was wintry here, with starry nights, bright sunshine during the day and frost in the air. We’re back to higher temperatures and overcast skies now, but it was lovely as long as it lasted, with the thinnest layer of ice on ponds and lakes…
… and hoarfrost on the brittle yellowed grasses.
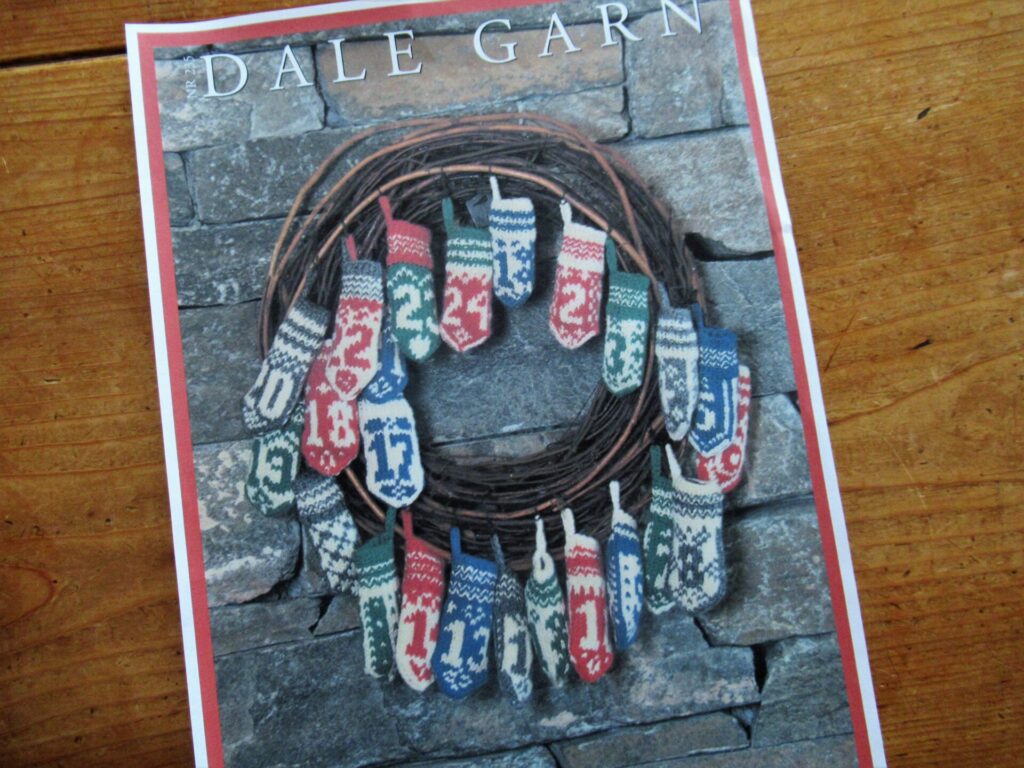
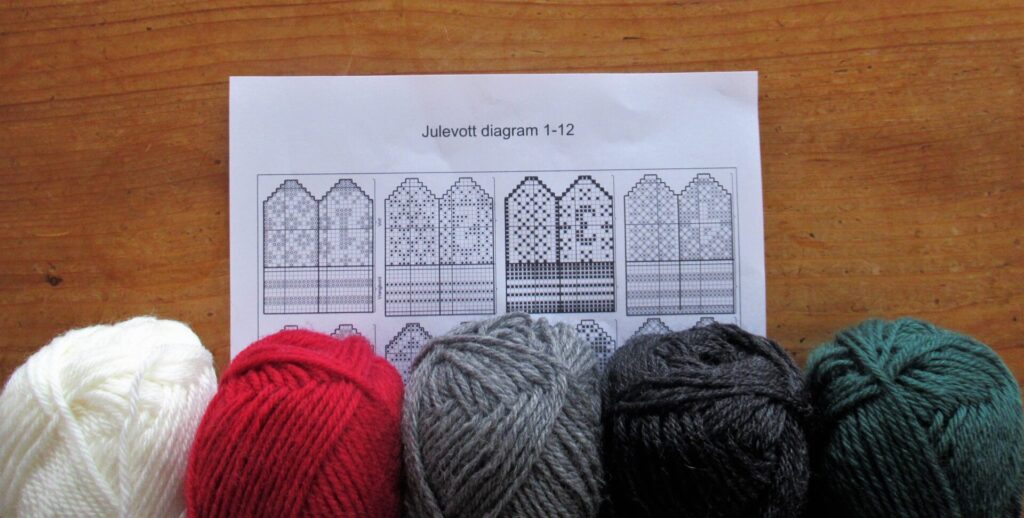
It was on one of these days that I decided to start a new, wintry knitting project: an Advent calendar with 24 small Norwegian Christmas mittens or Julevotter. A few days earlier a newsletter in my in-box mentioned it. As soon as I saw it, I loved it.
I didn’t plan on making one, though, until the wintry weather made me change my mind. It made me crave warm, woolly yarn and things. And, thinking about it, didn’t I have exactly the yarn called for in my stash?
The next minute I was running up the stairs, rummaging through boxes, and Yes! Found it! Some Dale Garn ‘Heilo’ and some Drops ‘Karisma’ in just the right colours.
This advent calendar is going to be a double gift. This year it’s a gift to myself – the gift of some peaceful knitting time every day during the Advent period. And next year it’ll be a gift for someone else – filled with small gifts.
I’ve already knit mitten number 1 to try the pattern out, at first using the indicated 3.0 mm/US 2½ needles. This made a very stiff mitten, so small that it would be almost impossible to wriggle a tiny gift into it. I tried another one on 3.25 mm/US 3 needles and that was better. Still small, but less tight.
Using knitting needles just a quarter of a millimetre thicker made a visible difference.
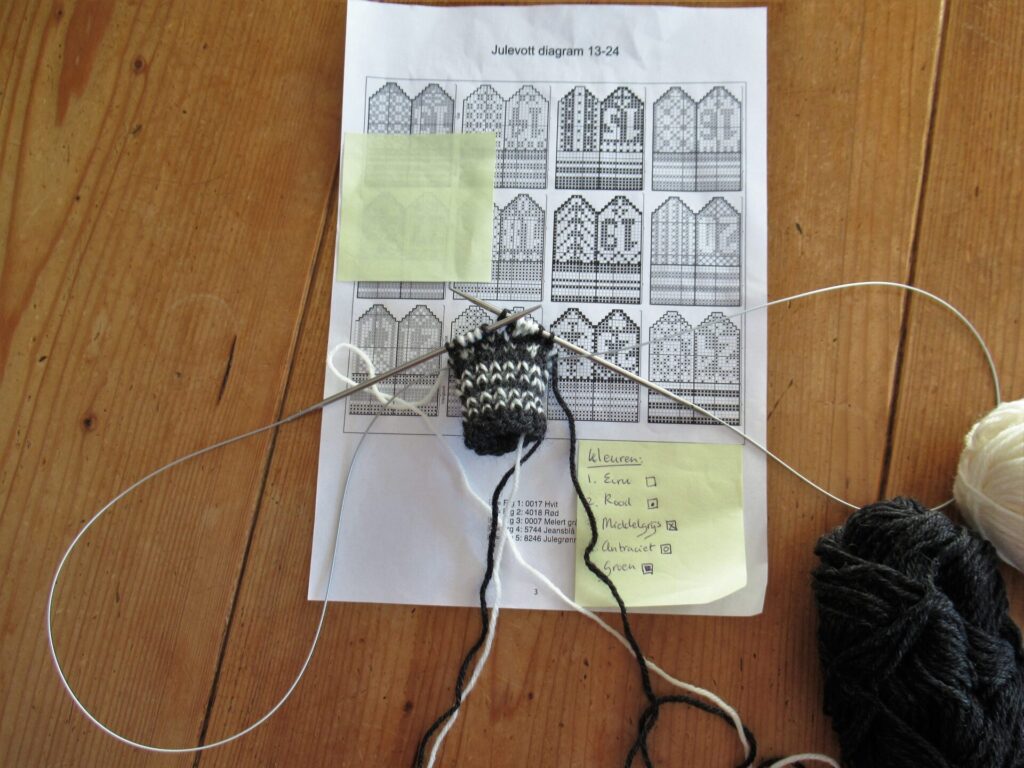
The pattern is in Norwegian, but that’s not really a problem even if you don’t speak a word of the language. Legg opp 26 m means: cast on 26 sts. The ribbing is k1, p1. And there are charts for the colourwork patterns and the decreases at the top.
The 24 tiny thumbless mittens are all going to be different, with a number on one side and lovely Norwegian patterns on the other.
I’m not sure it’s doable, knitting a mini-mitten every day during the run-up to Christmas, but we’ll see. I’m really looking forward to spending quality time with them and am not going to hurry. If they’re not finished ‘in time’ I’ll just keep knitting on in the New Year.
I read about this Advent Calendar in an e-mail from Rosy Green Wool, a German producer of organic yarns. I’ve subscribed to their newsletters because they are not too frequent and there is usually something interesting in them. Their post about this project can be read here on their website.
Sabine, the author of this ‘Knitting Letter’ as they call it, has knit one for each of her two children, and it’s fun to see them in the un-Christmassy colours she’s chosen, very different from my traditional ones.
The free pattern for the mini-mittens was published by Dale Garn and can be found here on Ravelry. Rosy Green Wool’s knitting letter says that it is no longer available for downloading, but it is. It is no longer available from Dale Garn, but can now be found on the Wayback Machine. Here is how to find it:
If on Ravelry you click on ‘This pattern is available for free’ or on the link under ‘For more information, see:’ you’re sent on to the Wayback machine (on my computer it takes a while). It looks a bit iffy, but the Wayback Machine is a bona fide internet archive.
When there, click on ‘Last ned katalog’. Then you’ll get a pdf of a lovely booklet with lots of patterns for knitted and crocheted Christmas projects.
For the mitten Advent calendar pattern scroll down past all the cosy pictures and you’ll find it on pages 1-3 of the instructions.
Well, I won’t keep you any longer. I know this is a busy time of year for many, but I hope you can find some quiet time in between all the jobs on your list to just sit and knit, or read, or listen to music, or do whatever else feels peaceful to you. xxx
Thank you so much for all your kind and supportive words after last week’s post, here and through other channels. While I’m writing this, we’re waiting for the plaster on our walls to dry with as many doors and windows open as possible. I’m using this quiet interlude before the next stage (ceiling repairs) for some focused work, and I’ve finally finished my pattern for a pair of fingerless mitts. Or rather, two pairs.
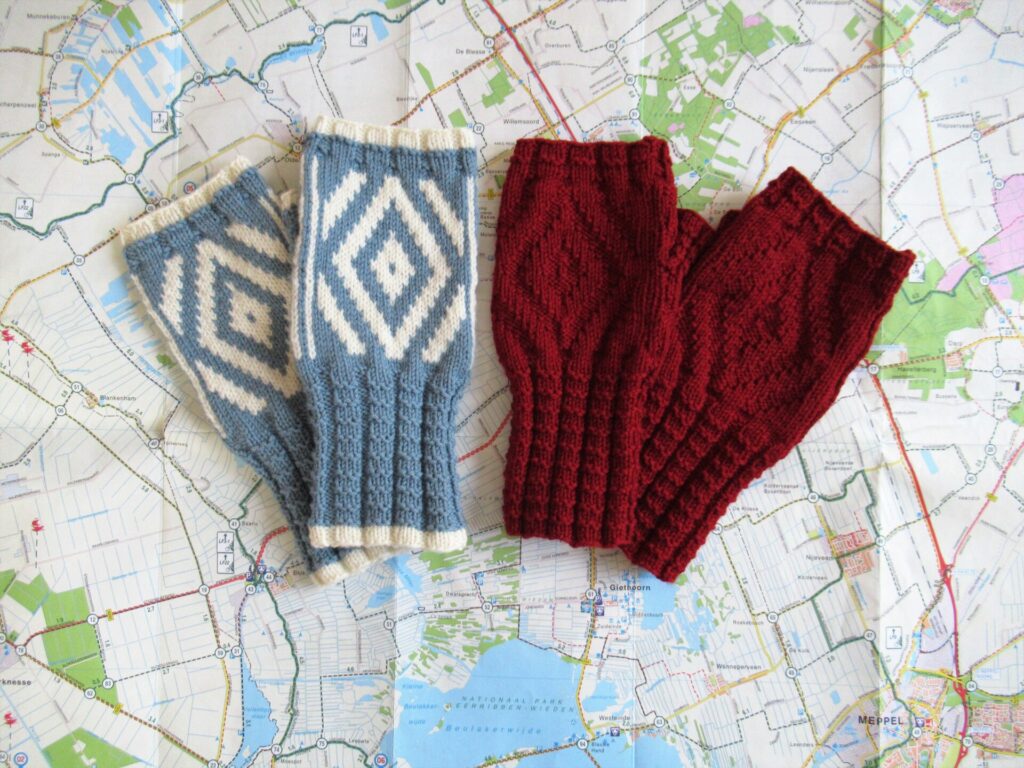
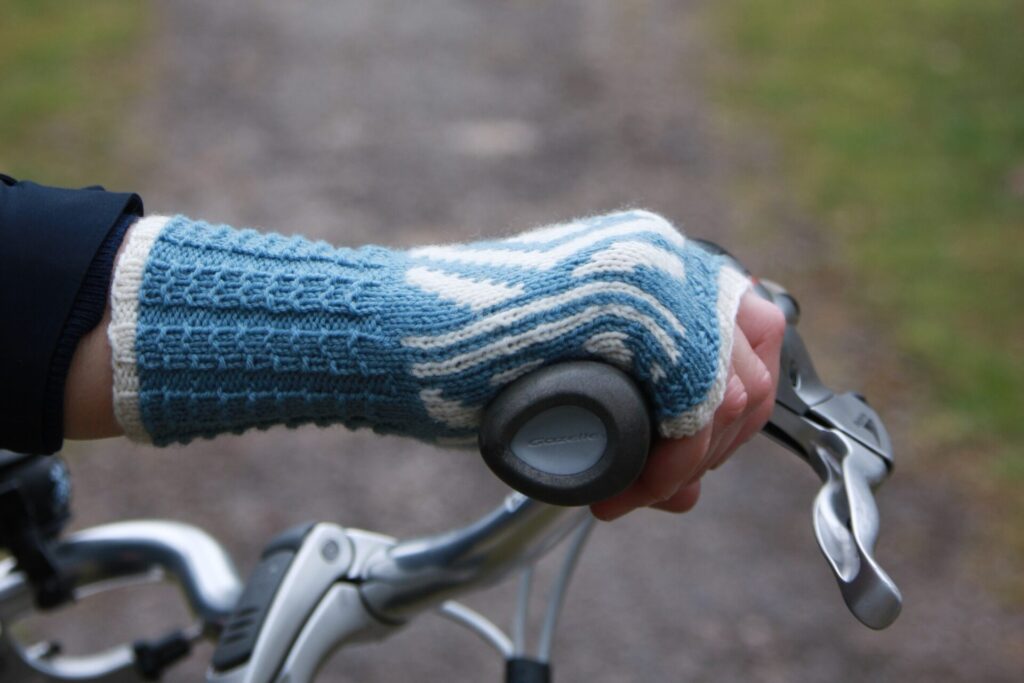
Meet the Gazelle Mitts!
I’ll explain why I photographed them on a cycling map and with a thermos flask further on. First a little about the design.
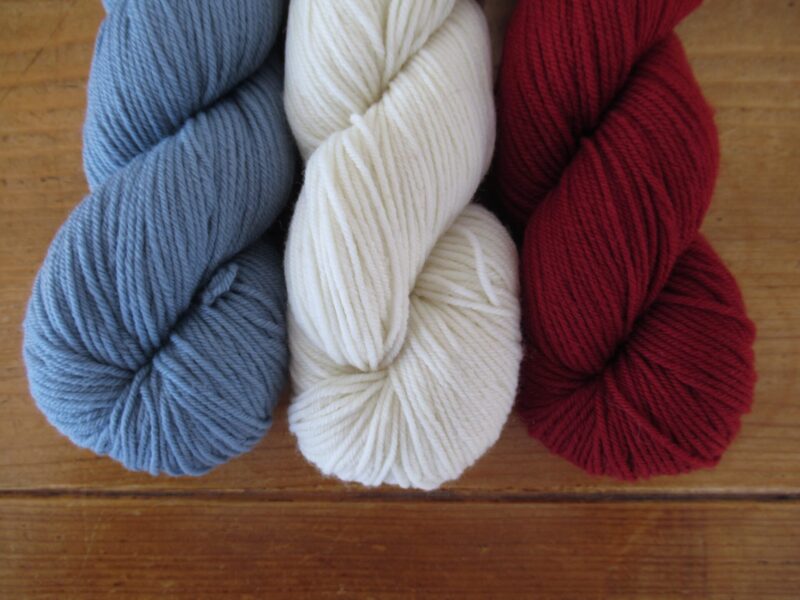
Taking the inherited knitting sampler I’ve written about before as a starting point, I began visualizing, drawing, thinking, calculating and swatching. After lots of swatches and prototypes I was ready to knit the final mitts in a single-coloured and a two-coloured version. I already had the yarn, but kept changing my mind about which colours to use for which version.
Red and cream together and blue on its own? Or blue and cream together and red on its own? In the end I asked your advice, and you were unanimous: Blue and cream for the two-colour version and red on its own.
So that is how I knit them.
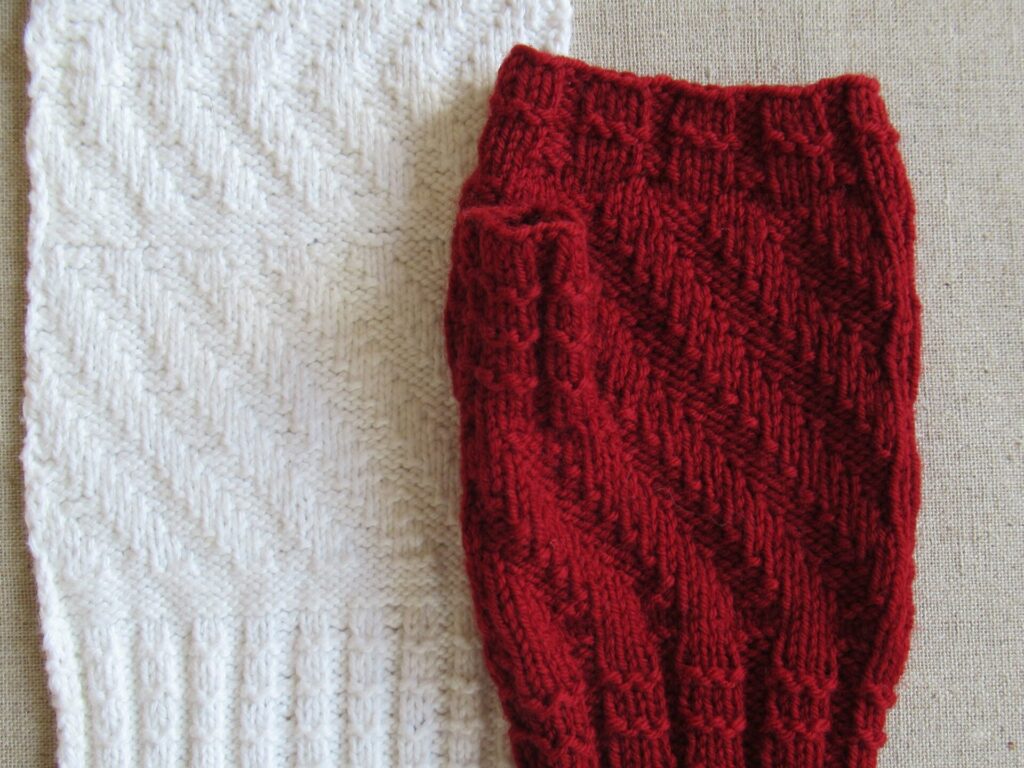
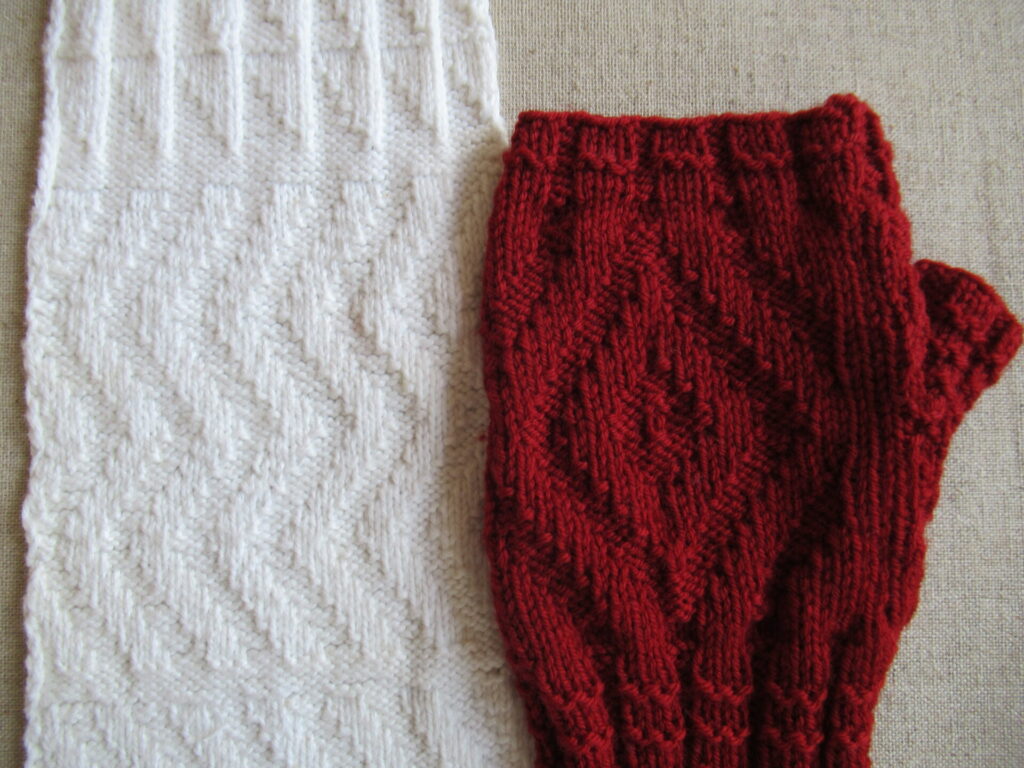
The red single-colour mitts combine three knit-and-purl stitch patterns from the sampler. For the palm of the hand, I used the sampler’s diagonals.
For the back of the hand, I took the zigzags and mirrored them to make diamonds.
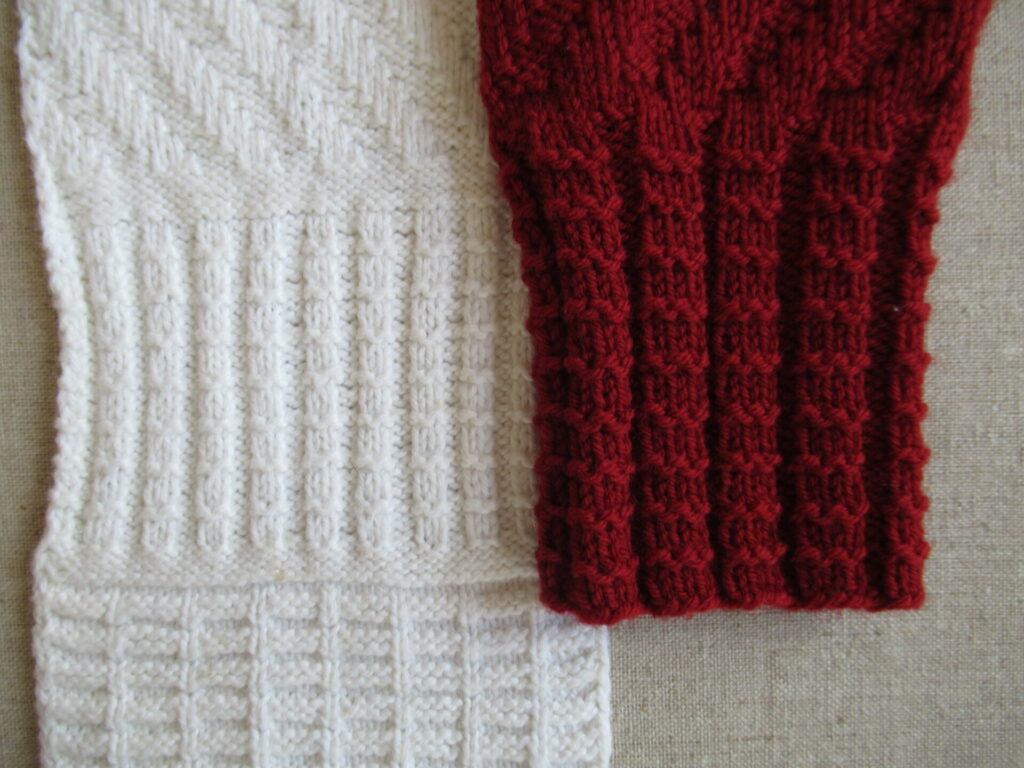
And a two-by-two knit-and-purl rib with purl ridges was perfect for the cuffs and thumbs. Only I changed it into a three-by-two rib to link it up with the diagonals and diamonds.
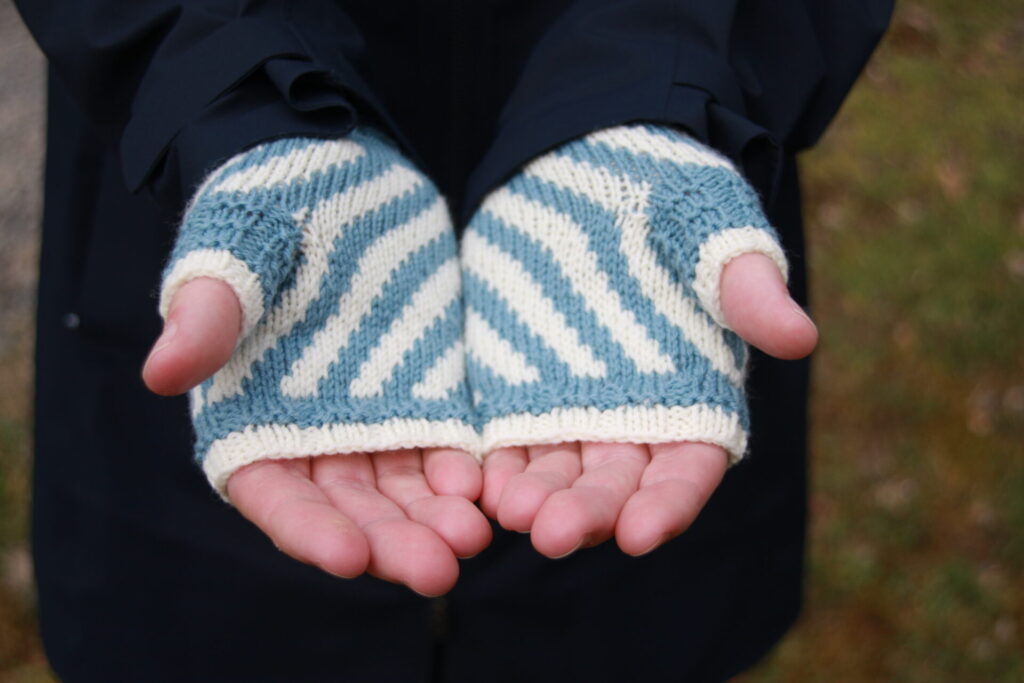
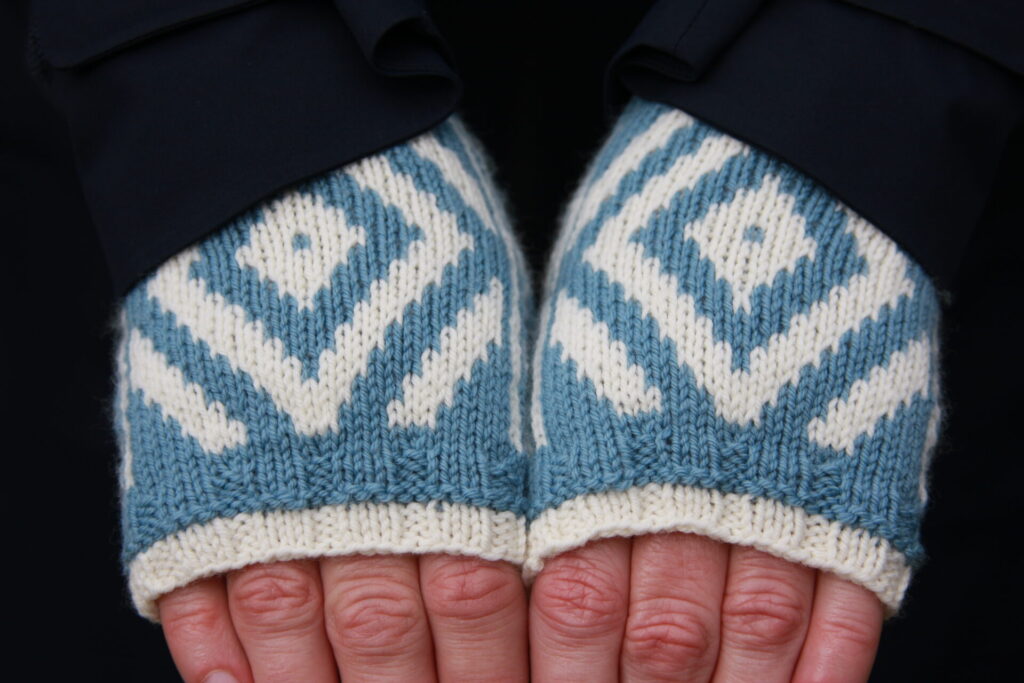
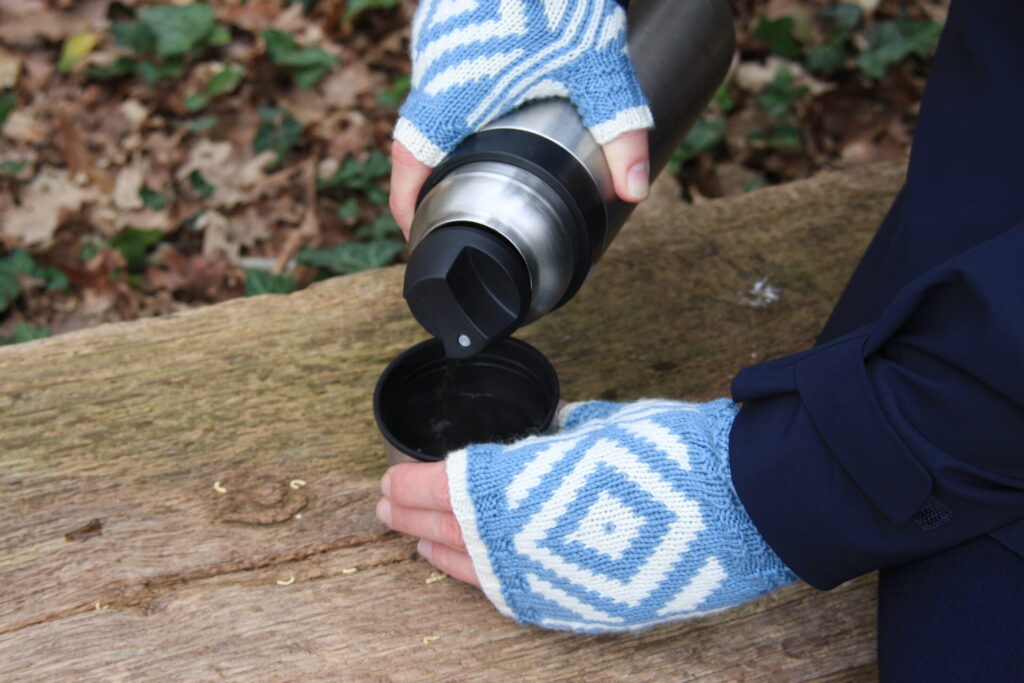
Although they look very different, the two-colour mitts are basically the same. They have the same diagonals and diamonds, and the same ribbing on cuffs and thumbs. Only this time instead of knit and purl stitches on the palm and back of the hands the patterns are knit entirely (no purling) and picked out in different colours.
Diagonals on the palms…
… and diamonds on the backs of the hands.
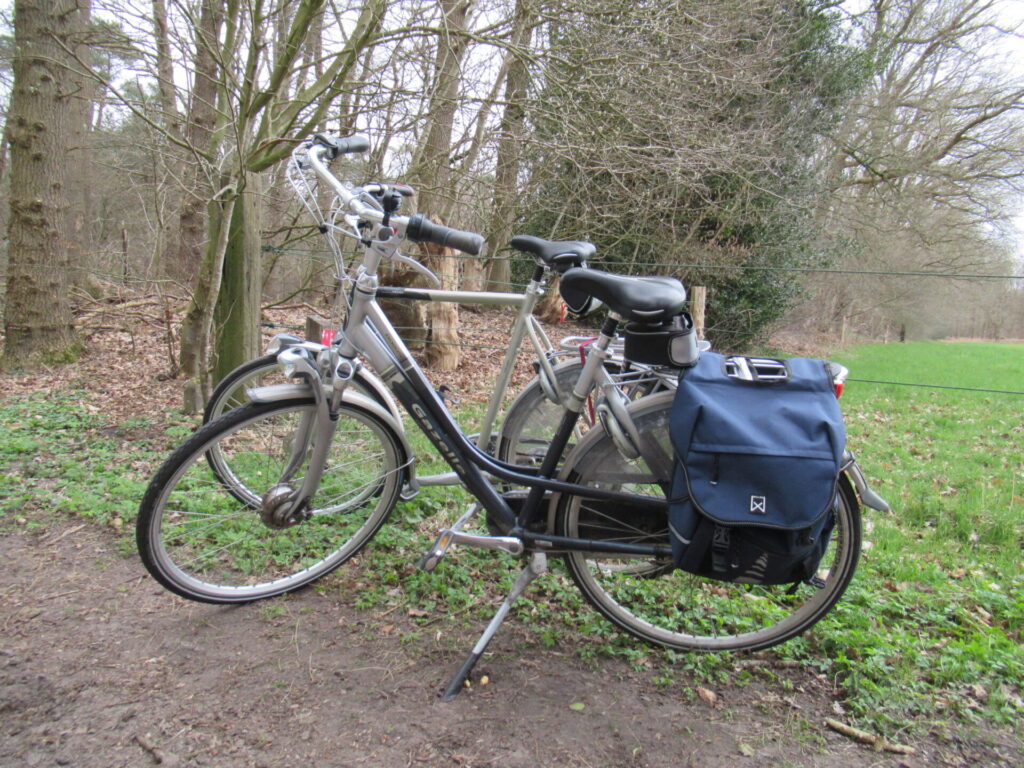
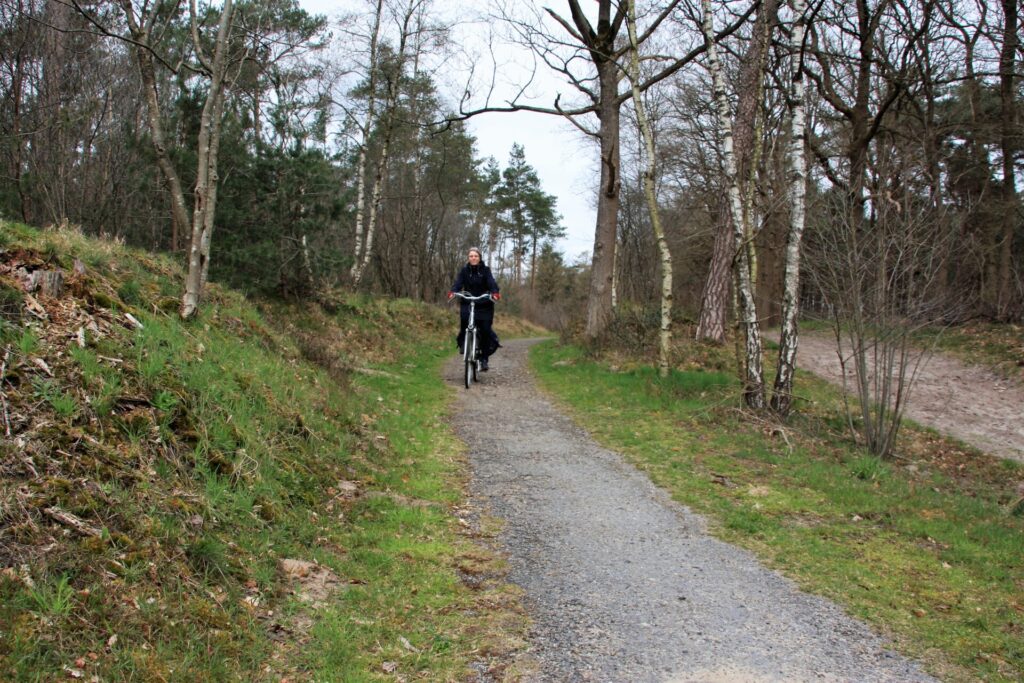
With bicycle rides on chilly days in mind, I named the mitts for my trusty Gazelle bicycle, my friend for over 15 years.
It gives me a sense of freedom and keeps me fit. I’m very much attached to it and not yet ready to trade it in for an e-bike like many people do nowadays.
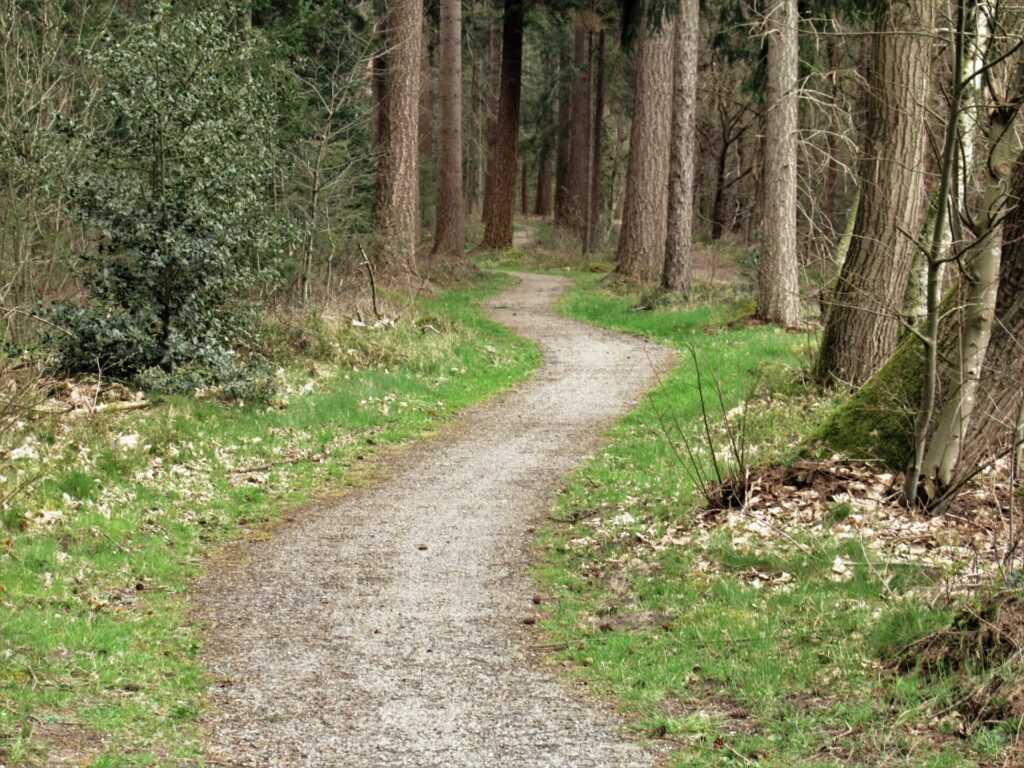
We (well, mainly my husband – thank you!) took most of the pictures for this post along one of my favourite stretches of bicycle track. It meanders through the wood just outside our village.
For the picture below, I’ve pulled up my coat sleeve to show you the nice and snug cuff.
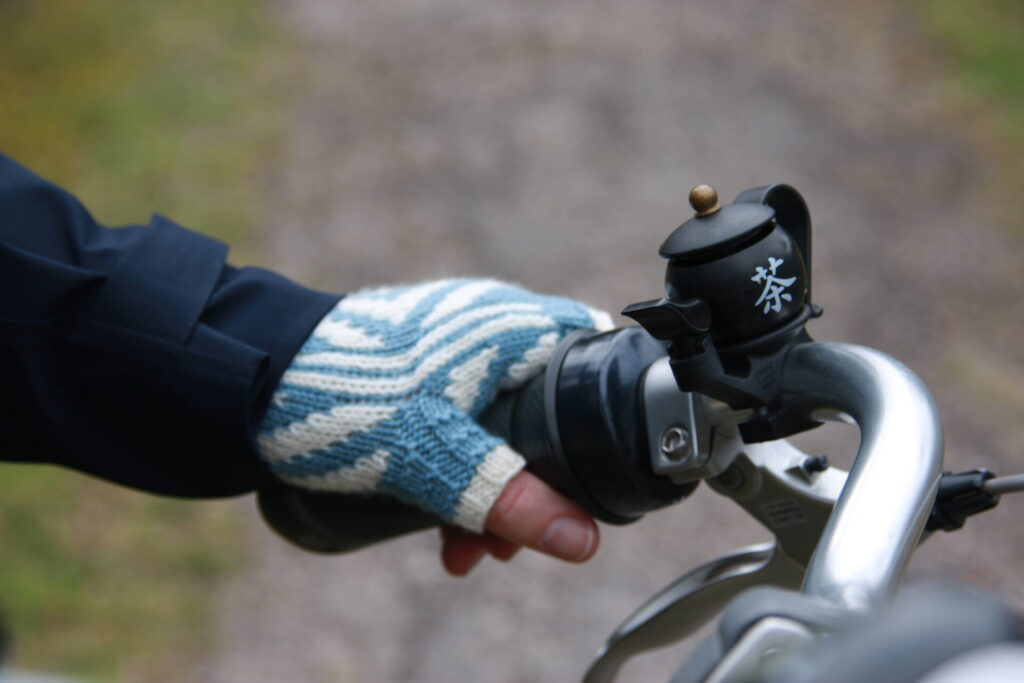
And here is a picture of my bicycle bell. It not only shows you the construction of the mitt’s thumb, but also tells you what my favourite beverage is. If I place my thumb on the teapot spout and release it, it gives off a sharp PING!
On longer bicycle rides, I often bring a thermos flask of tea. (Just for me – my husband prefers coffee.) Coffee-and-tea-to-go places have sprung up during the past year even around here, but they are still few and far between. And anyway I prefer my own.
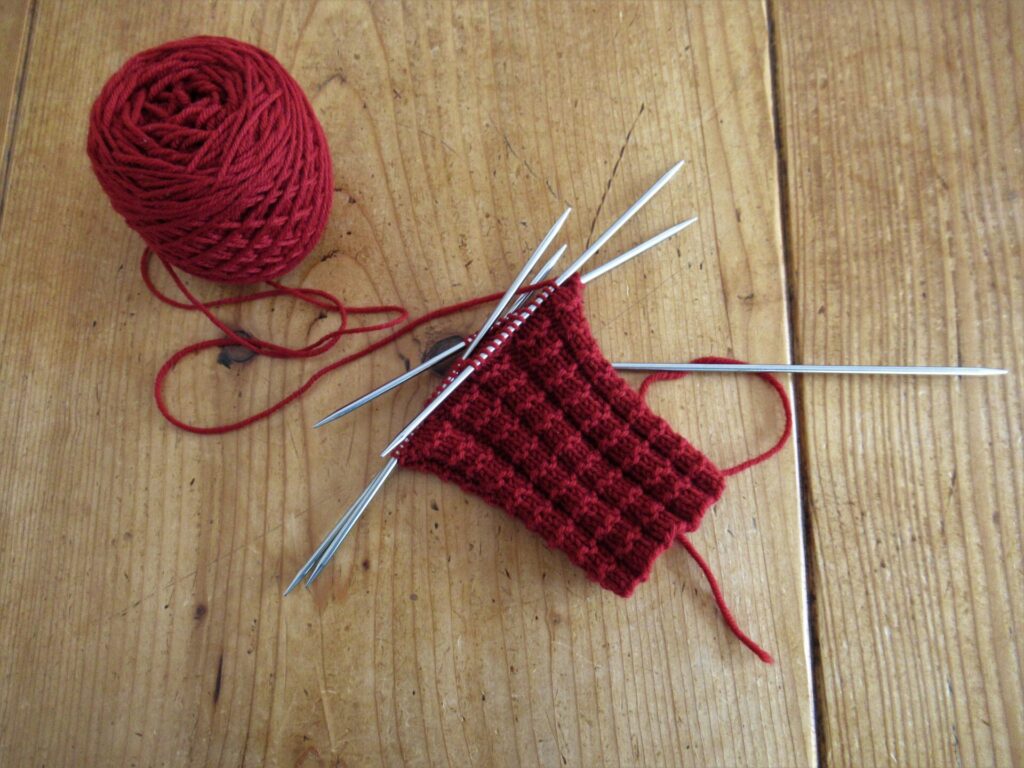
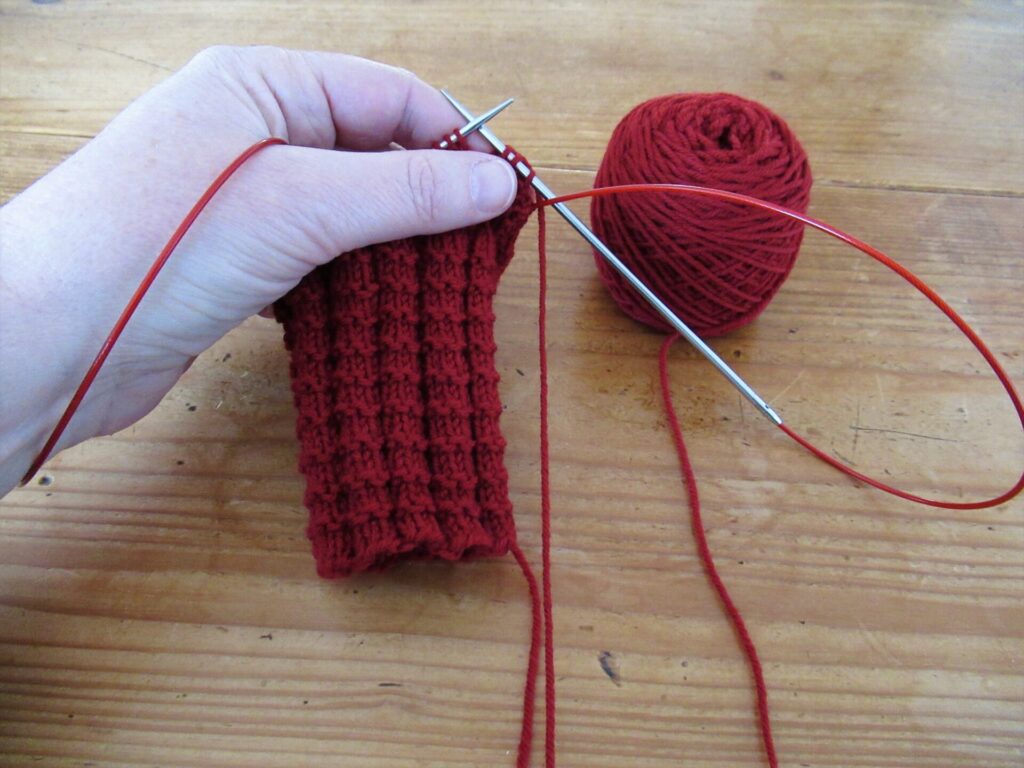
The Gazelle Mitts can be knit on a set of double-pointed needles or on long circulars using the Magic Loop method. Personally, I prefer double-pointed needles for the cuffs and thumbs…
… and the Magic Loop method for the hands.
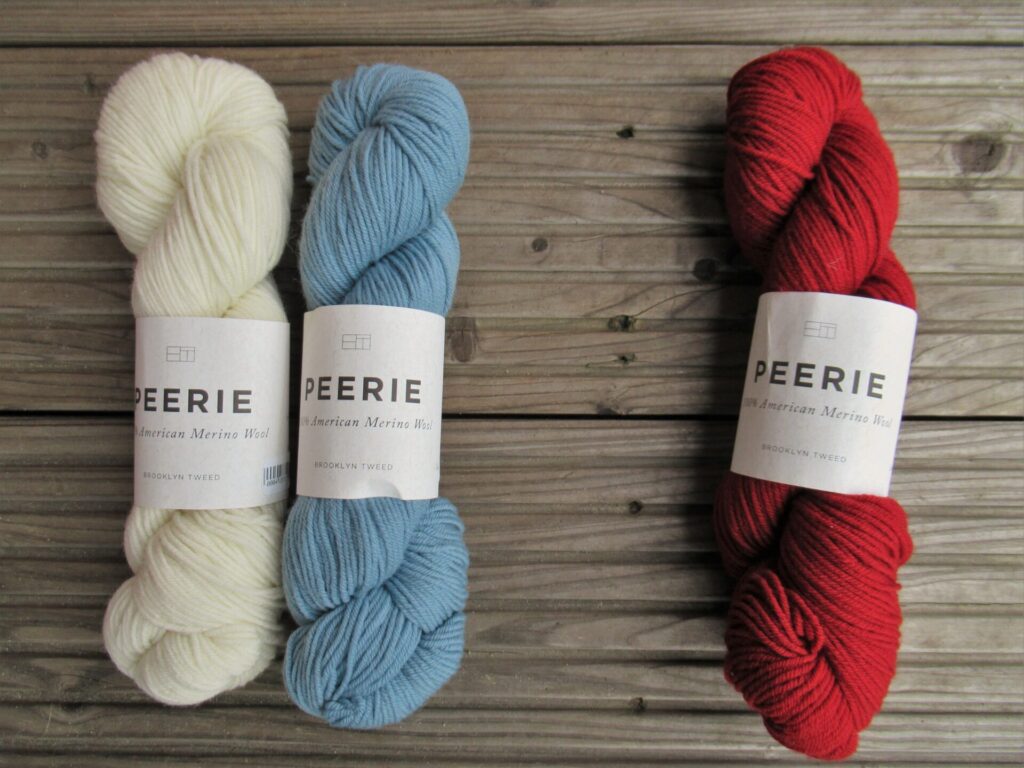
The yarn I’ve used is Brooklyn Tweed ‘Peerie’. One 50-gram skein for the single-colour mitts. And two 50-gram skeins in different colours for the two-colour version, with enough yarn left for a second pair with the colours reversed.
The Gazelle mitts can, of course, be knit in different yarns – I think that for instance many sock yarns are suitable. But should you decide to knit them, make sure your yarn is the same weight (fingering), and is smooth with a good stitch definition. And always check your gauge.
For those of you who’d like to make a pair,
The pattern for the Gazelle Mitts can be found here on Ravelry (available in English and Dutch, also to non-Ravelry members)
There is more information there on needles & notions, finished measurements etcetera. I’ve done my utmost to make the pattern as clear as possible. Apart from detailed instructions, photographs of the mitts, and charts for the diagonals and diamonds, I’ve also included a photo tutorial for the ‘afterthought’ thumb.
Well, that’s all about my Gazelle Mitts for now. If you have any questions, please leave a comment here or contact me through Ravelry (my Ravelry name is MerulaDesigns). As always, thank you for reading!