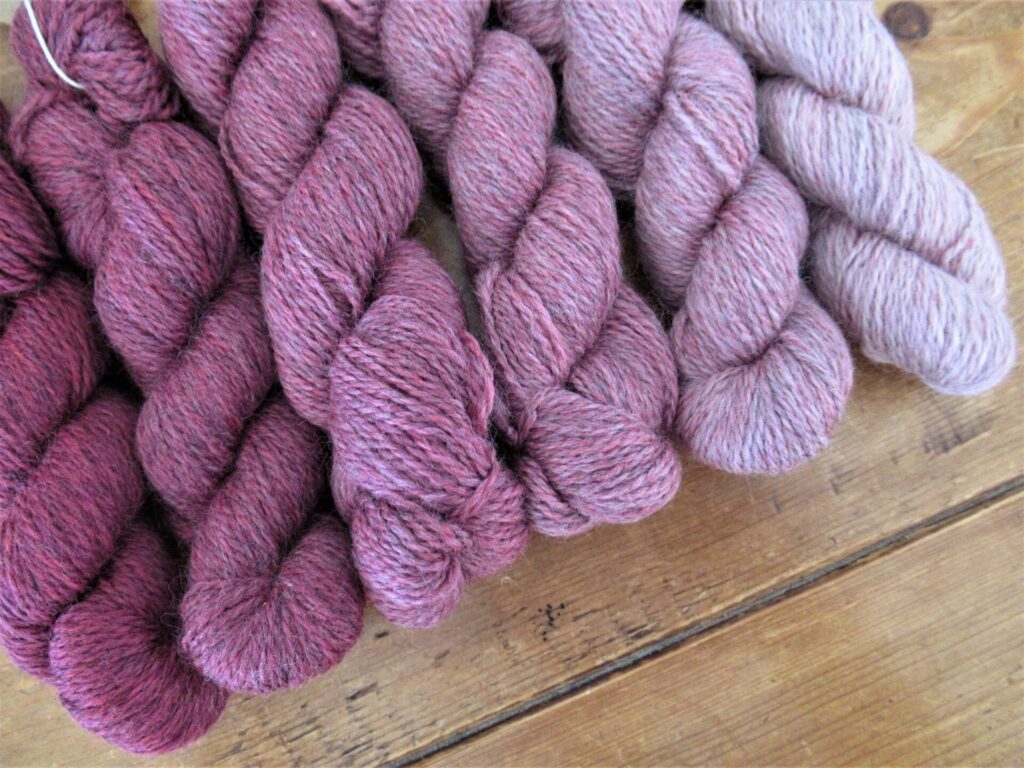
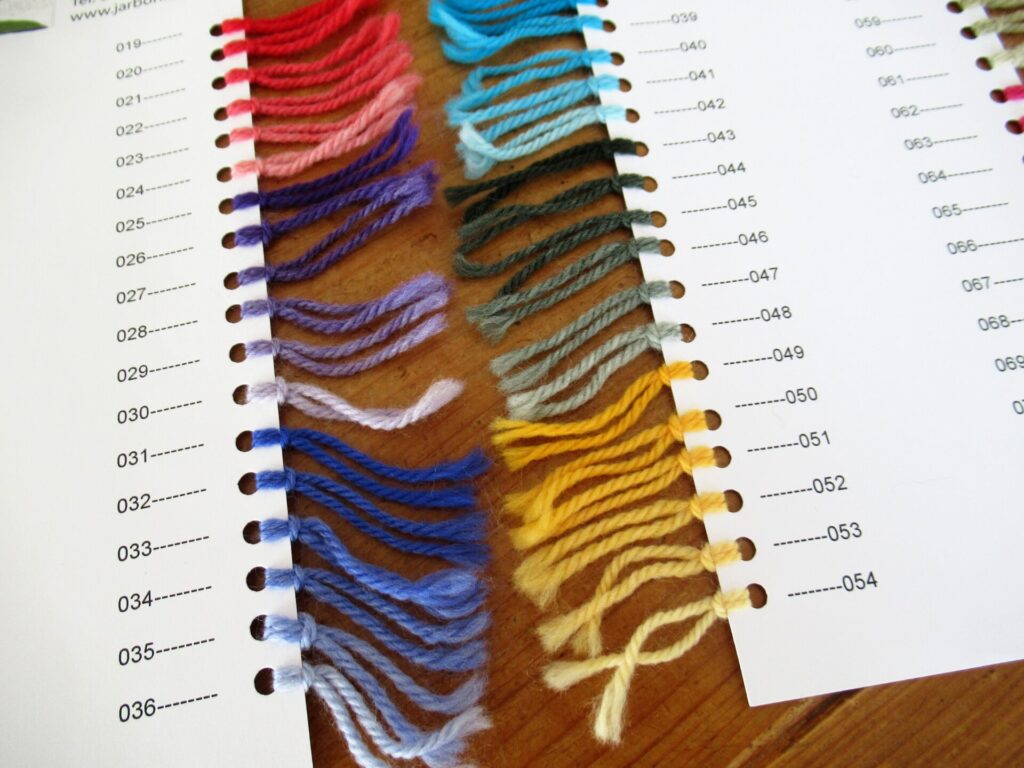
Thinking about a simple, portable knitting project I could start straightaway, I remembered a bag of mini-skeins stashed away for just such a thing. Lovely 25-gram skeins in a gradient of pinks, from a deep rose to the palest of petal pinks.
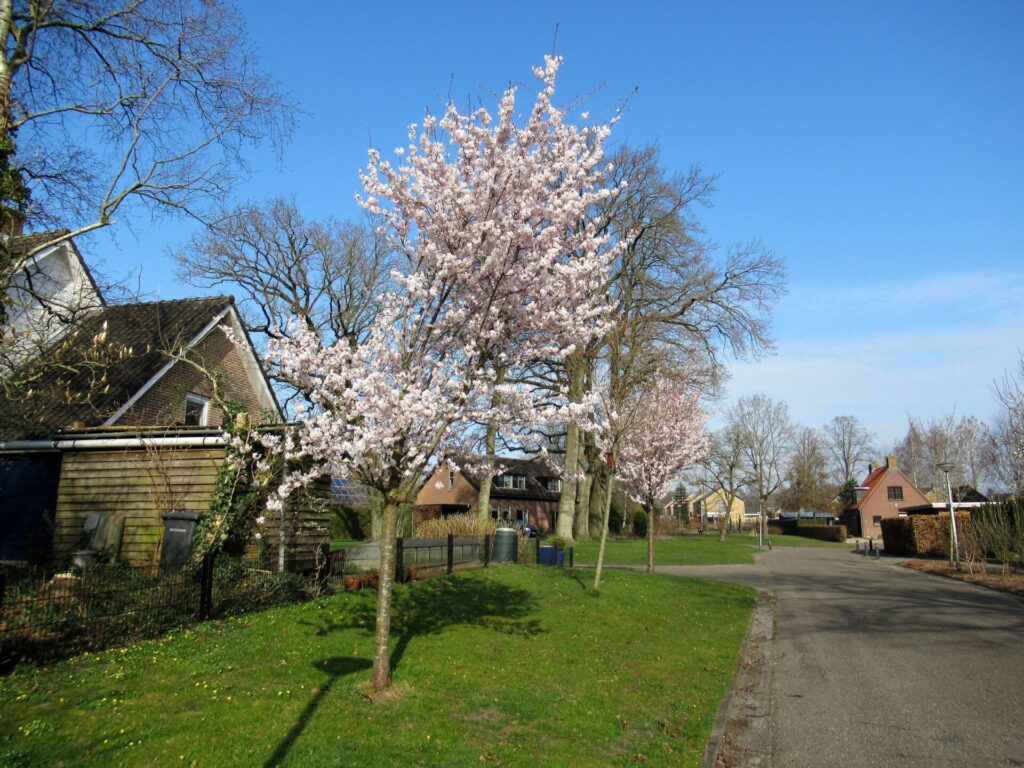
It’s too early in the year to find the darker shades of pink in gardens and parks. This is the season of the paler pinks. Most trees are still bare around here, but many ornamental cherries around our village are in full bloom. Very romantic with their frothy cloud of blossoms.
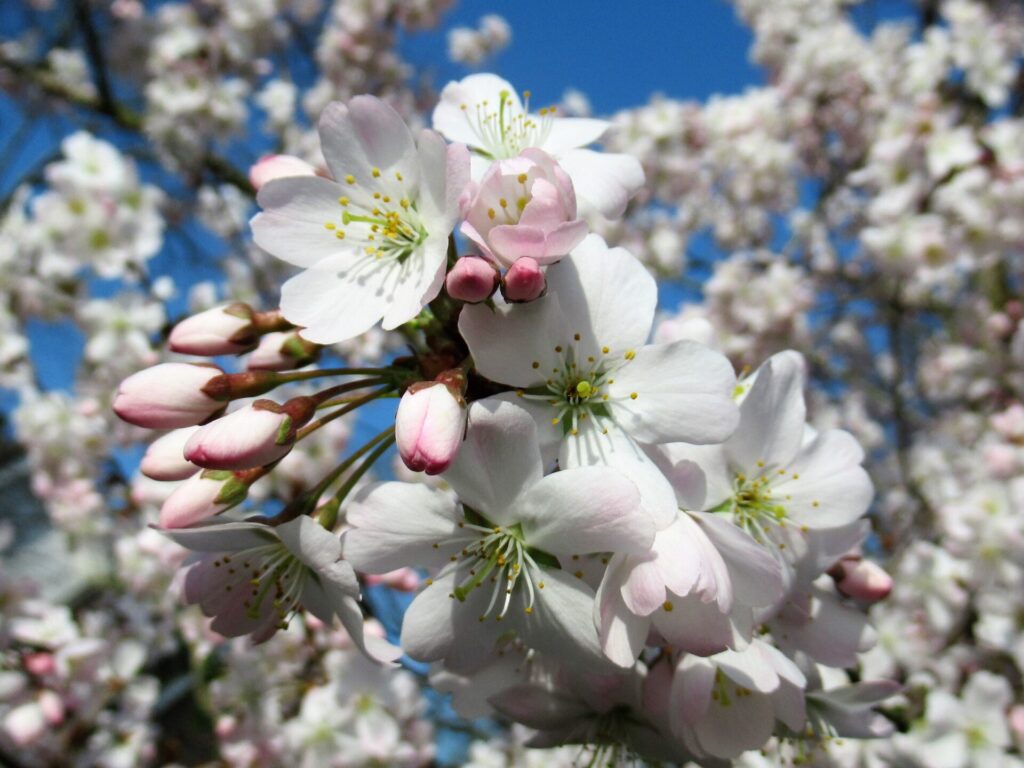
From close up the flowers look almost white, while the buds are a lovely shade of pink.
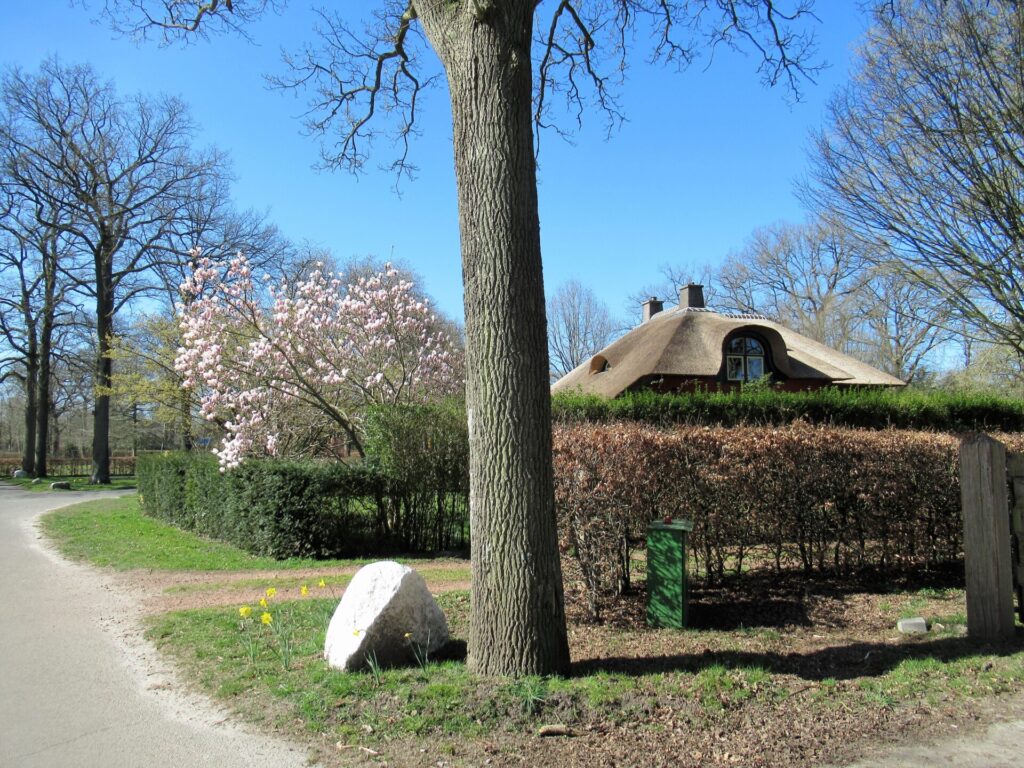
And then there are the magnolias. Oh, so utterly beautiful. There are all kinds of fancy varieties around, including pure white ones, but for me the most beautiful magnolias of all, are the ‘ordinary’ ones with the pink-and-white flowers. From a distance the general impression is pale pink.
But from close up – Oh la la, what a beautiful magnolia!
Well, back to the yarn of the mini-skeins. That’s what started all this talk about shades of pink, after all. It is John Arbon’s Knit By Numbers yarn, organically farmed 4-ply Merino. Each of the colours of this yarn is available in 6 shades, from dark to light, and there are over 100 shades in total.
The interesting thing about this yarn is that it is not dyed in these shades, but blended. Coloured top is blended with increasing percentages of white wool to make lighter and lighter shades.
Taking the palest of my mini-skeins as an example, it is just as with looking at the blossoming trees. The general impression is pale pink, but looking more closely you can see the marled effect: there is pink, white and even some grey in it.
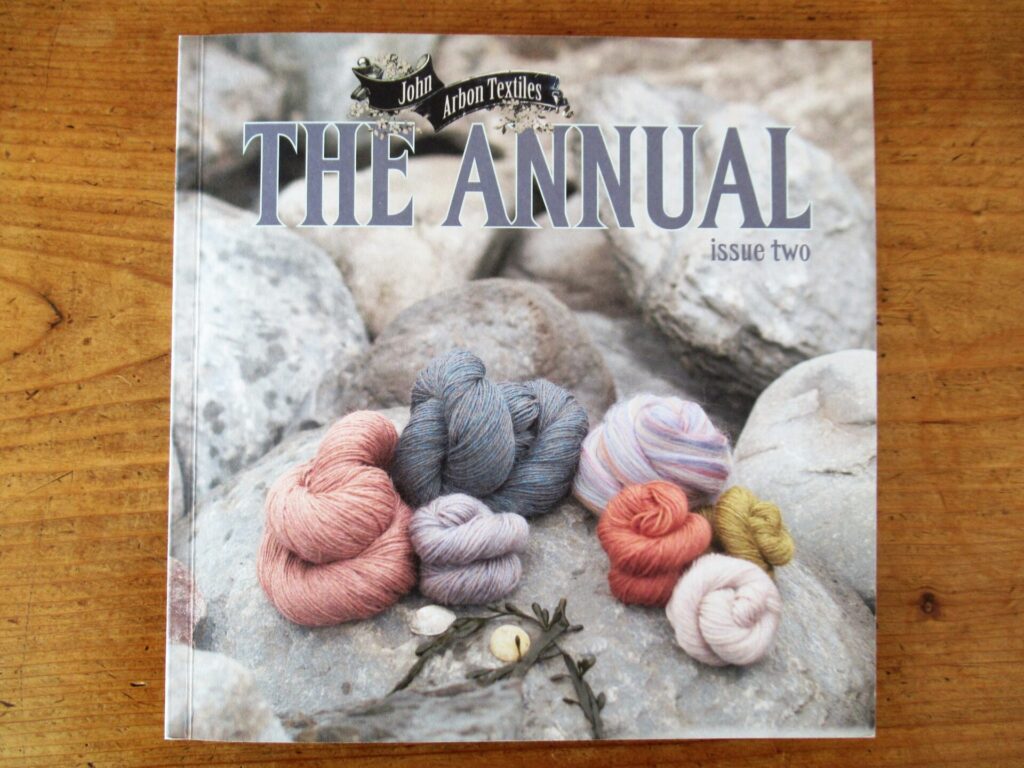
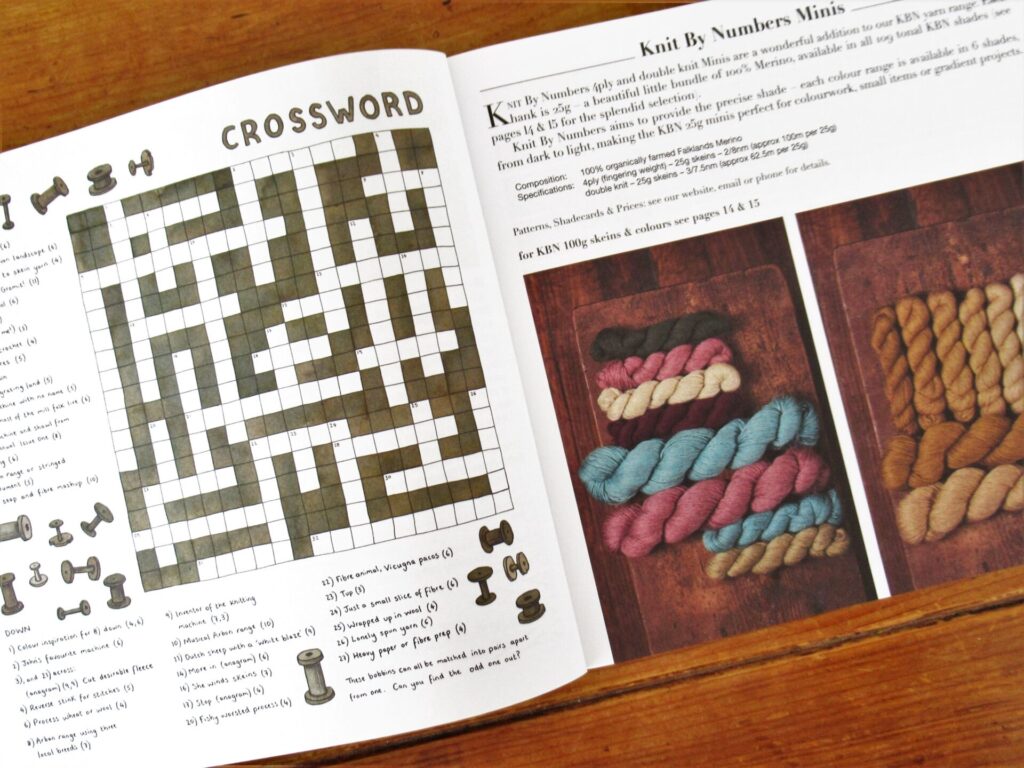
John Arbon Textiles is a small-scale spinning mill using refurbished old machinery, located close to Exmoor in North Devon. Apart from yarns, they also produce tops for spinning. And once a year, they publish their informative and funny Annual.
It is filled with information about their yarns and tops, patterns, stories, cartoons and puzzles.
I always feel slightly uncomfortable talking about yarn brands, shops etc. It’s as if I’ve been hired to promote them, which I’m not. I just want to share information that may be of interest to other knitters and spinners. Several years ago, we spent a summer holiday in Devon and camped close to John Arbon Textiles without knowing they were there! I wish someone had shared the information with me so I could have visited them.
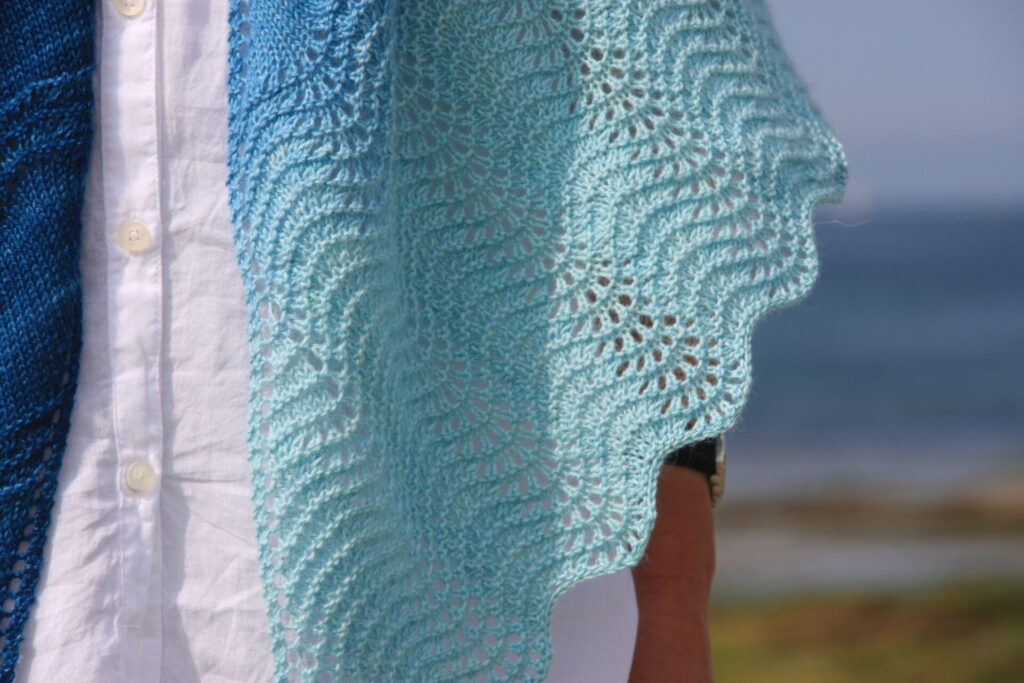
Fortunately there is always the internet. I’ll give you a link to their website at the end of this post. But before you zap away from my blog, I’ll quickly show you what I’m going to knit from the pink mini-skeins. A pink version of Morbihan, a shawl I first designed for a different yarn in a gradient of blues. This is the original.
The pattern can be found here on Ravelry. I’ll show you what it looks like in pink when I’ve made some progress. Finally, as promised, here is the link to the John Arbon Textiles website.
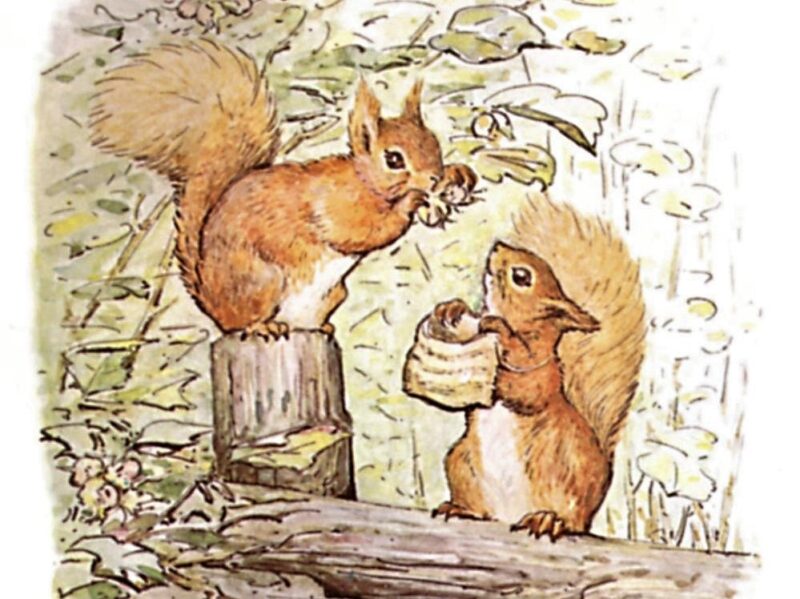
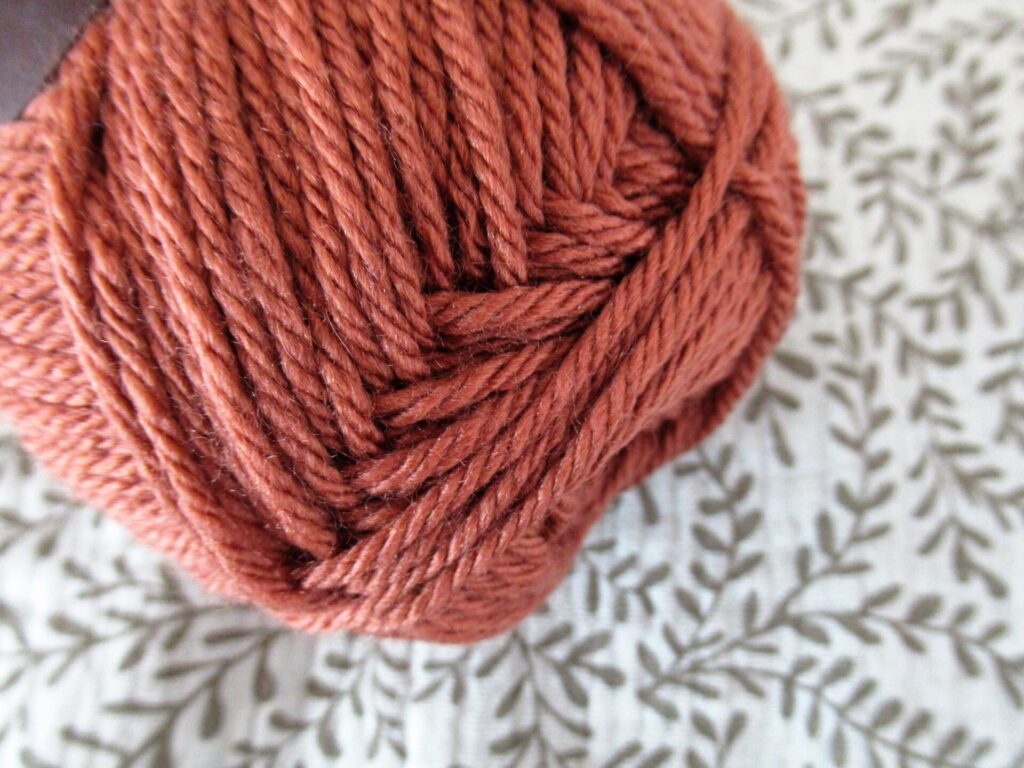
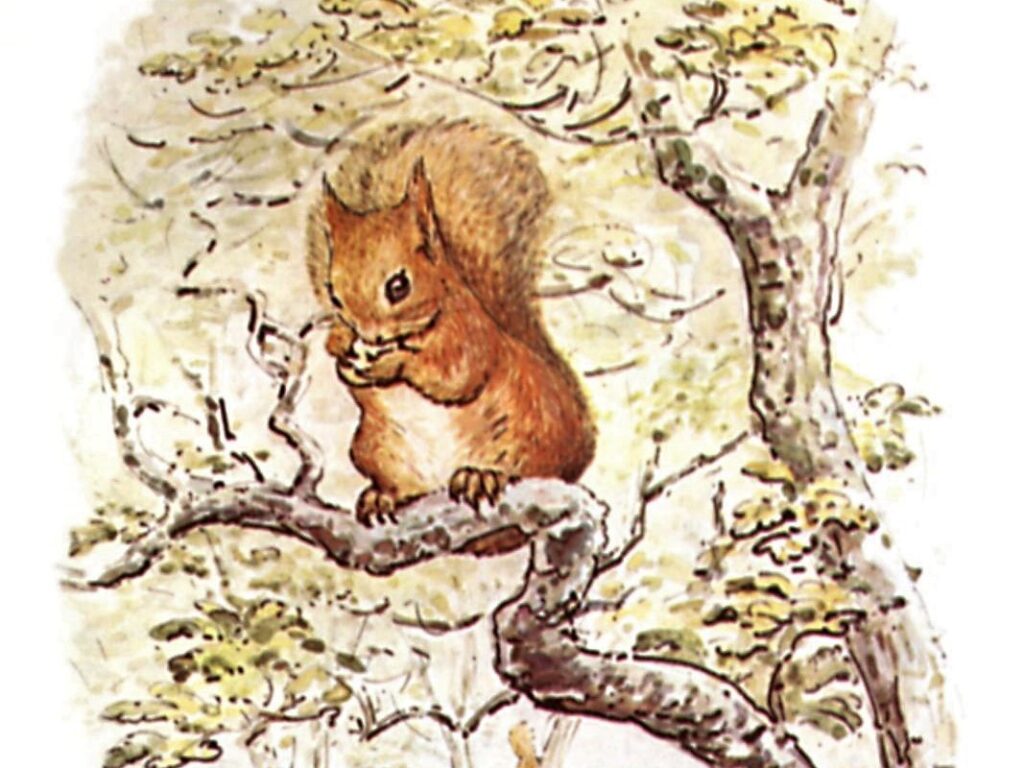
“This is a tale about a tail—a tail that belonged to a little red squirrel, and his name was Nutkin.” That is how Beatrix Potter began The Tale of Squirrel Nutkin. It was what I thought of when choosing yarn for a baby set in a colour called… Nutkin!
It really is the same warm reddish brown as a red squirrel’s coat. The other reason for choosing this colour was that the parents-to-be have indicated a preference for natural/undyed, green and brown for baby things.
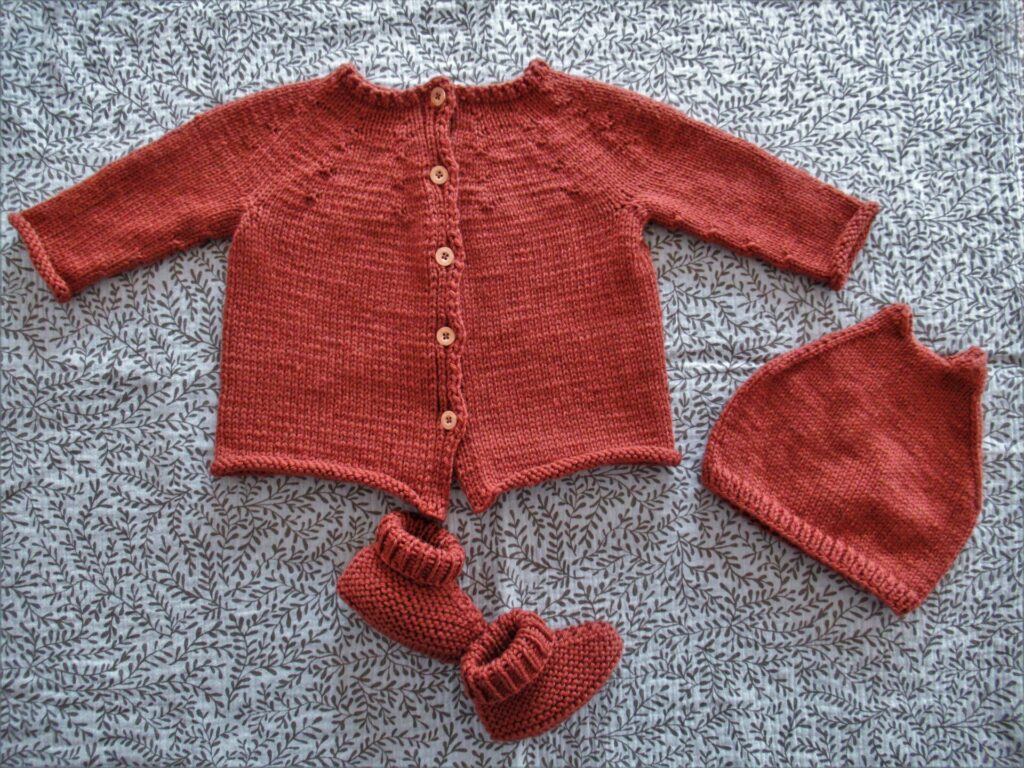
During the weekend and every evening, I knit, knit, knit… and finished the complete set within a week. These are only wee things after all.
Some of the things I’m making will remain a surprise until after the baby is born, but I’m giving them this set beforehand. It looks deceptively easy all in stocking and garter stitch, but certainly isn’t for novice knitters.
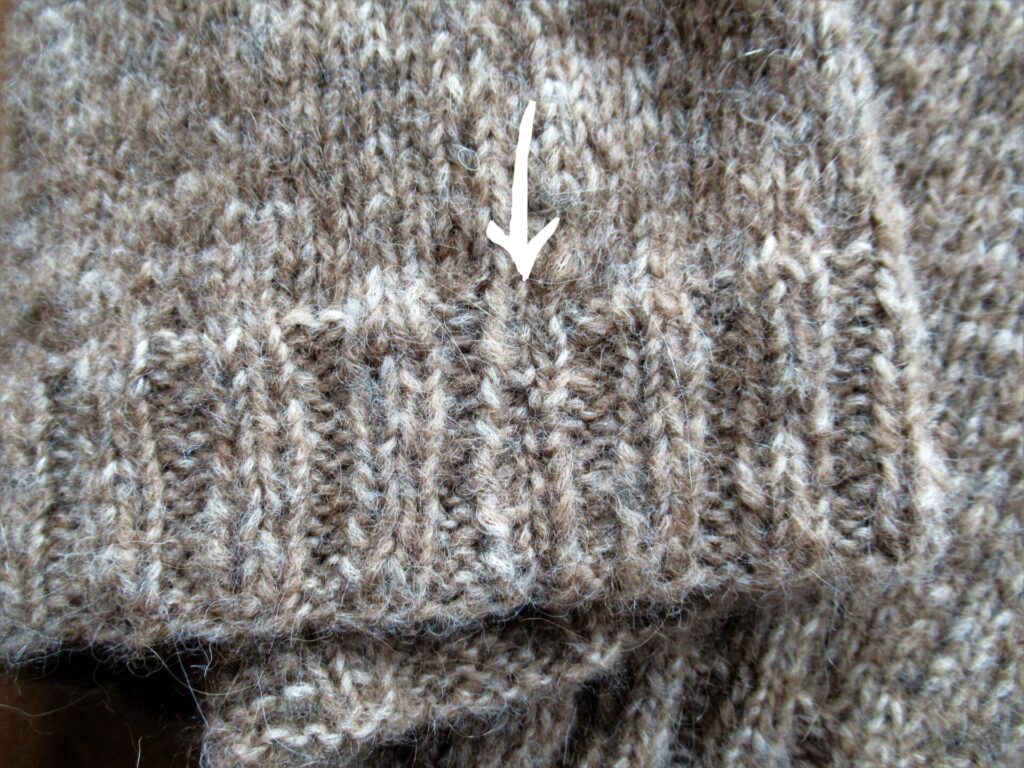
I had some trouble keeping track of the different increases and the button holes at the same time. I also had some difficulty with the place where the sleeves meet the fronts and back. To be honest, I was unable to prevent fairly large holes from appearing no matter how hard I tried and had to cheat a little to close them. The ears on the hat were not easy to get right, and the bootees were a bit fiddly.
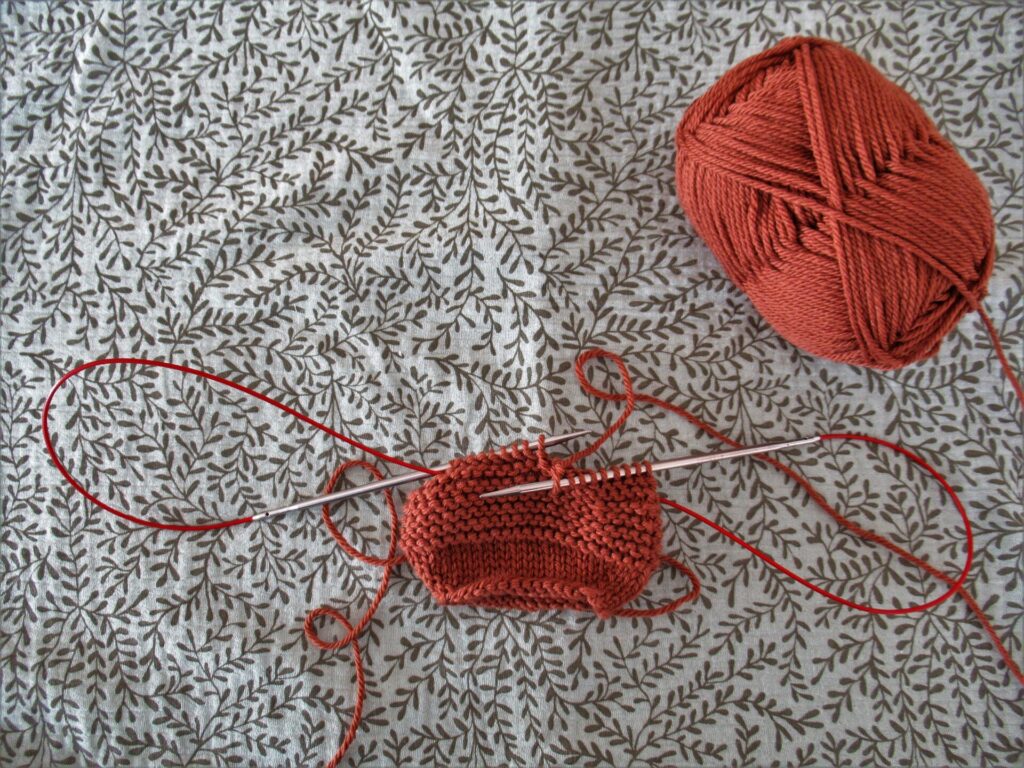
The patterns ask for double pointed needles in three different sizes. I didn’t have all of those, so used circular needles and the magic loop method for the hat and bootees.
They take some patience and concentration, but all in all, these are very nice little projects. (All of them can be found here on Ravelry.) What I like most of all are the small pointy ears on the hat – they really look a lot like Squirrel Nutkin’s ears.
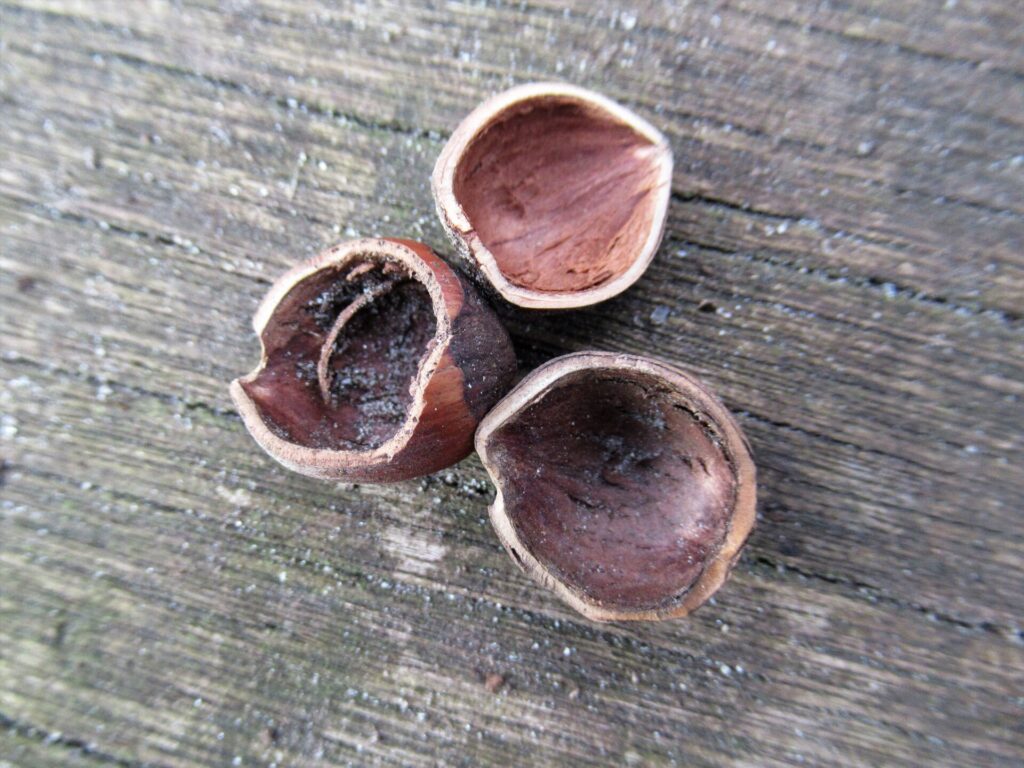
Last autumn, a red squirrel visited our garden every day. We have lots of hazel bushes bordering our garden, and we watched it burying hazel nuts all through our garden and our neighbours’ for weeks on end. Now, when it is time to dig them up and eat them, we don’t so much as catch a glimpse of the squirrel. But we do see the empty nutshells it leaves behind.
Not all of the nuts were eaten by the squirrel, though. I’ve collected some and tried to find out who made which holes. These halved ones were 100% certain cracked open by an adult squirrel:
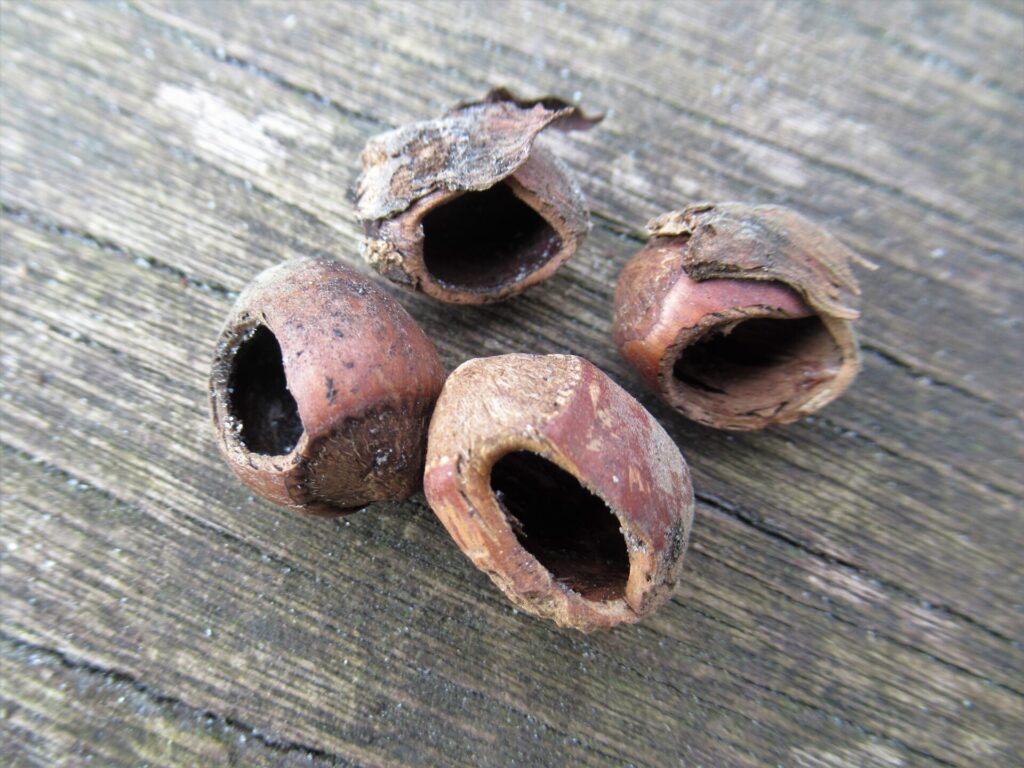
At first I thought that the ones with the oval holes were all left behind by the great spotted woodpecker:
But looking more closely, I’m not so certain anymore. Some of them look pecked out with a sharp beak, but others (like the one on the right) clearly have tooth marks around them. Hmmm… A young squirrel perhaps? How long does it take for a squirrel to become an adult? Or could it have been a mouse?
And then there are those with small round holes drilled into them:
I haven’t been able to find out whose marks these are yet. Some kind of insect? There is so much I don’t know.
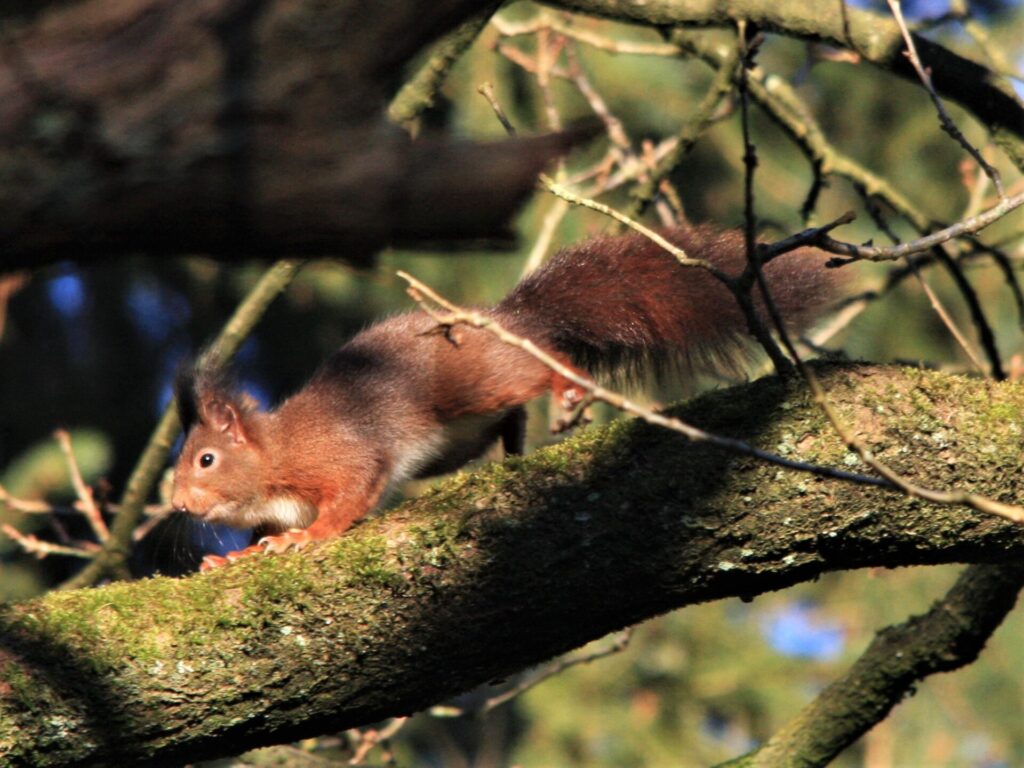
Red squirrels have become fairly rare in our surroundings over the years. We do not see them very often. But last week, my husband was lucky and saw no less than four of them on one walk, twice two together. This is one of the pictures he took:
In appearance it looks a lot like the squirrels in Beatrix Potter’s lovely pictures, but in behaviour not so much. I can’t see this one carrying hazelnuts in sacks, or rafting on a lake using its tail as a sail.
I only discovered Beatrix Potter’s delightful tales as a teenager. Did you grow up with her stories? Which one is your favourite?
March is giving us many gloriously sunshiny days this year. The weather seems very much at odds with the world news. But the sun will shine, regardless of what we’re up to down here on Planet Earth.
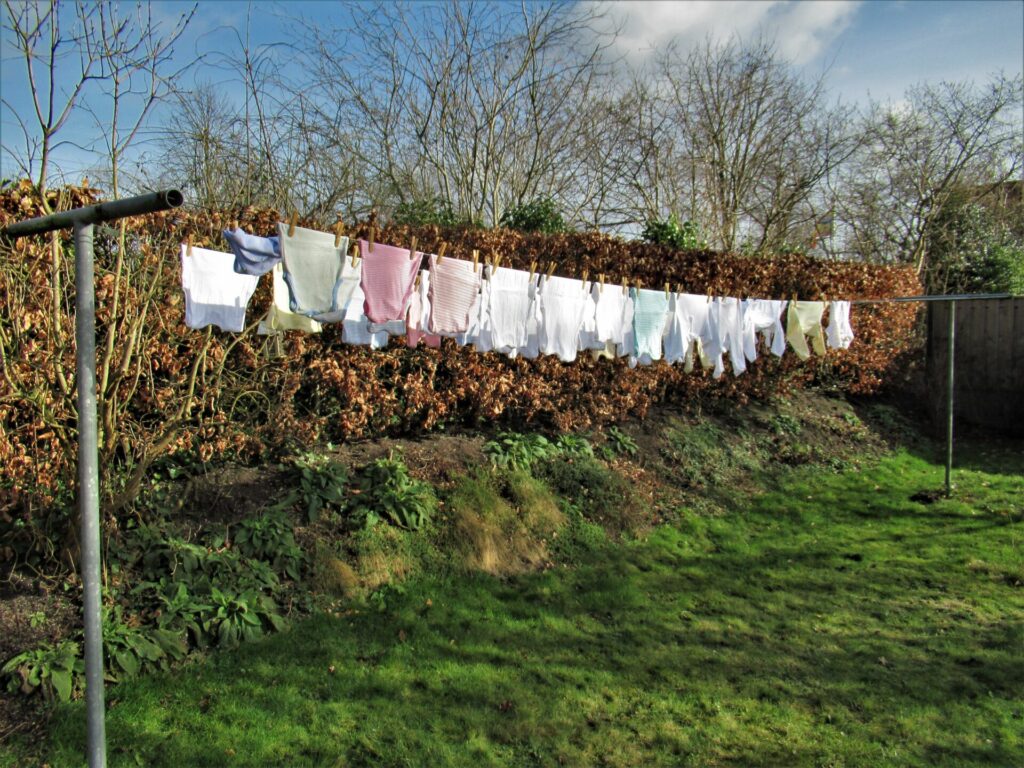
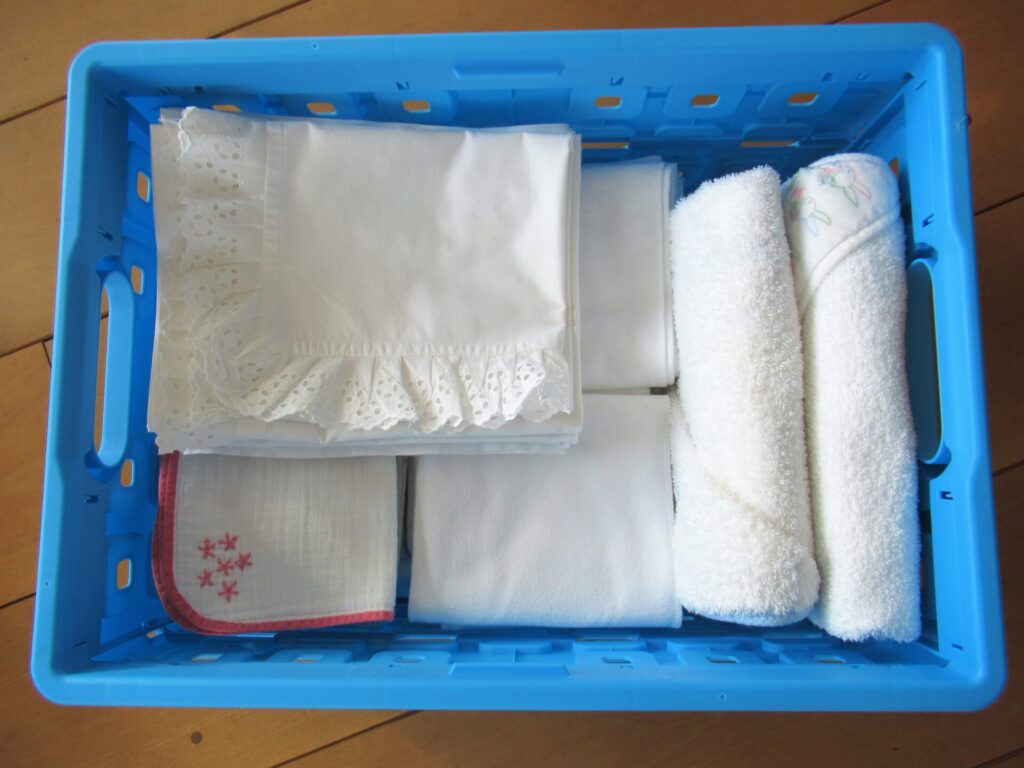
I’ve used some of these sunny days to wash baby things. I’ve given most of our daughter’s clothes and other stuff away, but kept some, too. After nearly three decades in the attic they’d become rather musty. Now, after a wash and a day in the sun and the wind, all sweet-smelling and neatly folded, they are ready and waiting for her baby.
I’ve been busy knitting, as well. When I first thought of publishing some of my designs on Ravelry, I had a conversation with myself that went something like this:
‘But if I become a Ravelry designer, does that mean that I can never knit from a pattern anymore? In that case, I’d rather not.’ ‘Don’t be silly. Of course you can continue knitting from patterns!’ ‘Oh, that’s a relief! Because, you know, there are so many beautiful designs around. And it’s just so nice when someone else does all the thinking, swatching and maths for you.’
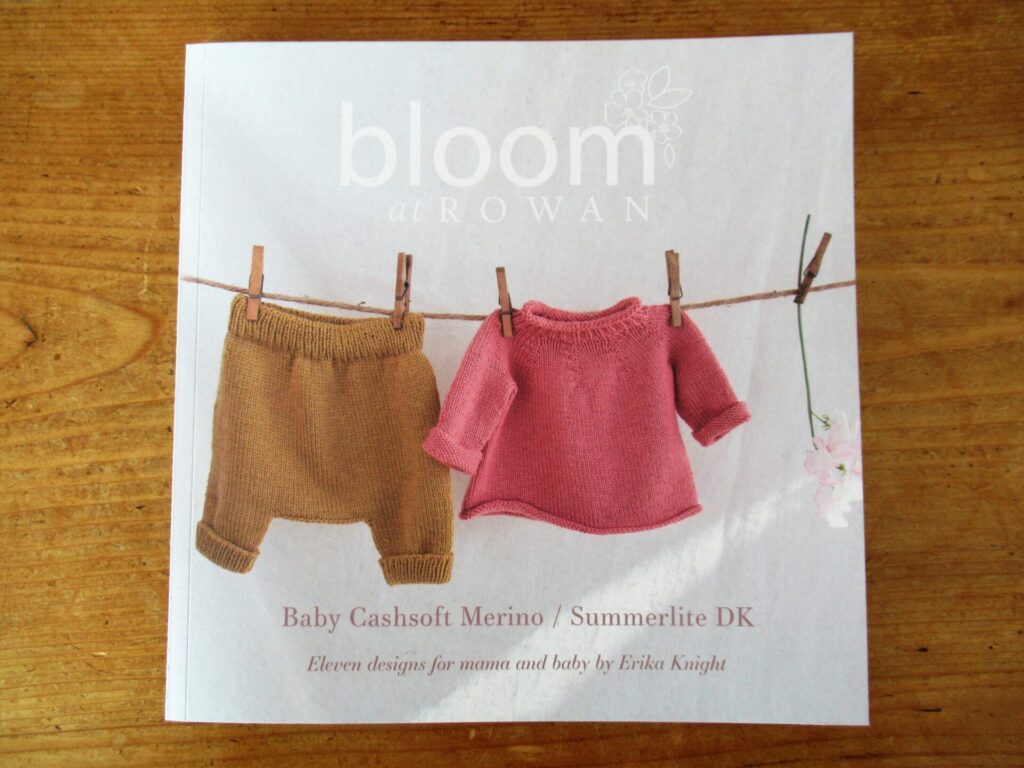
At the moment, I’m knitting from this booklet – Bloom at Rowan:
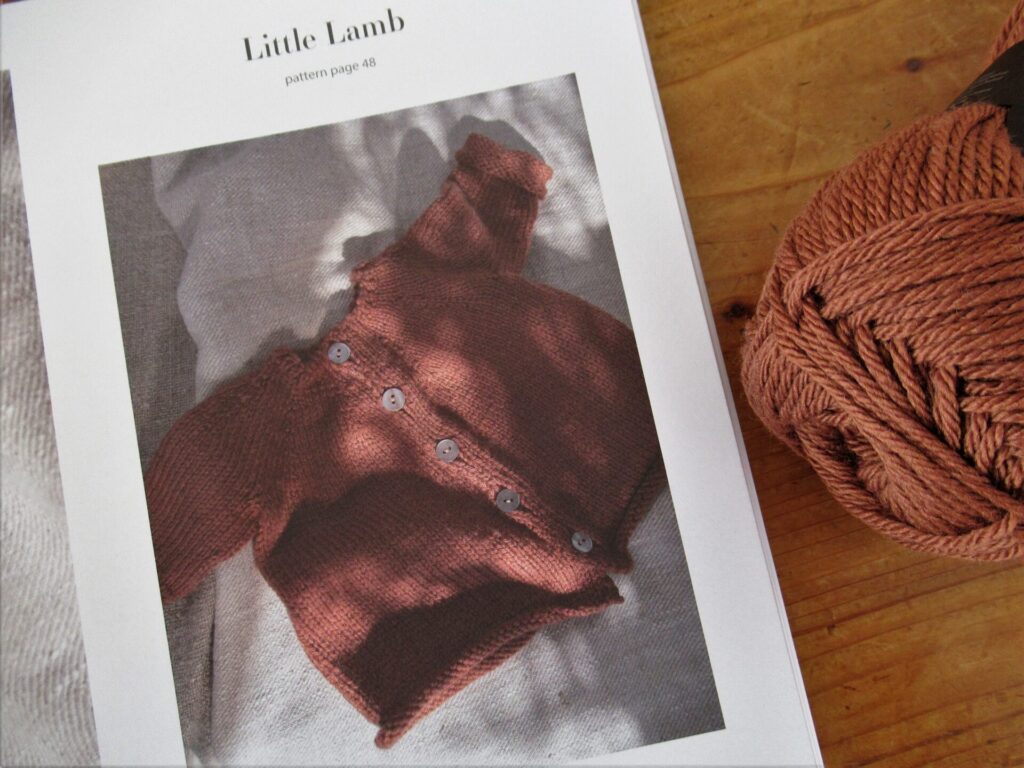
It contains 11 designs by Erika Knight – baby things, garments for mums-to-be, a crochet blanket and a simple shawl. I’m knitting a cardigan called Little Lamb, and have even chosen the same yarn and colour used in the pattern.
Terribly uncreative, but so very nice and relaxing. I’m going to knit the matching hat (with ears!) and bootees as well.
Meanwhile I’m also working on a baby design of my own. Here is a peek. More about it when it’s finished (which may take a while.)
While I’m knitting for our first grandchild, I’m beset with worries. No need to spell them out, I think.
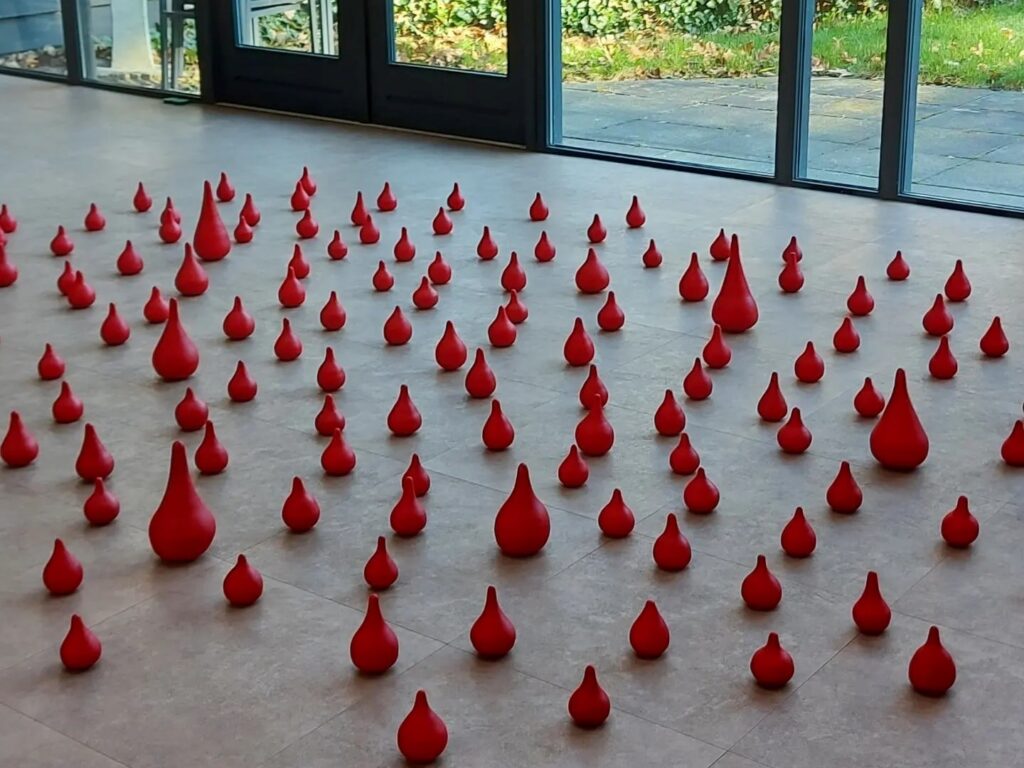
A group of Ukrainian refugees is now staying in a holiday accommodation near us. (Interestingly, the same accommodation housed a group of Russian refugees from 1945-1947.) There is a special fund to provide them with everything they need, and we are asked to contribute by buying some of these ‘drops’:
A donation often feels like a drop in the ocean, but in this case I know it really helps. I hope these people will feel safe and welcome here. More information about this small initiative here.
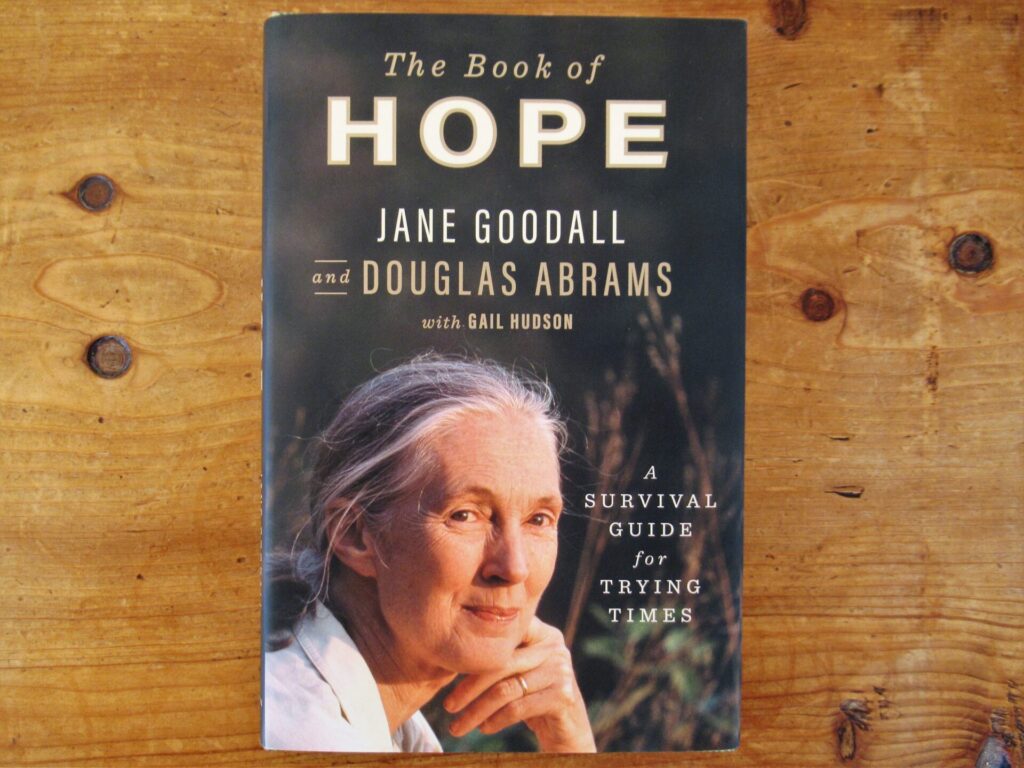
Speaking of hope – I’m reading this:
The Book of Hope: A Survival Guide for Trying Times by Jane Goodall and Douglas Abrams. (NL titel: Het boek van hoop: levenslessen voor een mooiere toekomst)
I haven’t finished reading it, so can’t write review, but here are a few quotes:
‘Hope is often misunderstood. People tend to think that it is simply passive wishful thinking: I hope something will happen but I’m not going to do anything about it. This is indeed the opposite of real hope, which requires action and engagement.’
‘Hope is contagious. Your actions will inspire others.’
Instead of just showing you the cardigan I’ve designed and knit for our daughter, I thought it might be more interesting to tell you how I did it.
There are many approaches to designing things, of course. This is merely my simple, practical way for designing a sweater knit from the bottom-up in pieces sewn together later. I’ve developed this method over the years and have tried to summarize it in 10 (hopefully easy to follow) steps. So, here we go.
How to Design Your Own Sweater in 10 Steps:
1 – Decide what you’re going to make For whom would you like to knit a sweater: For yourself? A loved one? What type of sweater would you like to make: A pullover? A cardigan? A summer top?
2 – Take measurements and draw a diagram Find a garment with approximately the fit you’re looking for and measure:
Chest width
Length
Armhole
Neck width and depth
Width at shoulders
Sleeve length
Sleeve circumference at wrist
Any other things you think may be useful
The chest/shoulder/armhole part is the most important. The rest is easy to adapt. Draw a diagram incorporating these measurements. It doesn’t need to be to scale, it’s just for your own reference. This is mine:
3 – Think about what you want and draw another diagram Things to consider are:
Details: buttons, pockets, stitch pattern, ribbing or no ribbing…
Add any relevant measurements to your new diagram.
Tip: If you have never designed anything before, keep it simple. If you have a little experience, you could set yourself a challenge. I used a very simple armhole and sleeve cap:
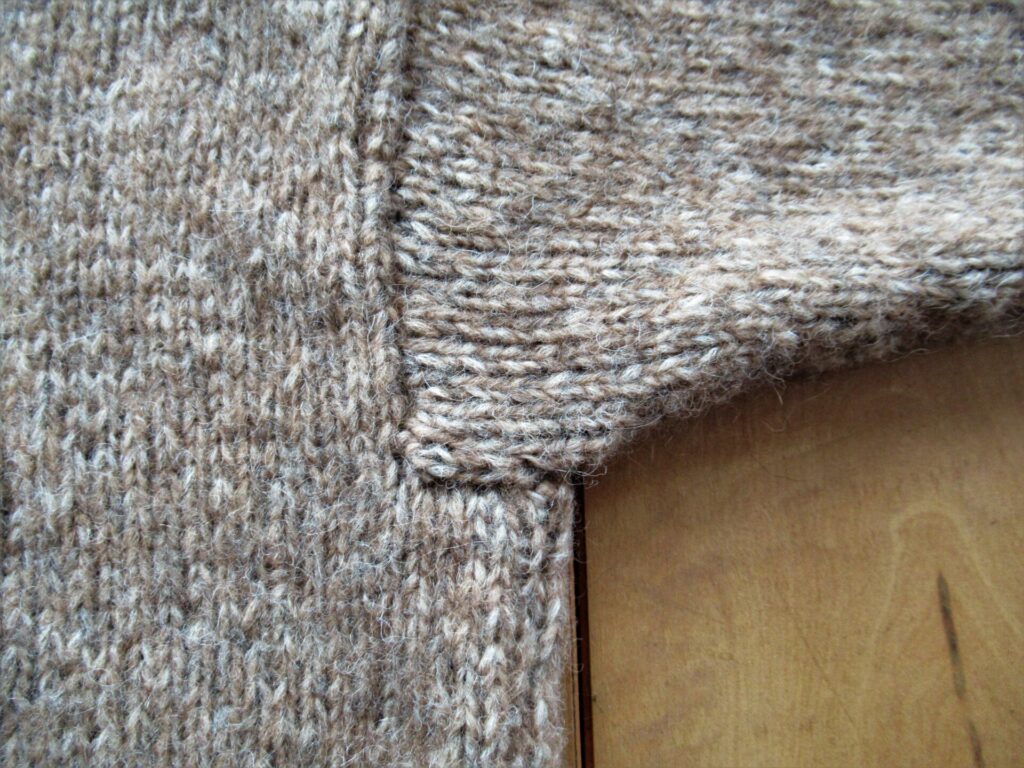
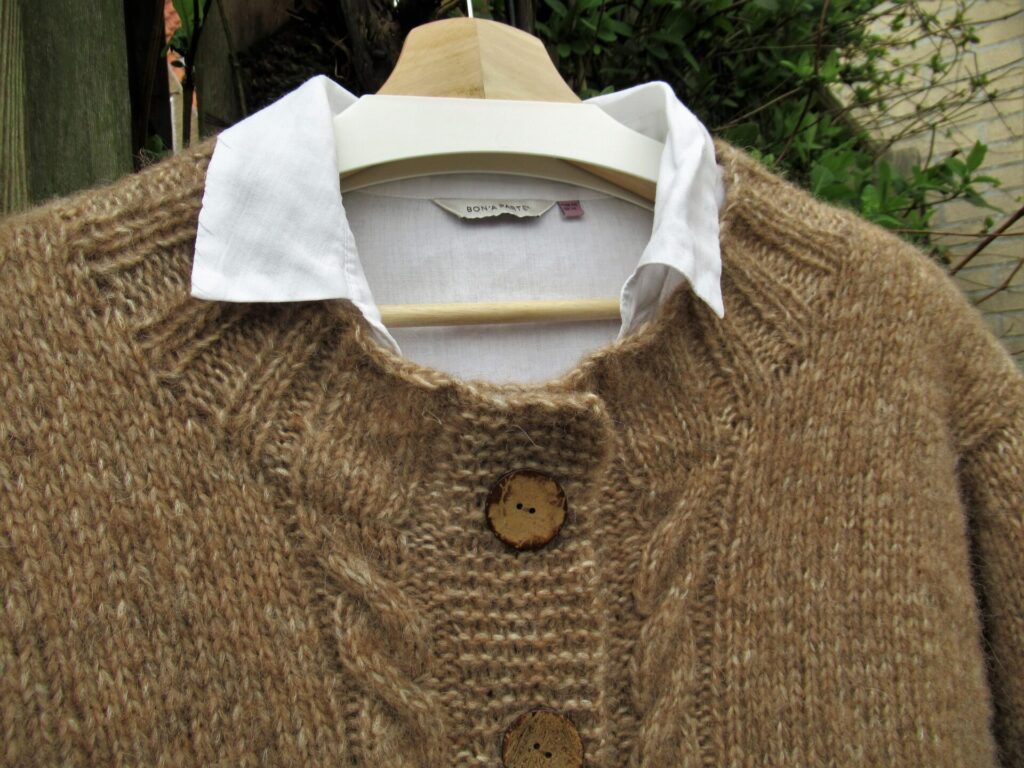
And gave myself the challenge of adding a cable, flowing from the ribbing at the bottom and into the neckband.
Another challenge I set myself was matching the ribbing of front and back so that the seam would be near invisible.
4 – Choose your yarn and work out approximately how much you’ll need If you’re an experienced knitter you’ll probably have some idea. It also helps to look at other people’s projects from the same yarn on Ravelry. Find a few similar garments in a similar size and check how much they took. Then add some extra for swatches and to be on the safe side.
Note: I did it the other way around: Fell in love with the yarn first and bought a generous quantity. Far too generous as it turns out. Never mind – it only means that I have enough left for a hat and a scarf.
5 – Swatch a – First swatch to decide what needle size you’re going to use: how open, drapey or dense do you prefer your knitted fabric for this project? Knit generous swatches – aim for at least 12 x 12 cm/5 x 5”. Wash your swatches and leave them to dry flat, or block and/or press them, just like you intend to treat your finished sweater. b – Then knit more swatches. This time in different stitch patterns and ribbings you might want to use. Again wash/block/press them.
6 – Decision time Decide what needle size(s) and pattern stitch(es) you’re going to use, how wide your ribbings and button bands (if any) will be, exactly what your neckline is going to look like, where any pockets will be placed etc. Add details to your diagram if you think that will be helpful.
7 – Start knitting the back Using your swatches, calculate how many stitches you need to cast on. Do you need to increase or decrease for, say, an A-line or waist shaping? Write down everything you do and keep your notes together. It isn’t necessary to work everything out beforehand. You can think about the armhole, neck and shoulders while knitting.
8 – Do the maths for the front(s) If you’re designing a cardigan with button bands, make sure they overlap. Work any buttonholes in the second front. Think deep about your neckline, and work out how to get what you want.
9 – Work out the sleeves How long? How many rows to armhole? How many stitches do you start with? How many do you need at the armhole? Spread the increases out over the length.
10 – Work out and knit the final details Now all you need to do is wash, block and/or press your pieces and seam everything together. Add button bands (if not incorporated), patch pockets, neckband etc.
There, all done!
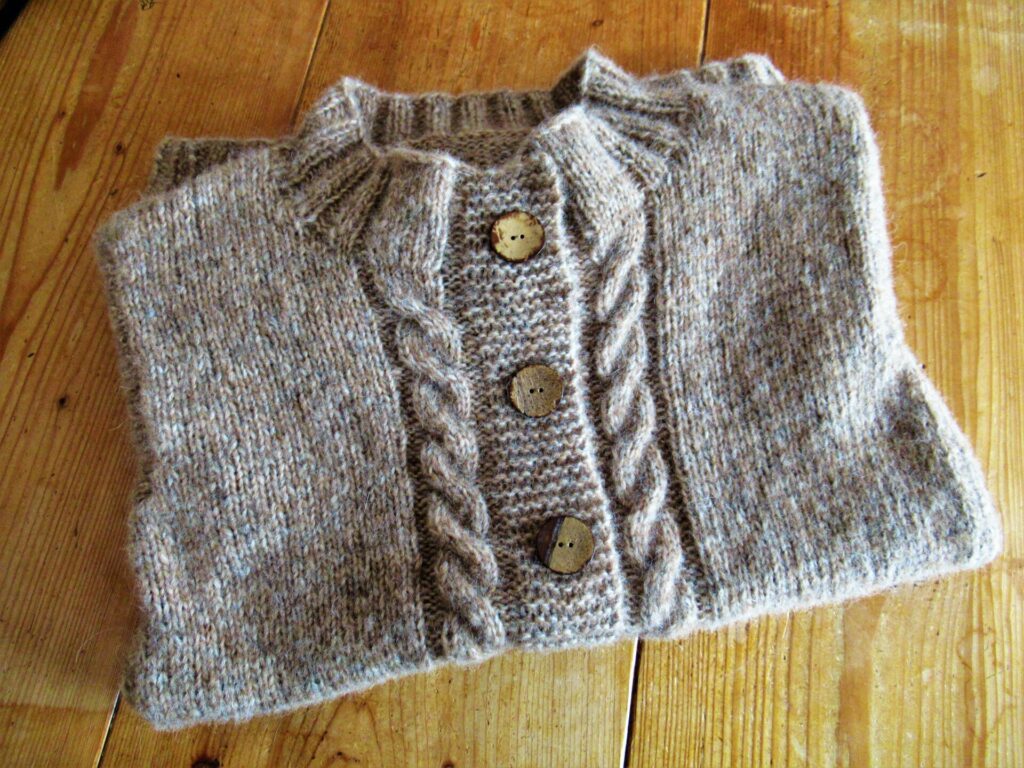
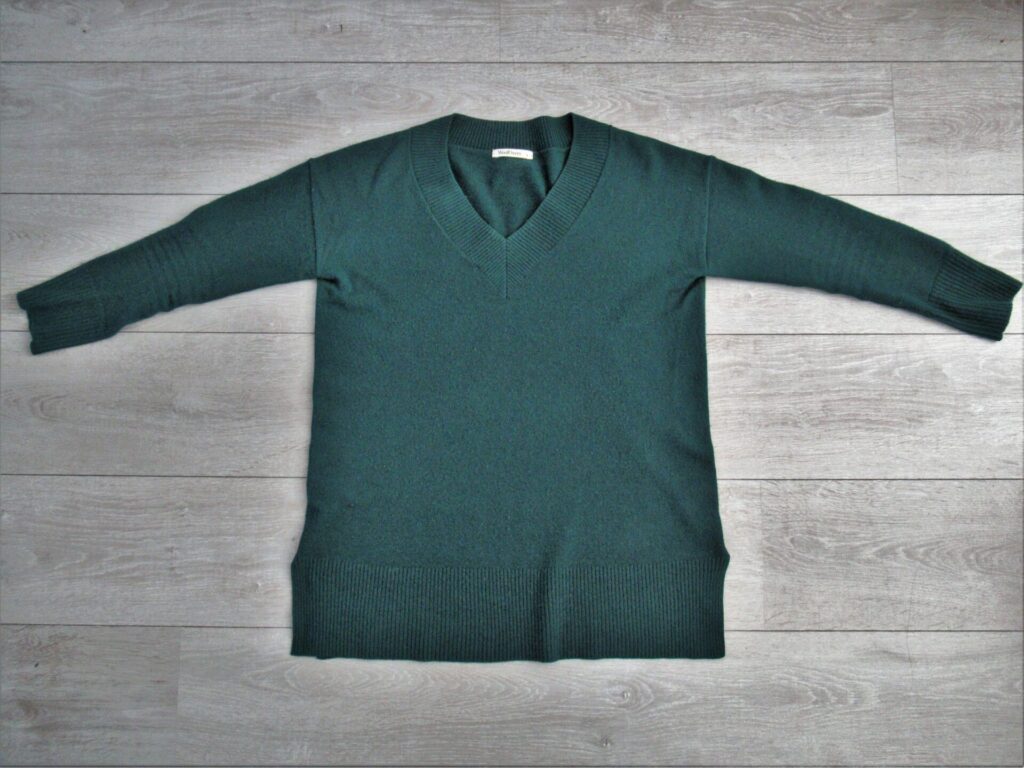
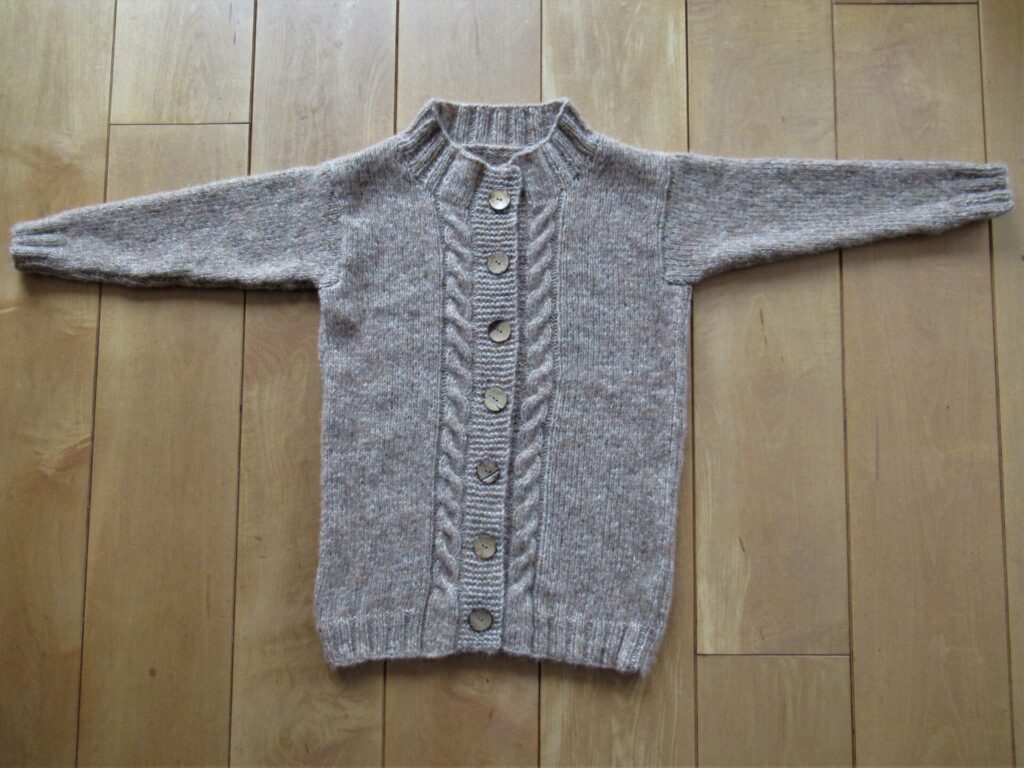
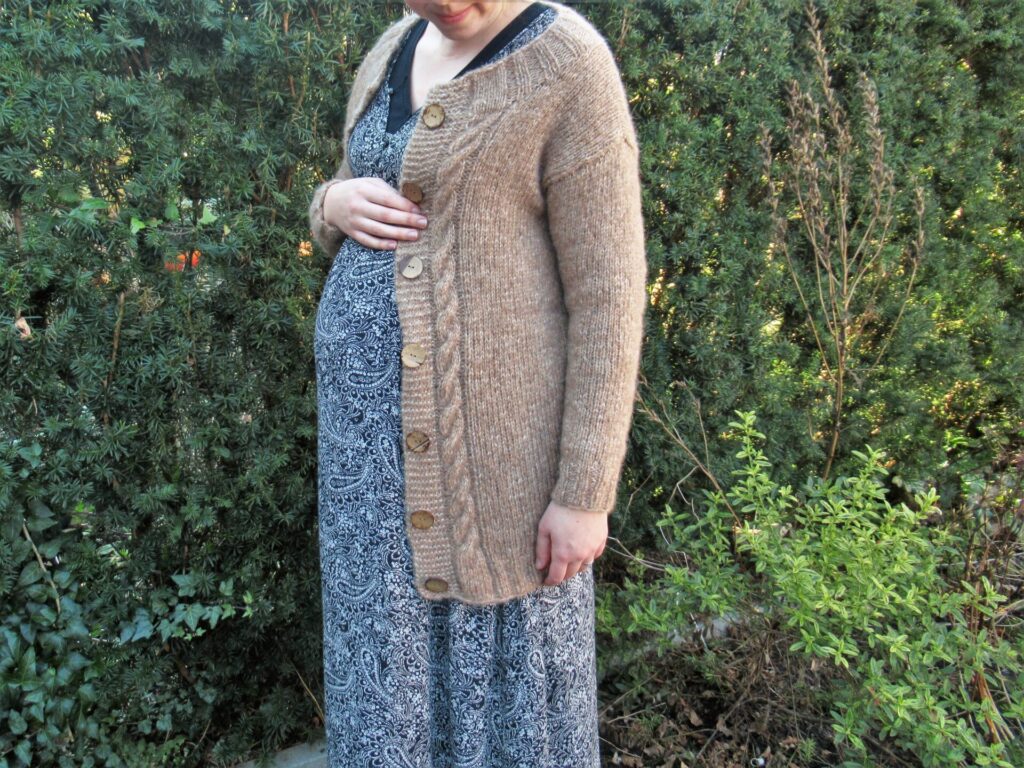
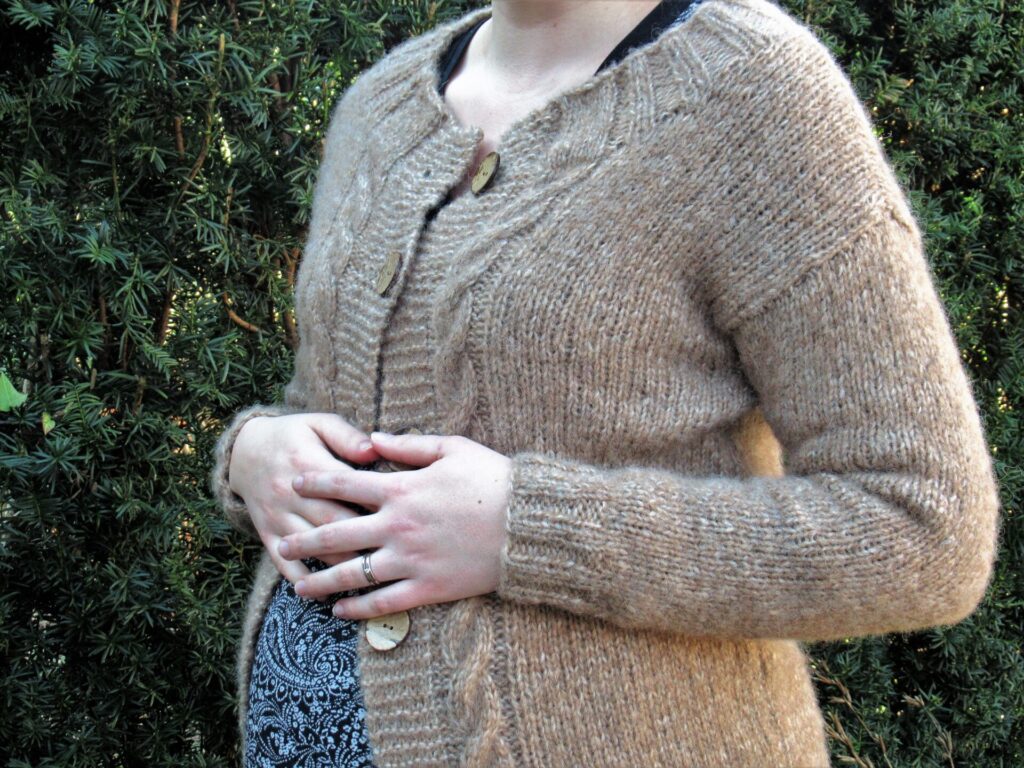
Starting from a deep green, finely knit, shop-bought V-neck pullover, I arrived at a fawn, chunky, hand-knit cardigan with a round neck and cables along the fronts.
It does not fit over our daughter’s already impressive bump, but will keep her back and shoulders warm.
With quite a few weeks to go, how much more will that belly grow?
Well, I hope this all makes sense. Do you sometimes design your own sweaters, too? Is your method very different from mine? If you’ve never designed anything yet, why not give it a try? Your sweater may not turn out perfect or exactly how you envisioned it, but it will be uniquely yours.
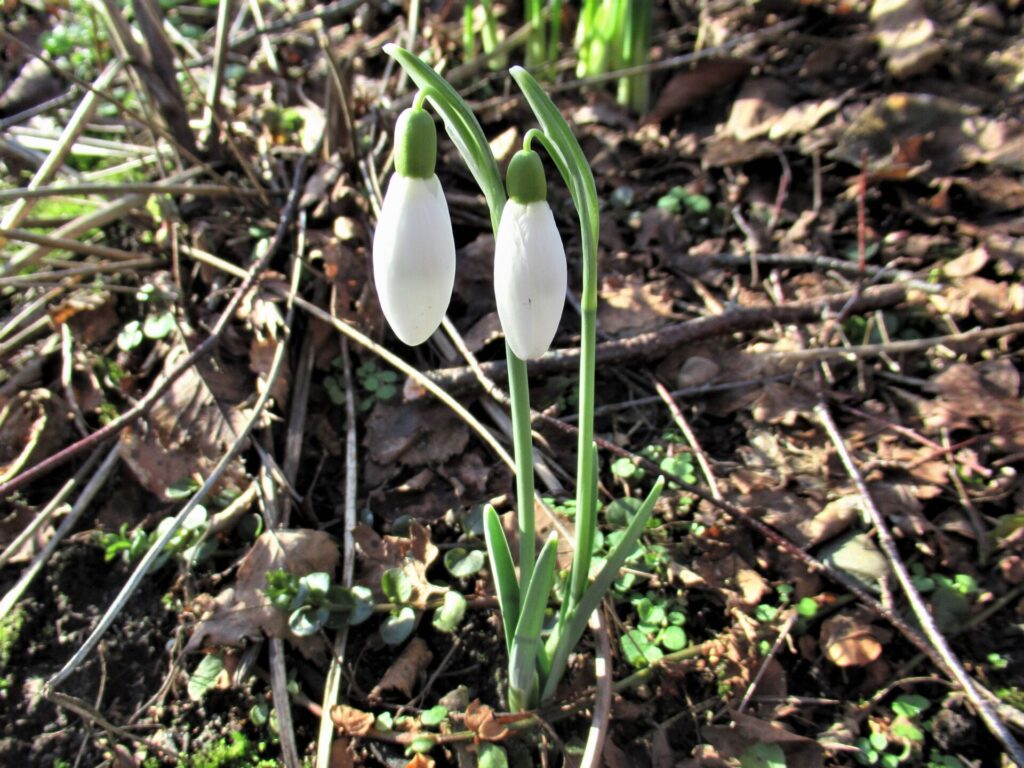
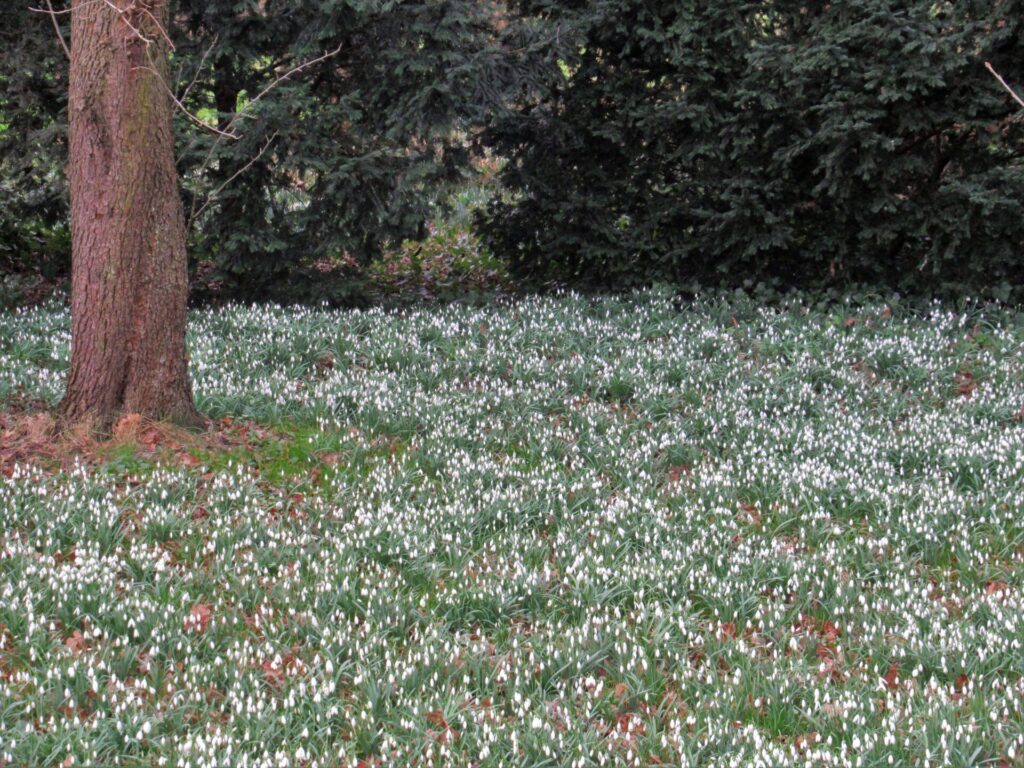
It’s snowdrop season! A garden I sometimes pass, is carpeted with them.
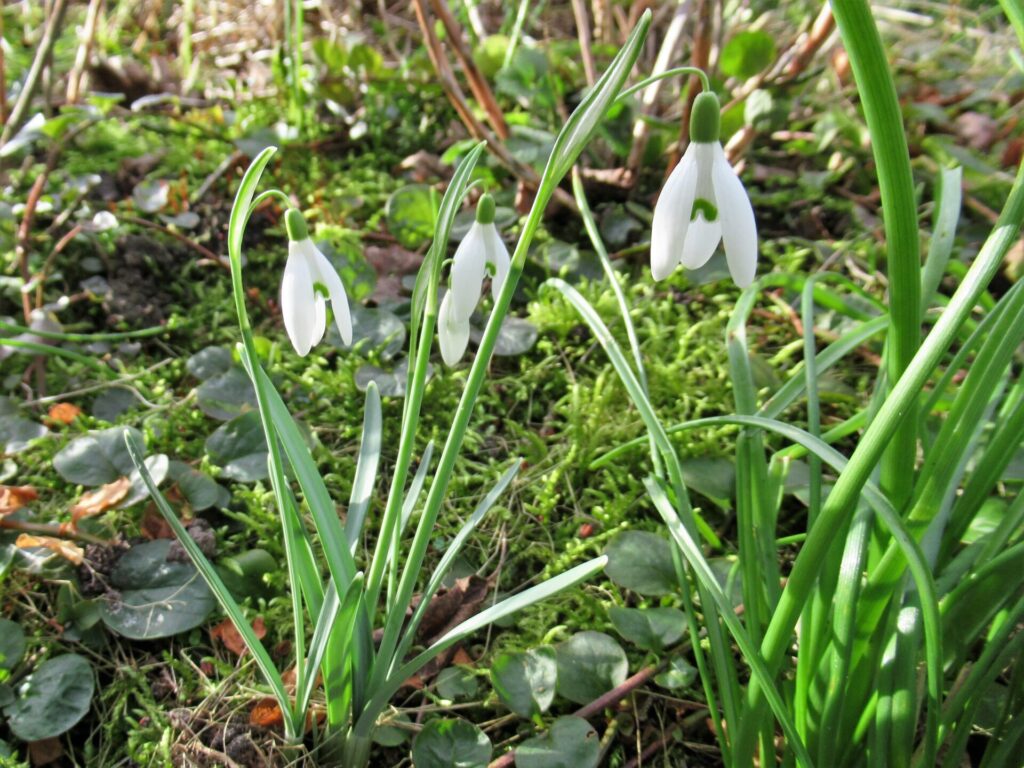
We have only small clumps here and there.
Maybe they’ll grow out to a carpet, too, over the years. Wouldn’t that be wonderful? For now, I’m very happy with the ones we have dotted through the garden. I just love their beautiful little bells.
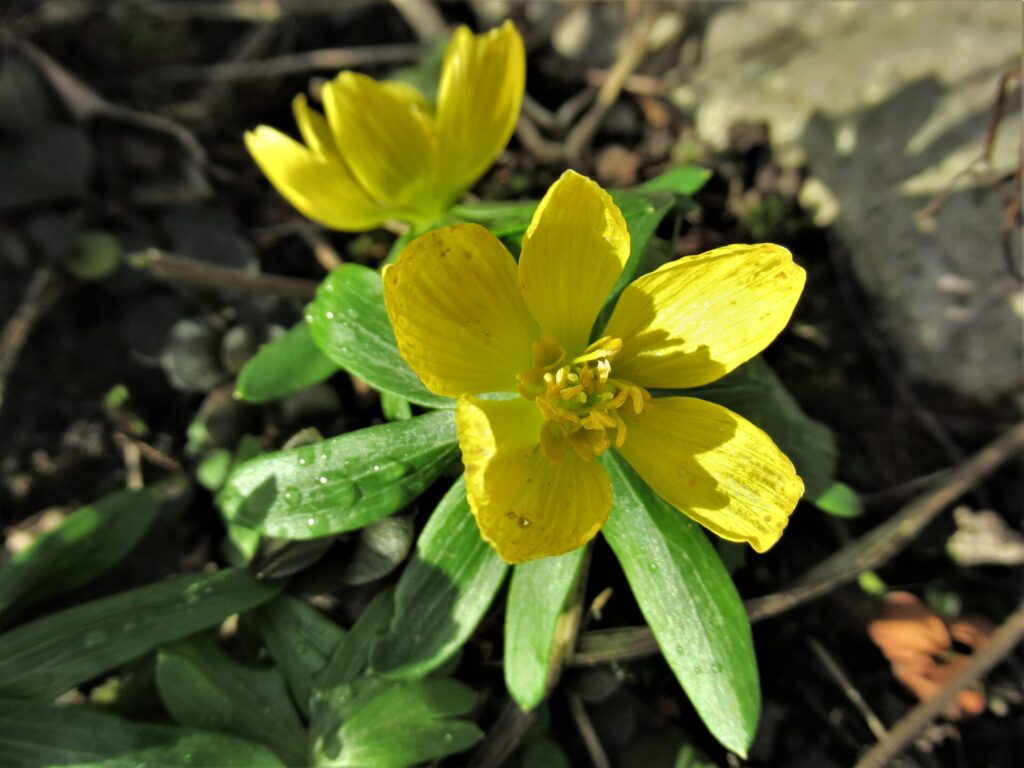
But it’s not just snowdrop season. It is also aconite season.
And iris season. We have yellow and blue miniature irises. The yellow ones are a little later, but the blue ones are in full bloom already. They are especially beautiful looked at from above.
Apart from the snowdrops, everything is earlier than normal this year. We haven’t had any real winter at all, and it feels strange to see so many flowers in the garden already. Compared to the 1950s spring arrives three weeks earlier now, according to Nature Today.
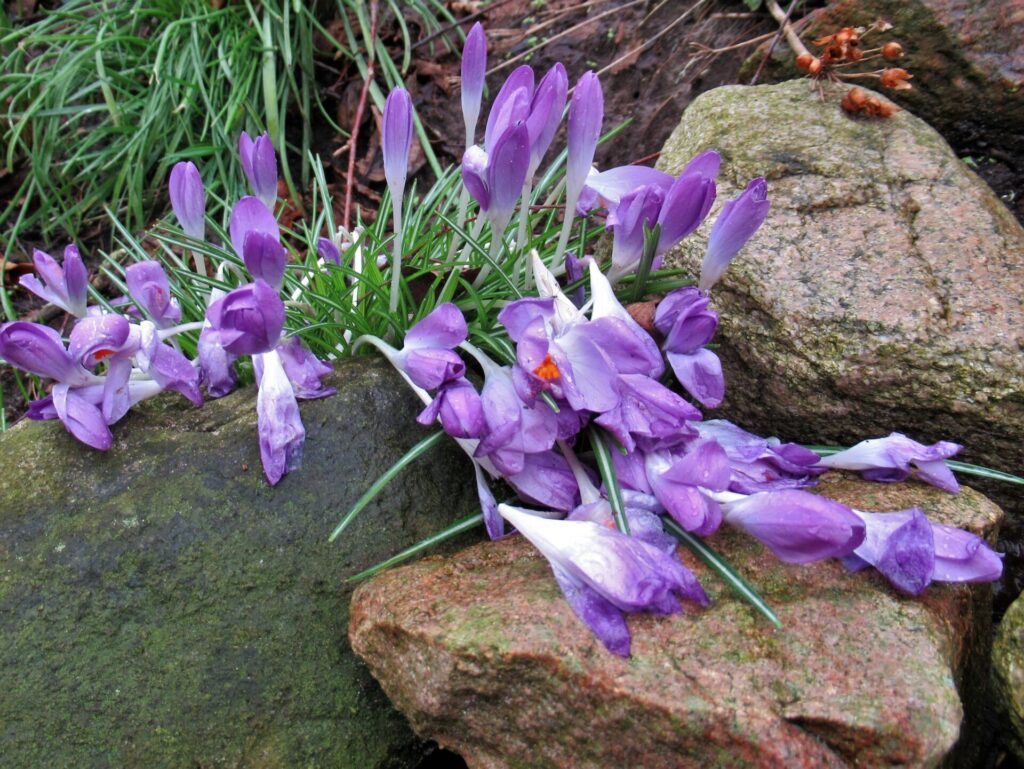
It’s crocus season, too. This is a photo I took last week:
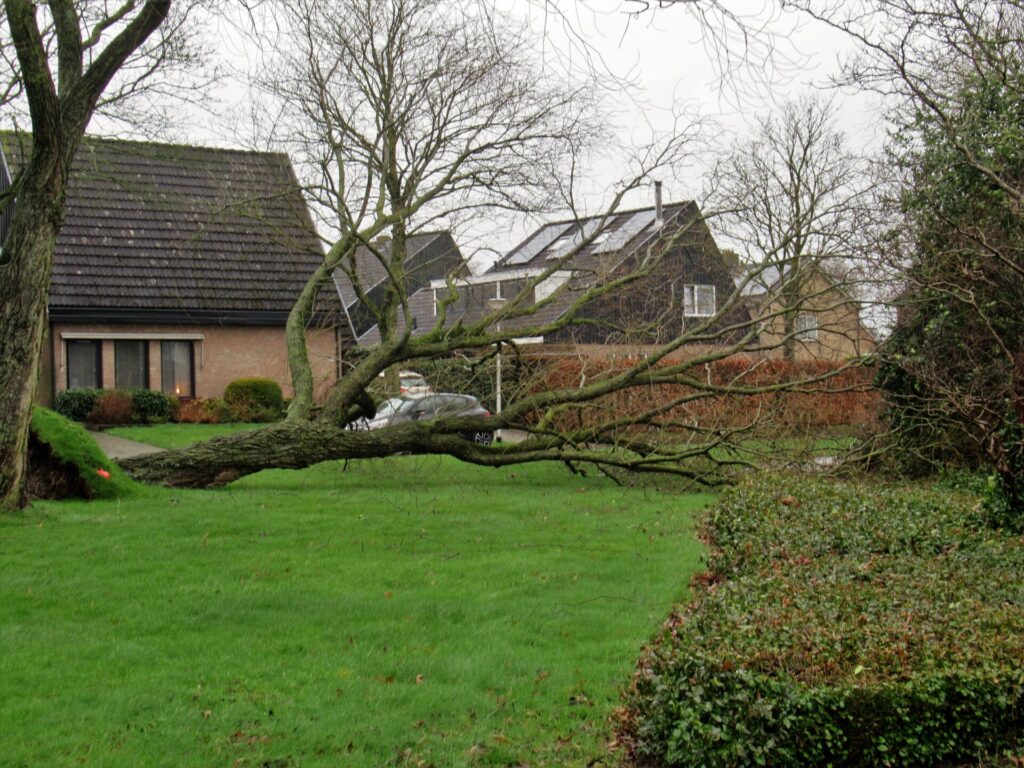
And this is what they look like after triplet storms Dudley, Eunice and Franklin raged across the country.
Especially Eunice was fierce, but we do not live close to the coast and it wasn’t as bad here as in the north and west, where it killed four people. Although the solar panels on our roof rattled dangerously, they stayed put. The strong gusts tore tiles from other people’s roofs, though, and toppled quite a few trees.
Some weeks the words flow easily from my keyboard, other weeks they do not. This is a week in the latter category. The seasickness-without-having-been-on-a-boat has gone, but my head is still tired and achy, like having a hangover-without-having-had-any-alcohol. It is also filled with worries about the storm hitting Eastern Europe.
How can I write about snowdrops and knitting at a time like this? But then again, maybe these humble little, peaceful things are more important than ever. So here is a report on my progress on the knitting front.
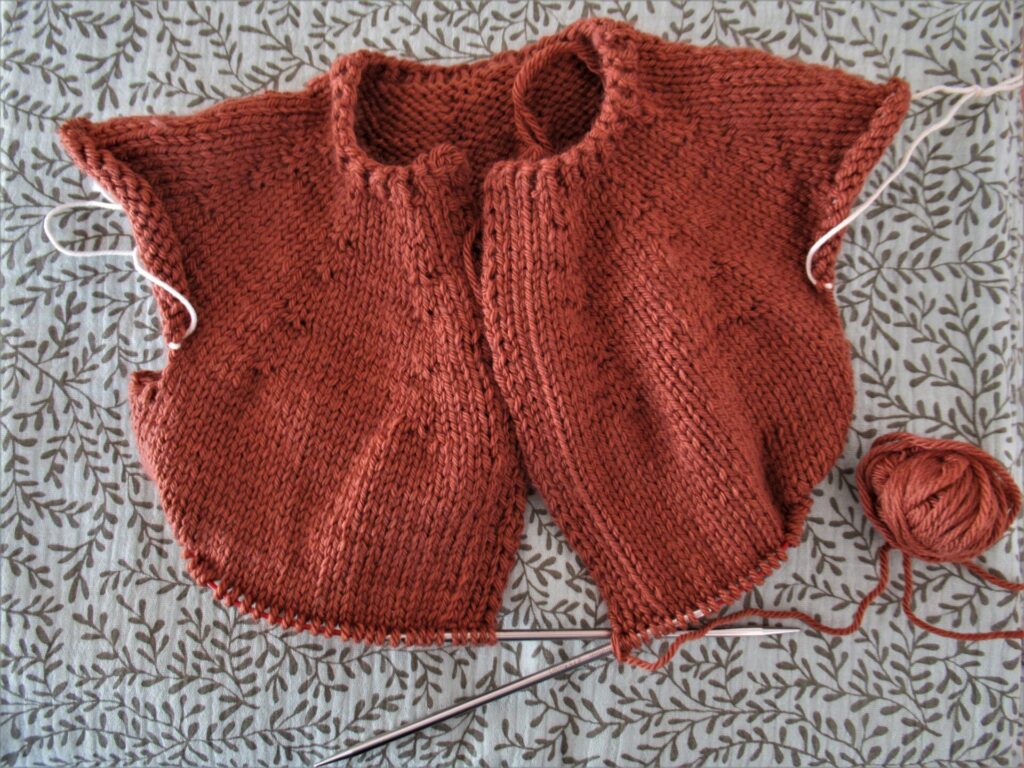
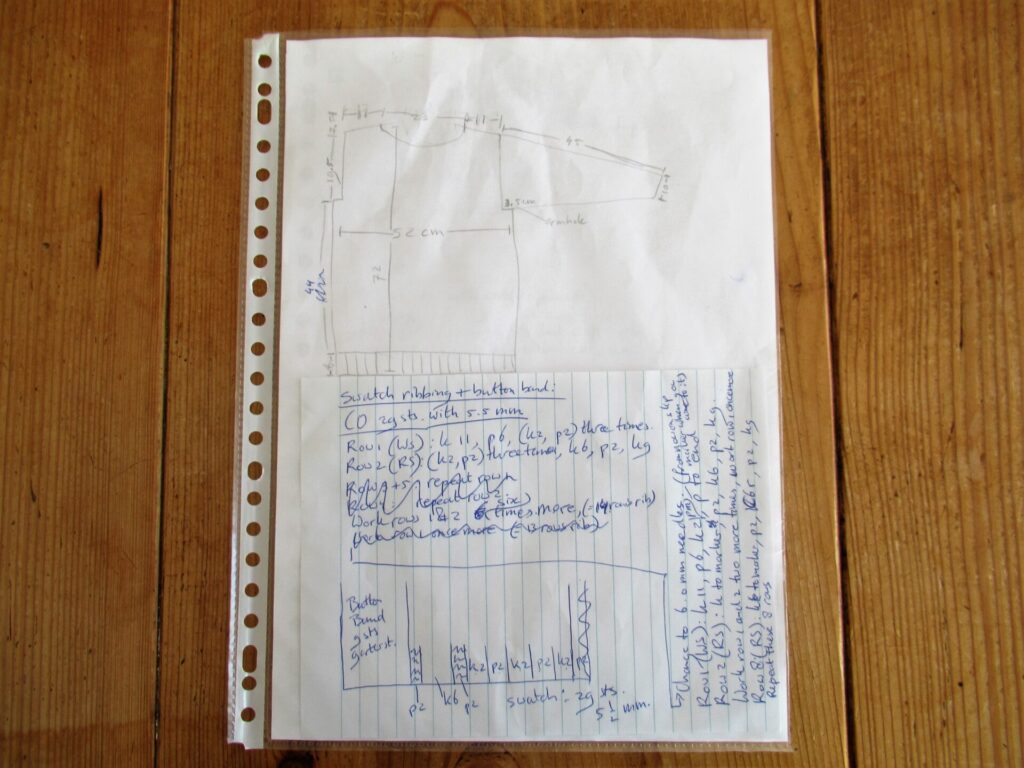
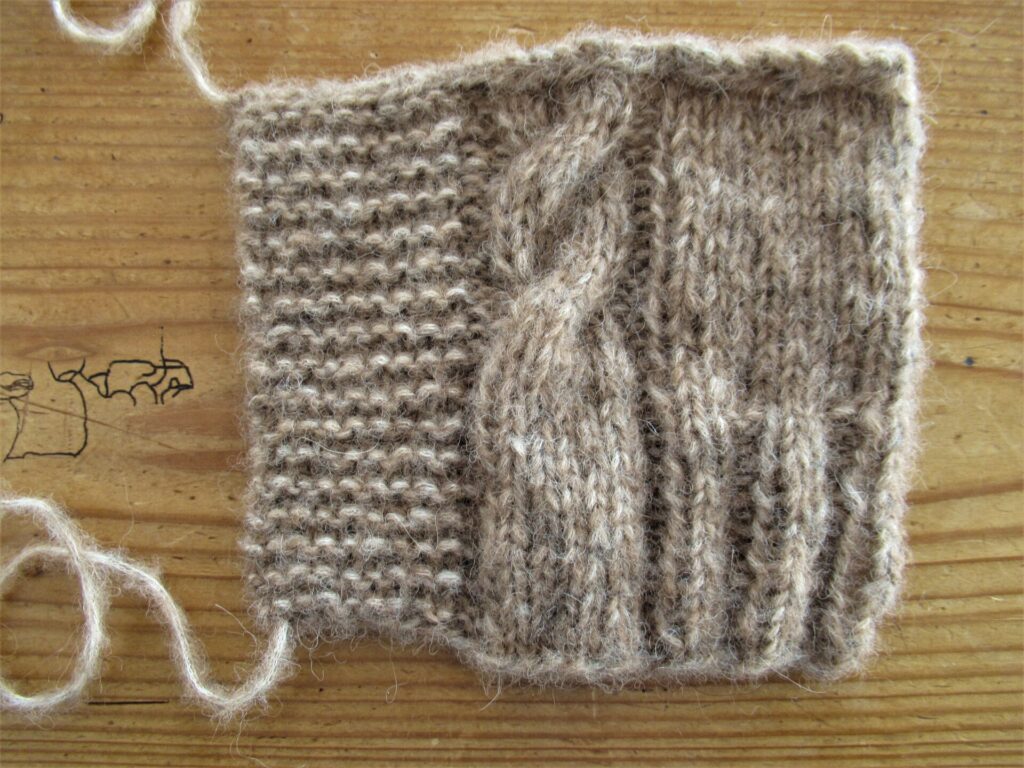
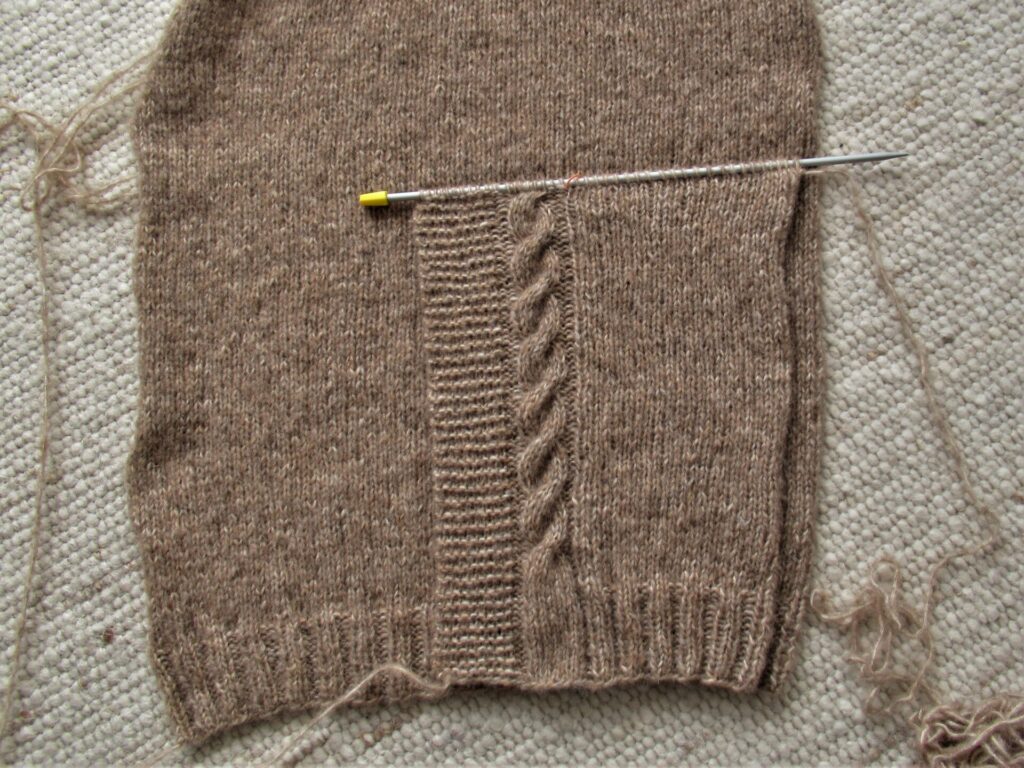
Remember the cardigan I’m designing and knitting for our daughter? (I wrote about it here.) After some initial swatching and brainstorming, I swatched some more and this is the winning swatch:
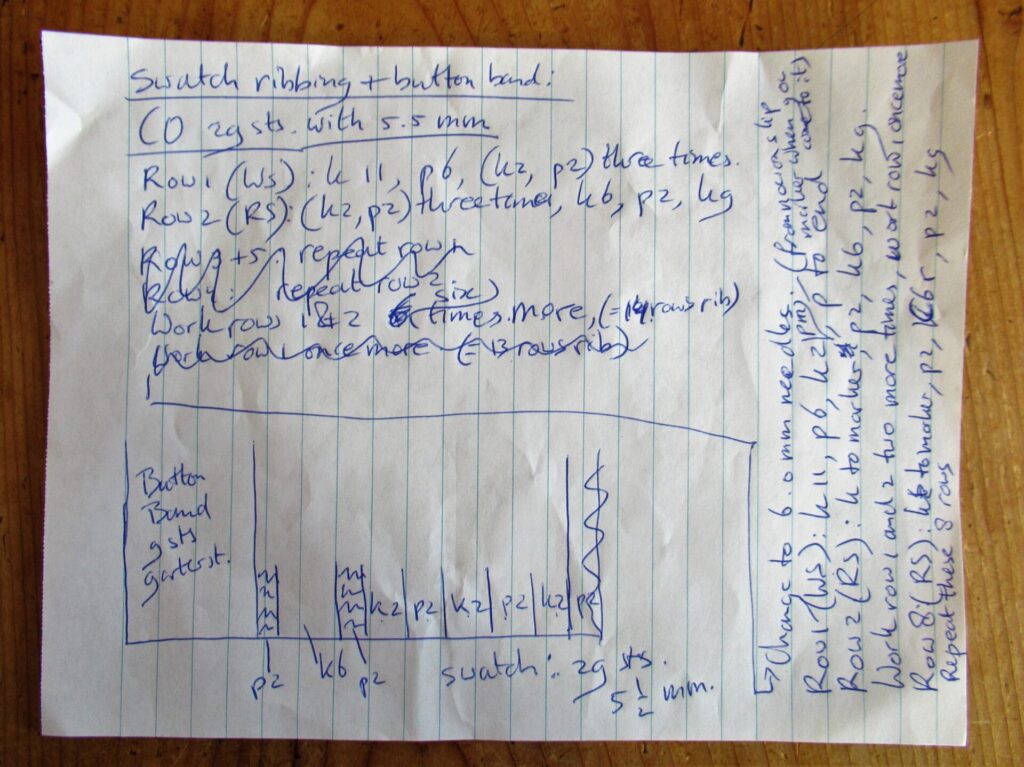
I scribbled down notes during the process.
The back was simply knit in stocking stitch. I added a cable to the front, next to the button band, but underestimated how much narrower the cable would be compared to the same number of stitches in stocking stitch. I should have made a larger swatch. Almost at the armhole, I realized that the front would be too narrow and the button bands wouldn’t overlap.
So I ripped the whole thing out, cast on a few more stitches and started again.
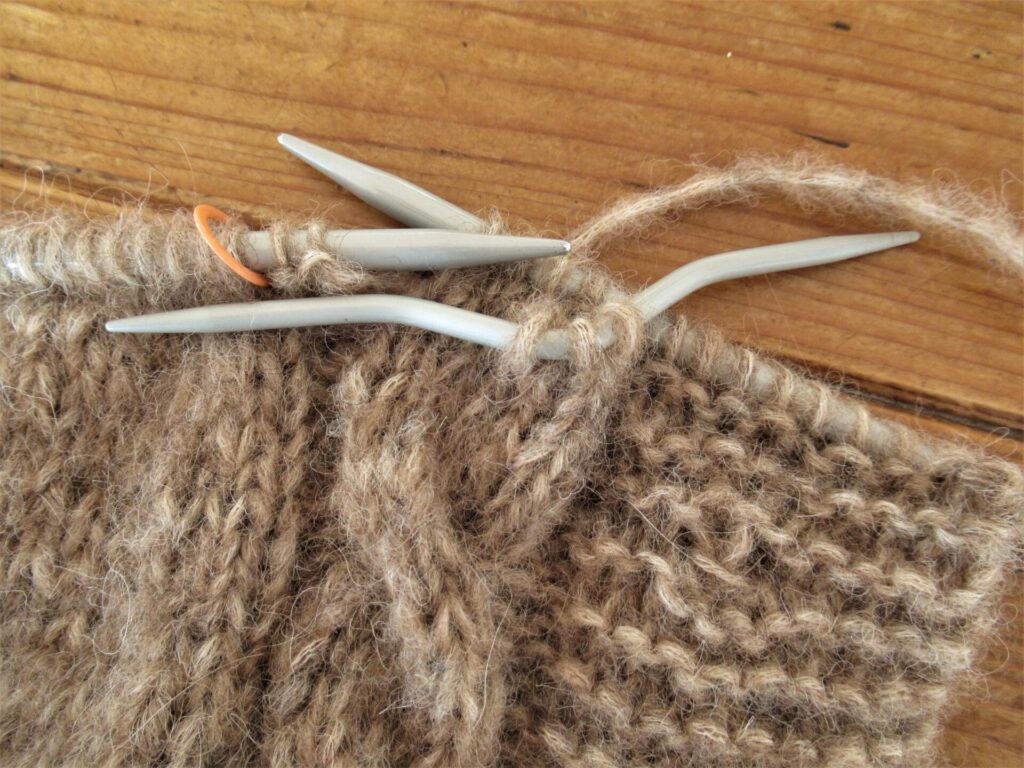
This is my favourite type of cable needle. Its V-shape holds the stitches really well, and it is easy to manipulate.
I’m halfway through the second front now, and have good hopes to have the entire cardigan finished by next week. Or am I being too optimistic? Anyhow, I hope to see you again next week. Bye!
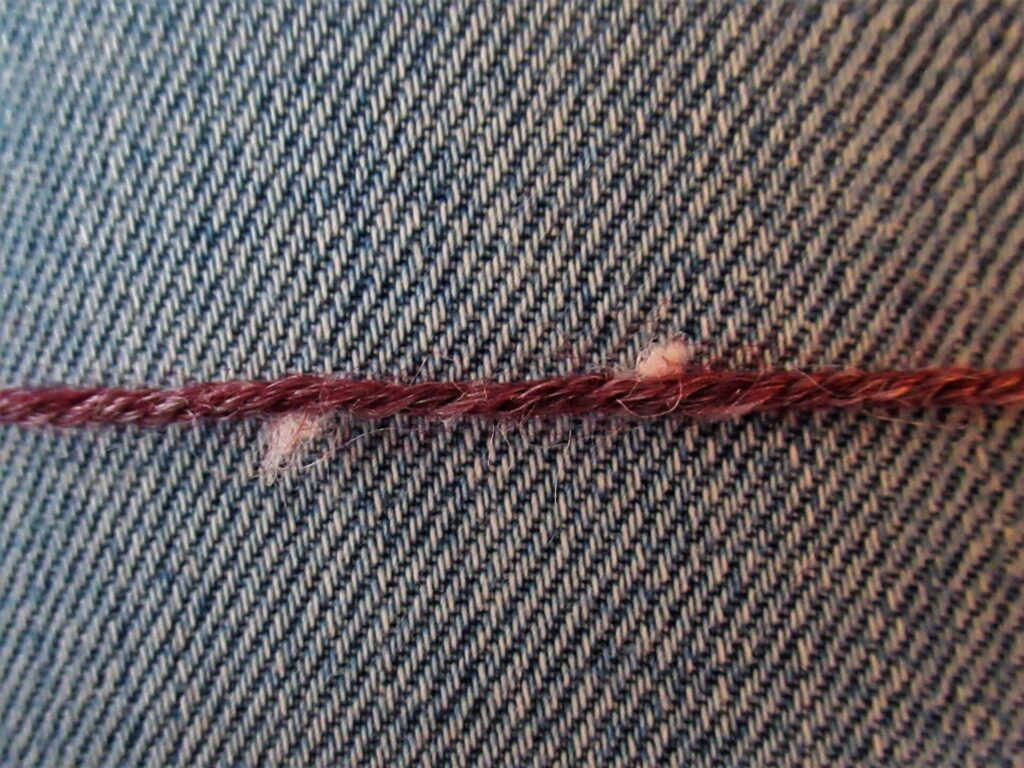
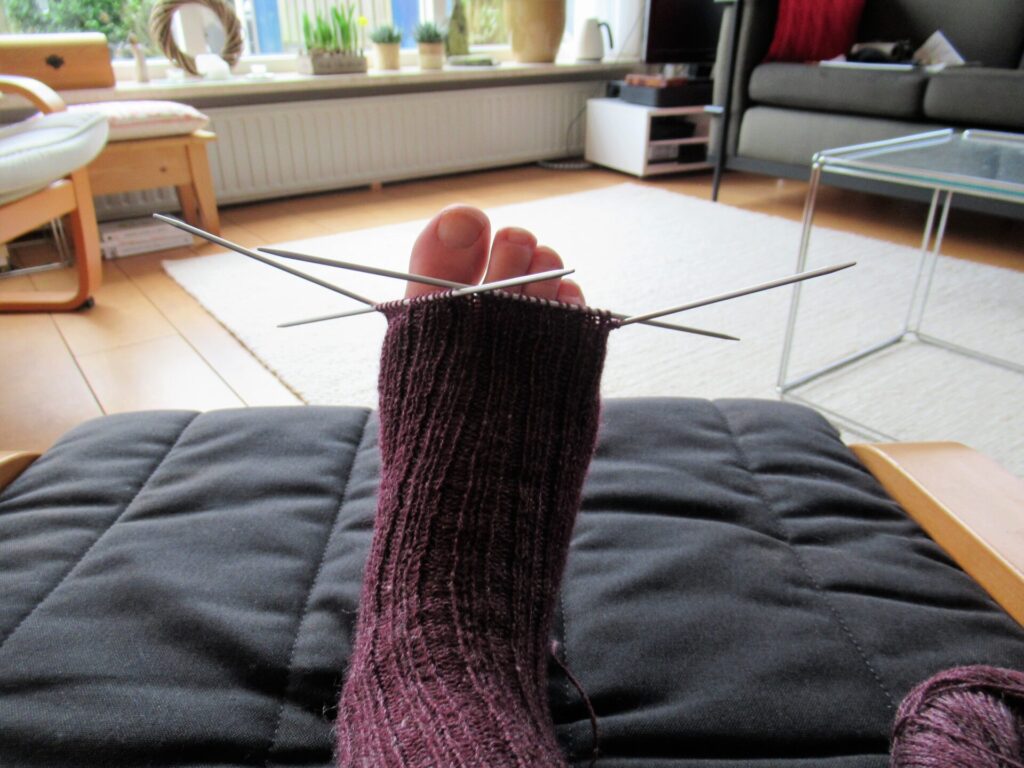
Today’s post has a nettle theme running through it. To begin with, I’ve knit a pair of socks with nettle fibre in them. That was interesting, because the yarn (Onion Nettle Sock) behaved a little differently from the usual all-wool or wool-and-nylon sock yarn. Let’s take a look at the thread first:
As you can see, there is maroon fibre and white fibre. The maroon fibre is superwash wool (70%) and the white fibre is nettle (30%). Nettle doesn’t take the dye used for wool and stays white, which gives a nice marled effect. Here and there thicker bits of nettle stick out, but on the whole the thread is smooth. Nettle is a very strong fibre, and the thread doesn’t break easily.
For me, the problem was that the yarn has hardly any elasticity at all. At my first try, with a few centimetres of knit 1, purl 1 rib followed by stocking stitch, the sock became too loose. Casting on fewer stitches would give a tighter fit, but also a stiff sock. After throwing it into a corner taking a break from it, I had a lightbulb moment: what the yarn lacks in elasticity, can be added by using a stretchy stitch pattern! So, I knit the leg and the top of the foot in k2, p2 rib.
TIP: Here is something I learnt from my mum and she learnt from hers: start on the toe of the sock when the little toe is covered. I can’t guarantee that it works for very long toes, but I think it’s a good rule of thumb.
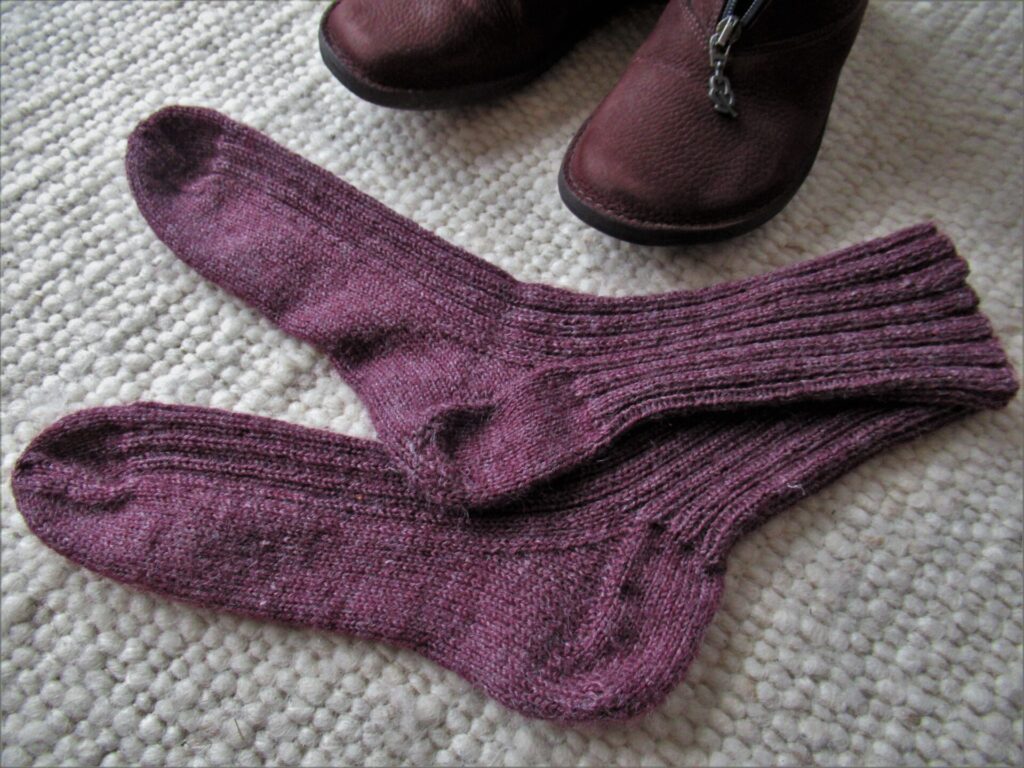
Laid out flat, the ribbing is all bunched up and the socks look rather narrow.
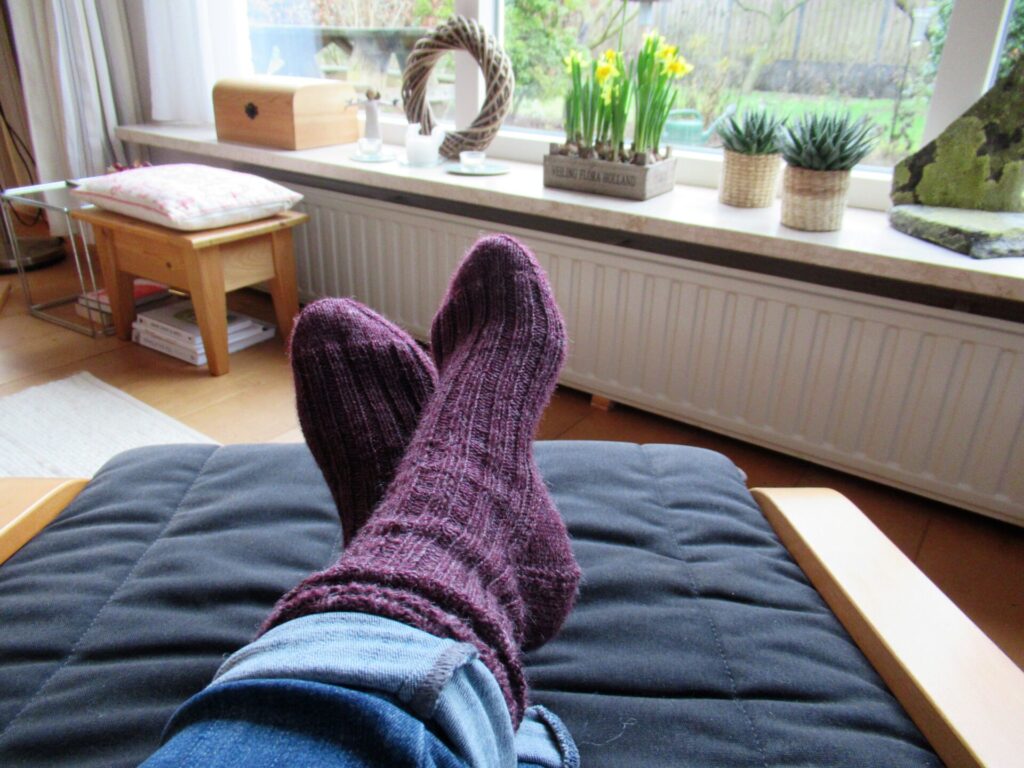
But on the foot, you can see how the rib stretches out and the socks fit perfectly.
I had my doubts about this yarn, but I’m happy with these socks now and hope the friend I made them for is too. Still, they’re pretty basic. I have more of this yarn for another pair and have an idea for making those a little more exciting. More about them in a few weeks’ time, I hope.
Q: Does nettle yarn sting or itch? A: No more than any other sock yarn. It feels surprisingly nice, really.
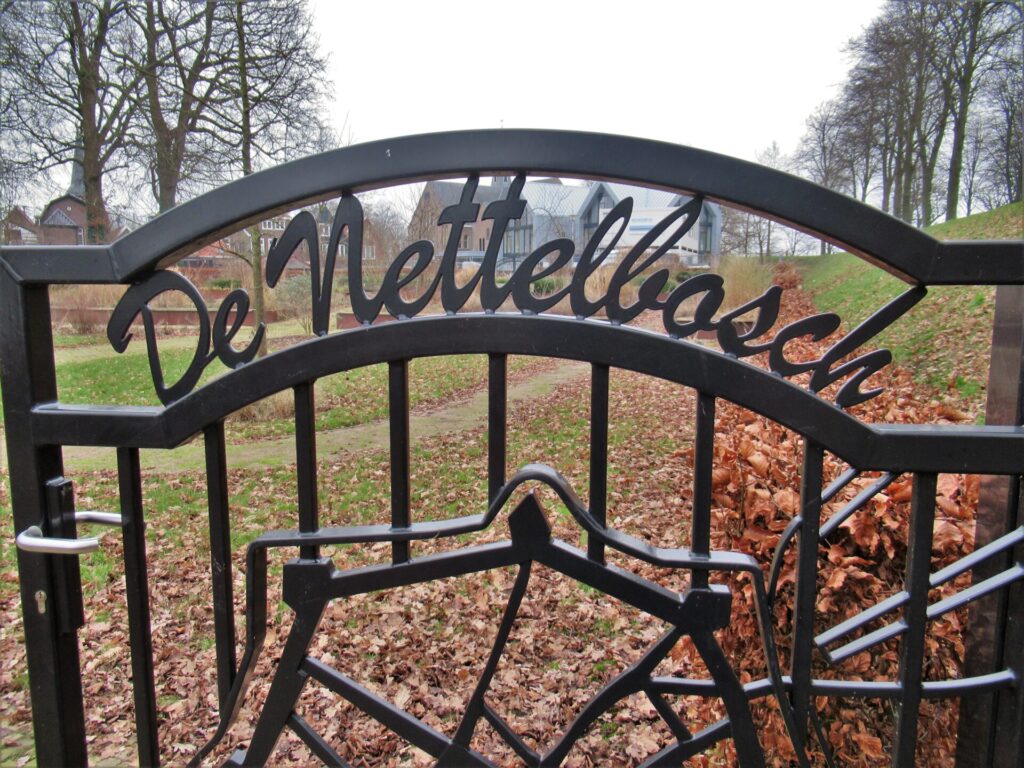
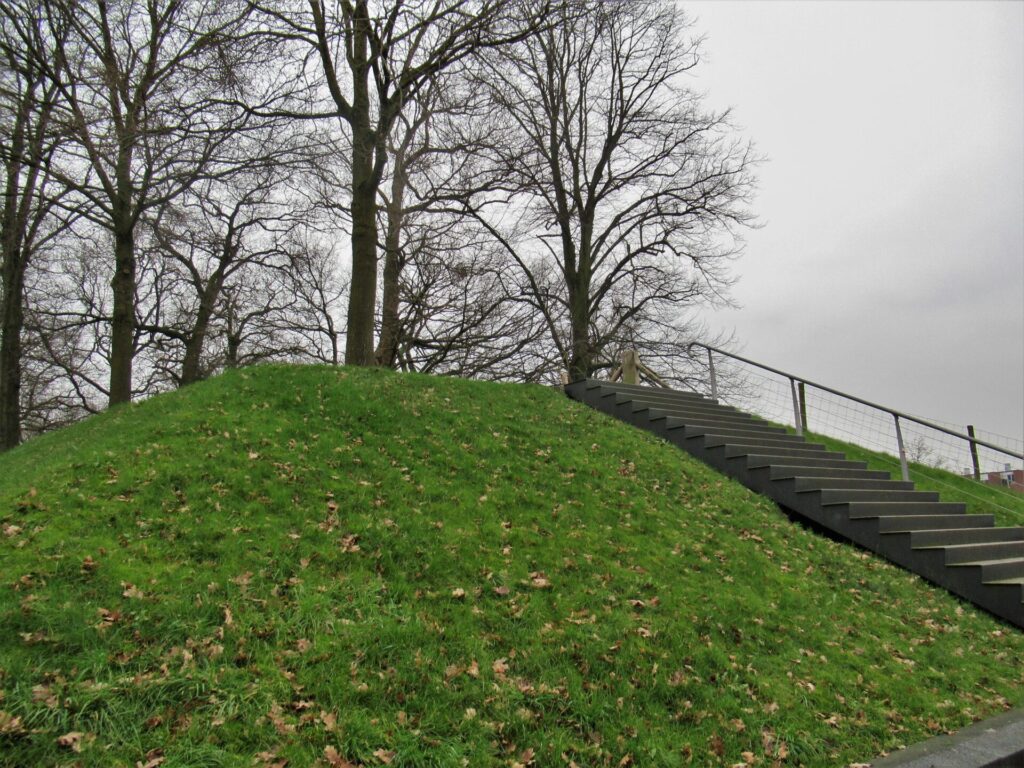
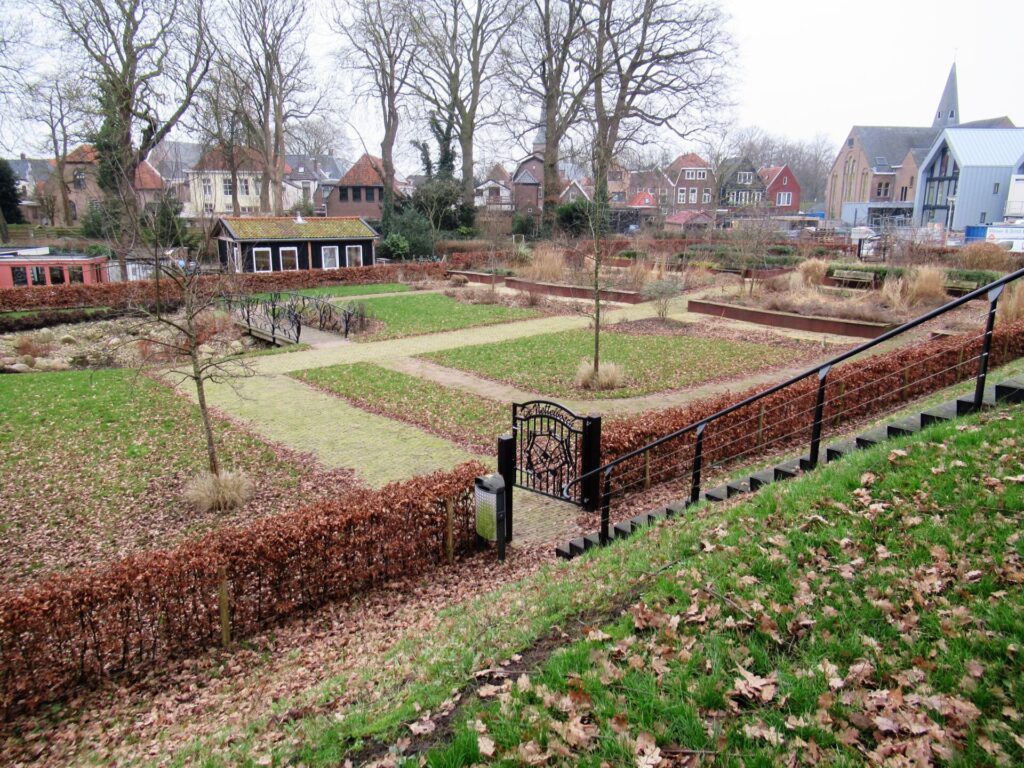
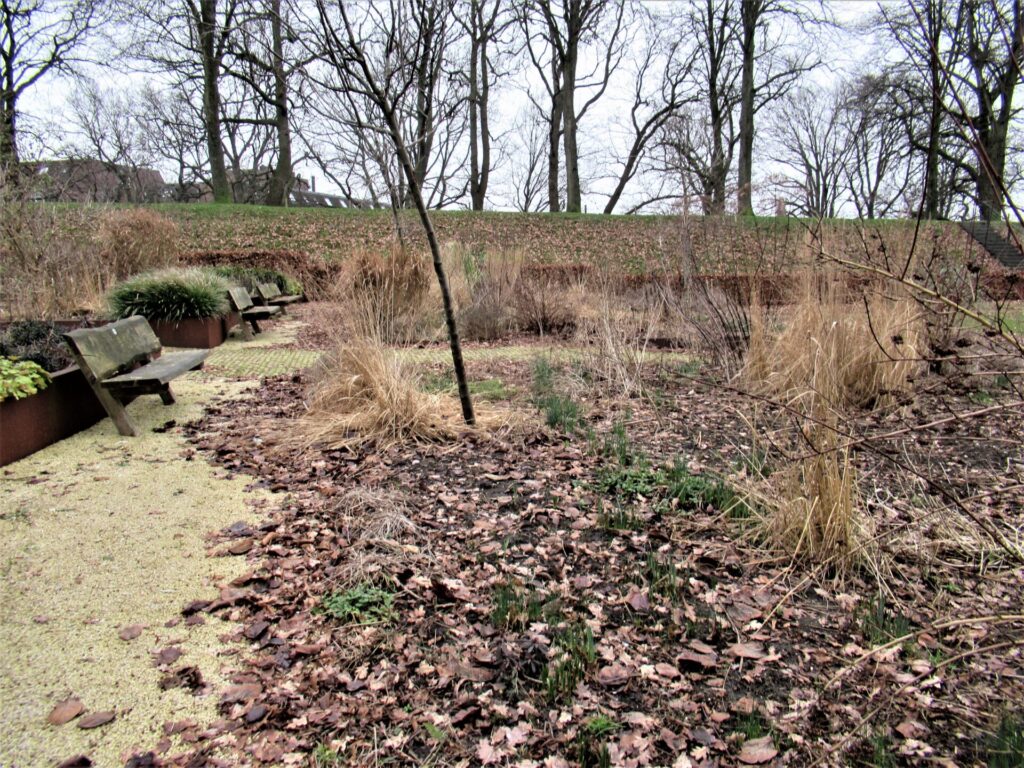
All this focus on nettle fibre gave me an idea for a little outing to the Nettelbosch, a garden in the nearby town of Steenwijk. Come along! Up, up, up the stairs we go, on to the top of the old town wall.
After a short walk we go down another flight of stairs…
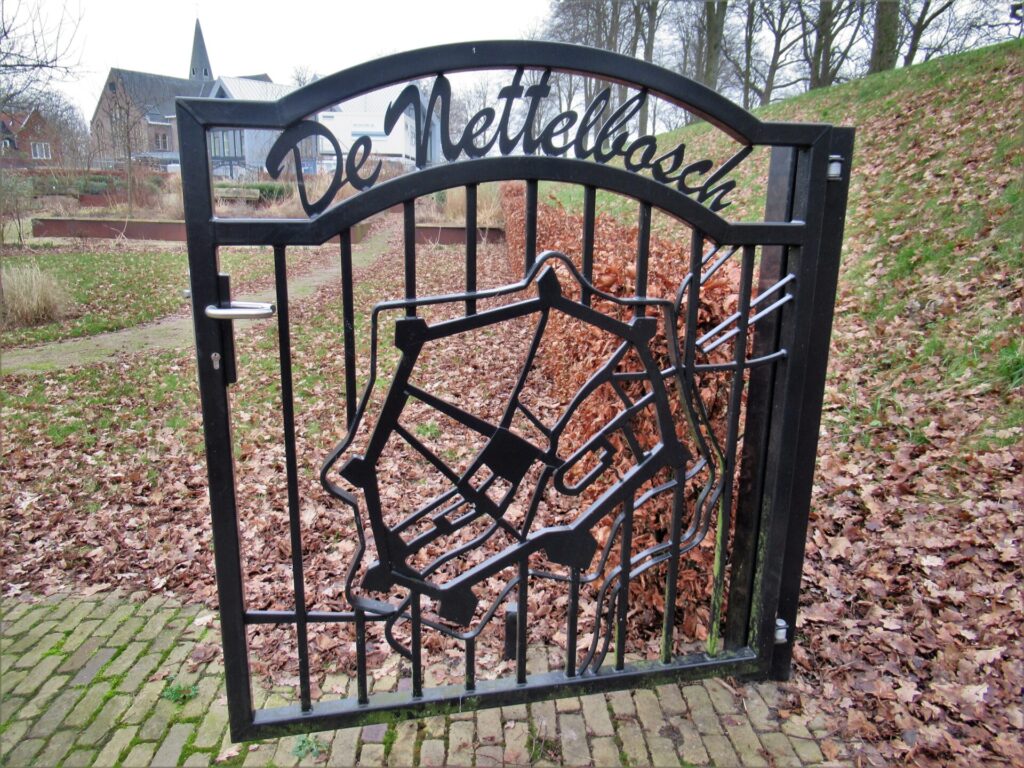
… and arrive at the entrance gate. Apart from the name of the garden, it shows a simplified map of the old town centre, with its wonky star-shaped defensive walls.
Long, long ago, there was a garden here, too. But it became a neglected spot – a tangle of nettles that was known to the locals as De Nettelbosch. When in 2018 the municipality decided to give the town centre a ‘quality boost’ by creating a new garden, the spot kept its name.
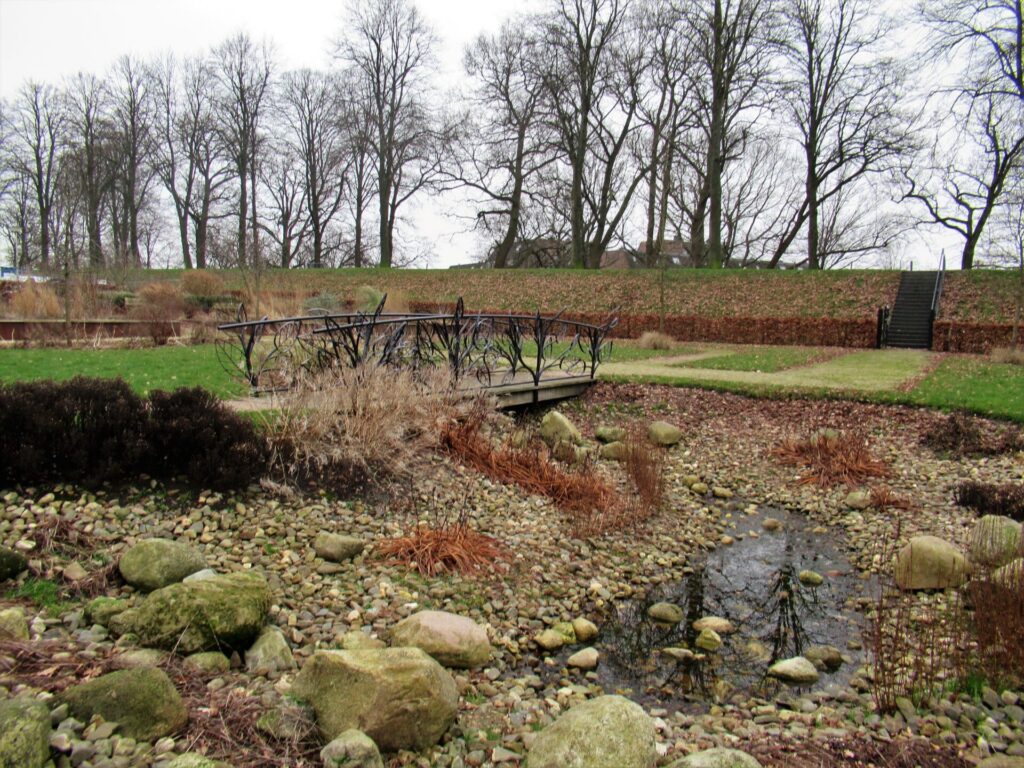
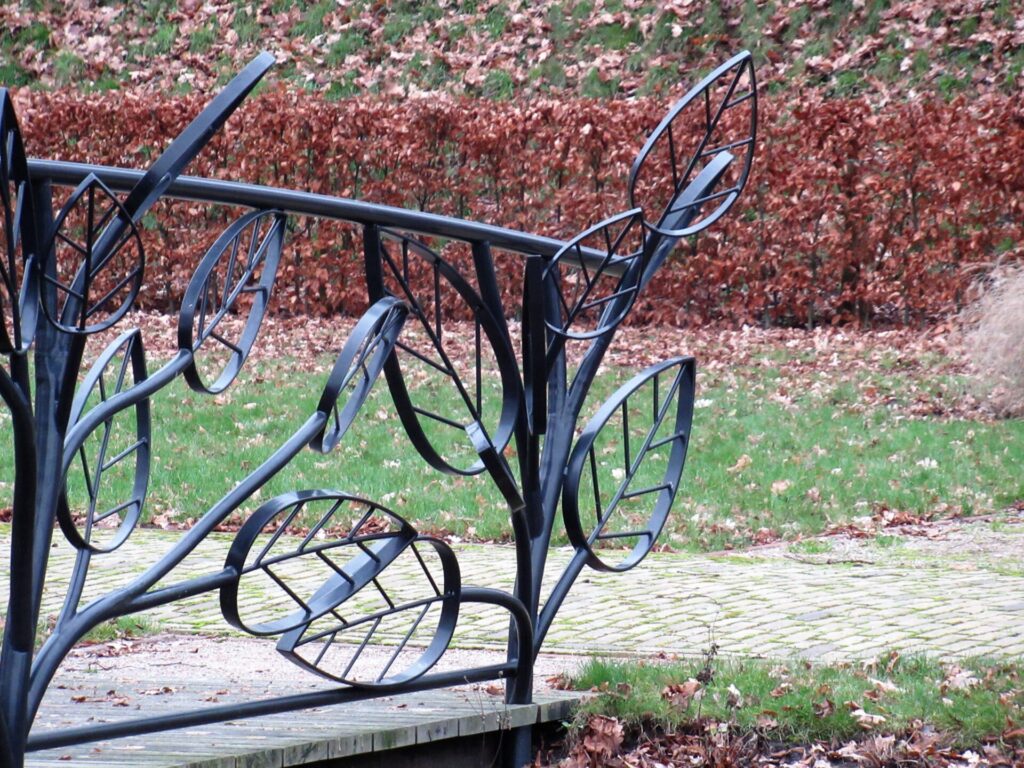
The small, stony pond looks nice all year…
… thanks to its attractive leafy bridge.
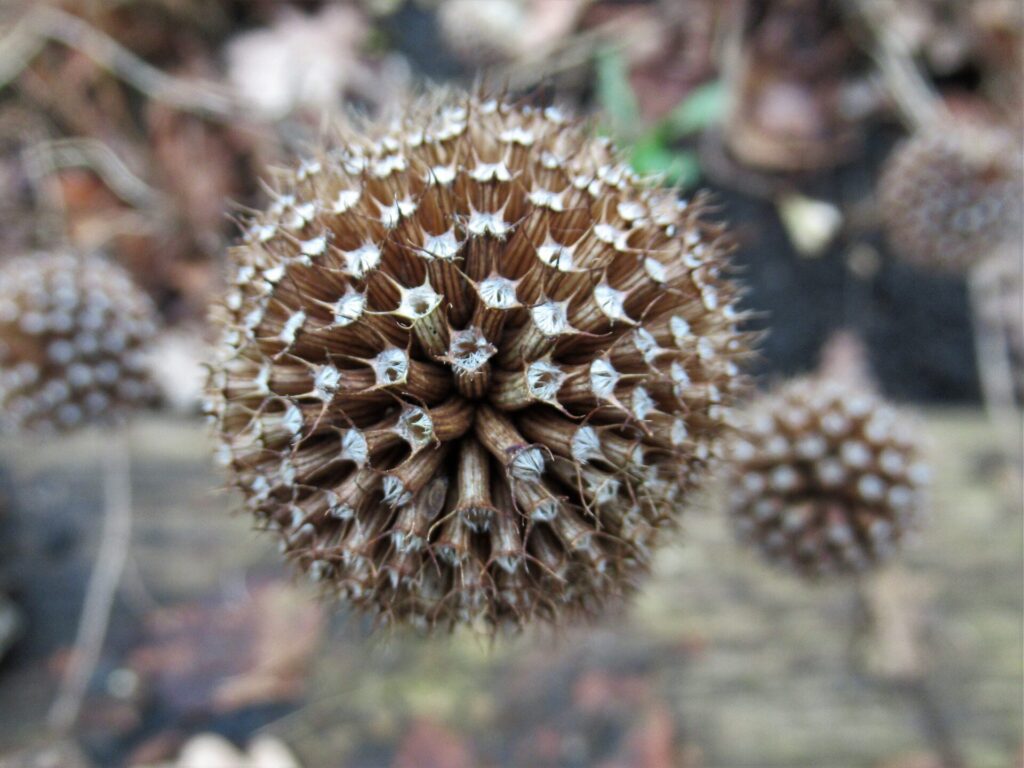
For the rest, De Nettelbosch looks rather bare and bleak at this time of the year.
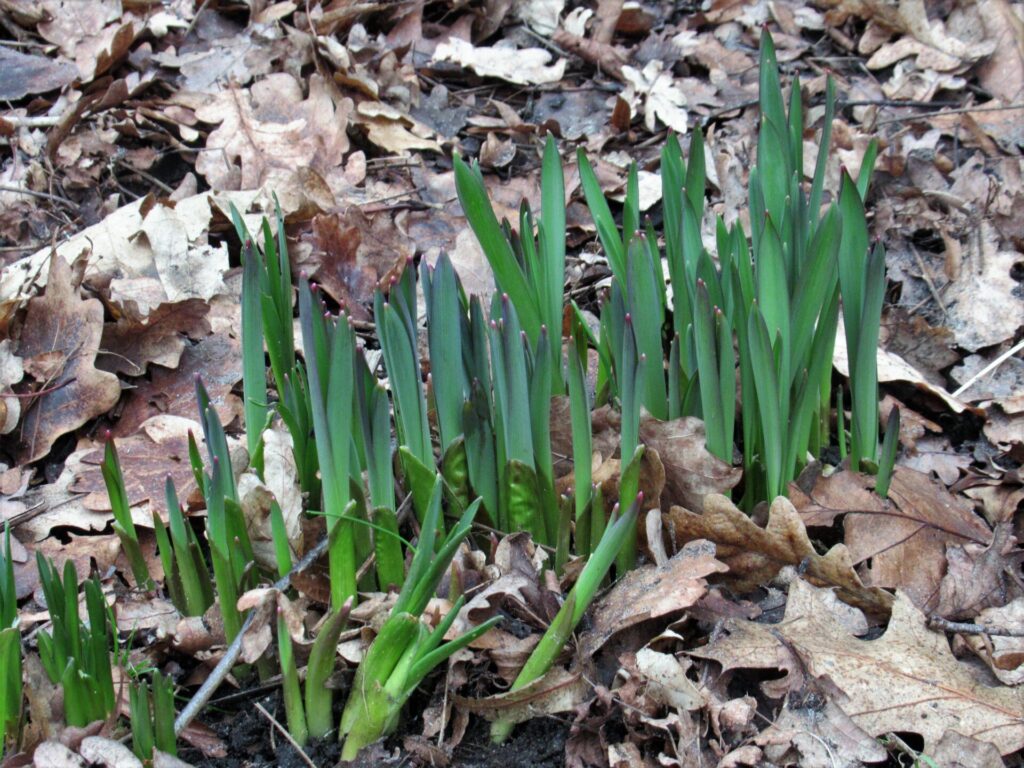
At least at first sight. Spending a little longer looking around, small details catch the eye, like these seed heads.
There is also some colour to be found.
And even a few signs of spring!
These bulbs (daffodils?) are much further along than those in our garden, probably because of their sheltered situation behind the town walls. I’ll certainly take you back here in spring, to see what De Nettelbosch looks like then.
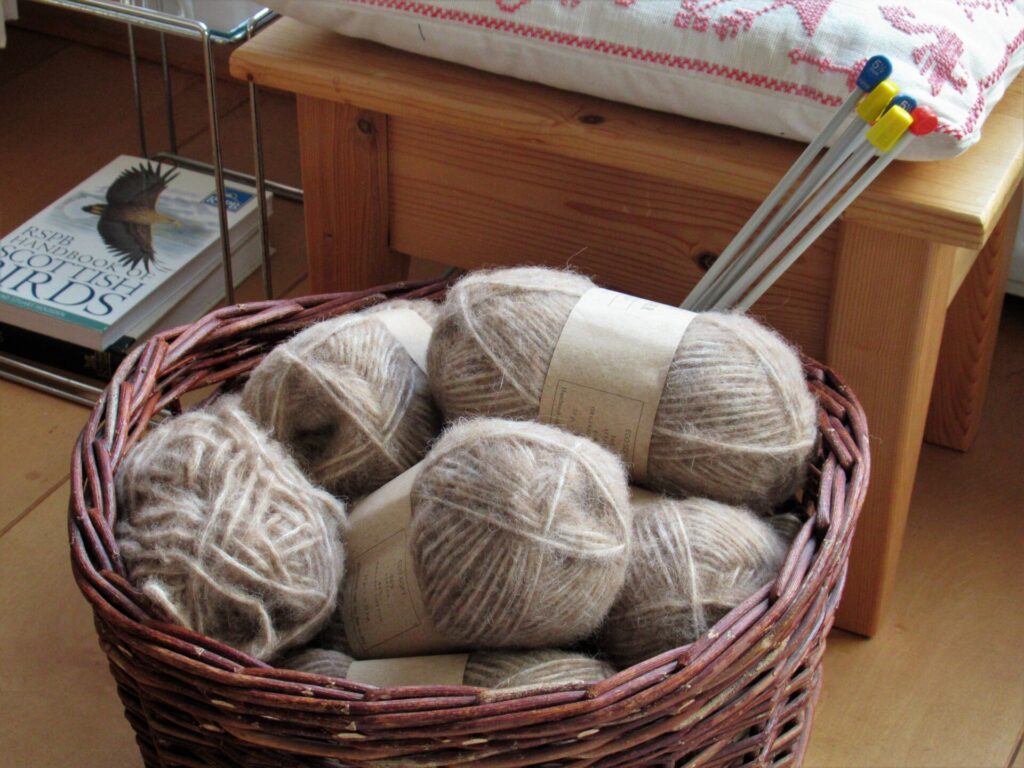
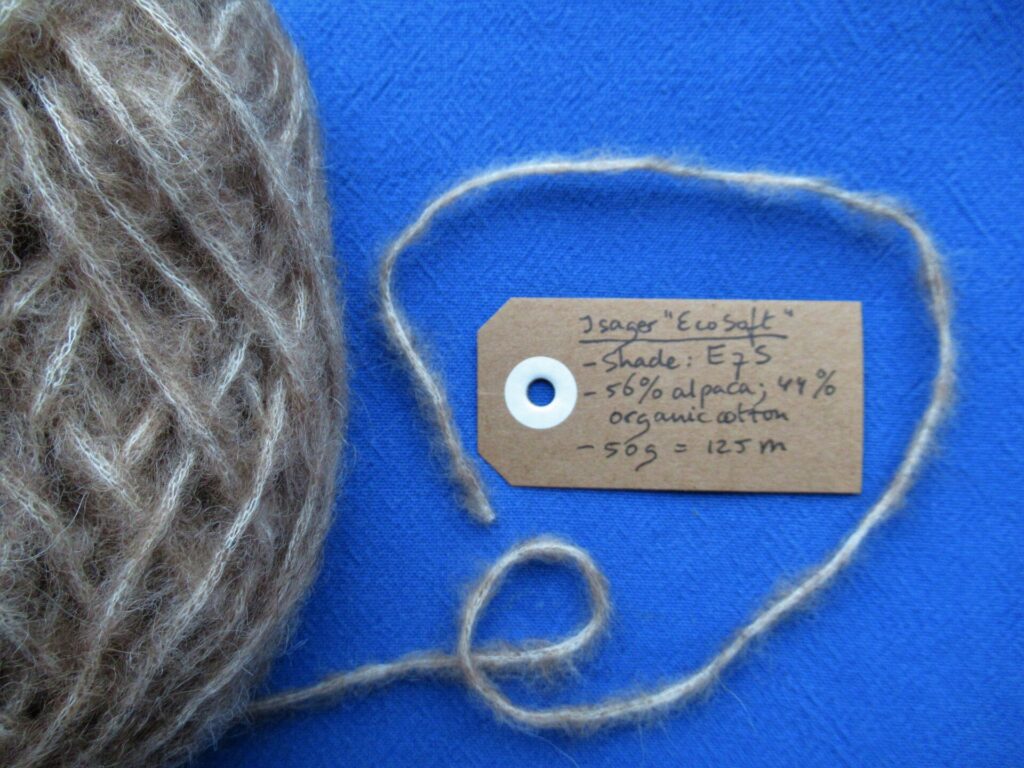
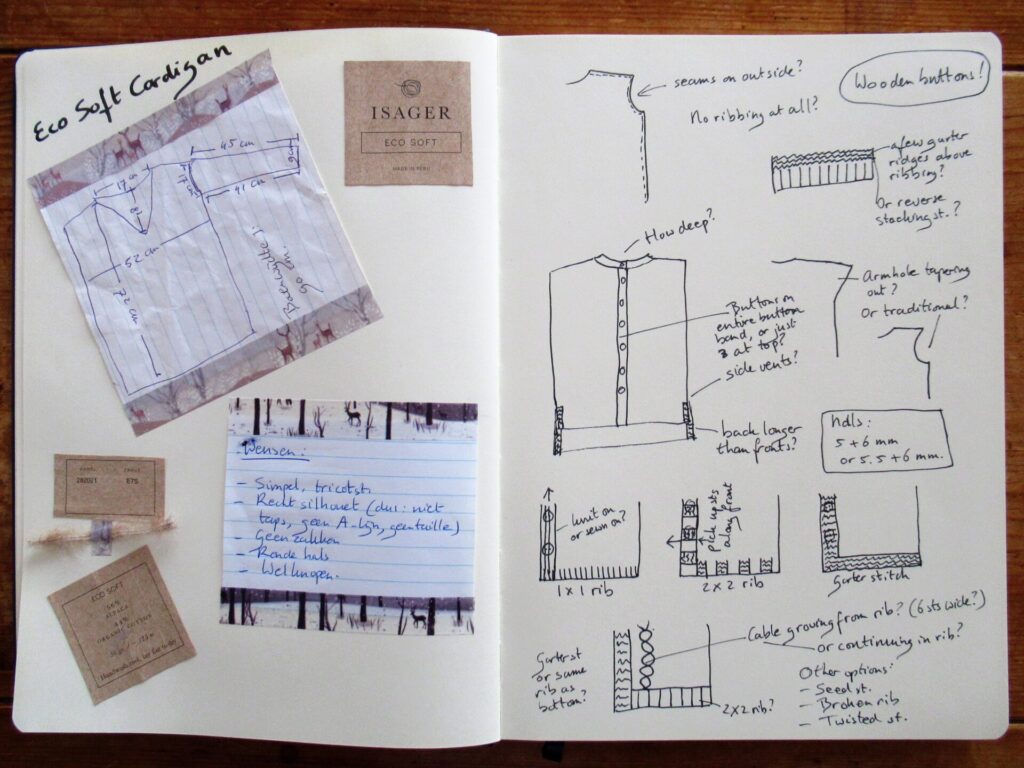
Do you remember our trip to Harlingen last autumn, and my visit to the local yarn shop? That’s when I bought the yarn in the basket above. It is Isager ‘Eco Soft’ from Denmark – a bulky yarn of 56% alpaca and 44% organic cotton. It is very soft indeed.
I bought it on a whim, with the idea that it would be perfect for a cosy cardigan for our daughter. Other than that I didn’t have a clue as to what it was going to look like or what pattern I was going to use. Or how much yarn I’d need (I hope I’ve bought enough).
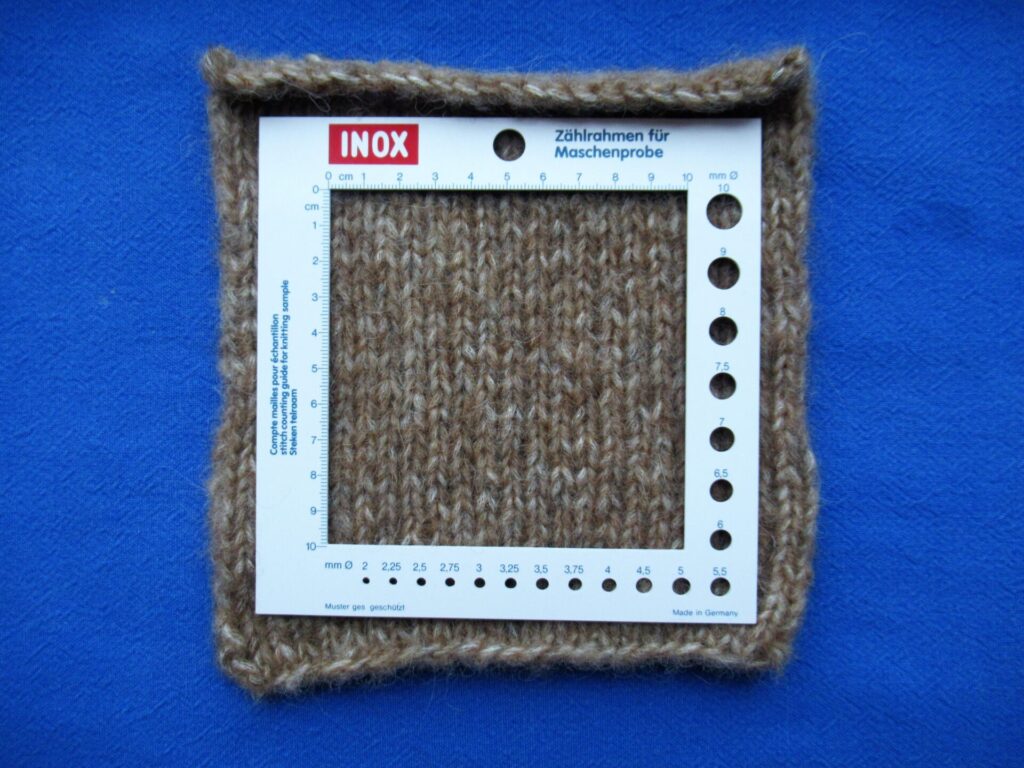
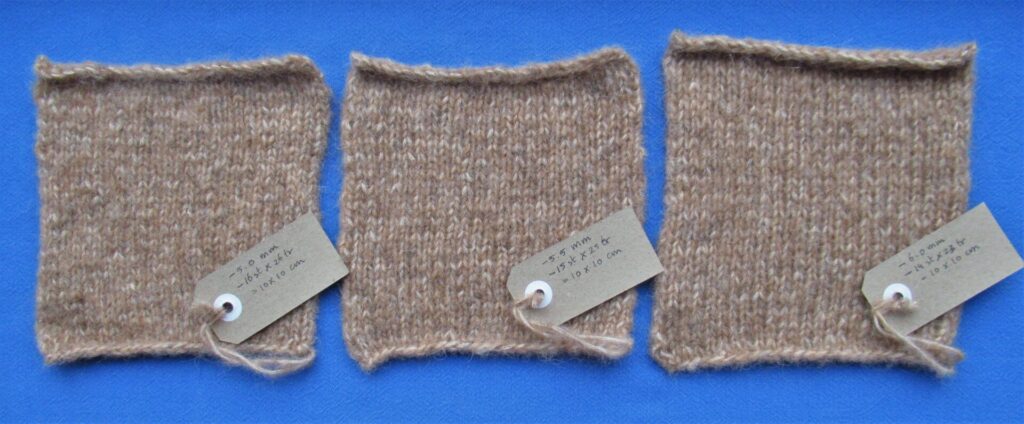
The ball band didn’t give any clues about needle sizes to be used or gauge suggestions, which is very unusual. So, I started swatching. I have a handy tool for determining how many rows and stitches go into 10 x 10 cm/4 x 4 inches.
It isn’t really necessary. A measuring tape will suffice, too, but it makes things easier.
I took the swatches along to our daughters place. She is way past the age that I buy clothes for her, and I never push any knitwear on people that they may not want. So my first question was, ‘Would you like a sweater in this yarn? I was thinking of a cardigan, but if you don’t like it, please feel free to say so and I’ll find a different destination for it.’
I was glad to hear that yes, she would love to have a cardi from this yarn.
Eco Soft is a brand-new yarn, and I soon found out that only 4 patterns using it have been published to date, all for children. I could have looked for a pattern in a similar yarn, but decided that it would be more fun to think up something myself. A bespoke cardigan, so to speak.
I thought it might be nice to show you how I go about it. (Fingers crossed that I’ll end up with a wearable cardi.)
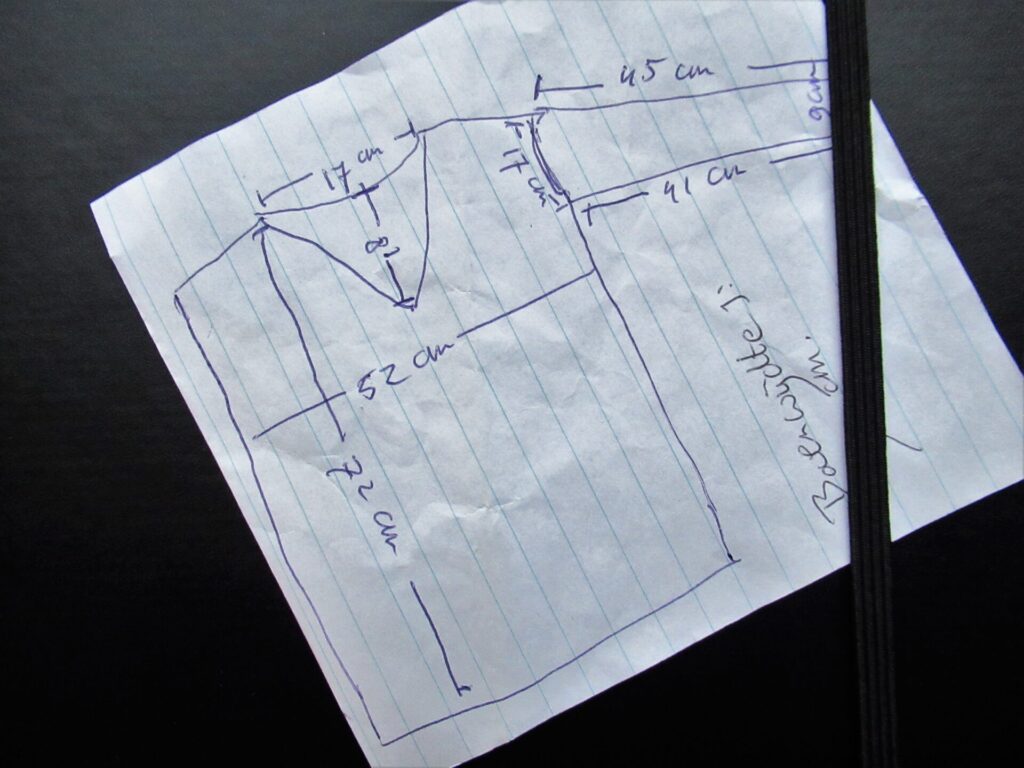
First, I quickly made a schematic drawing of a favourite, shop-bought sweater with approximately the kind of fit she wanted. It wasn’t a cardigan but a pullover and made from a very thin yarn, but that didn’t matter. This was just to get a general indication of the fit to aim for – oversized, but not hugely so.
I also asked her a few questions about shape, neckline etc, and these were the clues she gave me:
Simple
Stocking stitch
Straight silhouette (so no tapering, A-line or waist shaping)
No pockets
Round neckline
Buttons
I have a sketchbook for brainstorming about knitting ideas, and these are the pages I made for this cardi.
Next steps: knit more swatches, make decisions.
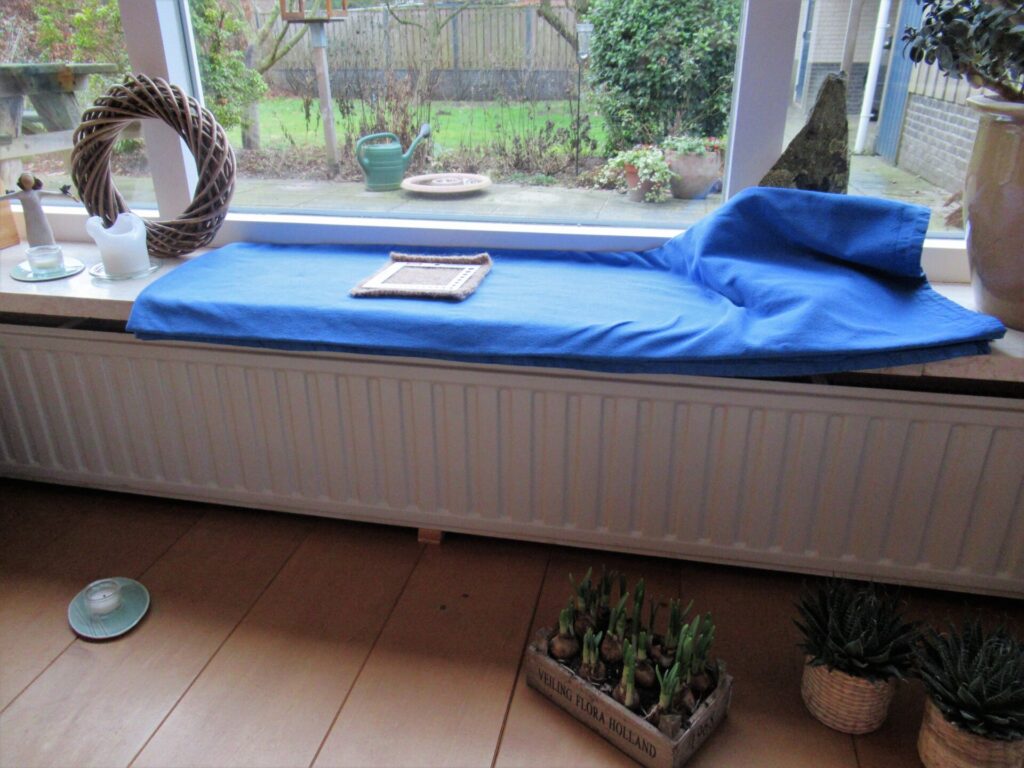
Many January days are so cloudy and dark that I often take my knitting outside to photograph it. This time, I removed some plants and things from the window sill, and covered it with a folded table cloth. It is the lightest place inside and fine for photographing small items.
Fortunately, those dark days are interspersed with lighter and sometimes even sunshiny ones. One morning, sunlight streamed through the windows and suddenly there were two vases of cherry branches – the real one and its shadow.
It’s always uncertain whether the buds on branches like these will open, but this time we were lucky. White cherry blossoms against a white wall – simply beautiful.
I’ll tell you more about the cardi-with-a-few-clues-now when I’ve made some progress. Bye for now and take care!
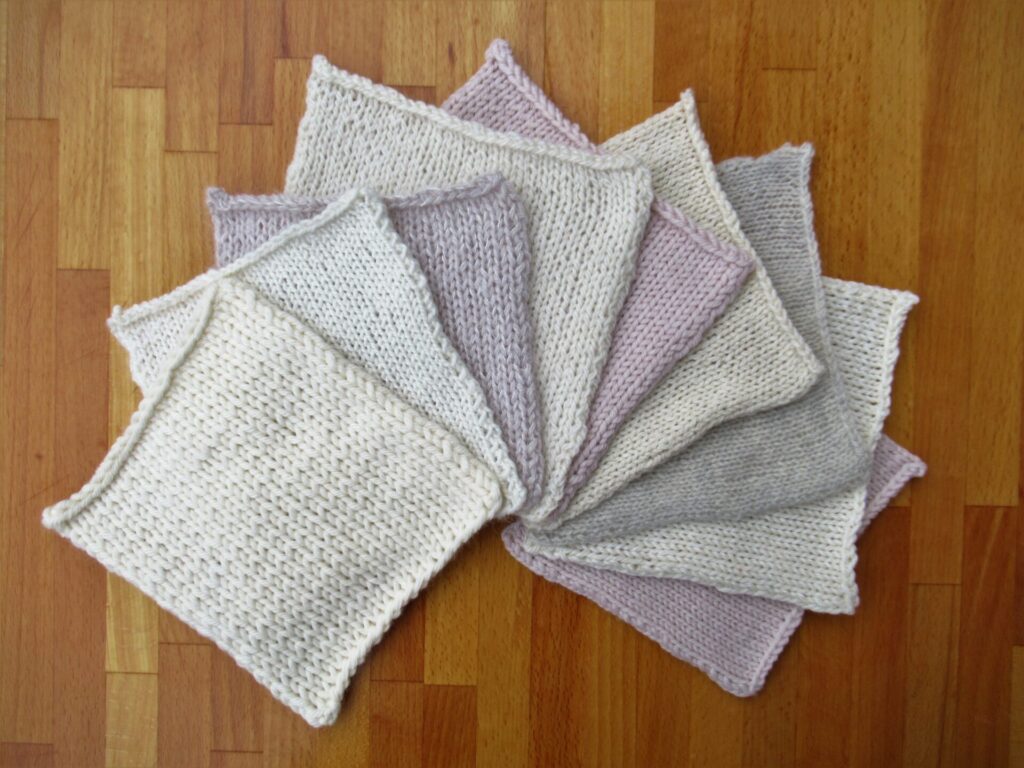
Today’s post isn’t about UFOs, FOs, WIPs*, or even about starting a new knitting project, but about the stage before that. It’s about exploring and studying yarns.
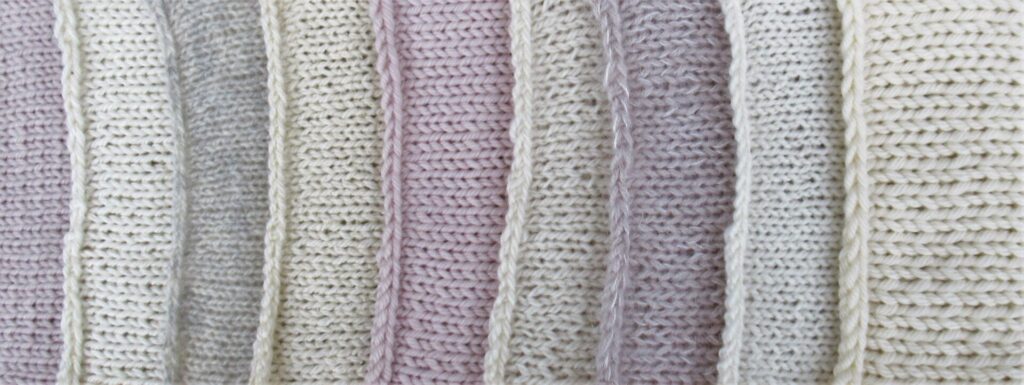
The yarns I’m trying out at the moment are all organic or otherwise sustainable. Over the past few years, I’ve picked up a ball here, a skein there in yarn shops and at crafts fairs. Now I’ve finally taken the time to knit swatches with some of them. Here is a first impression.
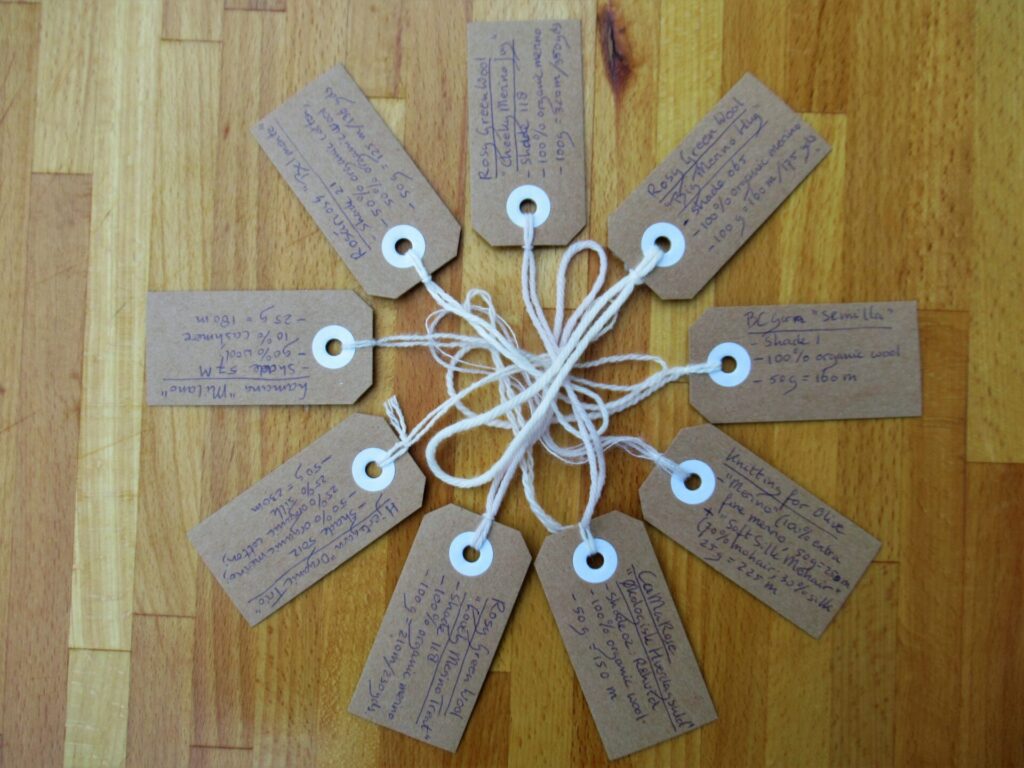
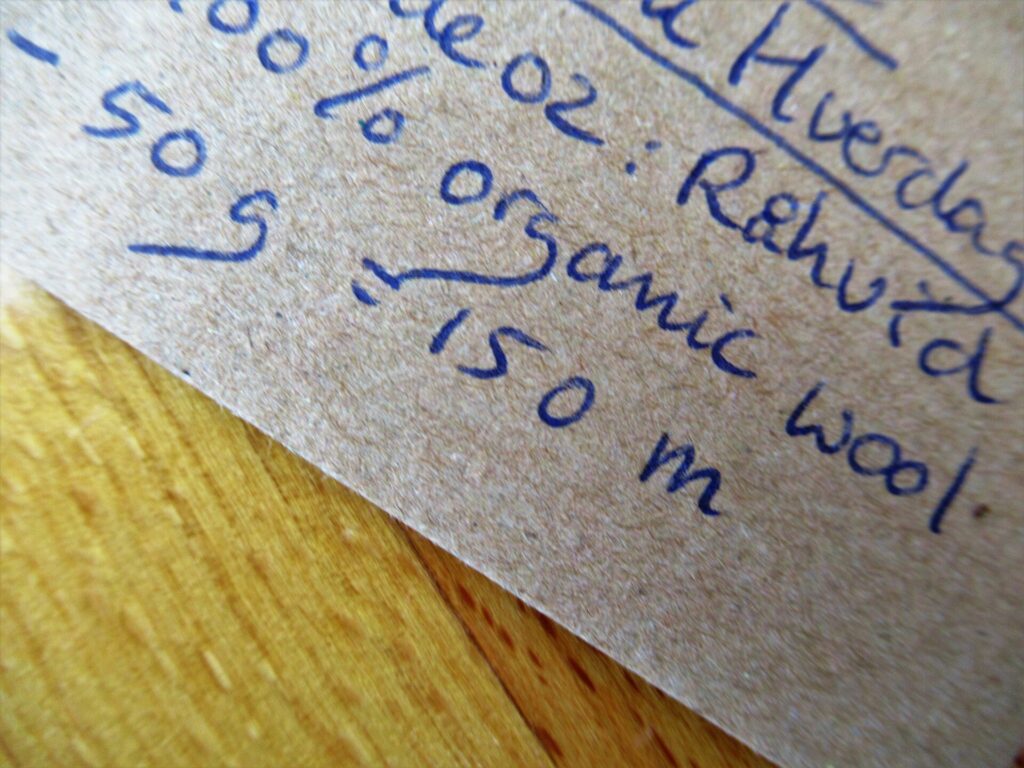
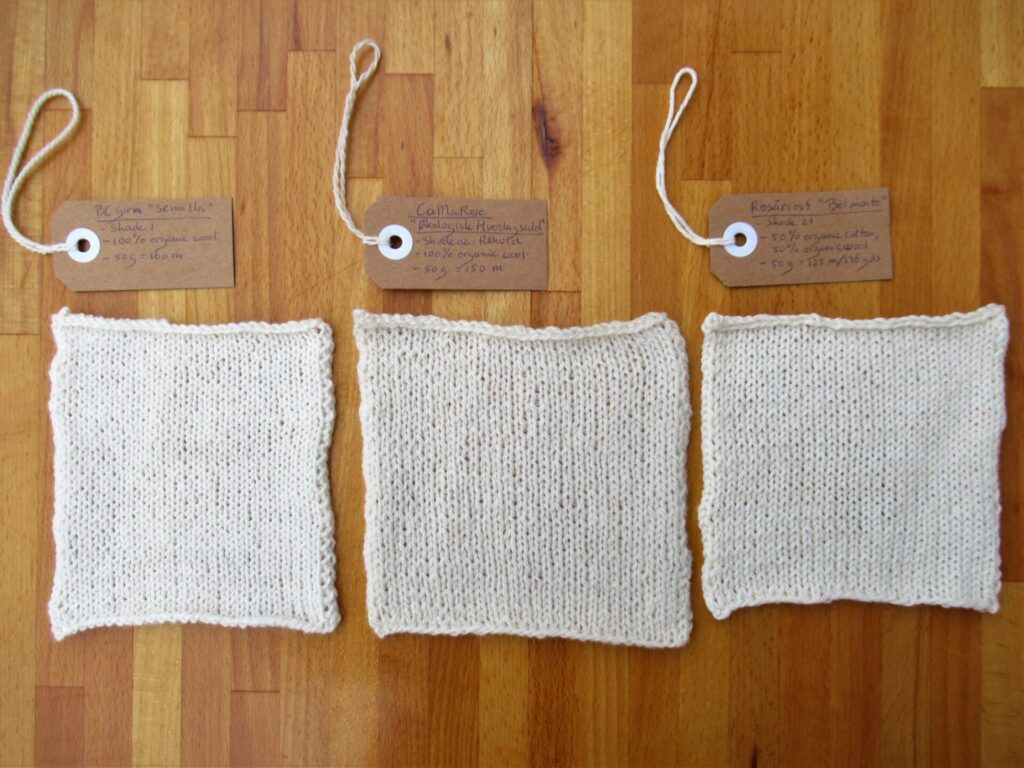
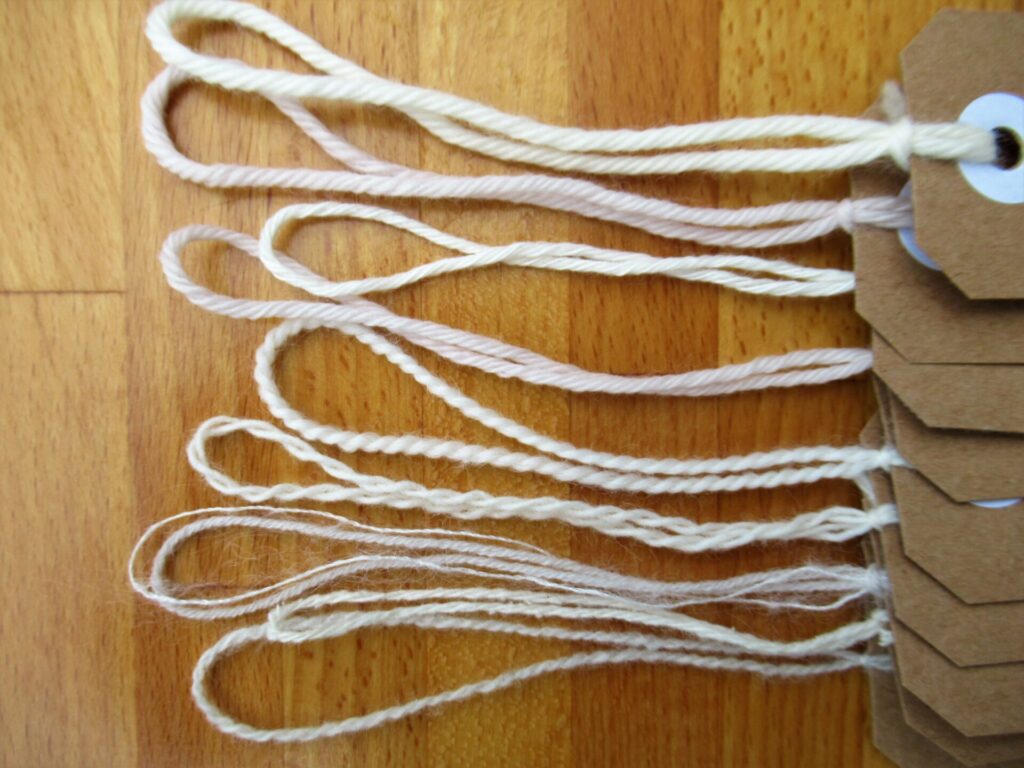
I label all my swatches.
On the front I write information about the manufacturer, yarn name, fibres, weight, and meterage/yardage. On the back I add info about the needles used and gauge.
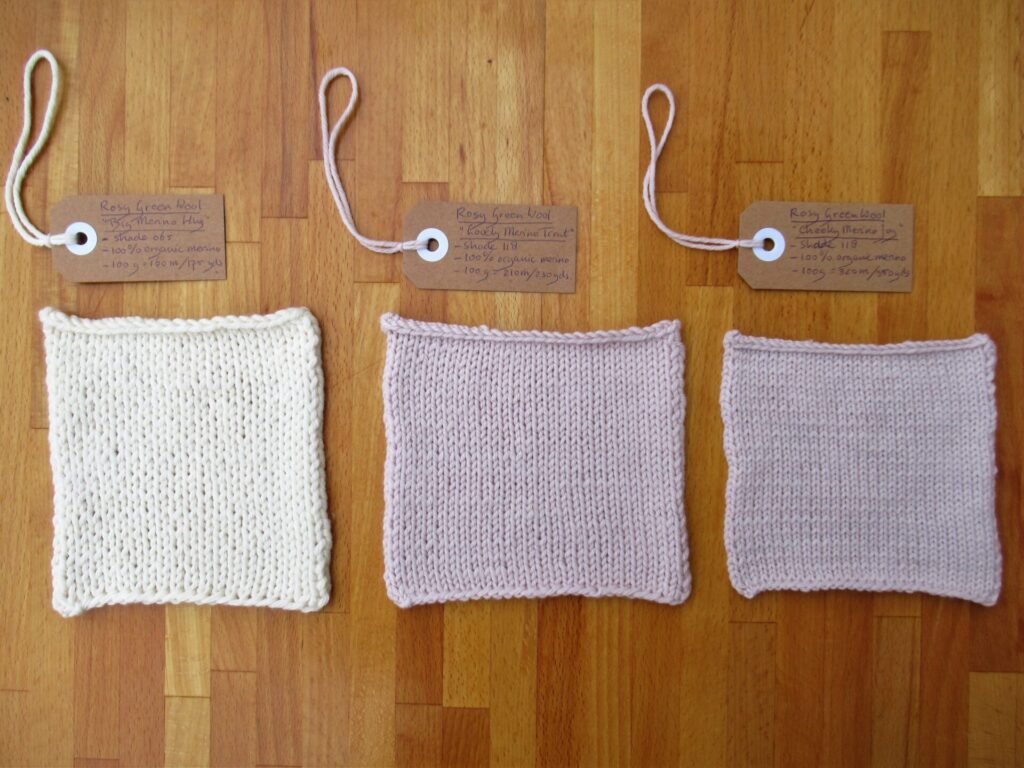
Below, the yarns I’ve tried out so far (from left to right).
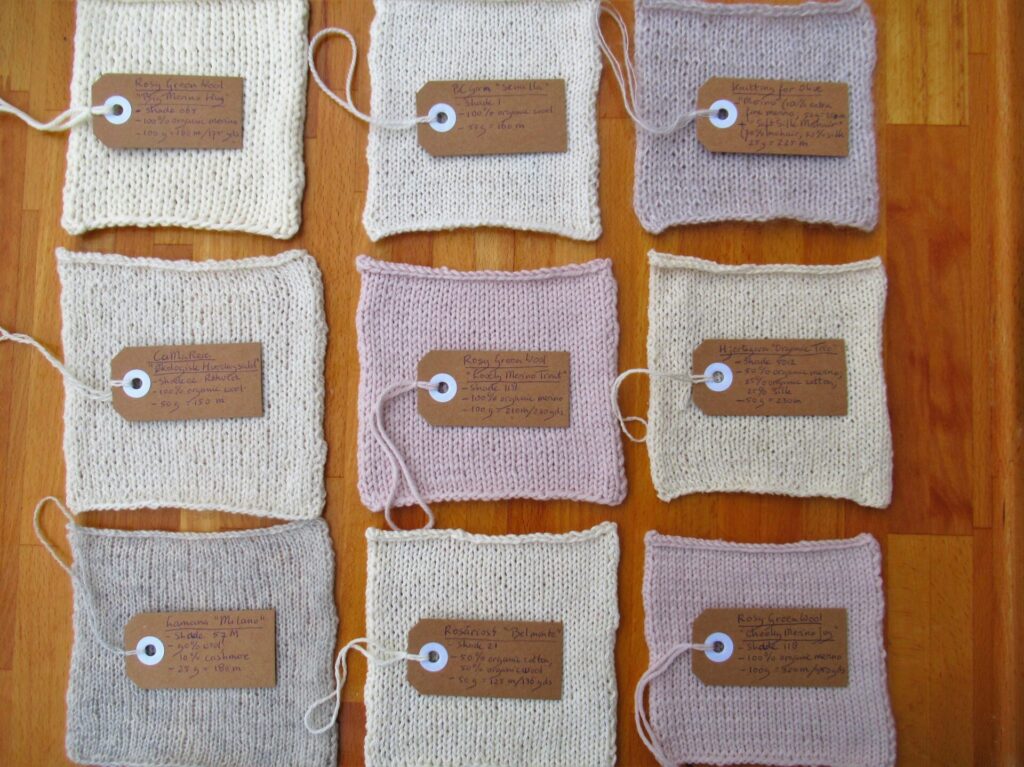
To start with, Rosy Green Wool ‘Big Merino Hug’, ‘Lovely Merino Treat’ and ‘Cheeky Merino Joy’:
Knitting for Olive ‘Merino’ + ‘Soft Silk Mohair’ (held together), Hjertegarn ‘Organic Trio’ and Lamana ‘Milano’:
BC Garn ‘Semilla’, CaMaRose ‘Økologisk Hverdagsuld’ and Rosários4 ‘Belmonte’:
CaMaRose ‘Snefnug’ on 3 different needle sizes:
These are some of the questions I’m asking myself about my Sustainable Swatches:
Do I like this yarn?
How do I like this yarn on this needle size?
Which yarns will be most suitable for colour work, cabling, knit-purl stitch patterns, lace?
Does the yarn feel stable, elastic, drapey?
Which of these would I choose for a shawl, sweater, mittens?
Are any of these yarns suitable for baby things?
And also:
How do I go on from here?
I’d love to hear from you if you have experience with any of these yarns, or suggestions for other sustainable yarns to try. Or if you have a question, or just feel like saying hello.
xxx
* UFO = UnFinished (knitting) Object; FO = Finished Object; WIP = Work In Progress
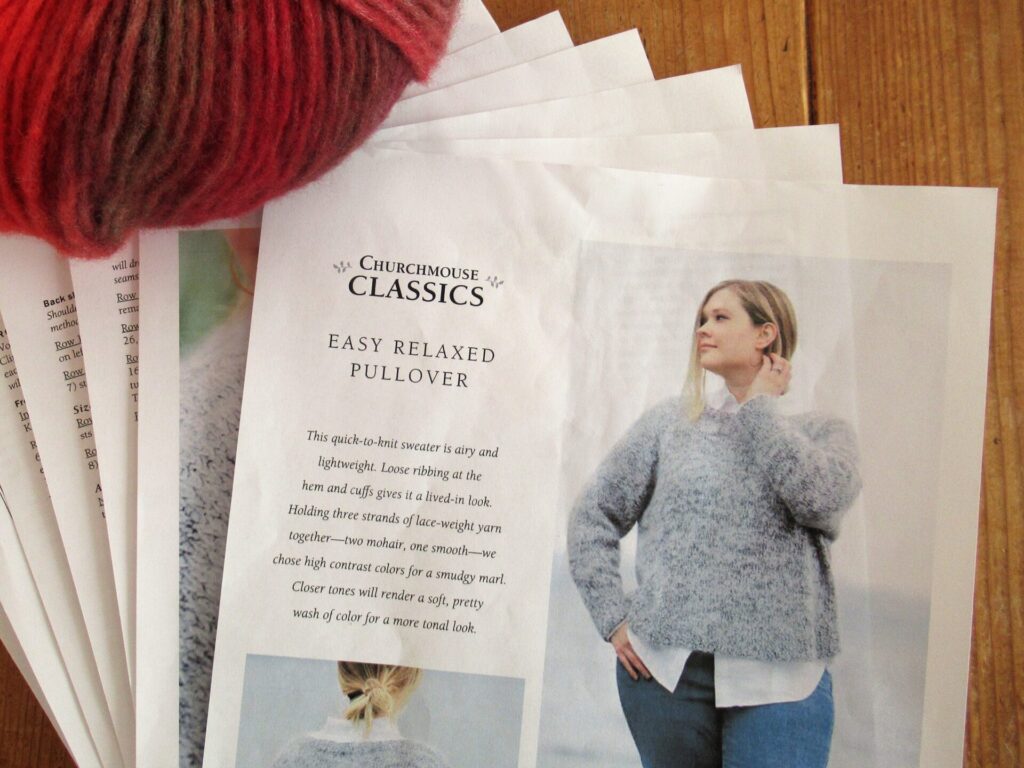
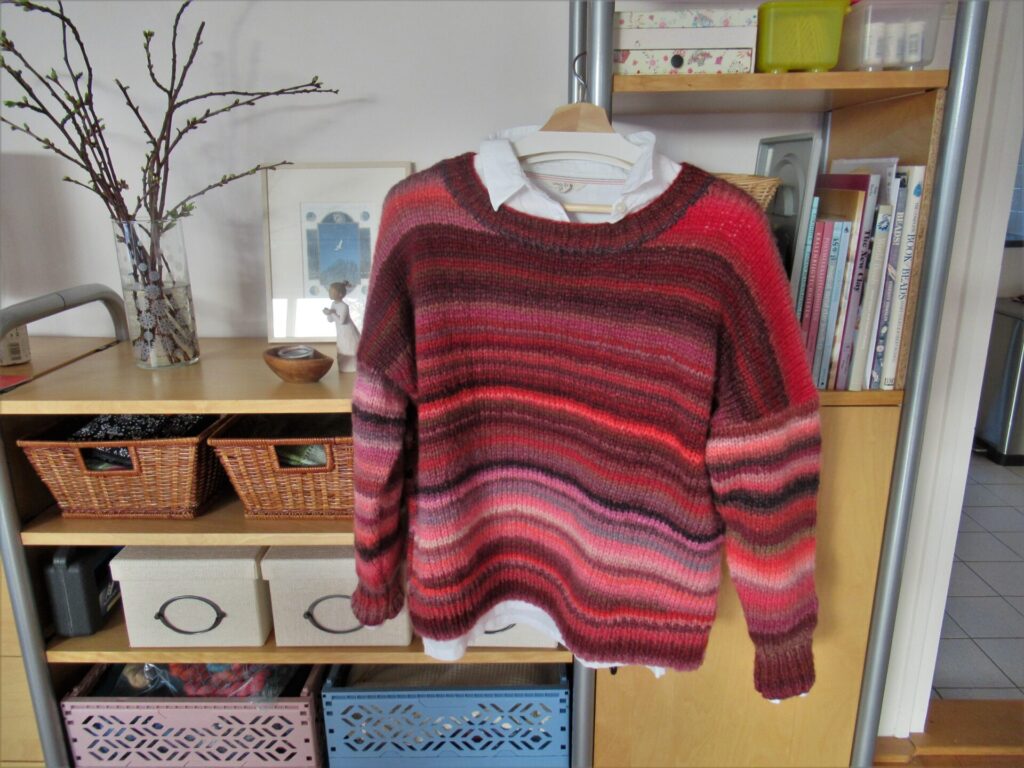
Easy and relaxed – doesn’t that sound like music to your ears? Life would be boring without any excitement or puzzles to be solved, of course. But as someone who tends to overcomplicate things and is far from laid-back, I often yearn for things to be easy and relaxed. So, how could I resist a pattern called Easy Relaxed Pullover?
The original version is knit with 3 lace-weight yarns held together. I knit mine with one strand of a colourful bulky yarn.
It is Cloud from Lang Yarns, and is one of those new light-weight ‘blown’ yarns. One of the balls had a couple of knots in it, but on the whole, I am happy with the quality. I considered cutting the neon pink and bright orangey-red bits out, but I’m glad I didn’t.
It was a quick, fun, light-hearted project. The pullover is knit from the bottom up. The shoulders are joined with a 3-needle bind-off. Stitches are picked up for the sleeves, and those are knit from the shoulder down.
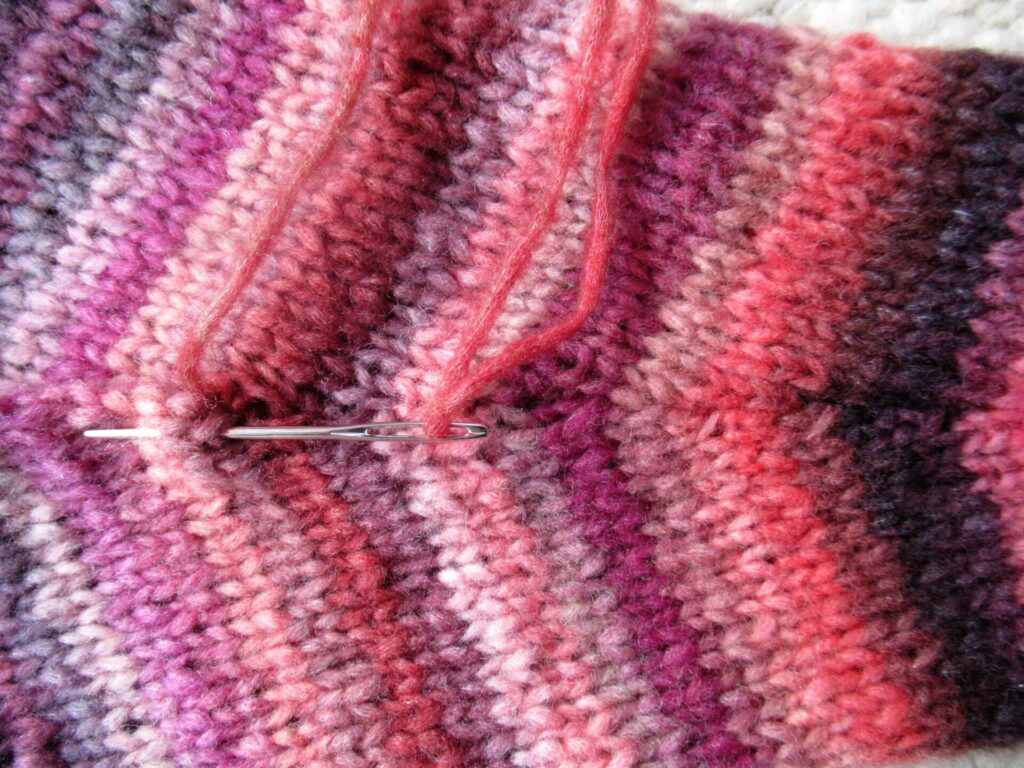
I seamed the side and sleeve seams using mattress stitch, worked from the outside. The stripes do not match up at the sides of the body at all, and that’s fine by me. But I did match up the stripes neatly on the sleeves.
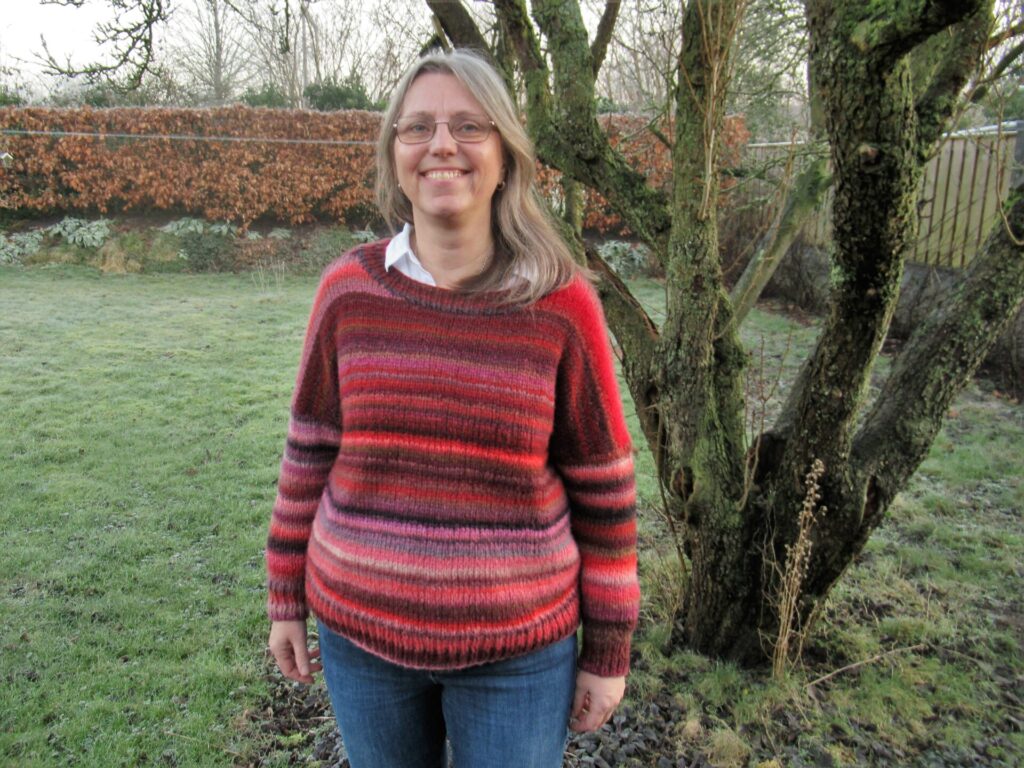
At first I thought I’d take the easy way out and just show you the pullover on it’s own. But how will you know how it fits without seeing me wearing it? So here we go, first the front:
And then the back:
As you can see, it has a very relaxed fit, with arm’holes’ tapering out, which is why the sleeves start halfway on the upper arm. So, that explains the ‘relaxed’ part of the pattern’s name. As for the ‘easy part’, this is a very easy knit. Because of the short rows at the hem and the shoulders not very-first-knit-ever easy, but easy enough for a knitter with a little experience.
‘Work from home unless it’s absolutely necessary to attend in person’ is still the norm here. Some people seem to thrive on working from home while others struggle. I’ve worked from home for most of my adult life, and think I’m somewhere in between. I know all about the pros as well as the cons, and if there is one piece of advice I can give, it is this:
Go for a walk every single day!
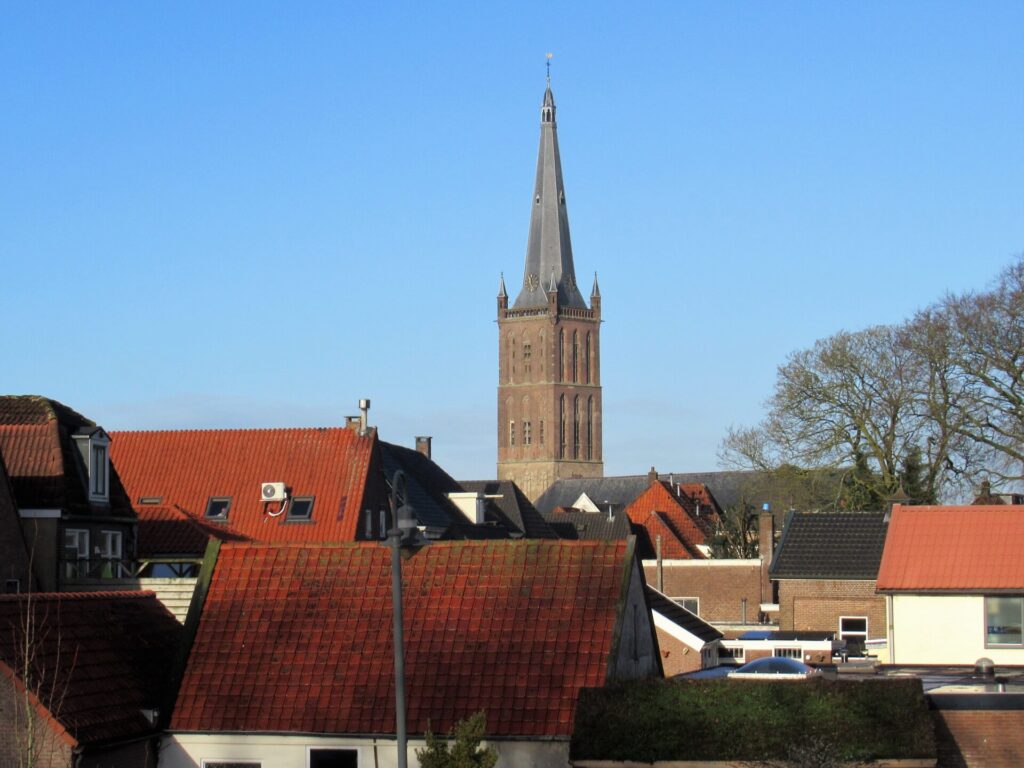
For some variation in my daily walks, I combined an errand in the town of Steenwijk with a walk and brought my camera. For anything but basic groceries we cycle to Steenwijk, and we can see its church steeple in the distance on most days.
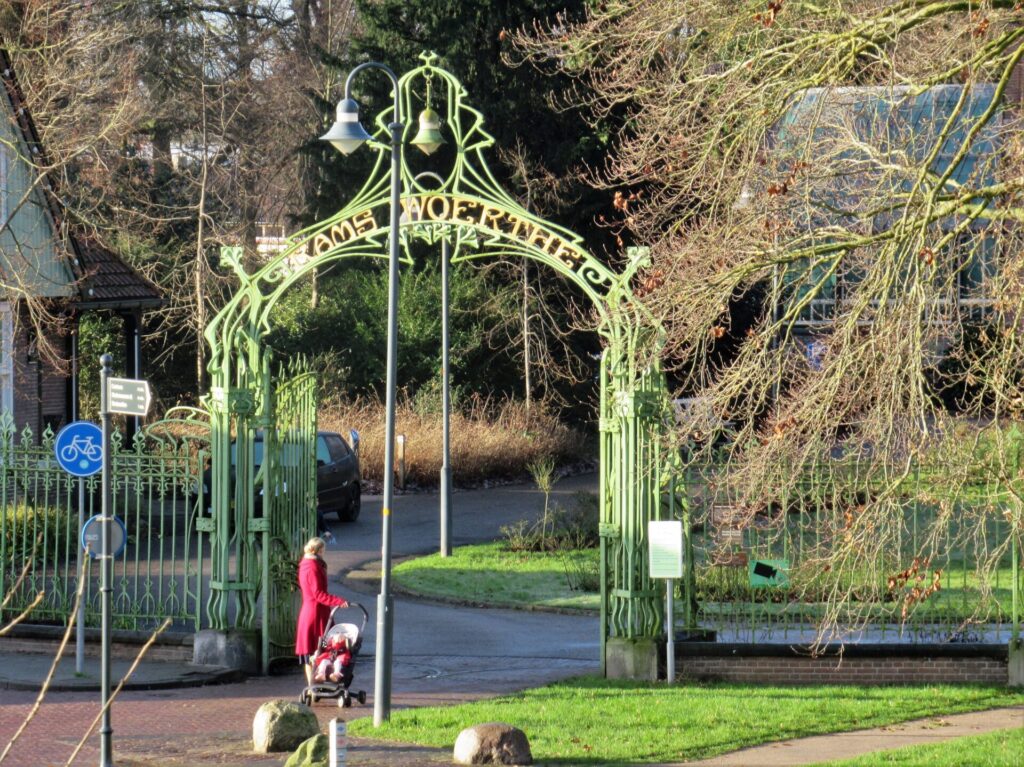
Steenwijk is also the town of the historic house of last-week’s pop-up card. I passed by its art nouveau entrance gate.
This is by no means an easy and relaxed time for many. First of all, I’m thinking of everybody who is ill or has a loved one in hospital, and our hard-worked care-workers. Other groups that are hit hard are those working in cafés and restaurants, and shopkeepers.
Like just about everything else, all non-essential shops have been closed again since the mid-December.
Blessed is the country that considers flower shops essential.
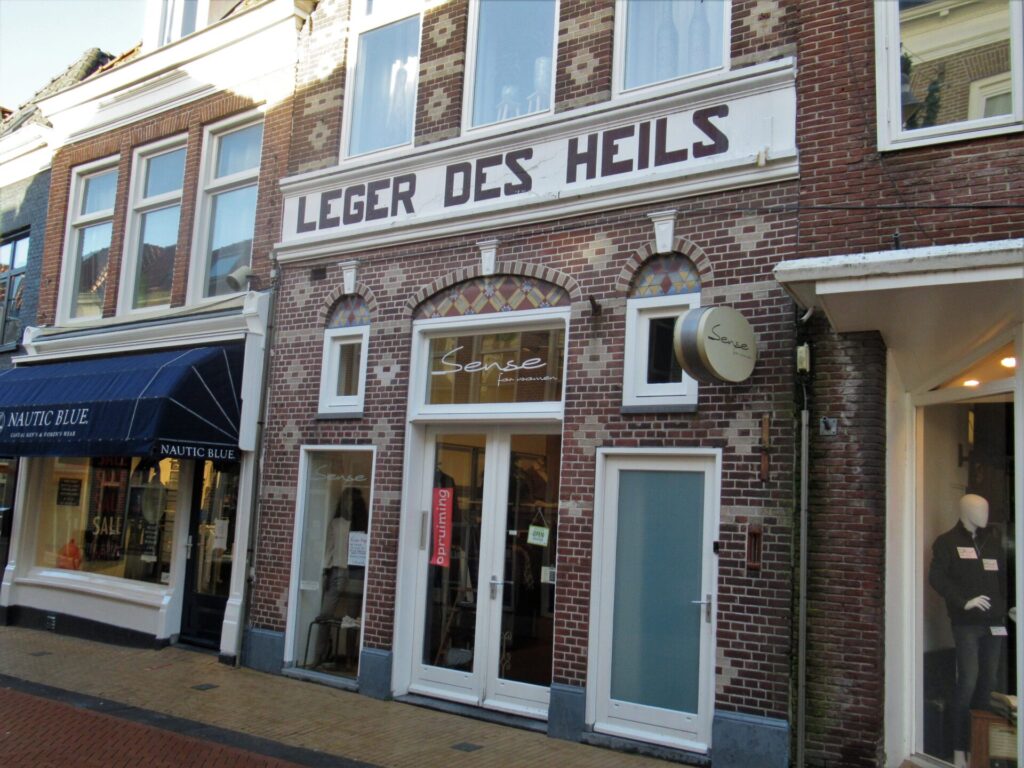
It’s strange to walk through the quiet streets. I notice different things, too. This shop is my first port of call when I need new clothes:
A funny detail I’ve never noticed before is that the building used to belong to the Salvation Army.
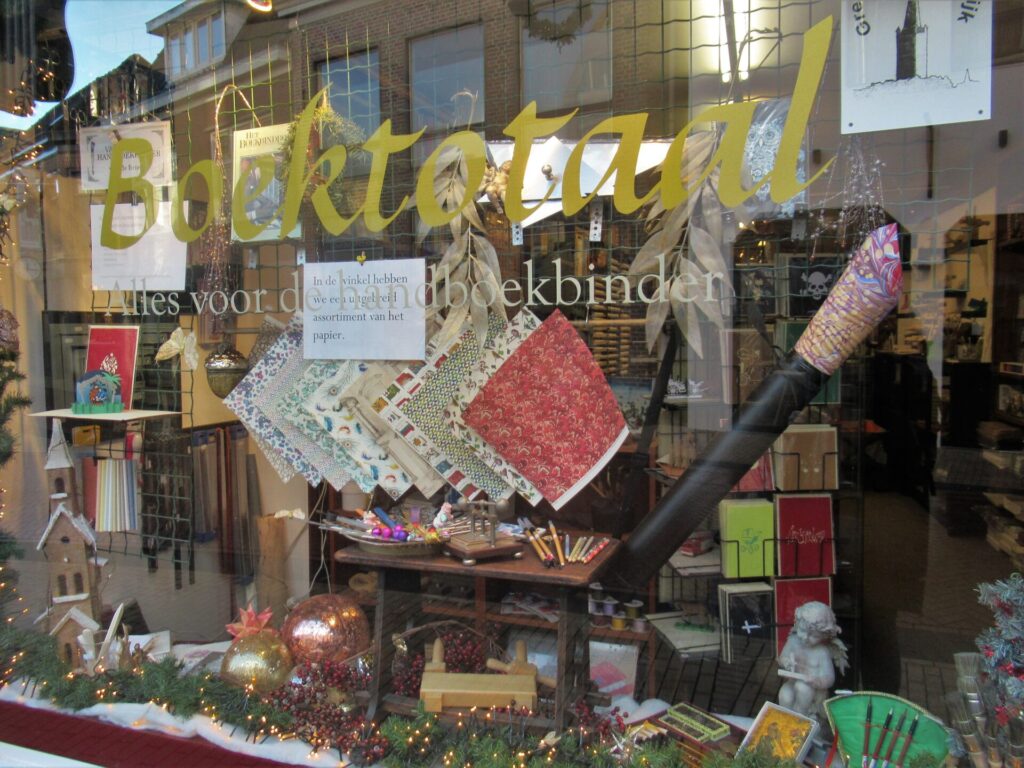
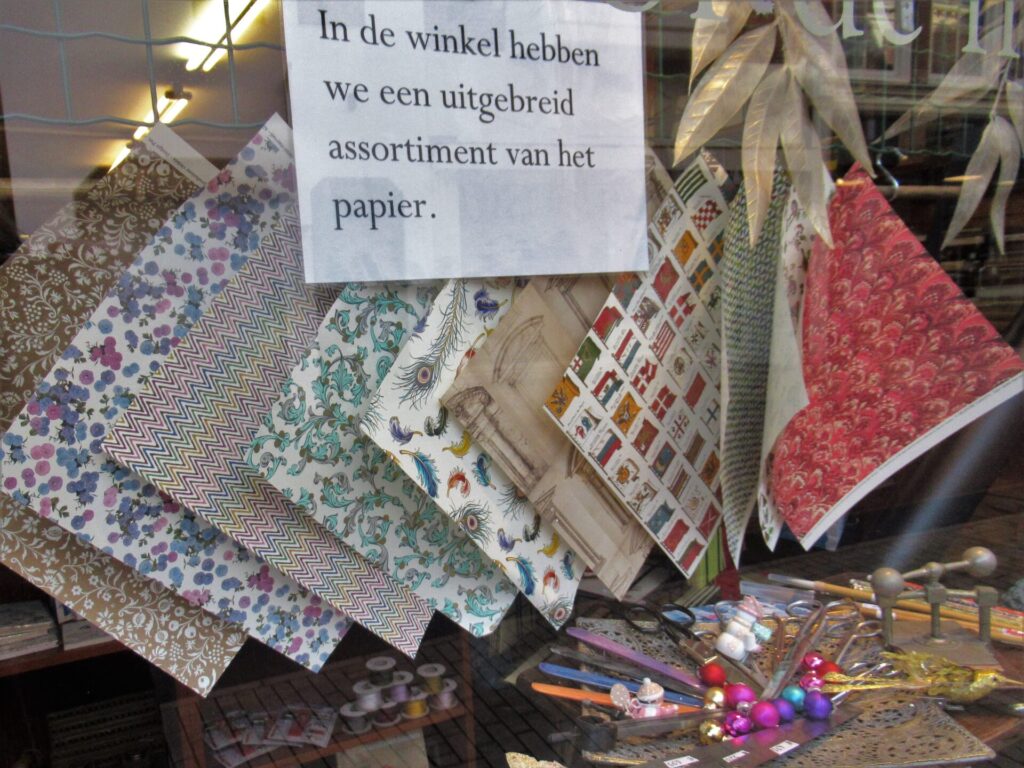
And here is something that I know will interest at least one of you reading this:
This little shop no longer sells second-hand books, but is now focusing completely on bookbinding materials and tools. I try to support our local shops as much as I can. And one of the small ways I can do that is by giving you a link to this shop’s website. Do pay it a visit if you’re interested in bookbinding or beautiful papers. There is a little flag at the top of their website for an English or German version.
I’m hoping for some good light this weekend to photograph the swatches I’ve been knitting. If all goes well, I’ll write about those next week. Hope to see you again then!
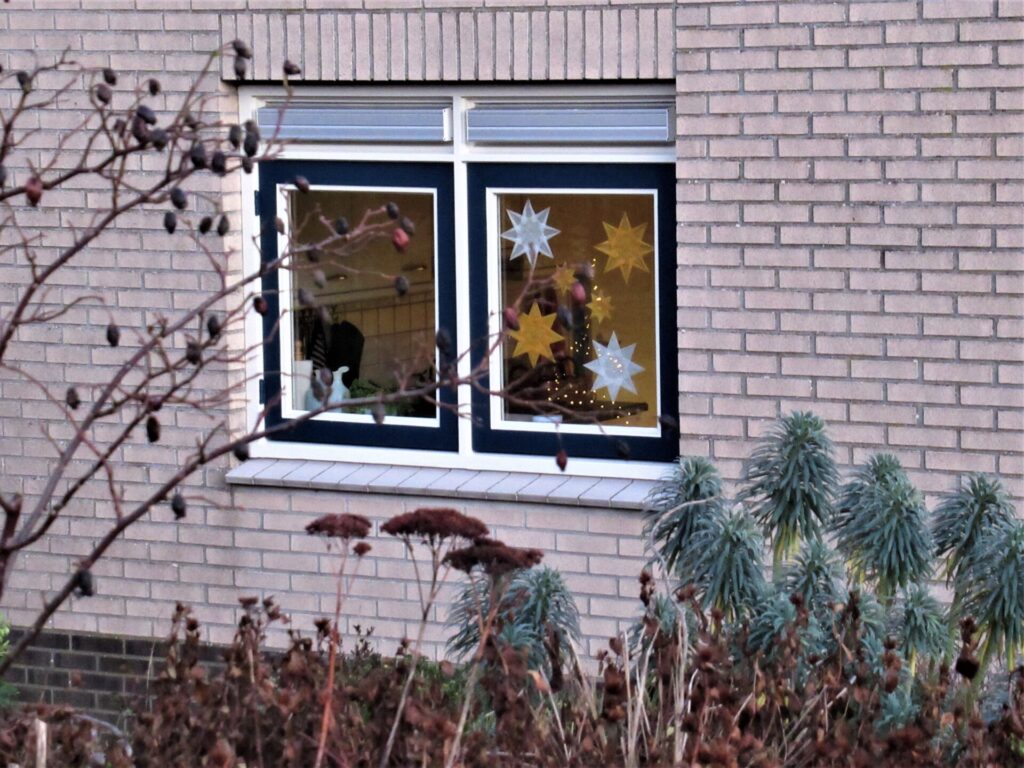
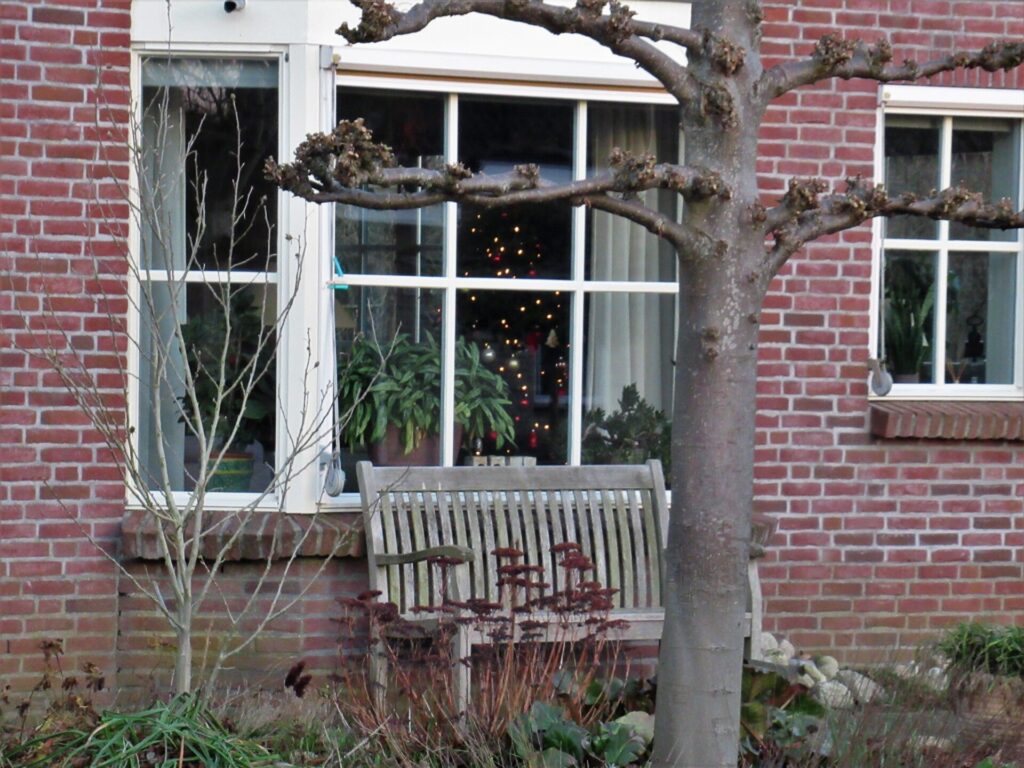
Hello, and welcome to the 3rd episode in the irregular series Places to Sit and Knit. For this Christmas special, I’m inviting you into our home. You’ll recognize it by the paper stars on the window.
What better place to sit and knit at Christmas than at home? Especially this Christmas. I don’t know what it’s like in your part of the world, but here in the Netherlands we’re in a strict lockdown again. Everything is closed, except essential shops (unfortunately the powers that be don’t count yarn shops among them) and other essential facilities. Let’s hope it’s enough to prevent black scenarios early in the New Year.
We’re only allowed 2 visitors a day (4 at Christmas) in real life. Fortunately the number of virtual visitors is unlimited, so come on in! Would you like a cup of coffee or tea?
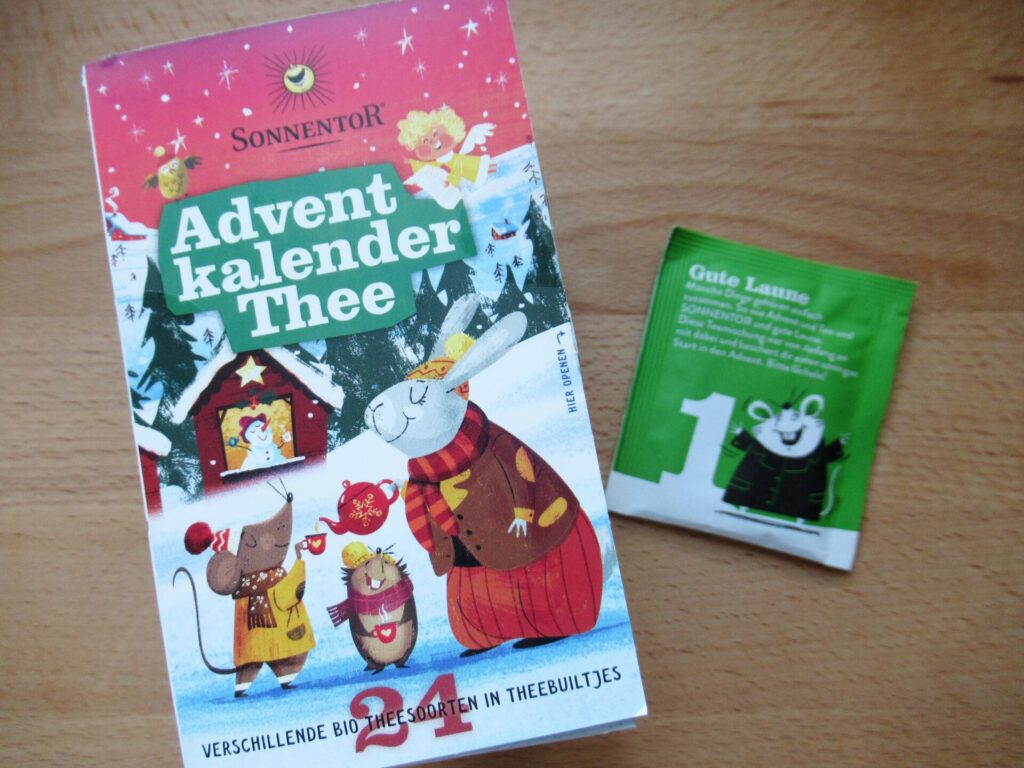
I was given a box of Austrian Advent Calendar Tea at the end of November, filled with green, black, white and herbal teas. It started with Gute Laune (Good Mood) tea on December the 1st.
Today, the last offering is Heavenly Christmas Delight, a spicy blend with cinnamon, orange peel, apple and clove. It sounds delicious, don’t you think? Please take a seat while I make our drinks.
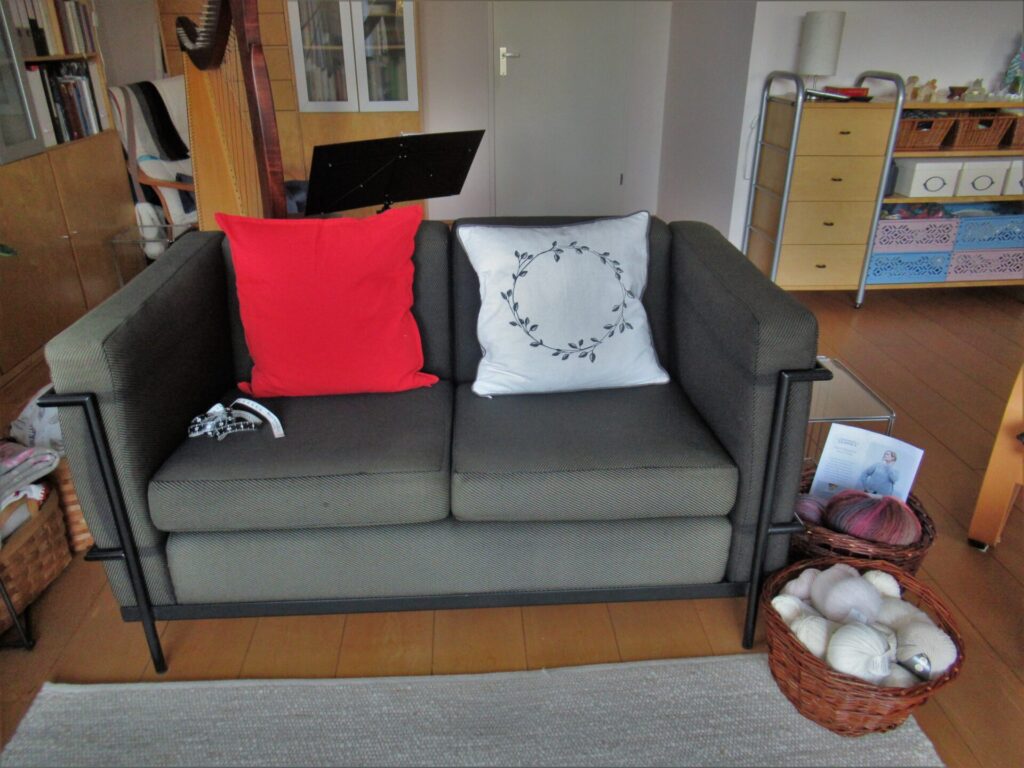
This is the sofa where I sit and knit at this time of the year.
My knitting chair by the window was moved away to make room for the Christmas tree.
Apart from finishing several pairs of socks, I have finished the body of a roomy cardigan knit from two lace yarns held together. I have even blocked it before starting on the sleeves, which are knit from the shoulder down. It looks a dark grey in the photo below, but actually is a lovely teal.
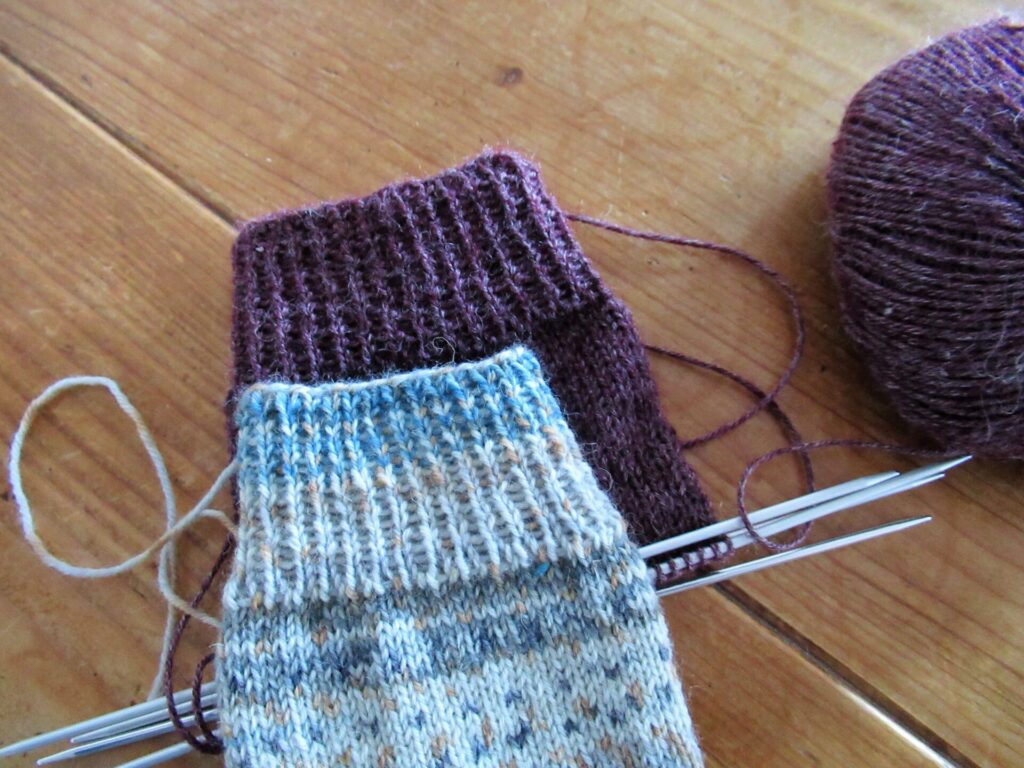
I have also made a start on the socks for my friend, the ones from the yarn with nettle in it instead of nylon. This yarn (Onion Nettle sock yarn) knits up differently compared to the yarns I’m used to. Here it is next to a sock from a traditional sock yarn that I’ve just finished.
Using the same number of stitches I usually cast on, the cuff turns out much wider. The yarn is also less elastic. Knitting on like this, I wouldn’t be happy with the end result.
So what am I going to do: cast on fewer stitches, start anew with smaller needles and/or use a different stitch pattern? Twisted stitches in the ribbing, perhaps? Hmmm, need to give that some thought.
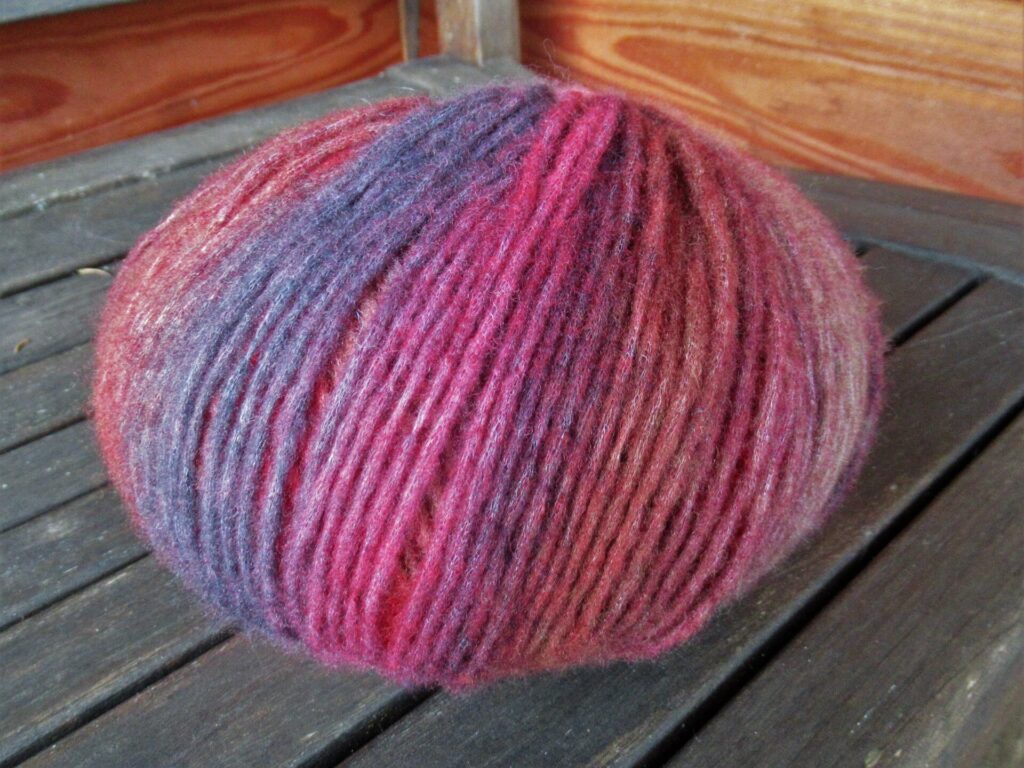
For the time being, I’m putting all my WIPs on hold to focus on two special Christmas Break projects. (There is that word again: focus, my word of the year 2021. Did I make any progress on that? Well, yes and no. I’ll try to write about that in January.)
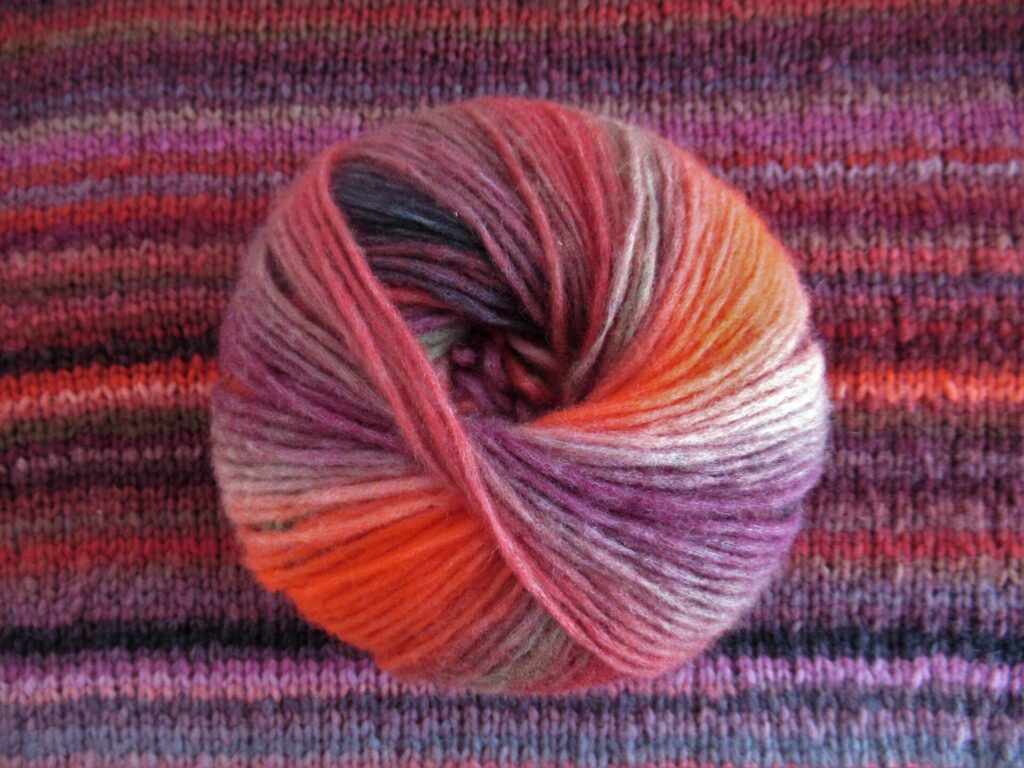
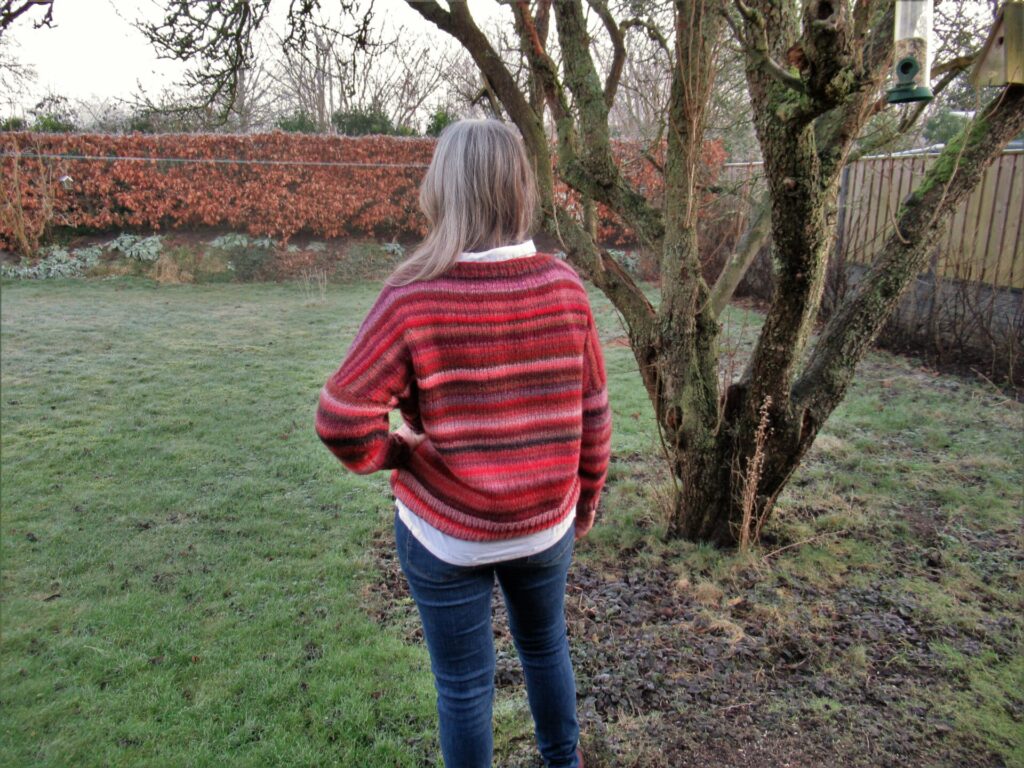
The yarn for these projects is already in the baskets beside the sofa. The first is a simple, oversized, comfy sweater in a lofty yarn – Lang Cloud – in many shades of red, burgundy, pink, purple etc. I’ve photographed it outside to do the colours justice.
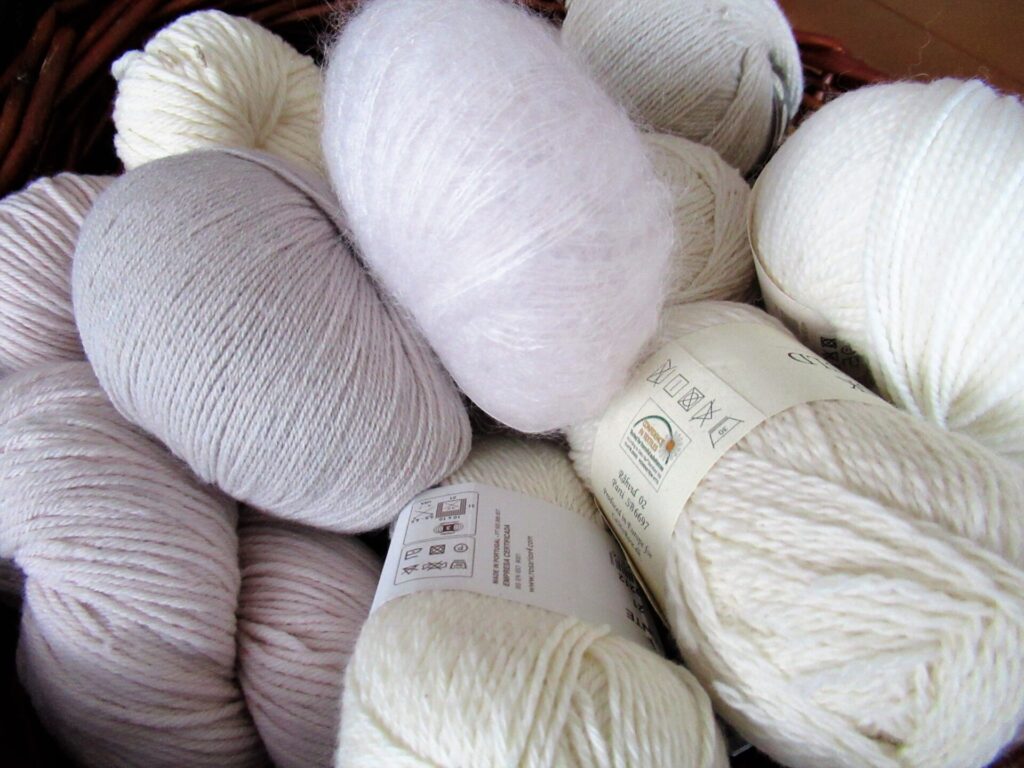
And my other Christmas Break project is knitting swatches. I’ve collected quite a few interesting yarns in undyed or neutral shades over the past couple of years. Somehow I never got round to them, and it feels like a real treat to finally get to try them out. My plan is to knit stocking stitch swatches on different needle sizes and try the yarns out in different stitch patterns as well, hoping that this will give me new ideas for things to design and make.
But that’s me nattering on. How are you doing? What is life like for you at the moment? Have you planned any special celebrations? Or are you working over the holidays, in health care or another essential job? Are you struggling to stay positive, like me? How do you keep your worries at bay? Do you have something nice on your needles? Any special knitting plans? I’d love to hear about them. Please leave a comment if you feel like sharing. It’s also perfectly fine if you don’t feel like it. I understand – I often feel too shy to leave comments, too.
Now, how about some fresh air? Let’s go for a walk. (We can only go for walks in ‘groups’ of 2 at the moment IRL, but again, the numbers for virtual walks are unlimited.) It’s often dark and dreary here at the end of December, but this year it’s been a true Winter Wonderland on some days. So far, it’s only been hoar frost, but we may even get some snow over the coming days.
I’ve planted the pots around the house up with some mini conifers, ivy and checkerberry.
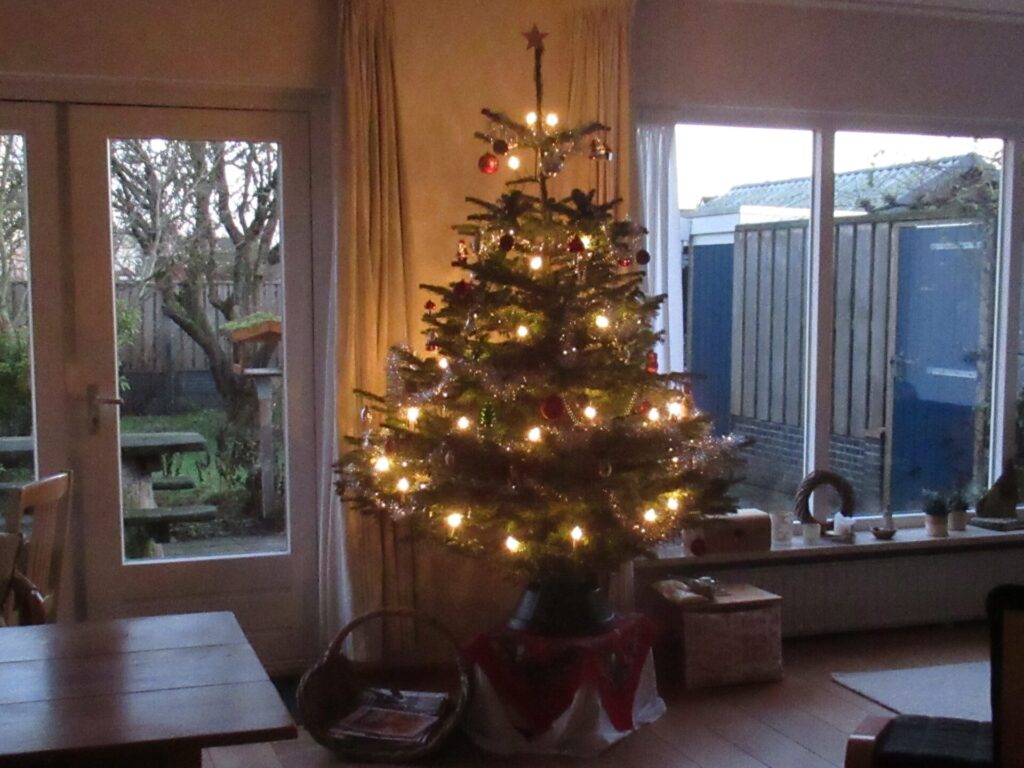
Almost every day, all year long, I take a stroll around our village. At this time of the year I love looking at other people’s Christmas trees.
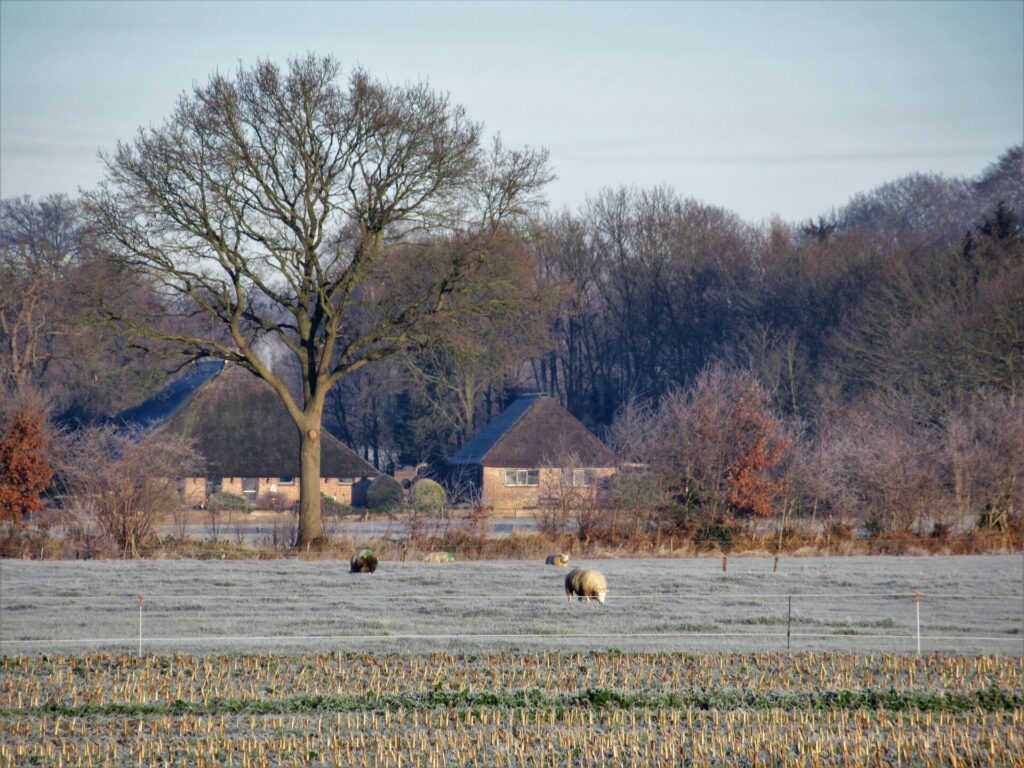
But on clear, frosty days it’s nicer to head out of the village. This is the view a two-minute-walk from our home.
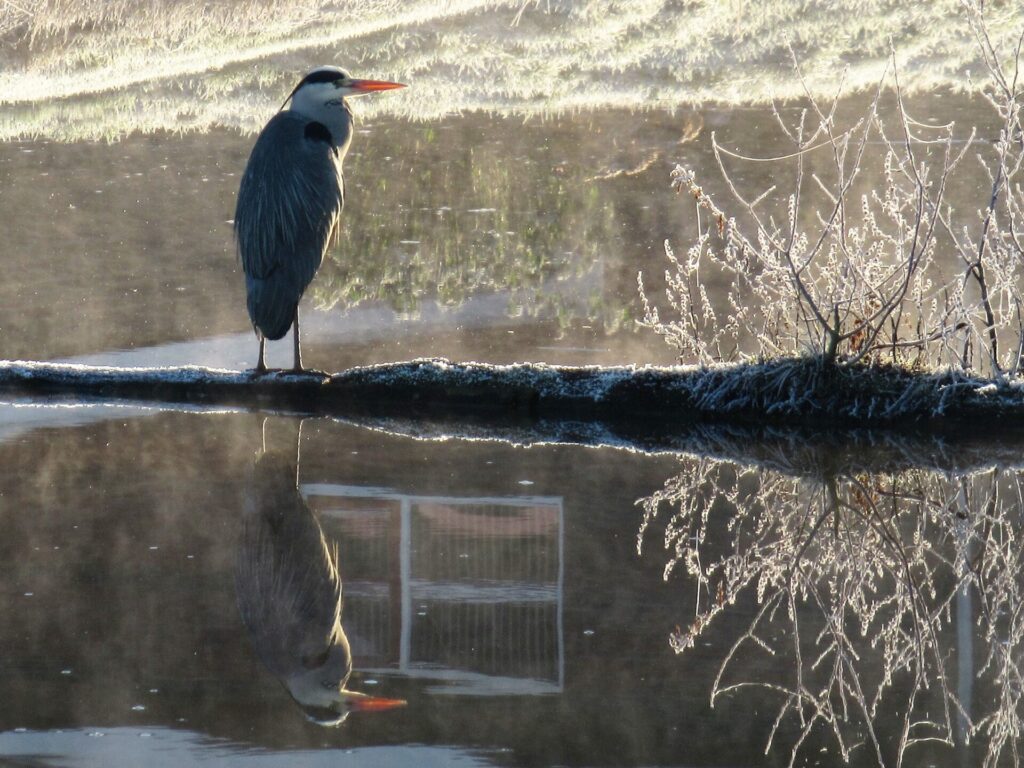
We are very fortunate to live here, and I never take it for granted. It’s not all idyllic, of course. But on some days even the local factory gets a magical quality, mirrored in a stream.
A little further on a blue heron is mirrored in the same stream.
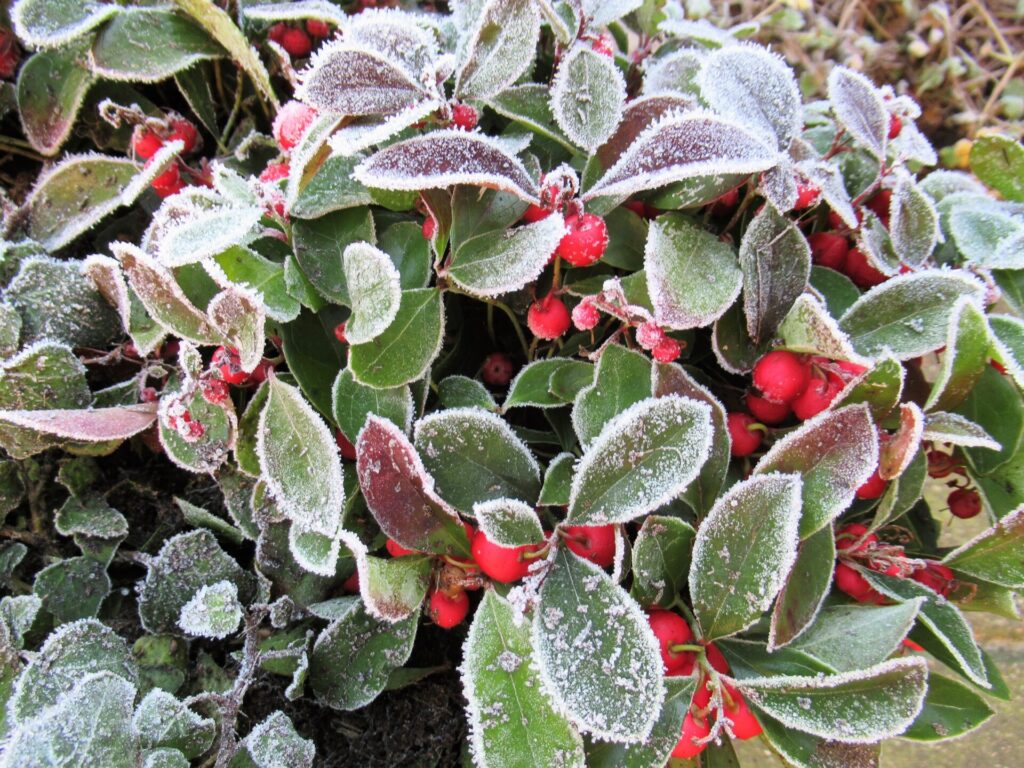
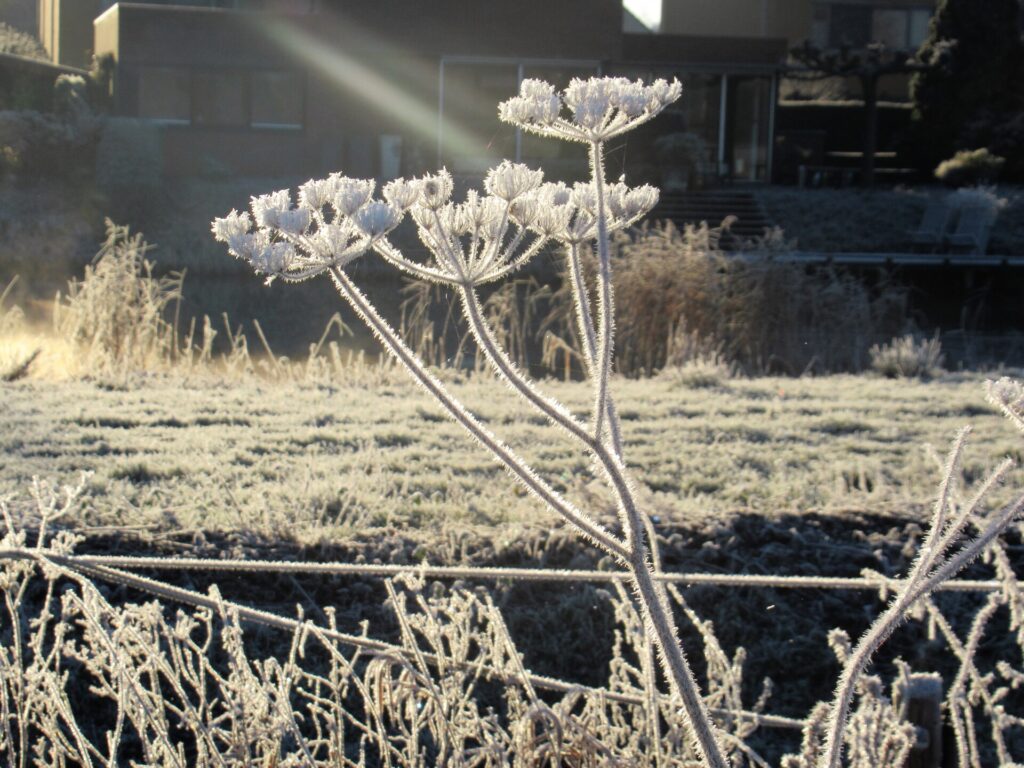
Father Frost has covered the plants with icy needles.
Truly magical.
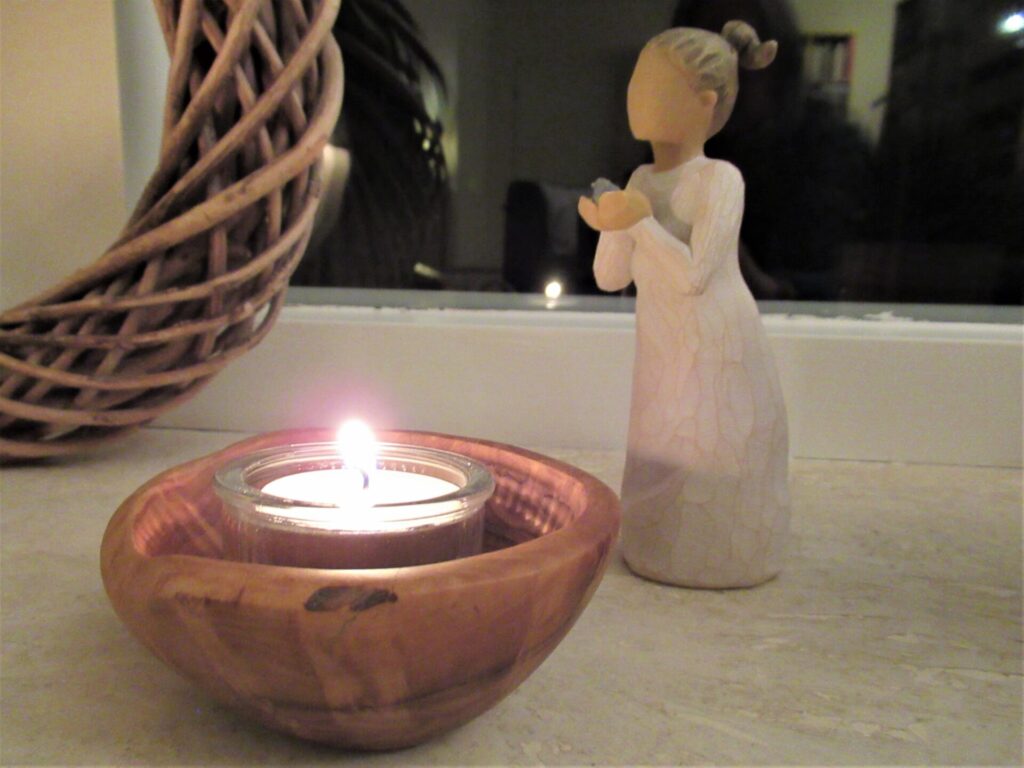
Well, I think it’s time to head back home and light a few candles. Thank you so much for stopping by – I really, really appreciate your spending some time with me here. Apart from all of you, we’re expecting very few real-life visitors over the coming days and weeks. Only two, in fact. And we won’t be going anywhere either. We love seeing friends and family and spreading good cheer, but we’d hate to spread the virus, so we’re keeping ourselves to ourselves this year.
I’m taking a break from my blog for a while, to just sit and knit (and read, go for walks, eat some delicious things prepared by my other half, and watch The Lord of the Rings for the umpteenth time).
All the best for a safe and peaceful festive season and I hope to see you here again in the New Year!