This post is looooong overdue. It’s the third instalment in a series of posts about ‘Stay Soft’, a shawl design by Veera Välimäki. I’d intended to write a step-by-step description of my knitting process way back in June, but… On the one hand, I got caught up in all kinds of new projects. And on the other, I felt unsure. Would people really be interested in reading about my knitting projects in so much detail?
But then two members of my knitting group asked: ‘How is your shawl coming along? You know, the one we helped you choose the pattern for?’ And I also started getting questions from readers, along the lines of: ‘Please explain how you knit the last part of Stay Soft, because I’m stuck.’ Apparently people do want to read about it, so here we go. (There’s a list of useful links at the bottom of this post).
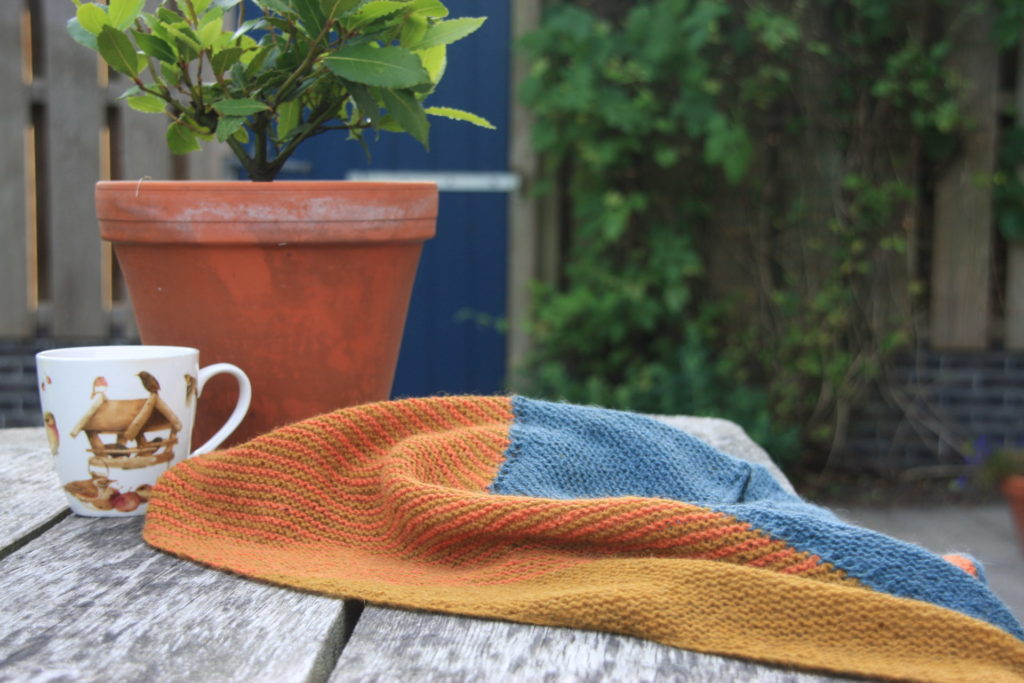
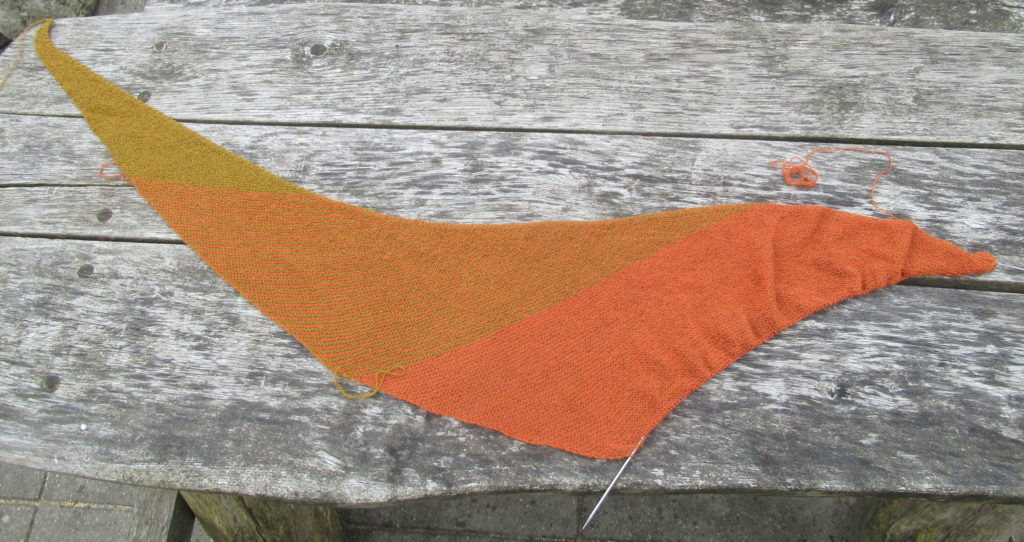
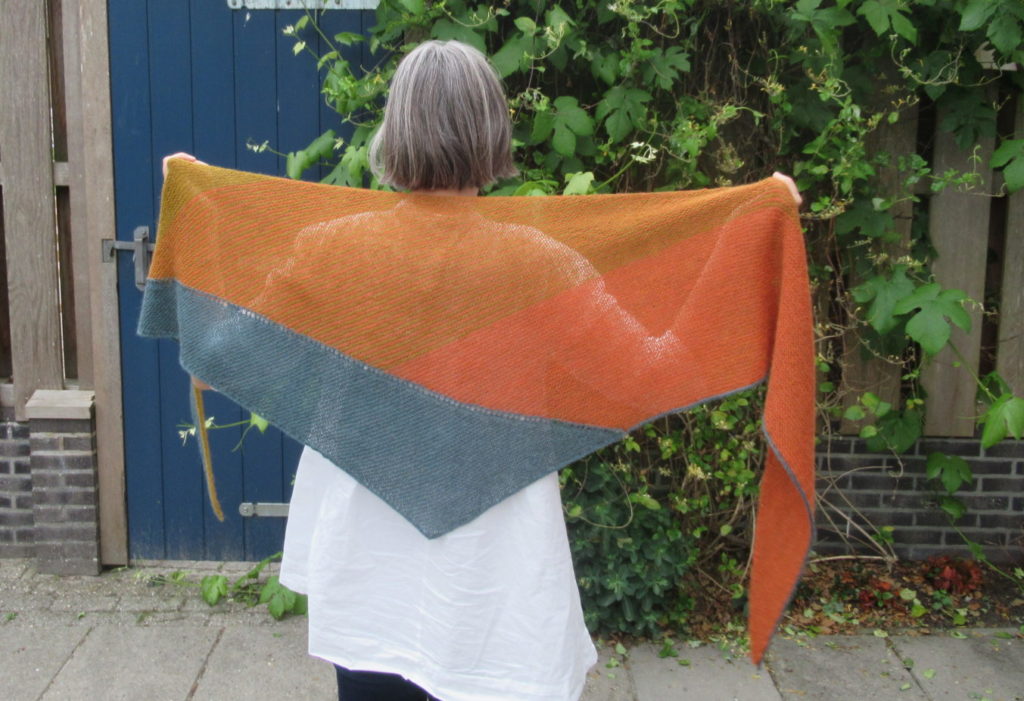
The previous instalment ended after the third part, called ‘Coral Part’ in the pattern. This is what the shawl looked like at that point:
These first 3 parts are fairly straightforward. Now we get to the hardest part of Stay Soft, the part starting with the heading ‘Yellow Speckled Part’. Although there aren’t any mistakes in the pattern, and all the information is there, I still had some trouble figuring out exactly what to do.
First a note about the colours, though. To avoid confusion, these are the colours used by the designer and the ones I used:
Pattern: MC white speckled; CC1 coral-pink; CC2 yellow speckled
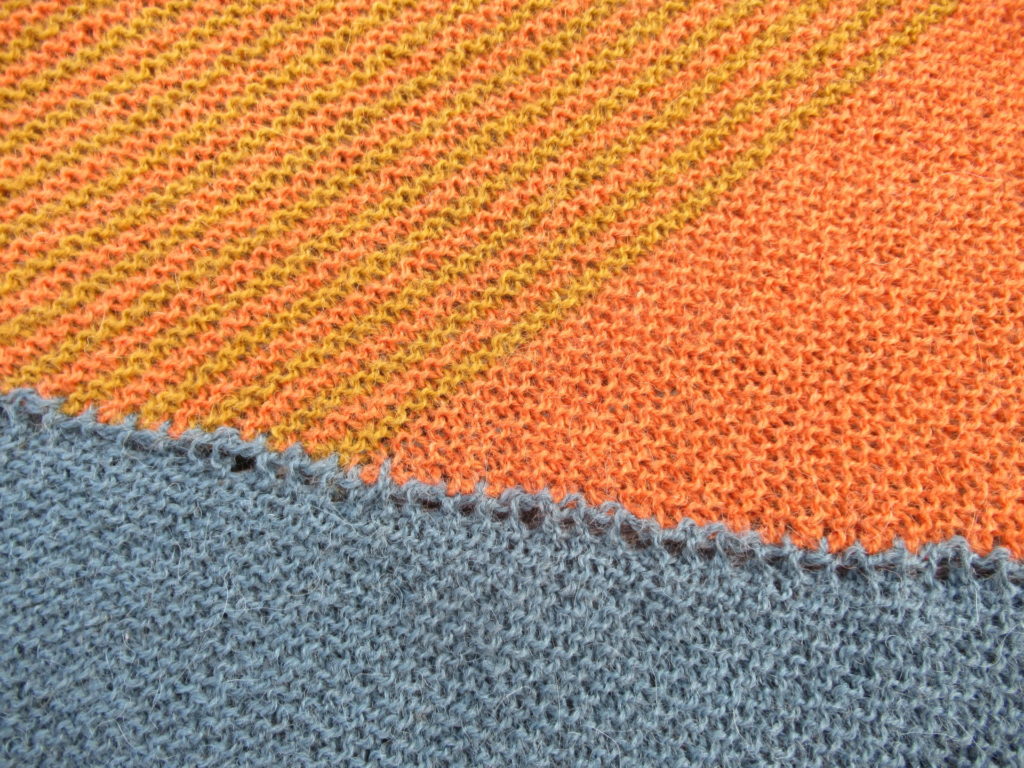
My version: MC yellow; CC1 orange; CC2 grey
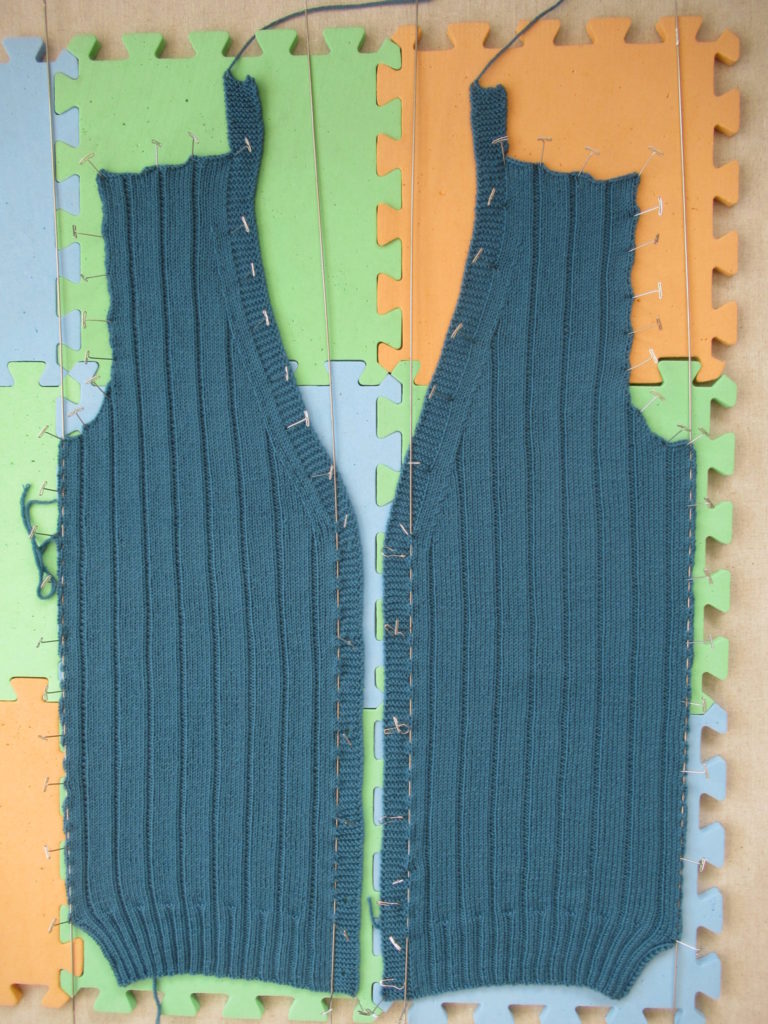
After the first three sections (called ‘Main Color Part’, ‘Stripes’ and ‘Coral Part’ in the pattern), stitches need to be picked up in the second contrast colour (CC2). The pattern says: ‘Use the same needle and CC2’, but I used a different needle, as suggested later on in the pattern. To my mind, this makes it so much easier.
I used interchangeable circular needles. This means that I unscrewed the tips from the cables, screwed them onto another cable, and screwed end stoppers (the rectangular white things in the picture below) on the cable with my orange live stitches. At this point I cut CC1.
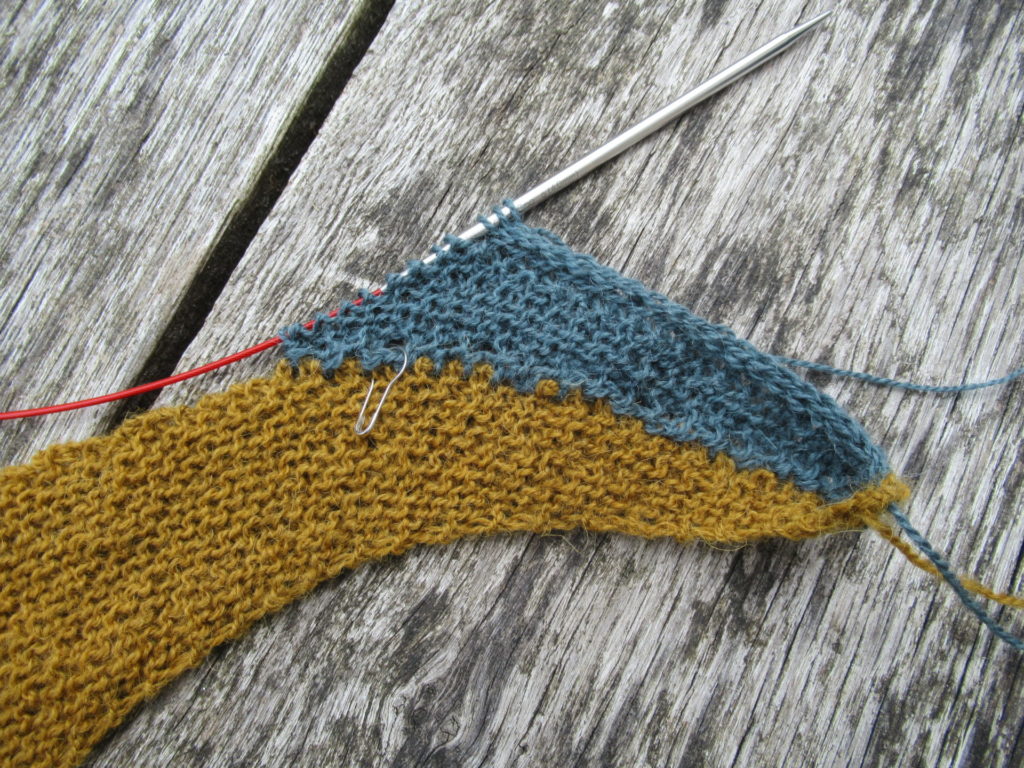
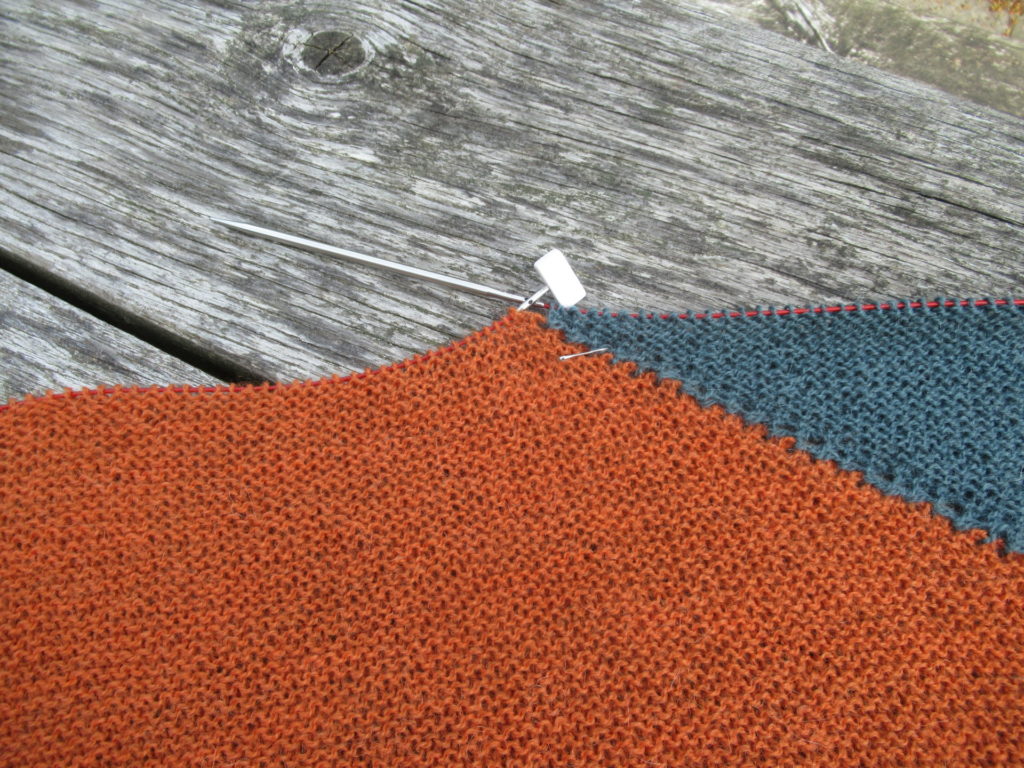
Then the pattern says: ‘pick up and knit 5 stitches starting from the cast-on corner of the shawl.’ And here it gets tricky. Where and how do we pick up these stitches?
After taking a good look I found out where to start picking up stitches. It’s at the tip the knitting needle below is pointing at – the very first stitches knit in the first colour (MC). And the stitches should be picked up on the right-hand side.
So, with CC2 and another needle the same size, and with the right side (RS) of the shawl facing, I picked up and knit 5 stitches, starting from the point indicated above. After a few tries, I picked up a stitch EVERY row (not in every ridge, which would be every other row), because otherwise the corner pulled and curled up.
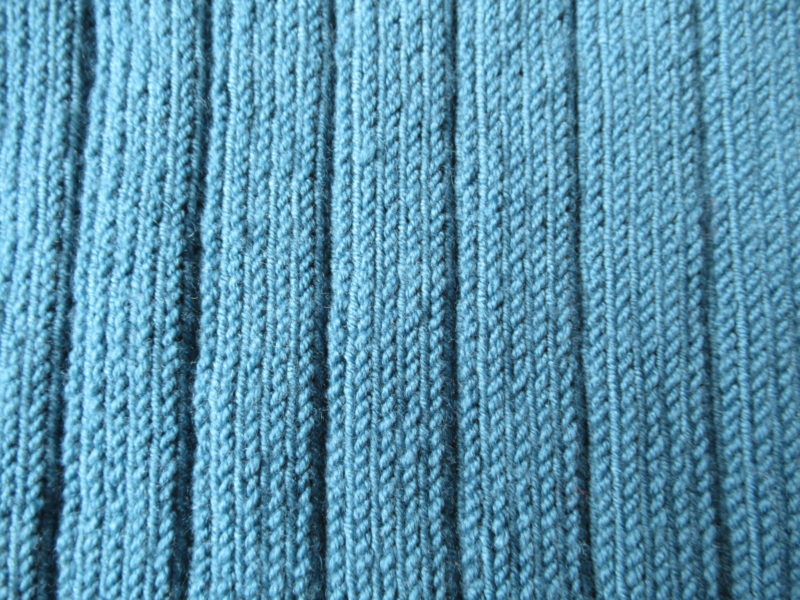
For the next row (WS), the pattern says. ‘Knit the first two stitches, and slide the remaining 3 stitches onto right-hand needle as if to purl’. This made me scratch my head again – should the yarn be held in front or in back? As it turns out, the yarn should be held in front. So: After picking up 5 stitches, turn your work, knit the first 2 stitches, bring yarn to the front, and slip the next 3 stitches purlwise (as if you were going to purl them, but without actually purling them) with the yarn held in front of your work. Then turn your work and knit rows 11 – 18.
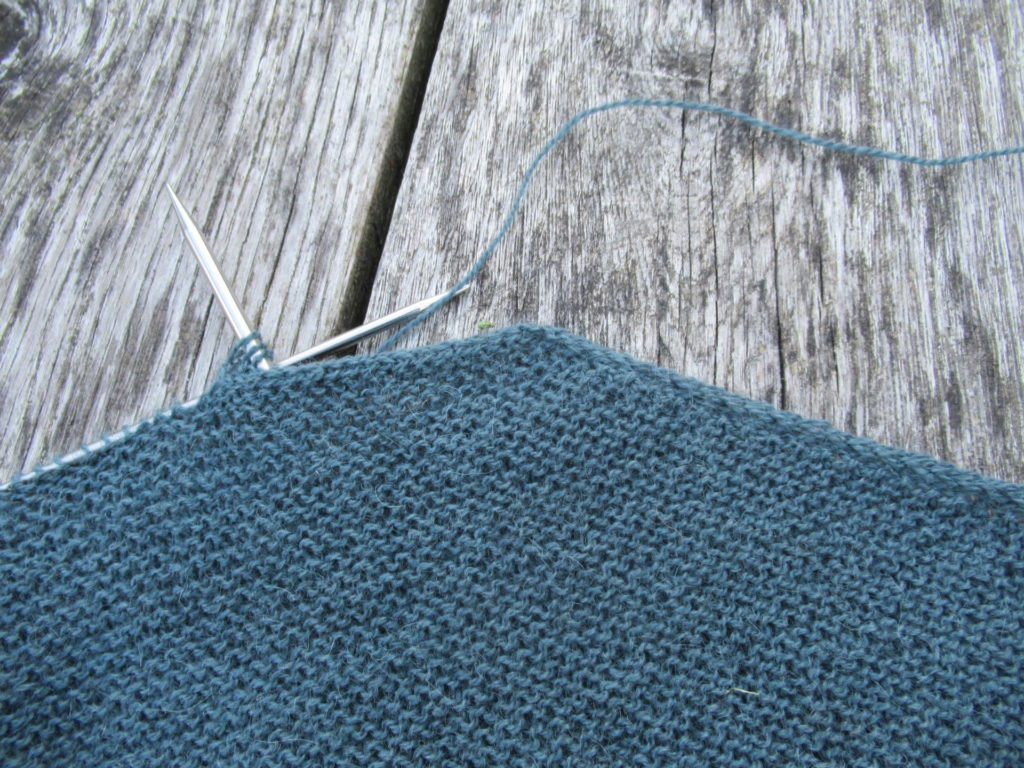
Slipping the last 3 stitches with the yarn held in front gives a sort of I-cord edge. When you’re just starting this edge it doesn’t look very nice or neat, as you can see in the picture below. But it will get better as you continue.
After that, rows 13 – 18 are repeated until the corner is reached, where the live stitches of the ‘coral part’ are waiting.
In this section, 1 stitch is increased in all right side (RS) rows by knitting 1fb, but this is neutralized by knitting 2 sts together in the same row. Only in row 17 it says k1fbf (instead of k1fb), so only in this row 1 stitch is increased. It is important to keep track of this, but I found it impossible to see where I had increased a stitch. To keep track of the increases, I placed a locking stitch marker immediately after I’d knit a ‘row 17’. And as soon as I came to the next increase row, I moved the stitch marker there.
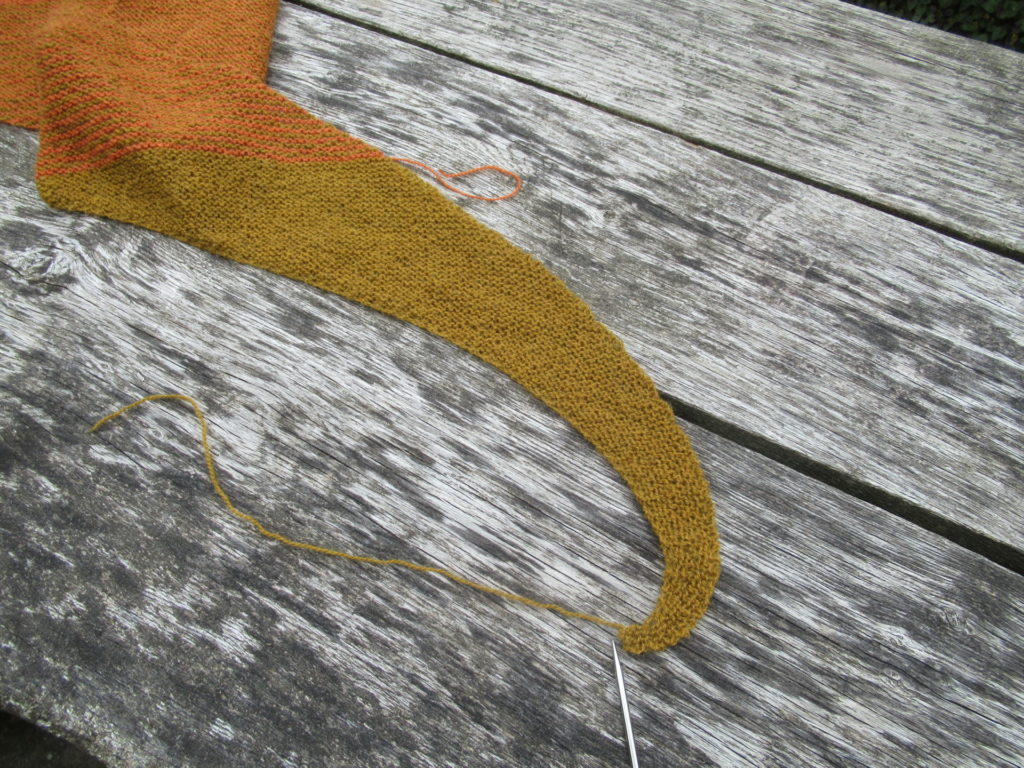
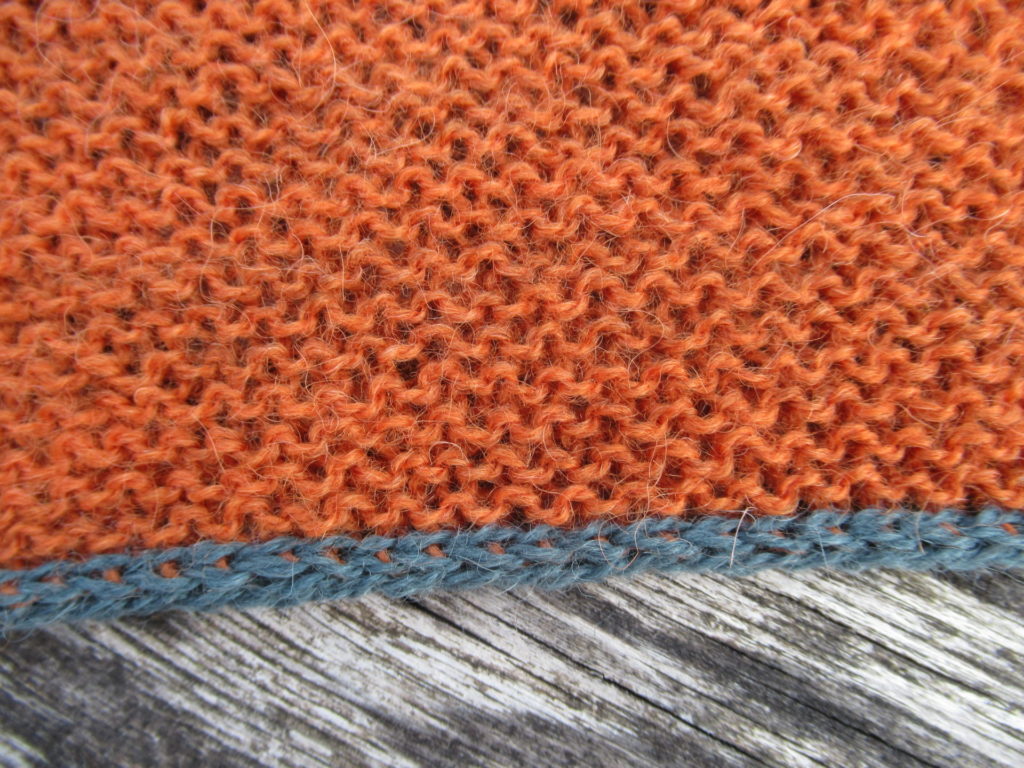
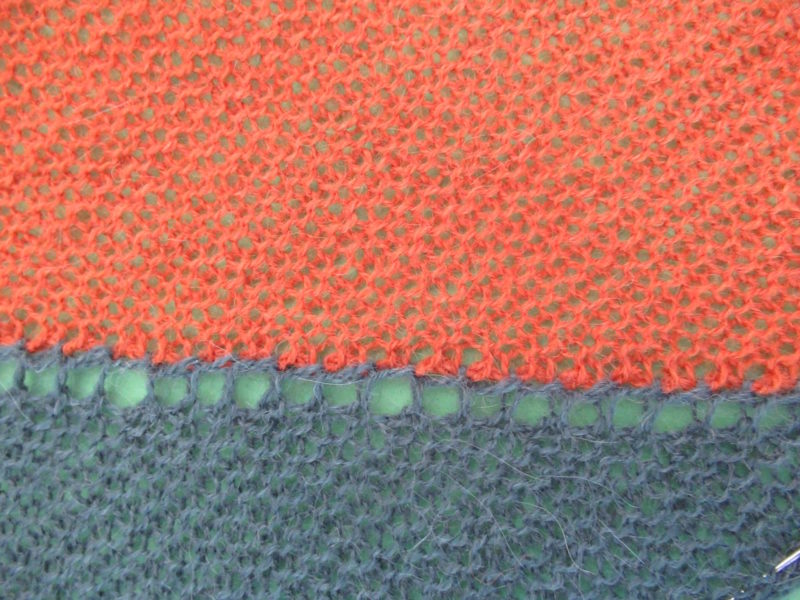
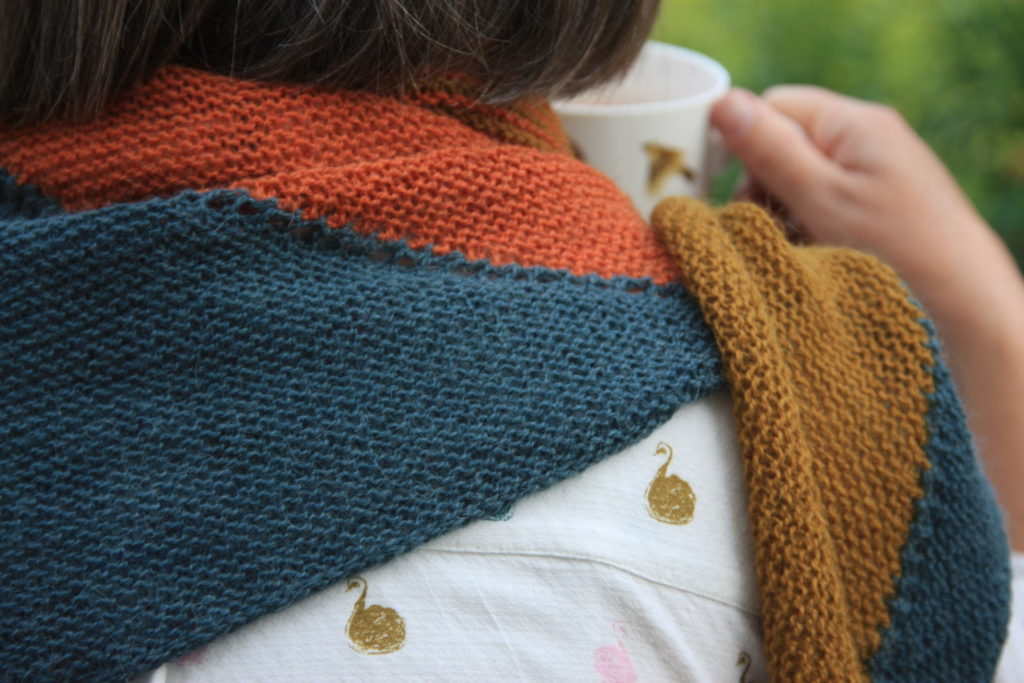
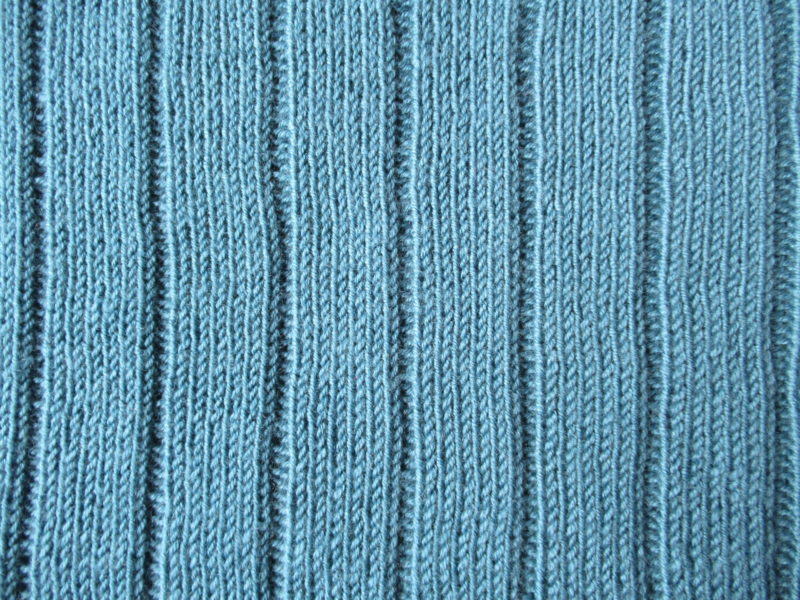
Knitting on like this, a knitted on I-cord edge is formed on the ‘outside’, and a row of holes along the body of the shawl. At first it doesn’t look very attractive, but after a while the edge becomes really neat, and it becomes visible how the part in CC2 brings everything nicely together.
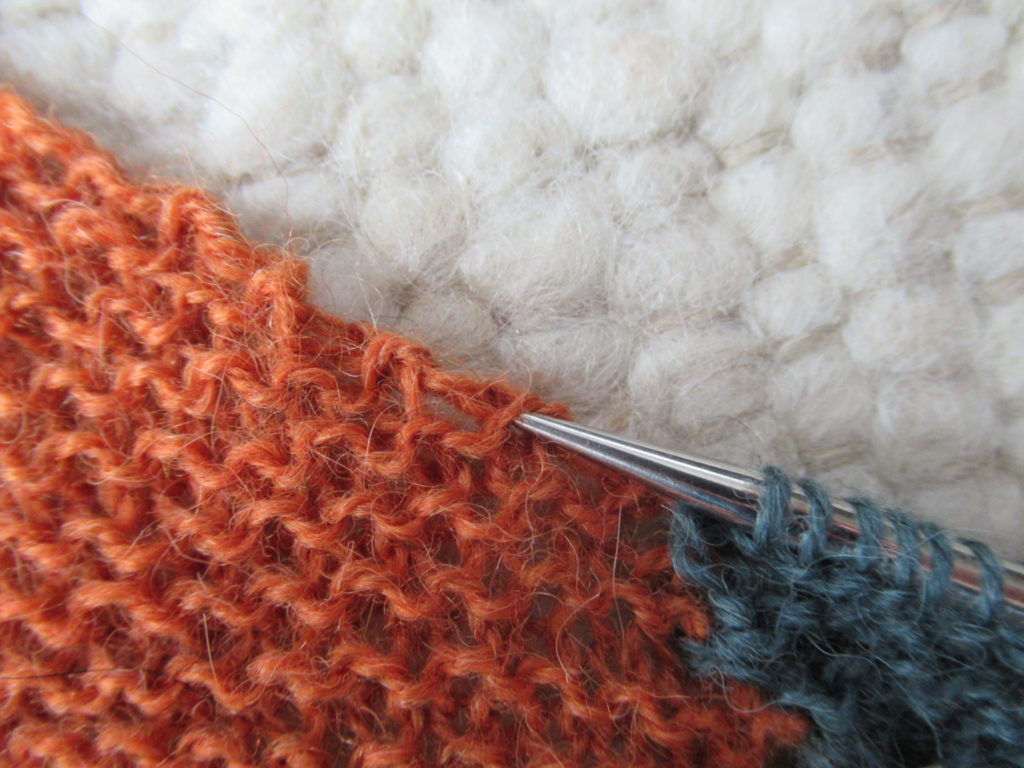
The next picture shows where exactly I picked up the stitches in the RS rows – just below the ‘curve’ or ‘bridge’ of the last knit stitch.
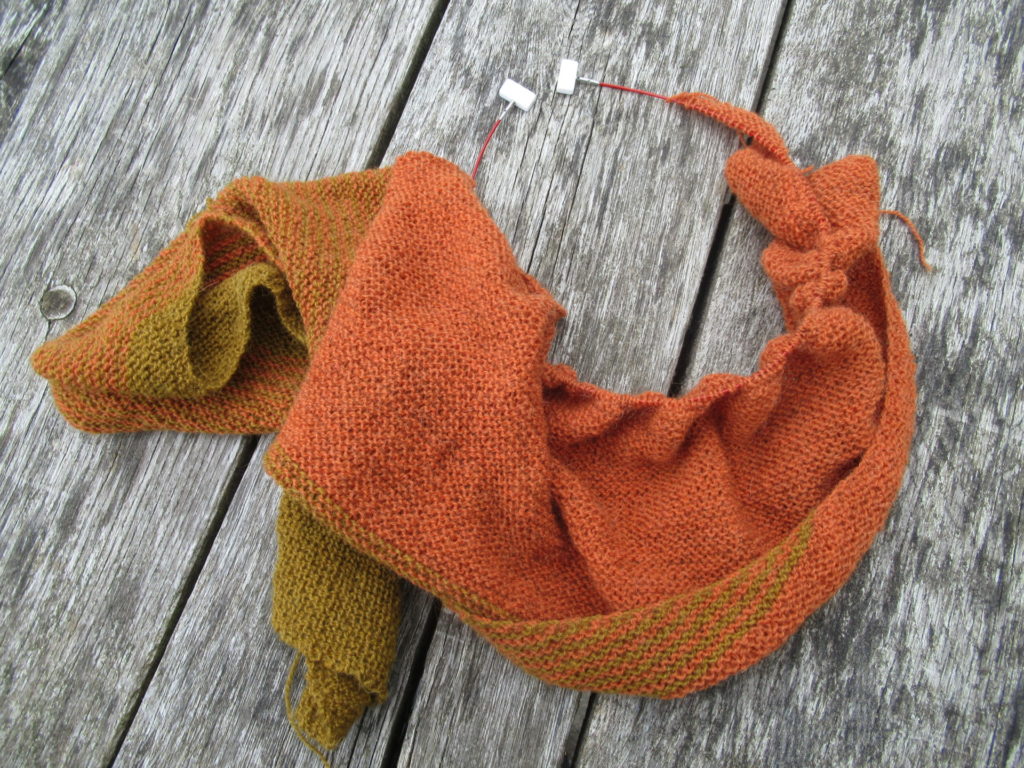
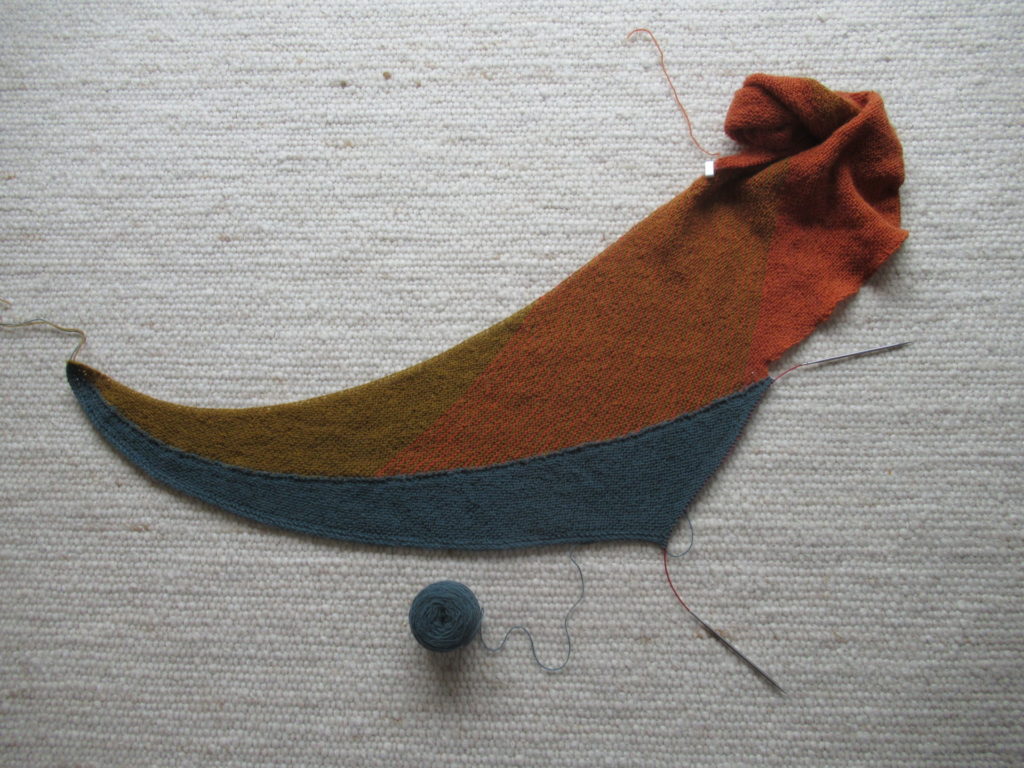
After knitting everything described on page 4 of the pattern, the shawl looks like this:
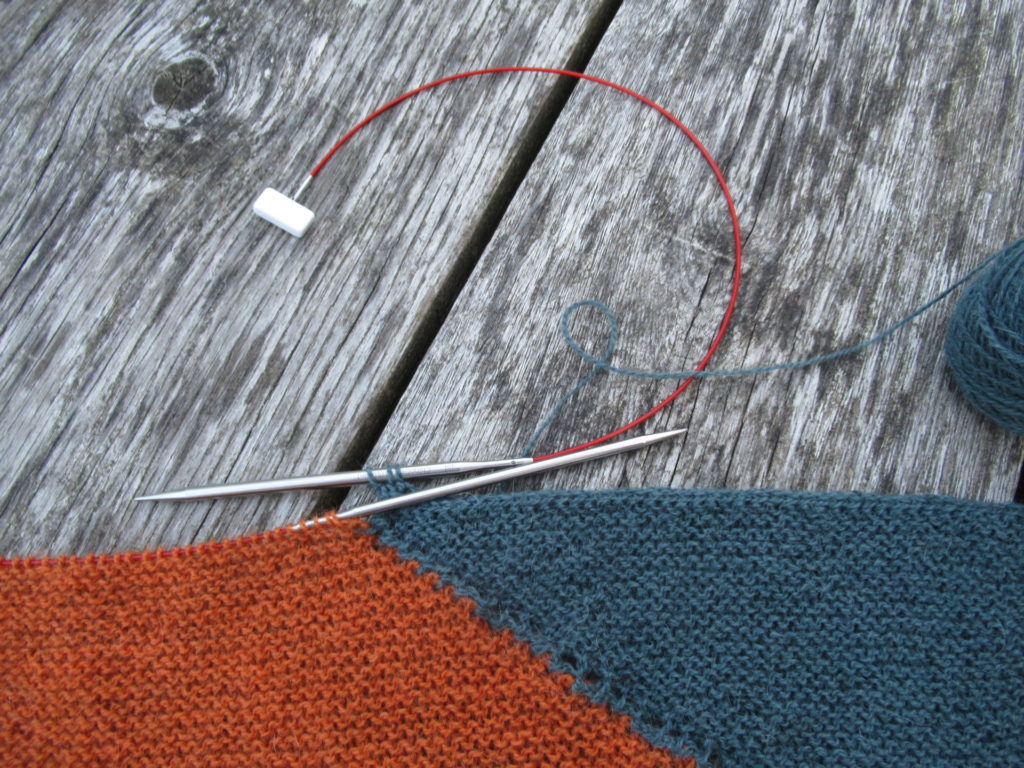
The needle in the grey part meets the end stopper on the cable in the orange part:
Time to start the I-cord bind-off along the end of the grey section. After about 10 cm/4 inches I noticed that this I-cord was much tighter than the knitted-on I-cord along the side of the grey section. I unraveled it carefully and started again with a thicker needle tip (5.0 mm instead of the 4.0 mm needle I used so far). Yes! Now both I-cords were similar.
Upon arriving at the orange section, I changed the end stopper for a thicker needle tip (in my case 5.0 mm) and continued the I-cord bind-off.
The knitted-on I-cord is just a small detail, but just look at it. It changes Stay Soft from an OK shawl into a fabulous shawl, don’t you think?
After the knitting is completed, it’s time to block the shawl. I think blocking is essential – it makes all the difference. After soaking the shawl in a non-rinse wool detergent (I used Soak, but Eucalan or any other brand works just as well) I spread it out on blocking mats. I threaded blocking wires through the knitted fabric along the edges.
I threaded the blocking wires through the stitches inside the I-cord edges:
While I was knitting I was a bit worried about the row of holes between the body of the shawl and the knitted-on part. They looked terribly irregular. Fortunately that was solved by blocking, too.
What a difference!
Before blocking
After blocking
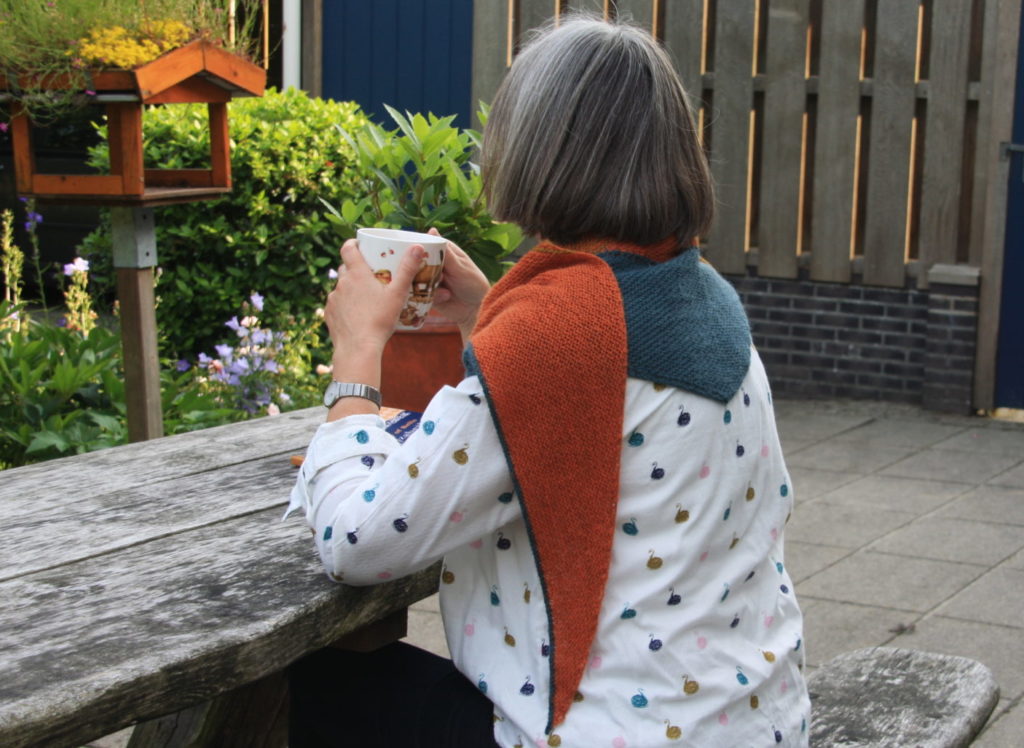
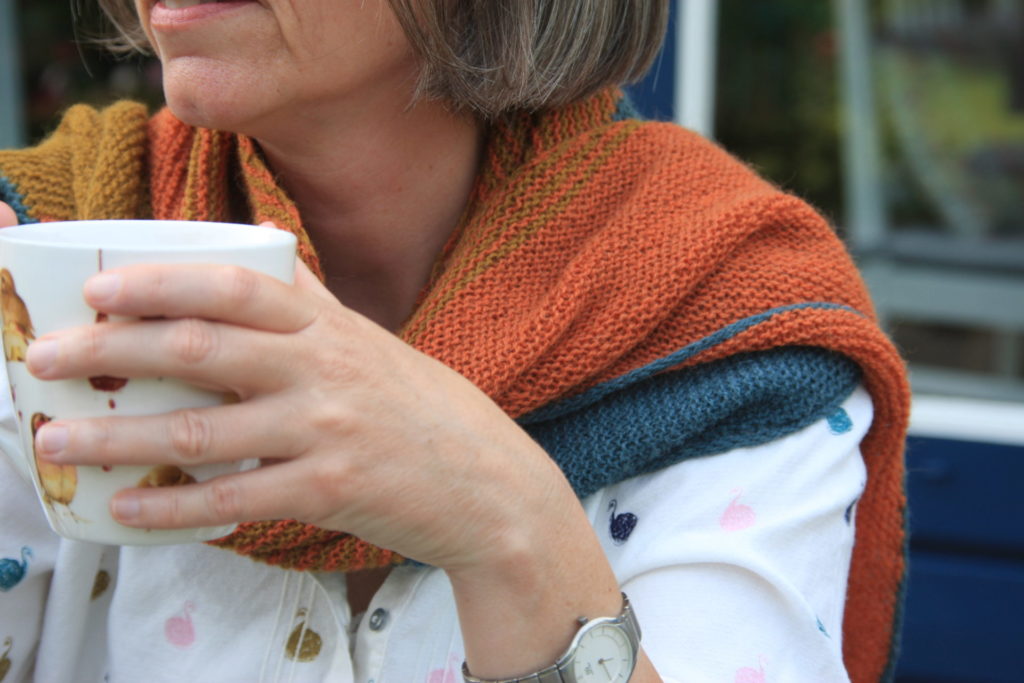
And that’s it – the shawl’s all done!
I used a thinner yarn than indicated in the pattern (fine fingering instead of ordinary fingering), which gives a nice and airy shawl. When the light falls through it, it looks slightly transparent.
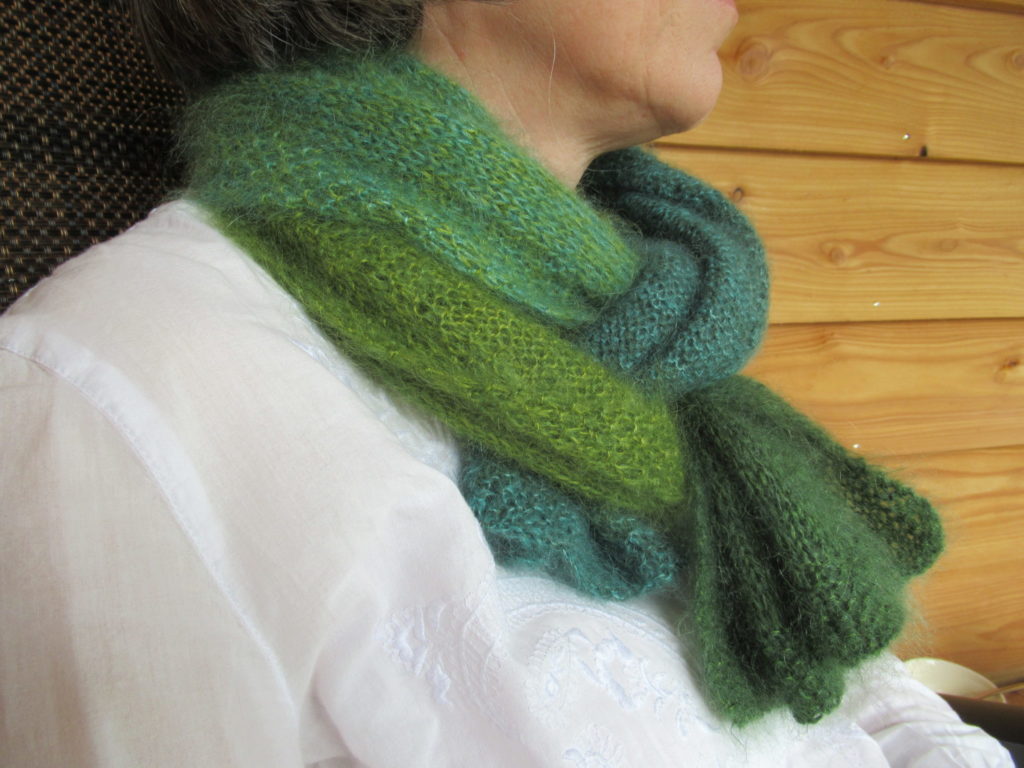
But wrapped around the neck, it is really cosy. Below you can see how the I-cord in a contrasting colour gives a nice crisp edge.
Needles: 4 mm/US 6 and 5 mm/US 8 (the thicker needle only for last stretch of I-cord)
Finished size after blocking: Wingspan 213 cm/84 in; Middle to tip: 57 cm/22.5 in
I think it’s a very wearable, good size shawl from just over 100 grams of yarn. For me, Stay Soft was a really, really enjoyable pattern to knit, in spite of (or perhaps rather because of) all the frogging and puzzling out how to get it right.
Phew! This may very well be my longest blog post to date. At least it was the most complicated one to compile. Thank you dear knitting friends and readers for giving me the motivation to do it.
I hope everything makes sense. If there’s anything that isn’t clear, or if you have any other questions, please leave a comment. I’ll try to answer as best as I can.
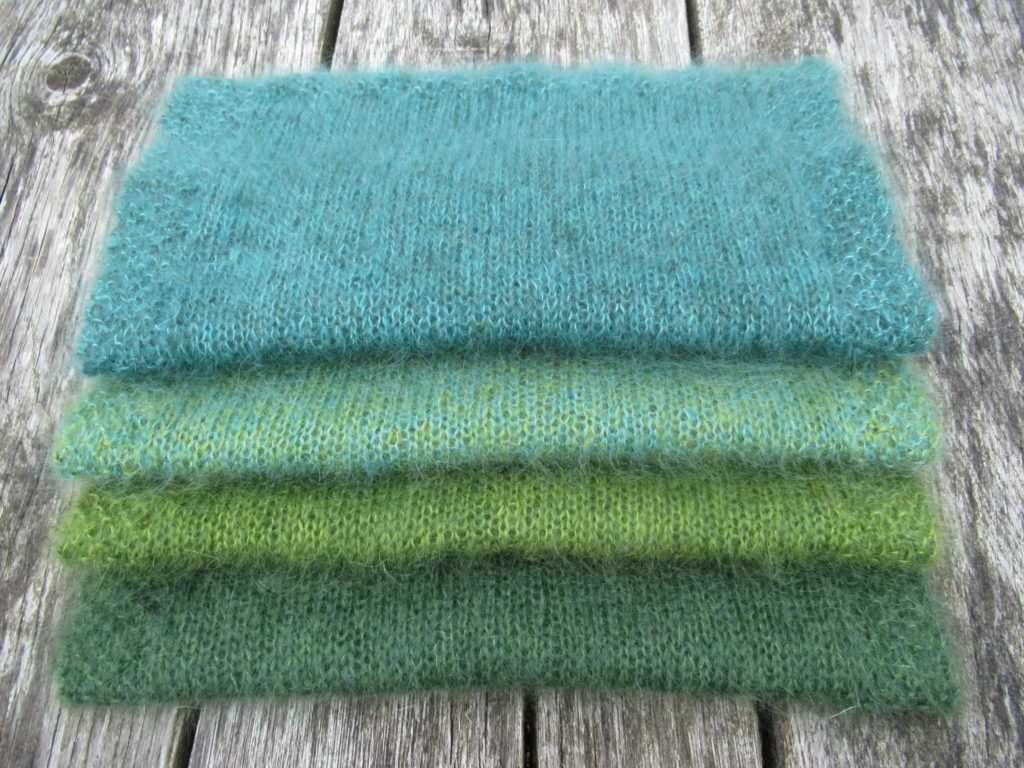
A while ago, I decided to mend my ways and finish things immediately after the actual knitting, instead of leaving them lying around half-finished. With my green mohair and silk scarf that was easy. I only needed to darn in two tails (at the beginning and end of the scarf, because I’d knit in the others at the colour changes), give it a soak and allow it to dry.
The pattern told me to roll up the scarf in dry towels, after soaking it, and gently squeeze out the moisture. That’s the advice that’s generally given for delicate yarns, to prevent them from breaking. But I just put my scarf in the spin dryer. (No! Really? Shock! Horror!). Yes, really! I know from experience that this yarn doesn’t come to any harm, as long as it stays in for just a short time. (I have a separate spin dryer, and haven’t tried the spin cycle of the washing machine, though.) The yarn is thin, but it is stronger than it looks, especially when two strands are knit together.
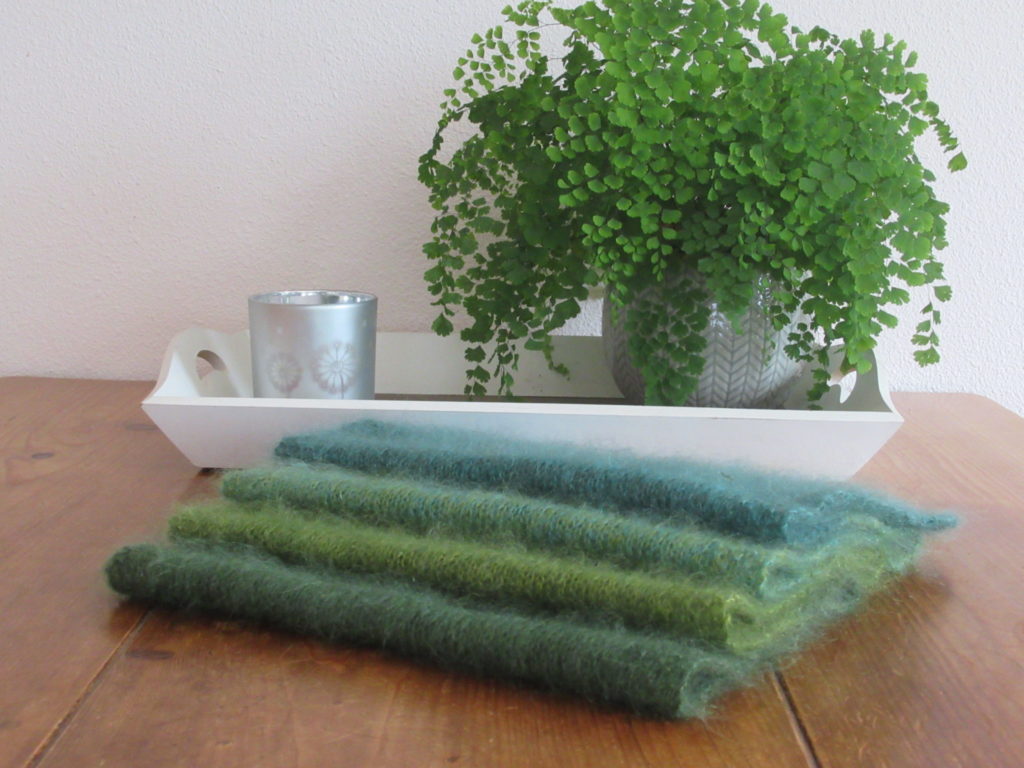
After spin drying, I just spread it out to dry on the floor at first. But on second thoughts I decided to block it on my foam mats, with blocking wires along the insides of the border. And I must say, that was worth the effort. It dried up nice and straight along the sides, and the fabric became loftier and more even than it would otherwise have been. It ended up really, really soft and fluffy, as you can see:
The pattern I used is the Color Play Mohair Scarf by Churchmouse, a yarn and tea shop on Bainbridge Island on the west coast of the US, near Seattle. I love their simple and stylish patterns. The CPMS is very easy to knit. Basically it is nothing but a stocking stitch rectangle with a seed stitch border. I could have knit it without a pattern, but I bought the pattern anyway. Why?
Because the pattern tells me exactly how much yarn I need (for this scarf as well as for a bigger wrap version), which needles to use, how many stitches to cast on, and when to switch colours. It is nice when somebody else does the thinking for me now and then. Besides, it has gorgeous colour photos and useful tips.
The scarf is knit in four shades of green, with two strands of yarn held together. This gives such a lovely effect:
Several years ago, I knit the same scarf in a red/orange/pink colour combo, and it’s still one of my favourites. If I had a limitless yarn budget, I’d knit ten of these, all in different colours.
The only thing is, I’ll have to wait for a few months before I can wear it, because it’s much too warm now. I often seem to finish things in the wrong season. At least, the wrong season from a temperature point of view. Colourwise it is exactly the right season!
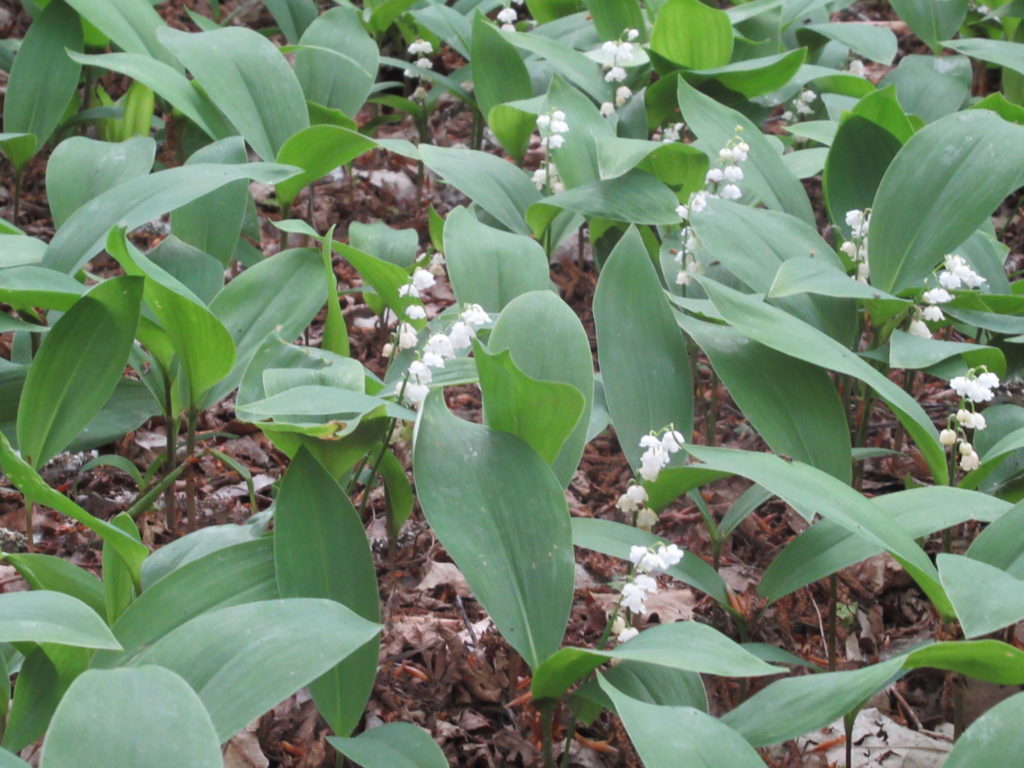
The month of May has been like an explosion of green. Part of our local wood has a green (and white) carpet of Lily of the Valley.
I knelt down to take some photographs from closer up. And to breathe in the heavenly scent of the flowers, of course.
During the past few months, the CPMS was my take-along project. It accompanied me on visits to friends and relatives. And also on an outing to Münster, Germany, where we spent a rainy morning at the Botanical Gardens. Speaking of green…
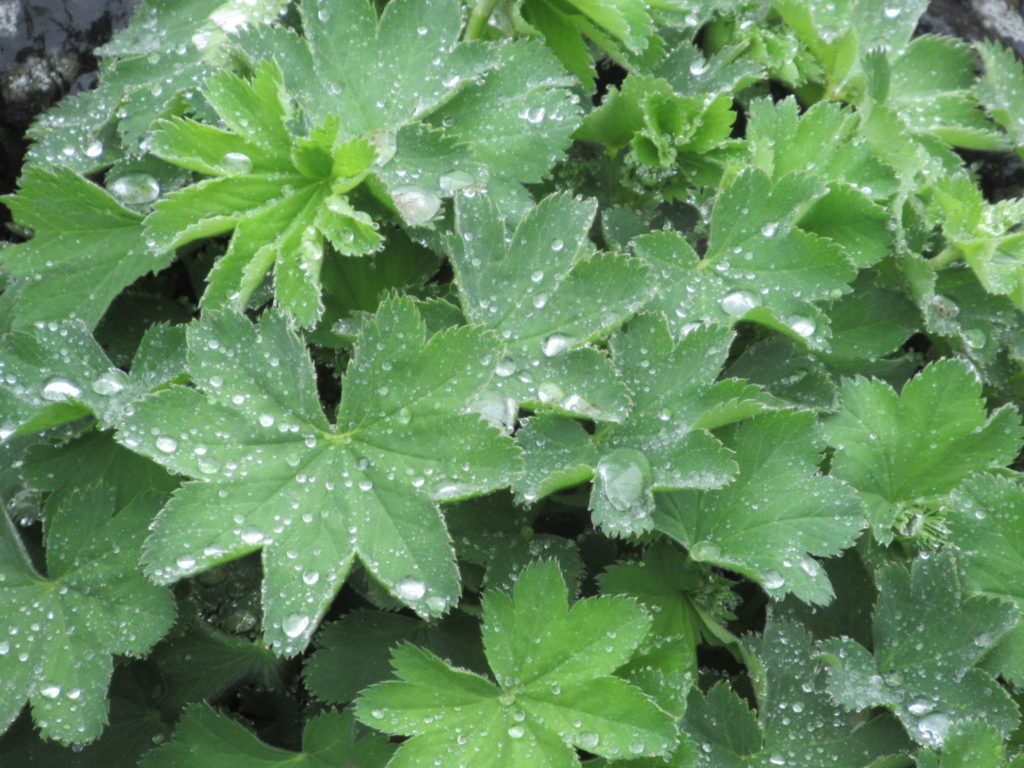
We didn’t really mind the rain. It made everything smell nice and fresh. And look how beautiful the raindrops gathered on the leaves of the Lady’s Mantle (this is a small alpine variety):
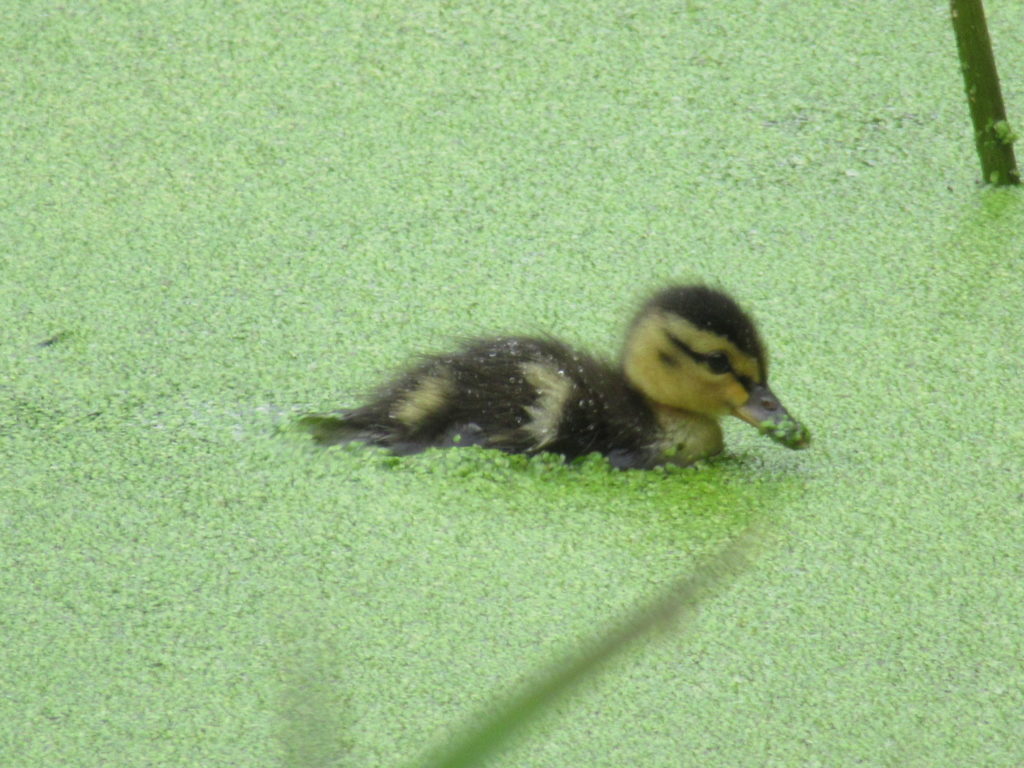
The Botanical Gardens had a big pond, with a weeping willow with bright green young leaves in the centre. It looked more like a lawn than a pond, though, with its surface covered entirely by duckweed.
A Mallard and several ducklings were swimming around in it. The beak of the little duckling in the picture is covered in duckweed, which made me wonder if they actually eat it. I looked it up and – yes, in addition to insect larvae, snails and so on, they also eat duckweed.
(Looking this up, I also found out that scientists are investigating duckweed as a possible food source for us, humans. And why not? I can see duckweed soup, duckweed smoothies and duckweed pesto in my future.)
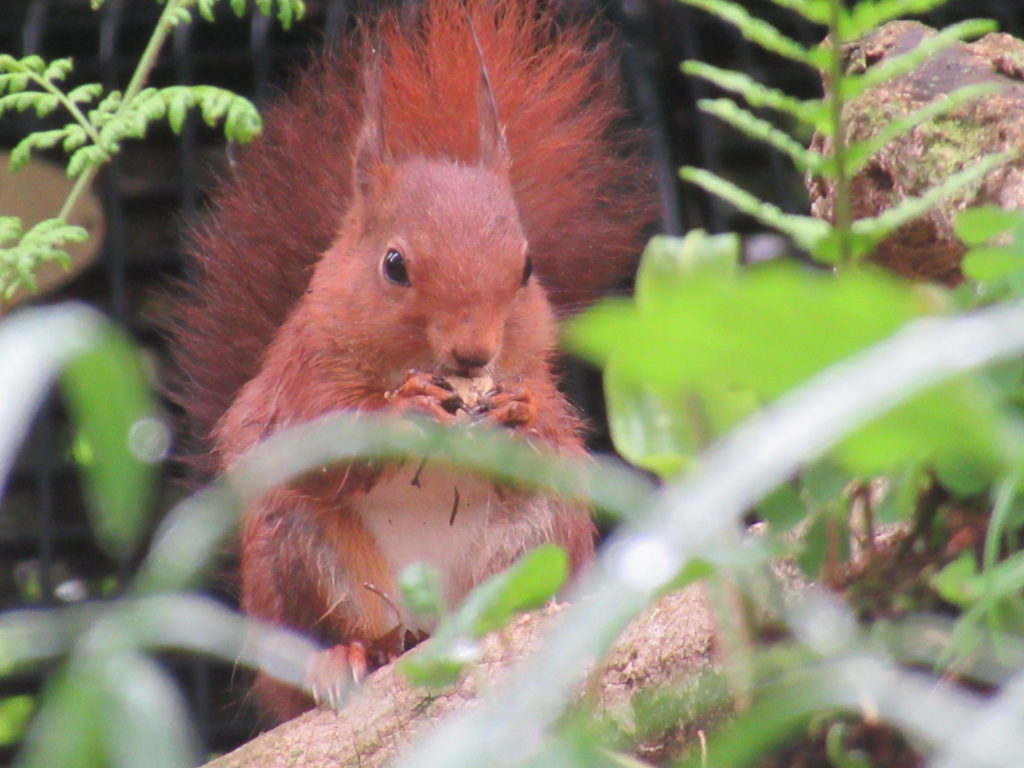
And then suddenly, in between all that green, a spot of red! A squirrel with a bushy tail, nibbling a nut.
Well, I hope you’ve enjoyed my shades of green. Many of us in the Netherlands have a long weekend ahead of us. I’m going to immerse myself in as much green as I can and I hope you have the opportunity to do so, too. Have a great time!
Finishing – weaving in ends, sewing seams – is my least favourite part of knitting. I’d rather start something new. So, while some people have skeletons in their cupboards, I have UFO’s (UnFinished Objects). Like a sweater with one sleeve, cardigans with just the buttons or pockets to sew on, a colourful scarf with a thousand ends to weave in, that sort of thing. Most UFO’s become FO’s in the end, but for some it takes a long, long time.
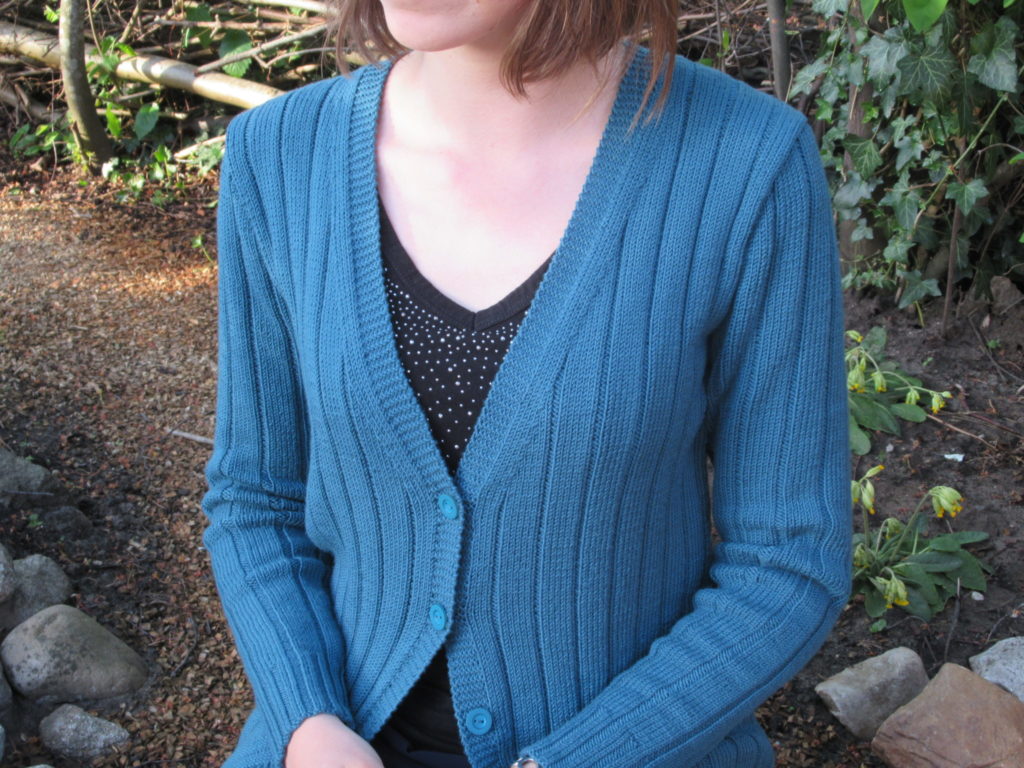
Now I’d like to mend my ways. I didn’t want to leave our daughter waiting for her new Granite cardigan for ages, so as soon as I finished knitting all of the pieces, I blocked them. Usually I don’t do this with garments, but only with lace shawls and other things that need opening up.
I gave the pieces a good soak, spun them lightly in the spin-dryer, and laid them out flat on my blocking mats – with blocking wires along the longest sides – and pinned them into place. I didn’t stretch them hard at all (as I would a lace shawl) but just to the size indicated in the schematics.
The pattern (Granite from Kim Hargreaves’ book Grey) said ‘Press all pieces with a warm iron over a damp cloth’. I gave it a try, but it soon became clear that that wasn’t going to work. As I wrote in another post, the combination of yarn and stitch pattern made the knitted fabric bunch up terribly. I could stretch it out in every direction, but it sprang back as soon as I let go.
I took some pictures of the knitted fabric before and after blocking, to show what the blocking did:
Before blocking
After blocking
The fabric underwent a transformation. Dry it was elastic and springy. Wet it was limp (I have no other word to describe it). I tried to block the pieces very carefully to correspond with the sizes in the diagrams. Widthwise this was no problem, but lengthwise it was. They were much longer! The back and fronts were longer, the sleeves were longer, the armholes were wider. Yikes! Well, there was nothing I could do about it at this stage.
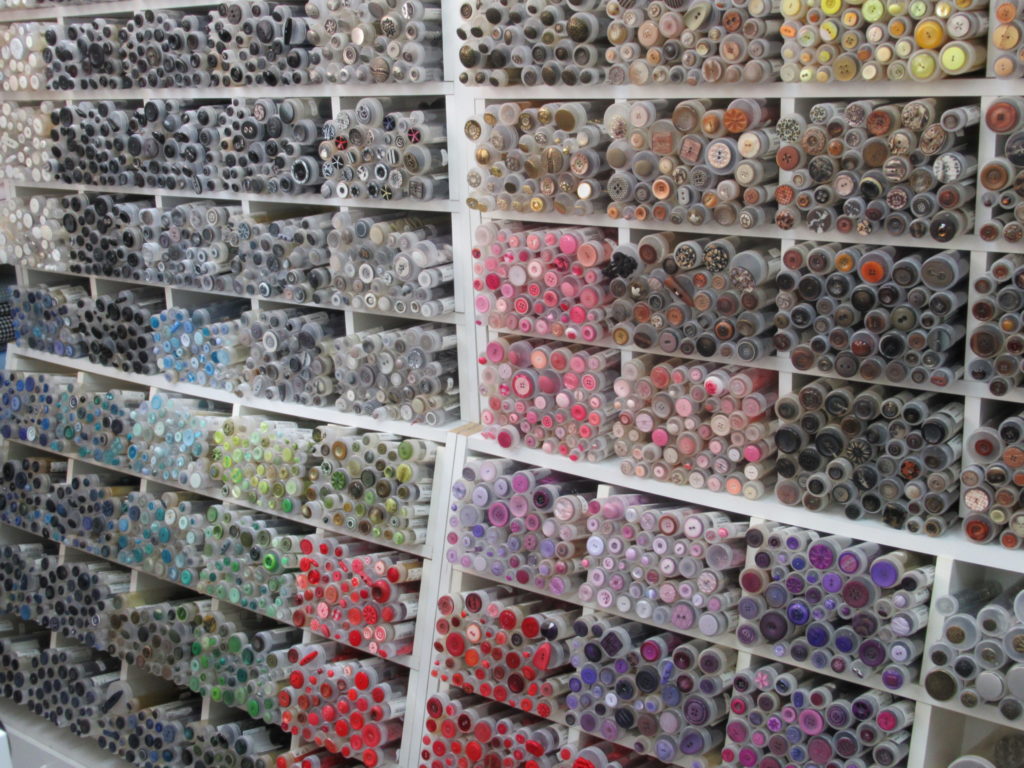
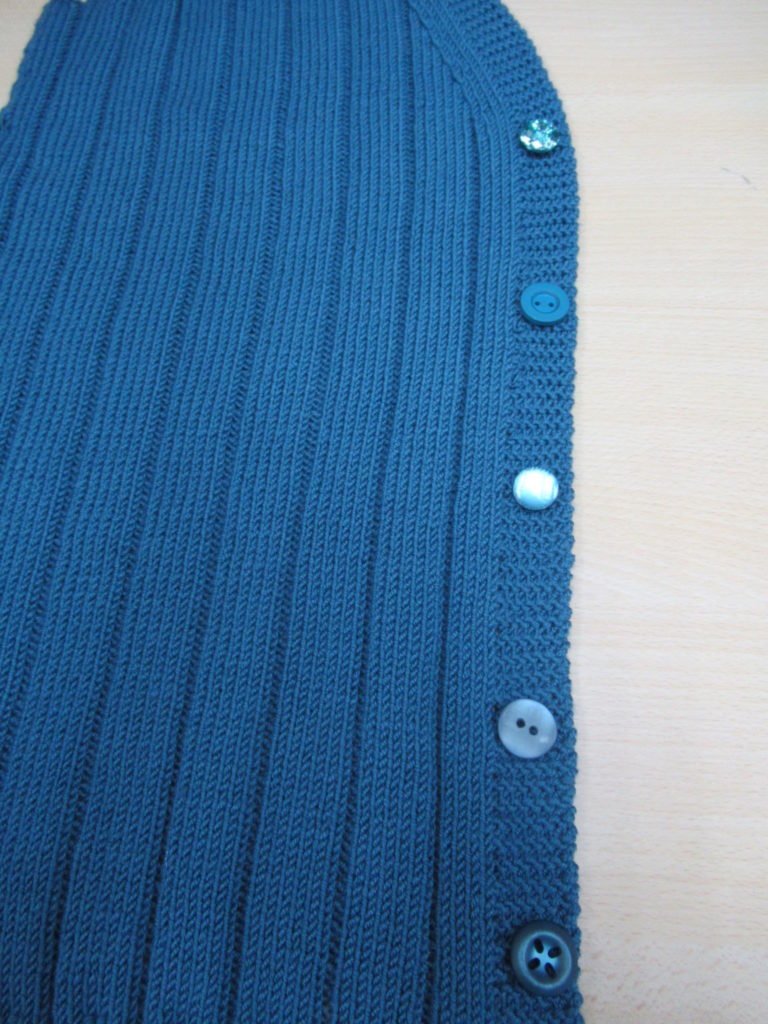
While the pieces were drying, I went looking for buttons. Now that is a part of the finishing process that I do like! I visited a great little haberdashery shop, with an impressive wall of buttons:
I zoomed in on the blue-green section and found several buttons that looked suitable. I spread the cardigan front out on the counter and placed some on the button band.
Now which one to choose?
The top button: too blingy The second button: hmmm, maybe The third button: too small The fourth button: too dull The fifth button: yes, I think this is perfect!
And then the two shop ladies (both several decades younger than me) had their say: It’s for your daughter, isn’t it? I wouldn’t choose the fifth button – that’s the granny option. (Ouch!) Take the second one. Much better!
Taking another look, I knew they were right. So, the second button from the top it was. Thanks for your help girls!
When they were dry, I didn’t sew the pieces together. I just pinned them, because I expected I’d have to rip them back and shorten them. But magically the cardigan fit!
The sleeves were the right length and the armholes were just right. The body was slightly longer than planned, but that was fine.
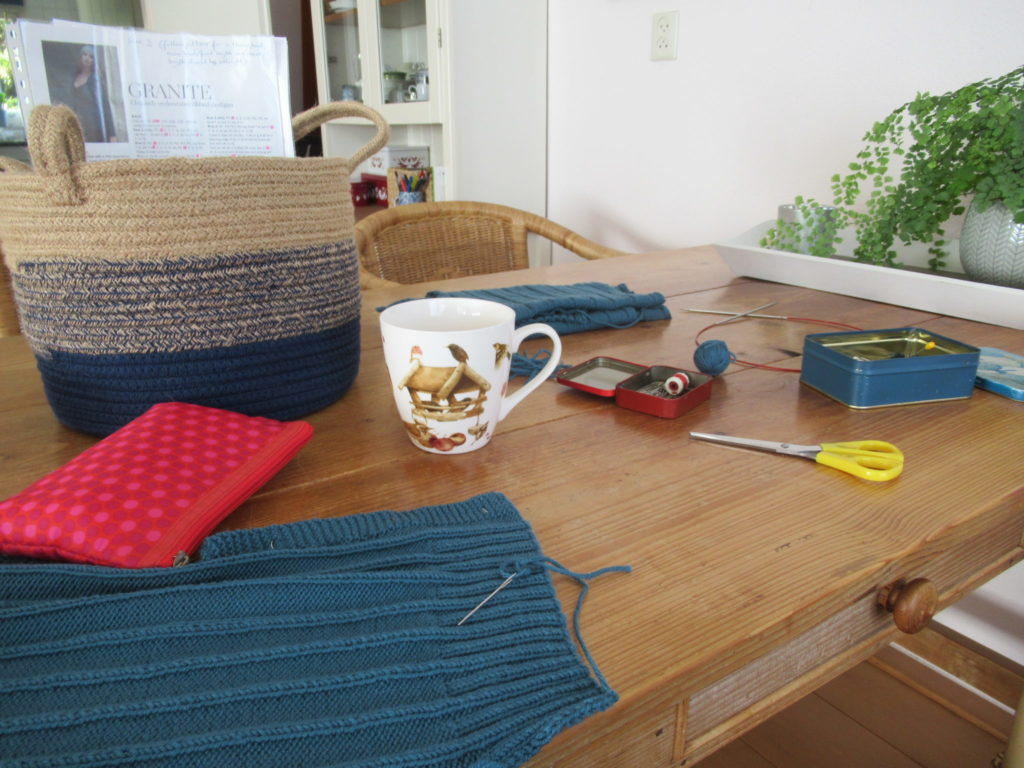
Now I could set about sewing everything together. How could I make that unpleasant task more pleasant? Well, I collected everything I needed in a basket, put on a nice bit of music, lighted a scented candle and treated myself to a special cup of tea.
I also promised myself that I didn’t have to do it all in one sitting. Half an hour here, 45 minutes there, and before I knew it, it was finished.
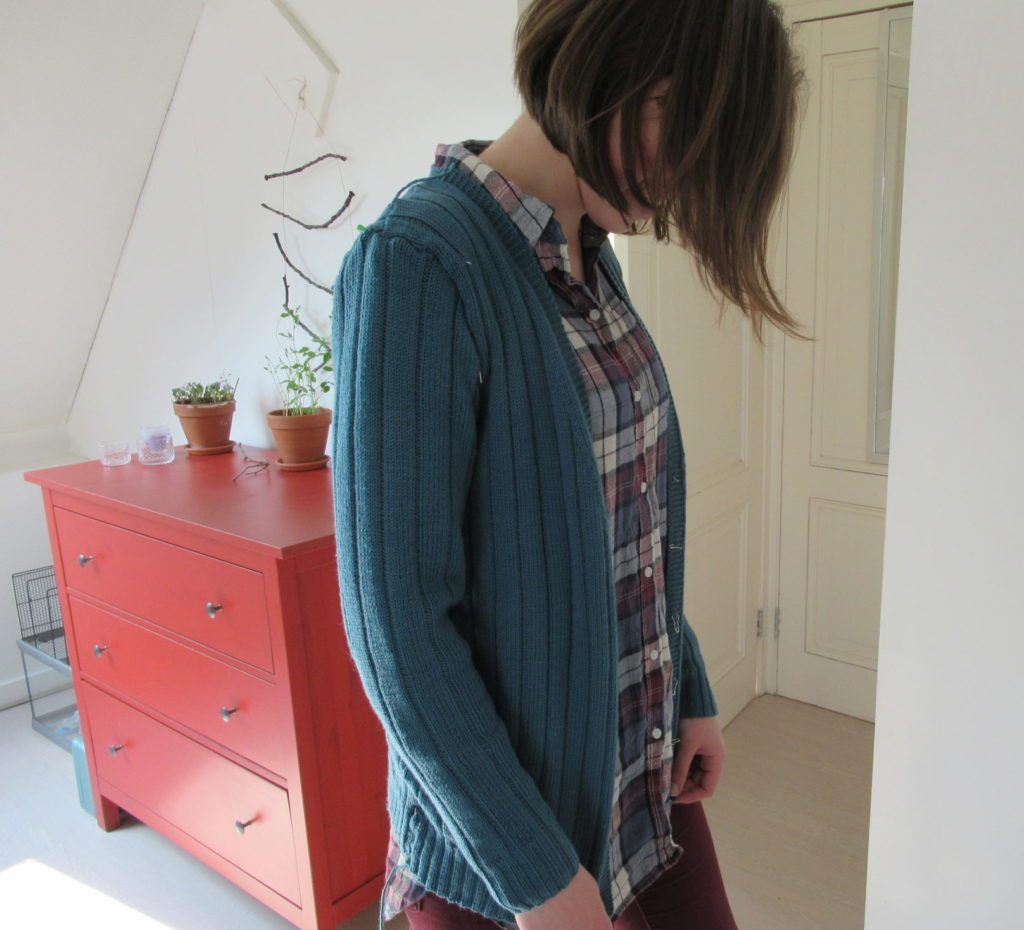
During a lightning visit from our daughter, we did a quick photo shoot:
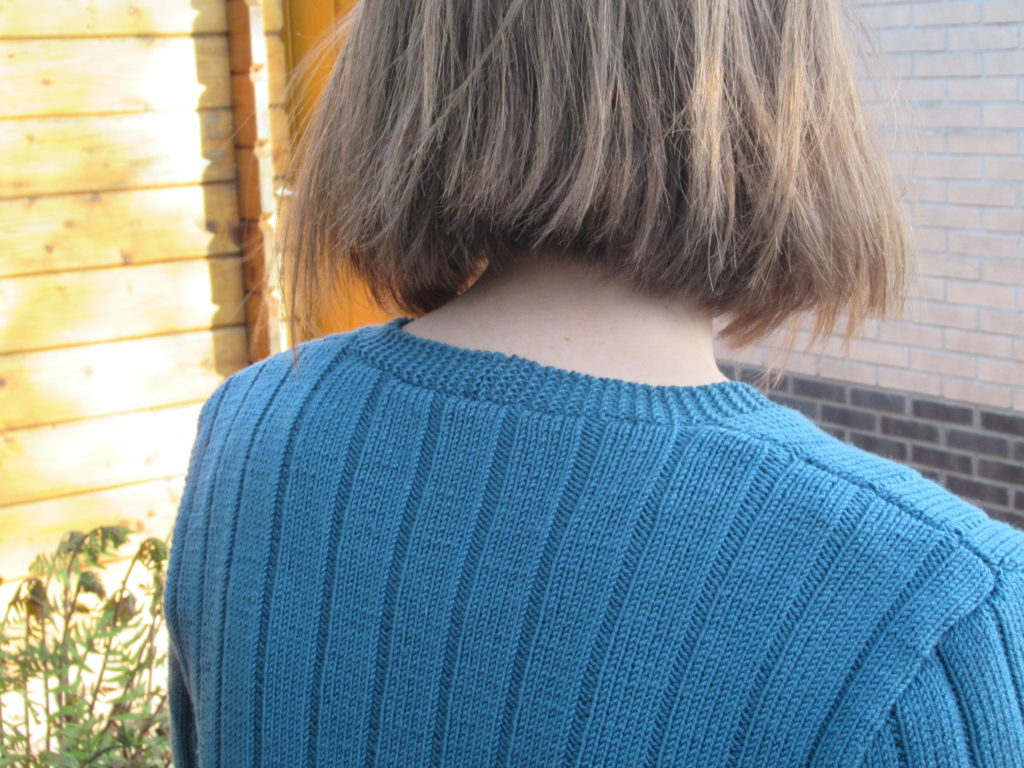
I joined most of the seams with an ordinary back stitch (on the wrong side), but for the band at the back of the neck I used a mattress stitch on the right side of the fabric. That way I was better able to see what I was doing, and got a flatter seam. I’m very happy with how this worked out:
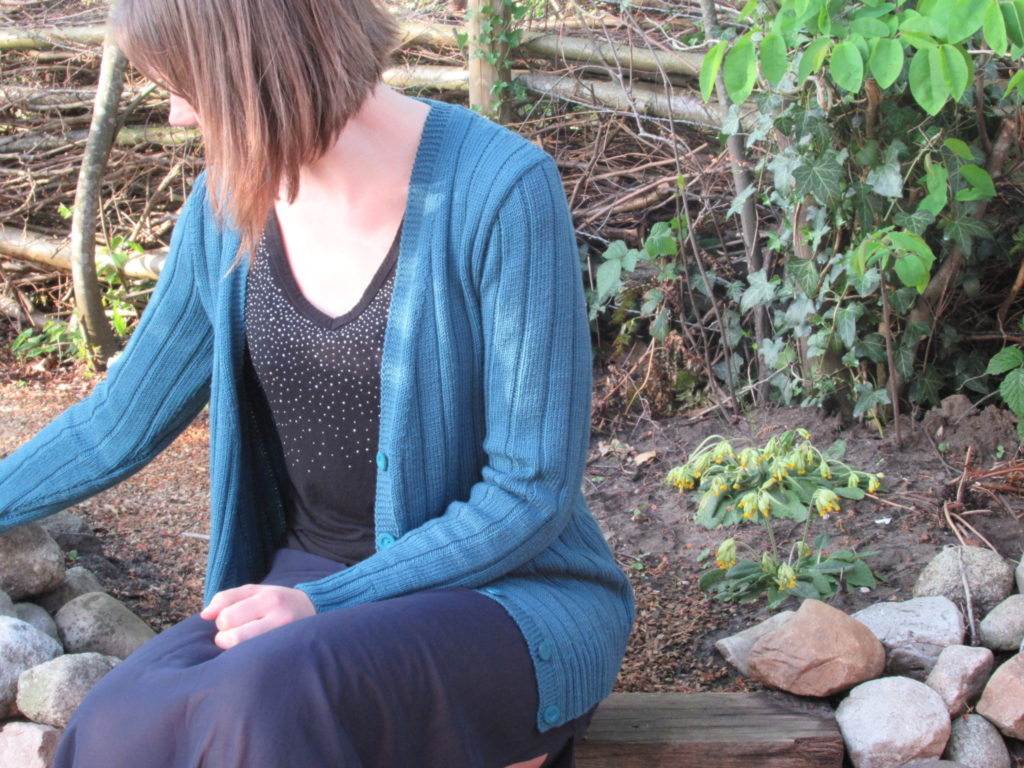
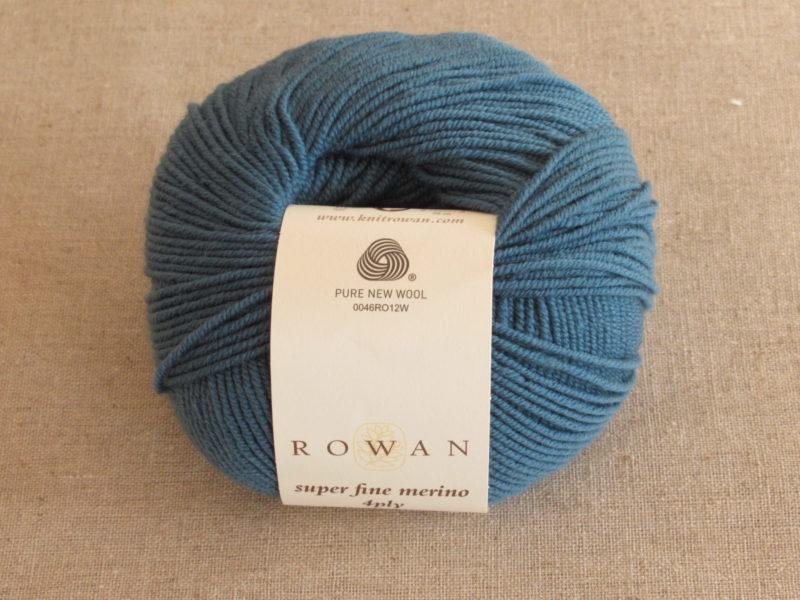
Taking beautiful photographs is a skill/art I need to practice a lot more. As you can see in this post alone, the colour of the yarn looks different all the time. In reality it is a medium dark teal (blue-green). The yarn I used is Rowan ‘Super Fine Merino 4-ply’:
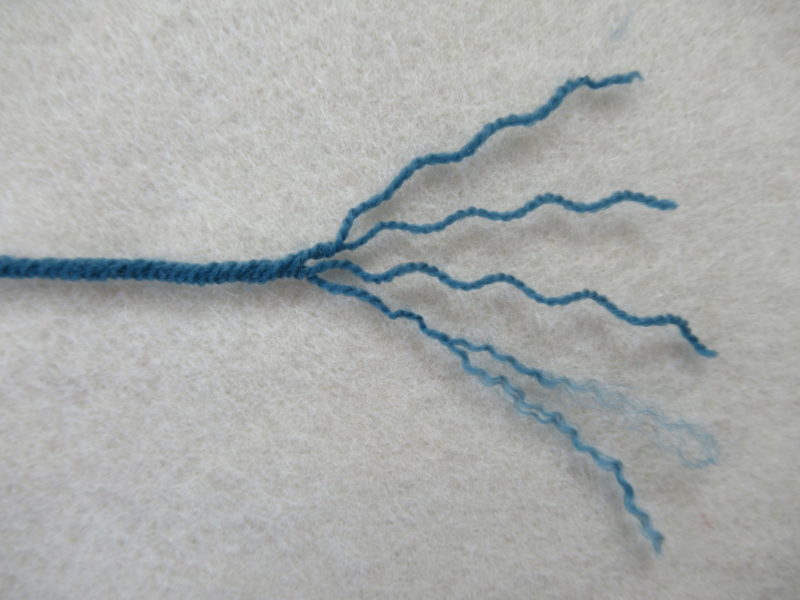
As the name suggests, the yarn consists of 4 plies. Each one of these plies consists of 2 plies again, as you can see in the picture on the right. This construction makes the yarn very elastic, which caused some of the troubles I experienced.
I wouldn’t recommend this yarn to a beginning knitter, because it is very hard to get the measurements of the knit right, and also because it is easy to stick one’s needle into the yarn and miss one or more of the plies while knitting.
But all in all I’m really, really happy with it. After washing and blocking, the fabric is beautifully soft and smooth, with a subtle gleam, and a wonderful drape.
Here’s one last photo, which shows up the pretty decreases along the neckline very well.
Thank you for reading. I know I’ve gone rather more into technical detail than I’ve done so far. I hope it was interesting nevertheless. If you’re a Ravelry member and would like even more details (yarn quantities, needle sizes etc.) you can find them here on the project page.
It almost hurts the eyes, doesn’t it? That blue, blue sky with those bright white flowers of the June berry. I was taking a spin on my bicycle when I took this photograph. Something was bothering me, and I thought a bit of exercise and fresh air might help clear my mind. The air was certainly fresh, not to say icy. I was glad I was wearing my woollen gloves. But what a glorious afternoon!
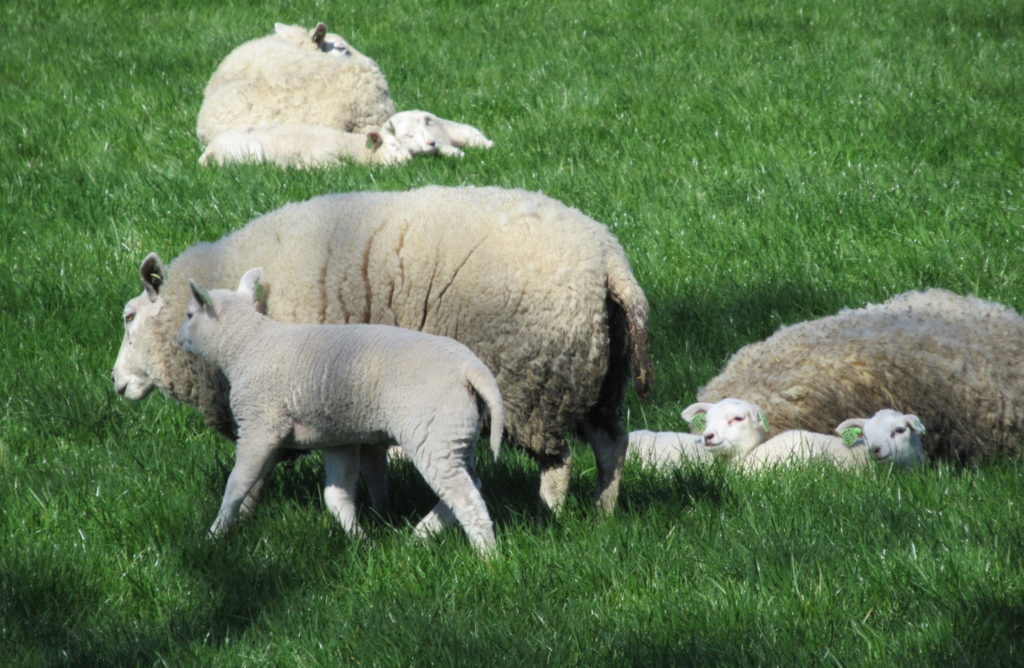
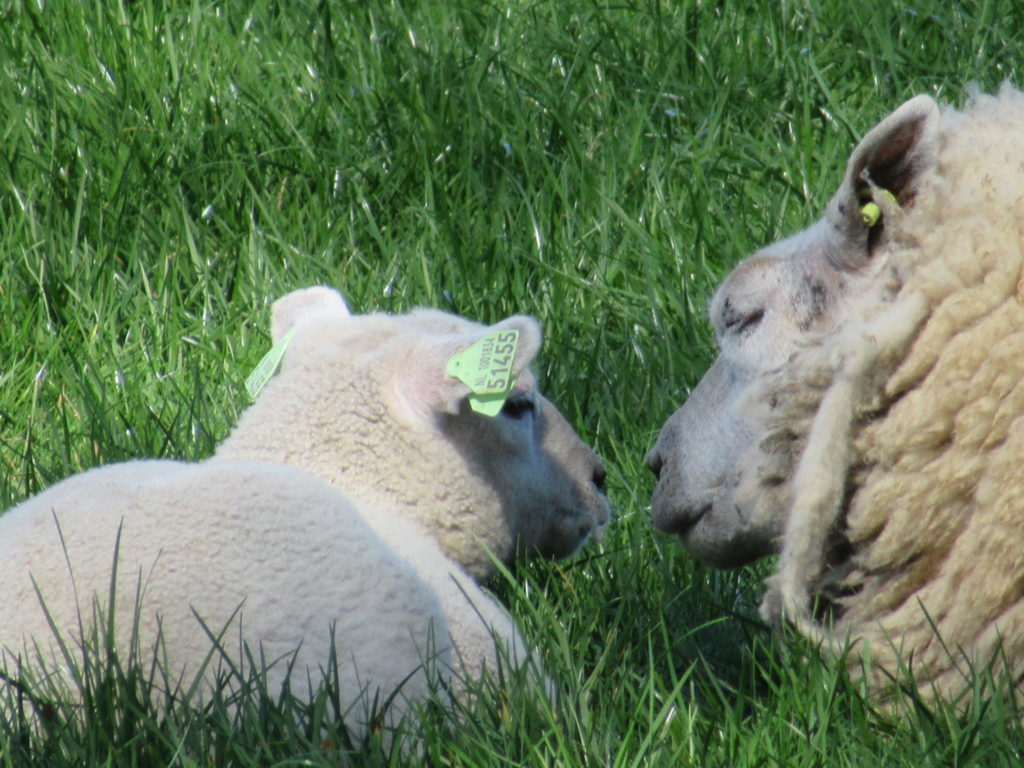
There were lots of lambs in the fields:
You’d expect the air to be filled with the sound of bleating, but it wasn’t. The sheep and their lambs were quietly dozing or grazing – or following their grazing mums around – and watching each other.
We all know that ewes and their lambs can recognize each other’s voices. But we don’t know (or at least I don’t) if they have other ways of communicating. One ewe and her lamb, lying with their heads close together, made me wonder about that. Do they communicate with other sounds besides bleating? They don’t seem to have many different facial expressions. But what about eye contact? Or perhaps they communicate in ways that we humans have no idea of.
What a wonderful bicycle ride! It was no more than 45 minutes, but I’d seen so many lovely things. And although I hadn’t consciously been trying to solve the problem bothering me, just cycling along had solved it for me – I knew what I had to do when I got home.
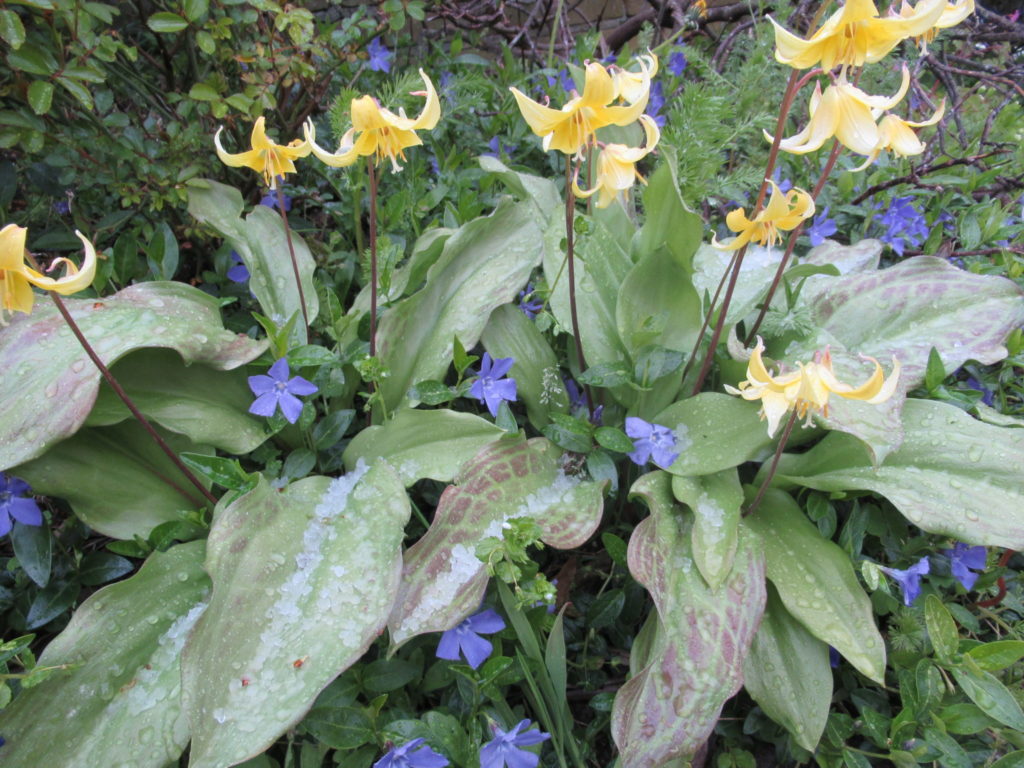
Apart from some cold and bright days like these, April has given us all sorts of weather. We even had an afternoon of snow and hailstorms! I don’t know if you can see it on your screen, but the leaves of these dwarf lilies in our garden are filled with hailstones.
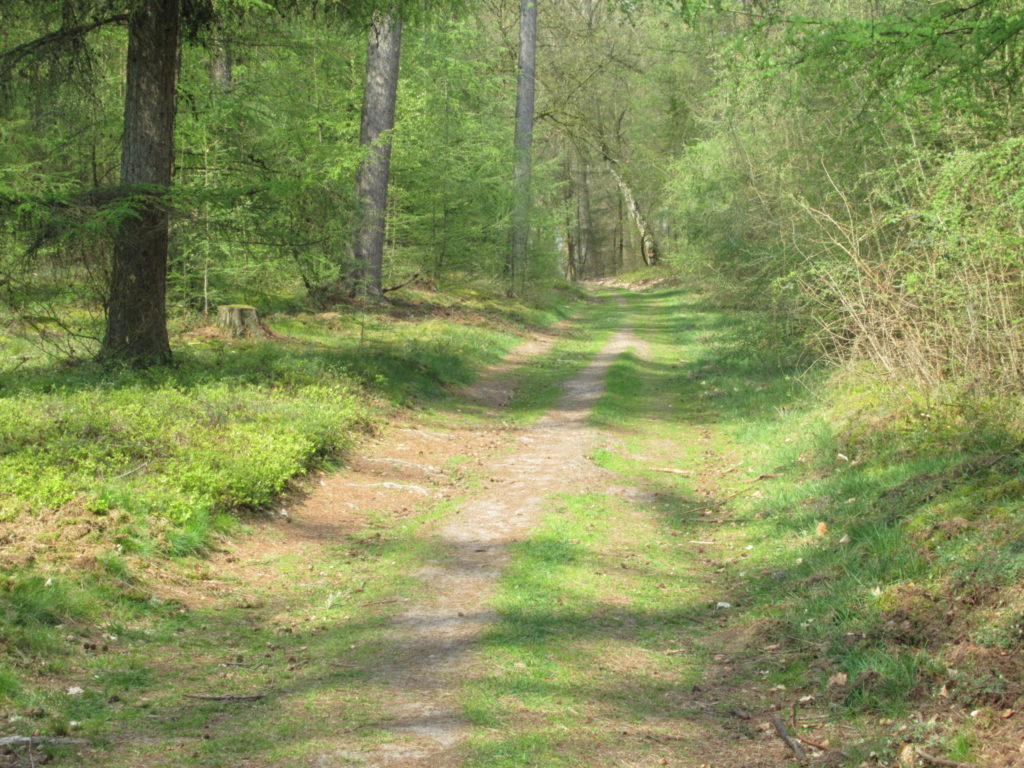
Last Sunday, the day after these wintry showers, was a little more spring-like. Not as warm yet as it is now, but really nice weather for a woodland stroll.
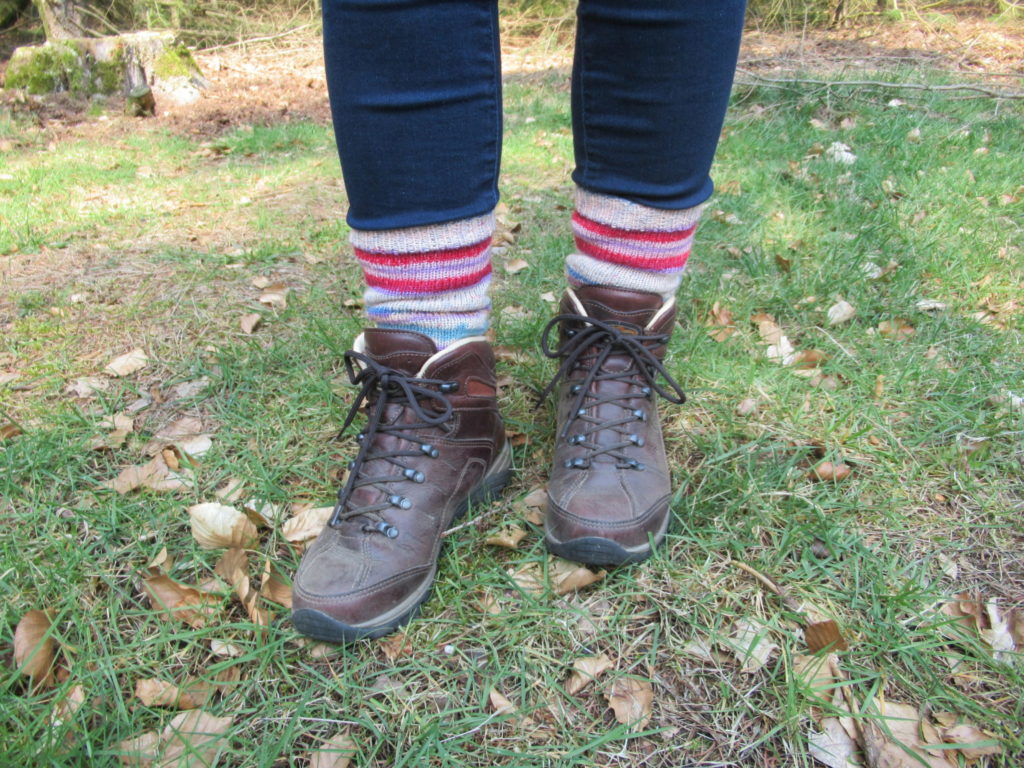
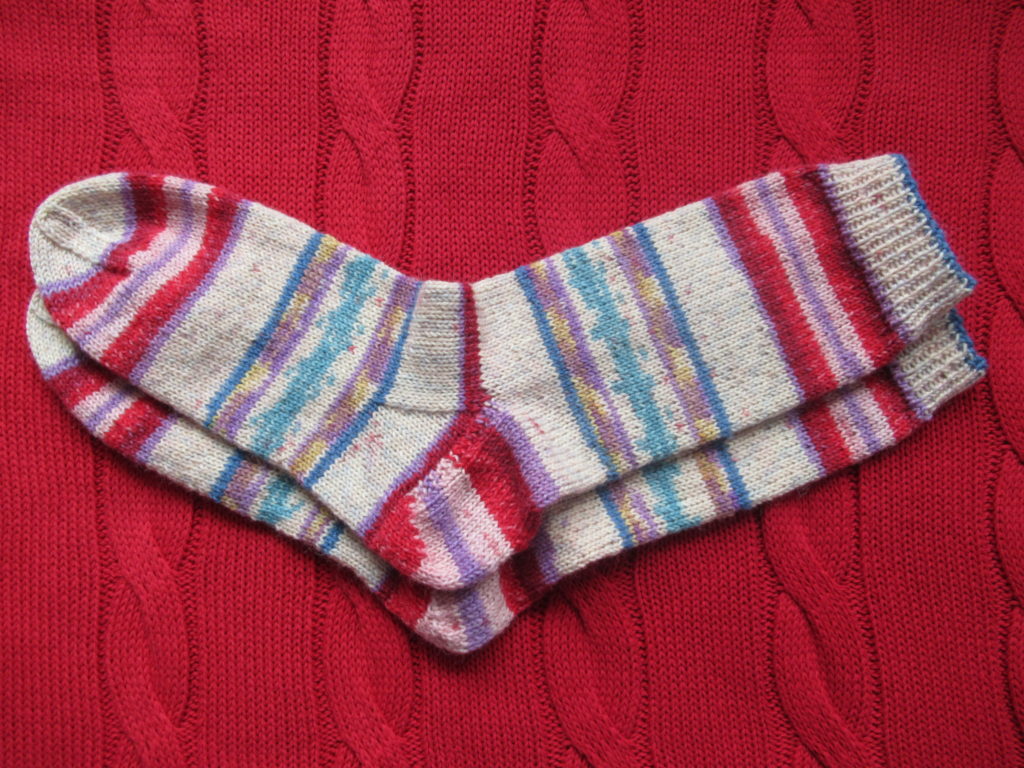
I was wearing my new socks. Maybe you remember them from a previous post – the ones with the wide stripes:
I tried to get the stripes matching on both socks. I’ve tried to do that before, with varying success. In theory, it should work if you find a clear place in the stripe pattern, note down where you are starting on the first sock, and start at the same place in the stripe sequence on the second sock.
The emphasis here lies on ‘in theory’, because sometimes there is a knot in the yarn (*#@!), or the stripe pattern suddenly skips a section for no clear reason (*#@!!!). This time it worked, though:
I give lots of socks away, being fortunate enough to have friends and relatives who want to wear them. But I’m keeping these.
The yarn I used is Regia 4-ply in a colourway called ‘Nissedal’. This stripe pattern was designed by Arne and Carlos, the sympathetic Norwegian guys (or is one of them Swedish?) who gained world fame with their knitted julekuler (Christmas baubles). They’ve designed lots of other knits since then and have a YouTube channel with some 60.000 subscribers. I must admit that I’ve never watched any of their videos myself, but that’s not Arne and Carlos’ fault. It’s just that I’m not much of a video watcher in general.
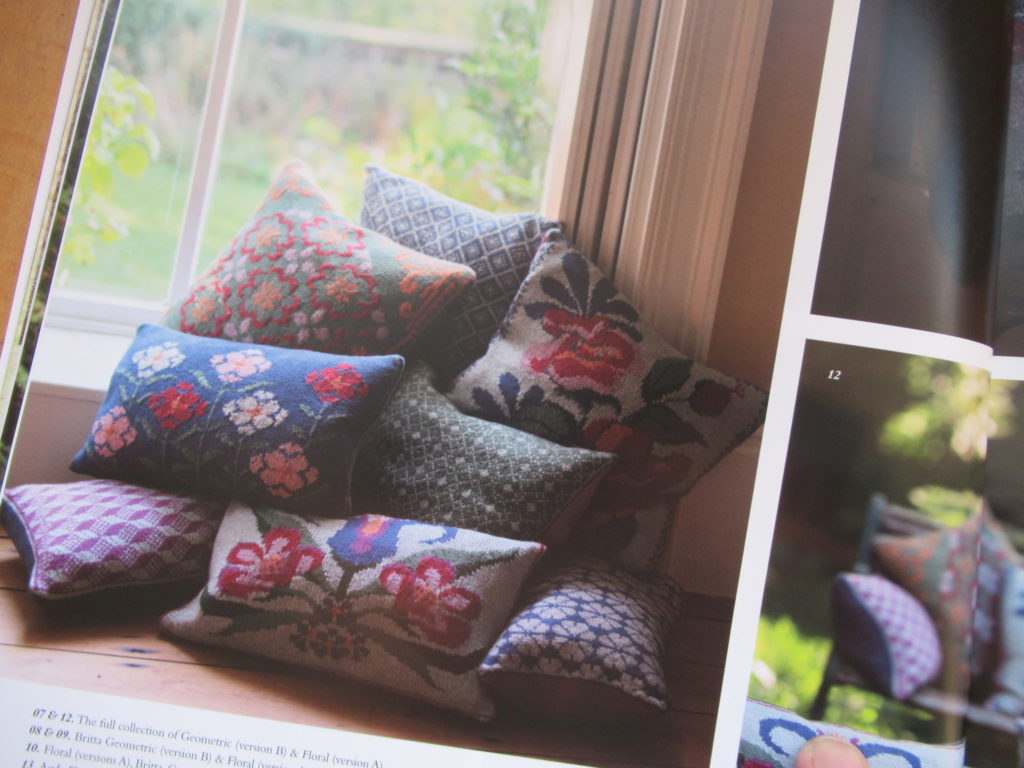
One of their latest ventures is a collection of cushion patterns for yarn brand Rowan, which is presented in Rowan’s latest Spring/Summer Magazine (number 65):
Some cushions have geometrical designs, others have intarsia flower patterns, and all of them have ‘Scandinavian knitting design’ printed all over, don’t you think?
Word of Warning: Don’t buy this magazine just for the cushions, because the patterns are not included. I don’t regret buying it, as it is filled with lovely spring and summer knits, including four designs for garments and accessories by Arne and Carlos. Everything is beautifully photographed, the patterns for all the other items are included, and I love leafing through it for inspiration. But the cushion patterns need to be bought and downloaded separately from the Rowan website.
I’ve almost come to the end of what I wanted to show and tell you today. There’s just one more thing. I’ve finished knitting Granite, the cardigan for our daughter. I struggled with the right way to measure the stretchy knitted fabric, and was worried that I’d get it wrong. So I didn’t sew the pieces together yet, but just pinned them.
During our visit on Sunday she tried it on and…
… it fits! Yay! Can you see the pins sticking out at the armhole? Now there’s just the ends to weave in, the seams to join and the buttons to sew on.
Well, that’s all for now. I wish you a lovely weekend. And if the weather is as spring-like in your part of the world as it is here, I hope you have plenty of time to enjoy it.
Knitting for others can be a pleasure all around, with the emphasis on CAN. I know that it can also lead to uncertainty, frustration and stress (on the part of the knitter) and embarrassment (on the part of the recipient). For handknit gifts to be a success, it’s important to choose well.
I’ve been thinking about what ‘choosing well’ means in this context. A lot of things went through my mind, like choosing the right colour, yarn, size, or type of project. I could write several blog posts on the subject, but basically it is all very simple. I think it all comes down to 3 things:
Only knit gifts for people who will really, really appreciate them (don’t waste your precious knitting time on others – buy them something)
Always take the recipients’ tastes and preferences into consideration (if you’re not sure, ask!)
Never knit anything that you don’t enjoy knitting
And for me, personally, there is one more thing that is very important:
Take your time
I need to be careful to avoid unrealistic deadlines. When knitting becomes a race against the clock, it becomes a chore instead of a joy. So whenever I’m unable to finish something in time for, say, a birthday, I just buy something else or write a card, and tell the person that the handknit gift will be finished soon.
Keeping these principles in mind, I have had a great time knitting warm and woolly gifts over the past few months. I haven’t photographed everything, but here are some pictures of a shawl and a pair of mittens that I knit for our daughter.
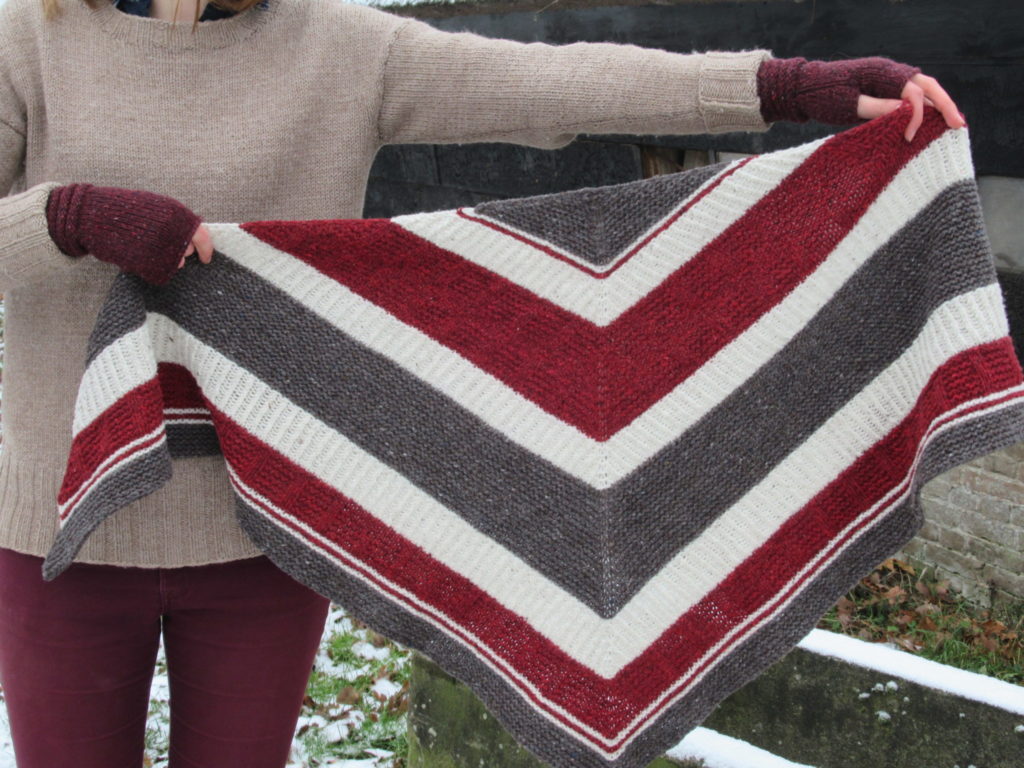
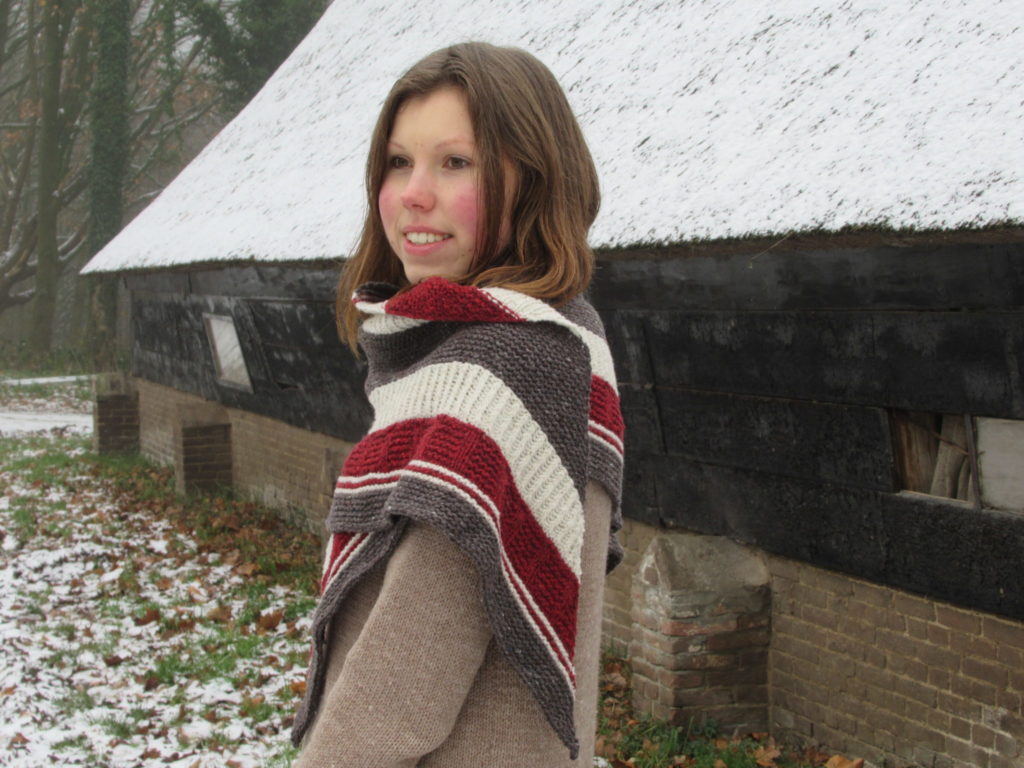
The Shawl
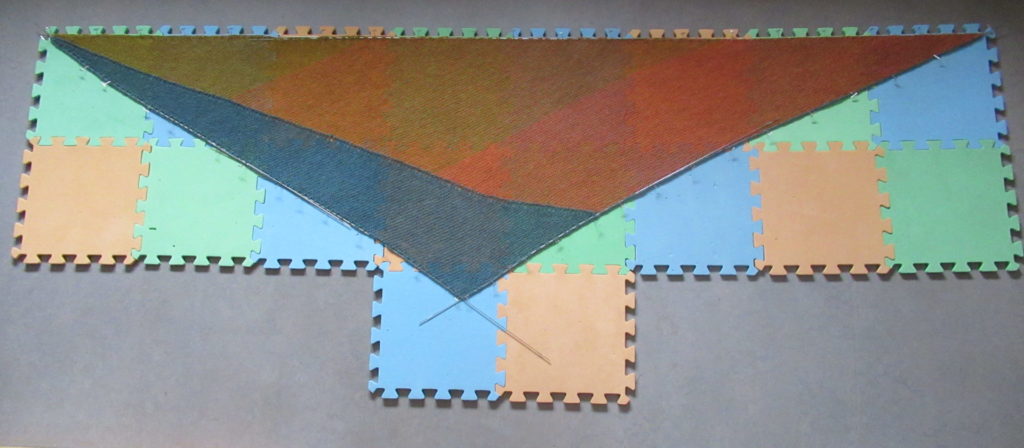
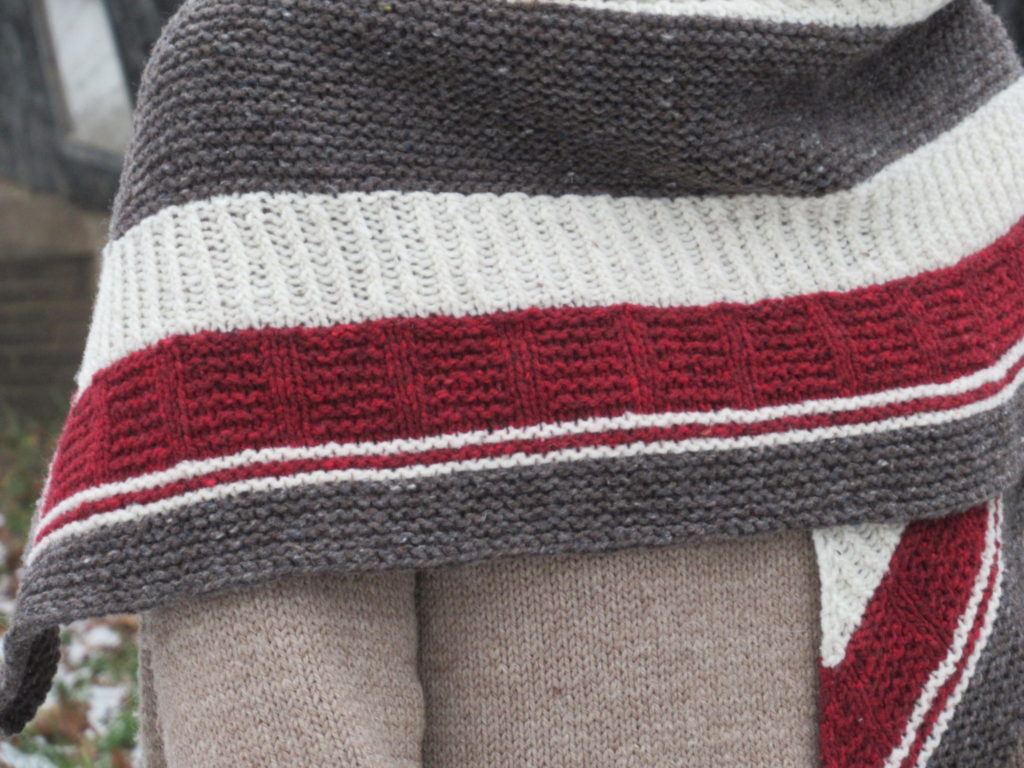
For the shawl I used a pattern called Bradway. It is a fairly quick knit on 5 mm (US #8) needles. The triangle starts with just three stitches and is knit from the middle of the top outwards. It has wide and narrow bands in three different stitch patterns, as the photo below shows from close up:
There are bands in garter stitch, twisted 1/1 rib and ’tiles’ consisting of knit and purl stitches. I was a bit worried that the twisted rib sections would be tighter than the other stitch patterns so that the sections next to them would pucker, but that did not happen at all.
I was not happy with the increases used in the pattern (they did not look good on the reverse side) but that was easy to modify. And the bind-off technique used by the designer was too tight to my taste, so I used a stretchier lace bind-off. (More details about these modifications on Ravelry.)
Bradway is not huge, but big enough to wear wrapped around the neck as a cosy scarf with a winter coat.
The Yarn
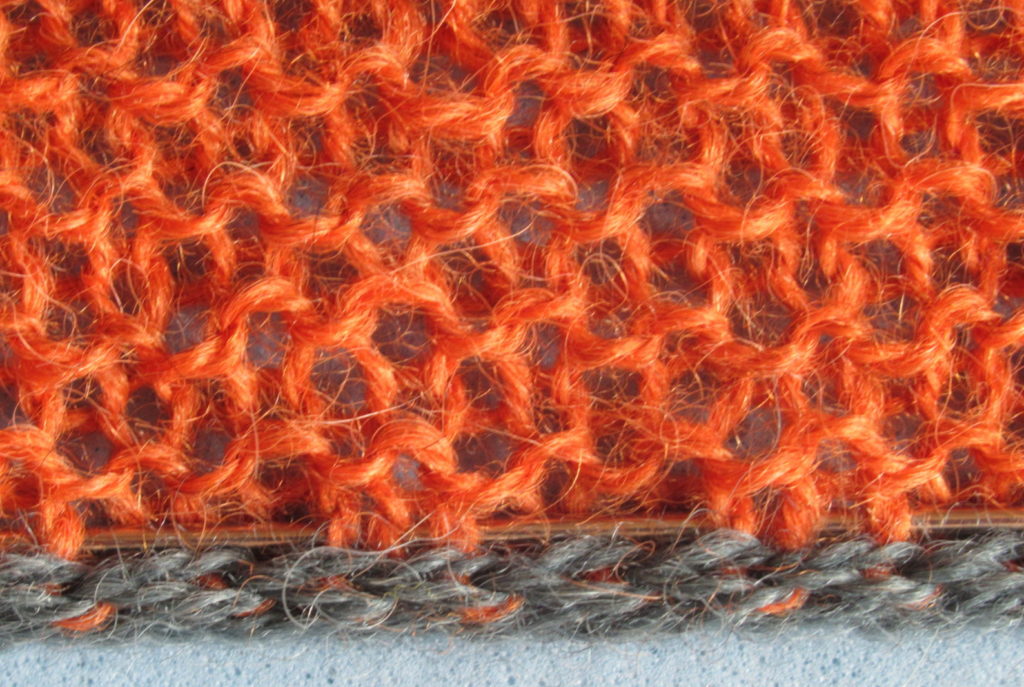
I knit Bradway in Brooklyn Tweed Shelter, a yarn that I have been wanting to knit with for ages. It is a gorgeous rustic tweed yarn. For us, in the Netherlands, it is rather expensive, but in my humble opinion it is absolutely worth the price. The colours are fabulous and vibrant, and the tweedy flecks add another dimension. I chose Truffle Hunt (brown), Fossil (natural white) and Long Johns (red).
What struck me while I was knitting with Shelter, was that each of the three colours had a different character. The red yarn (Long Johns) was slightly thinner than the other two as well as more uneven, with thicker and thinner parts.
Looking at the natural white (Fossil) and brown yarn (Truffle Hunt) I could not see any differences, but to my hands they did feel very different. Truffle Hunt somehow felt less supple and the knitted fabric also looked denser than the other two colours. I even wondered if I should use a different needle size. The differences are probably due to the red being dyed and the white and brown being undyed as well as from different fleeces. In spinning I’ve noticed this phenomenon of different colours having different properties, too, even though the wool is from the same sheep breed.
Having said that, the differences did not bother me in the finished shawl. The yarn softened up nicely after a good soak. And blocking evened out any irregularities.
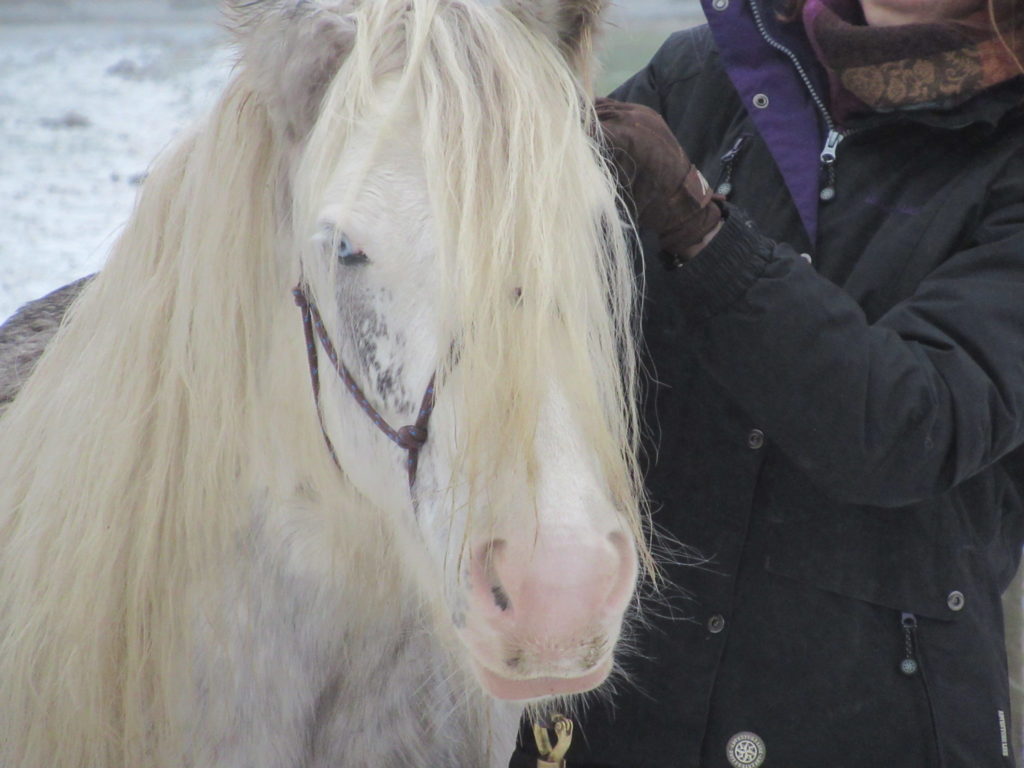
The Horse
The horse? What horse? Well, we decided to combine the photo shoot for this blog post with a visit to our daughter’s horse. She’s so sweet and photogenic. I just couldn’t resist including a picture of her here, in between all the knitting. I hope you don’t mind. Hello Silver!
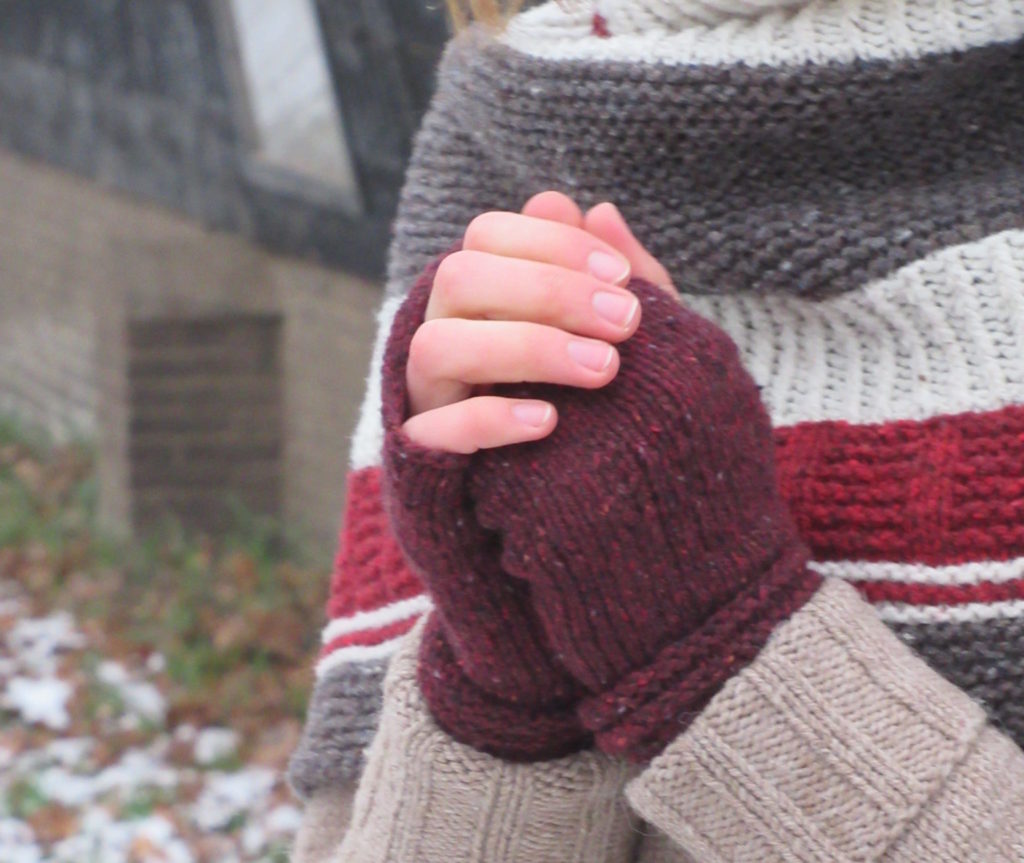
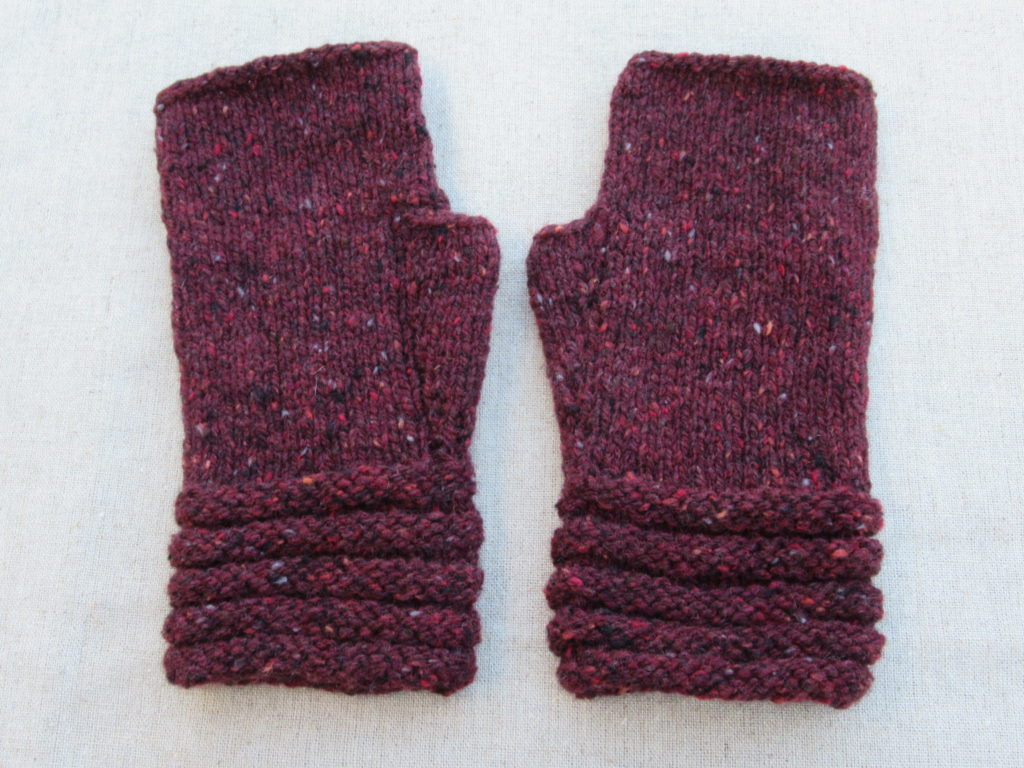
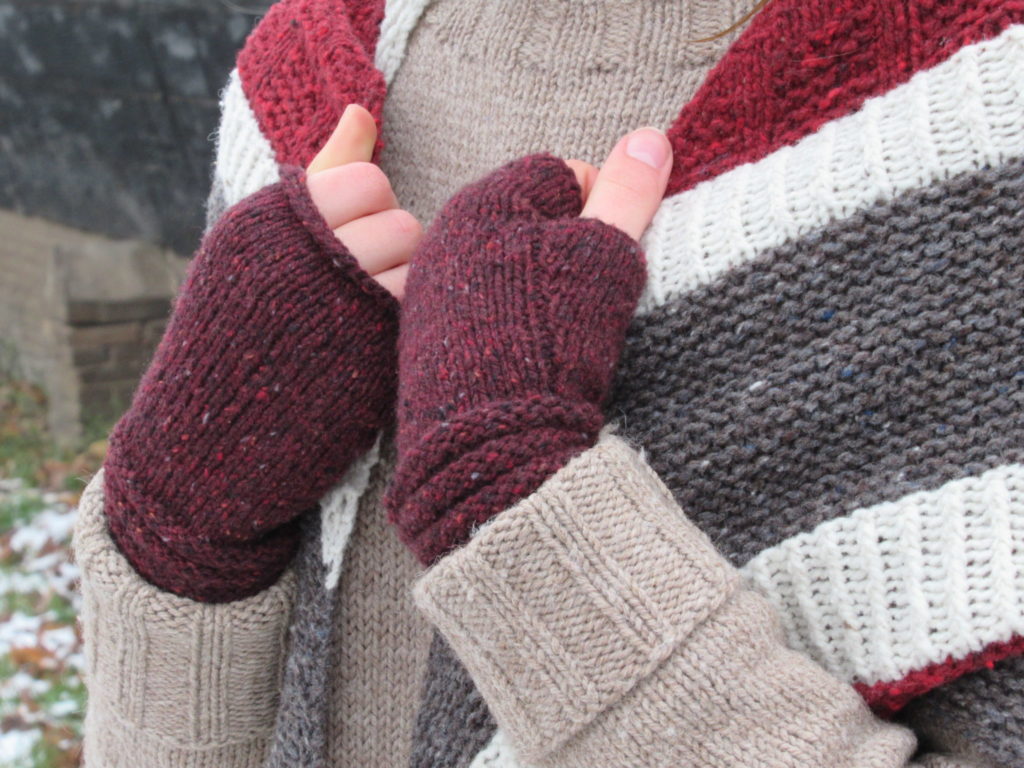
The Mittens
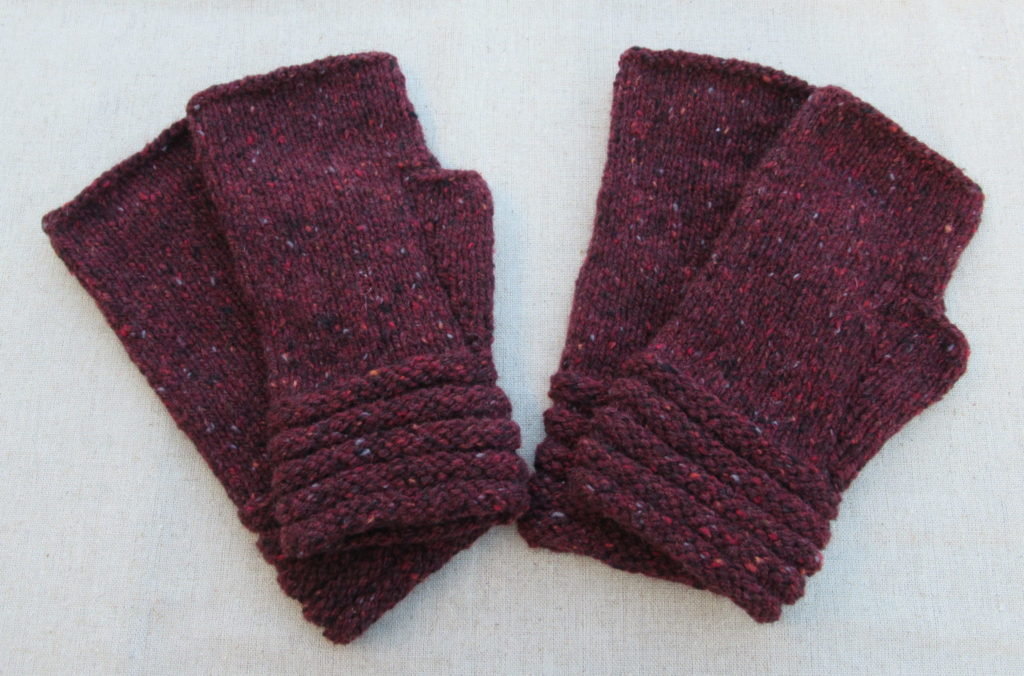
Now, onto the mittens. I’ve knit these Welted Fingerless Gloves several times before, in different yarns. It is such a quick and satisfying knit. Not difficult at all, and just the kind of small project for indulging in a really special luxury yarn (I used Rowan Cashmere Tweed).
‘Welted’ refers to the welts in stocking stitch (US: stockinette stitch) and reverse stocking stitch around the wrist. The really special part about these mittens is the thumb. Actually, they do not have a knitted on thumb, but just a kind of large button hole, which makes them easy to knit and fit perfectly. What I also like is the nice, knitterly detail of a row of purl stitches along the thumb gusset (see photo below).
In fact, I did not knit one but two pairs of the same mittens. The other pair was for the dear daughter of one of my very best friends. I can see her wearing them walking to the bus stop on her way to uni on chilly mornings.
The big gift-giving month of December is over, but I am knitting still more gifts. I have just finished a super soft alpaca cowl and am knitting two more pairs of fingerless mittens, this time for our lovely niece. If you read this, dear niece, the first pair of mittens (the pink ones) is almost finished. Not quite in time for your birthday, but I’ll mail them to you soon!
I’m always on the lookout for new ideas for doable knitted gifts. So, if you have any tips, please let me know. Is there a favourite pattern that you knit again and again?
Mid-November our first spell of cold weather arrived. One Sunday morning we woke to a wonderfully quiet, frozen world. We often spend our Sundays (or at least part of them) walking or cycling. On this Sunday we couldn’t wait to get outside, and we set out for a walk straight after breakfast.
The thermometer indicated zero degrees Celsius. The fallen leaves were white with frost, the air was crisp and the sky was a clear, pale blue. During the night a thin film of ice had formed on the pools.
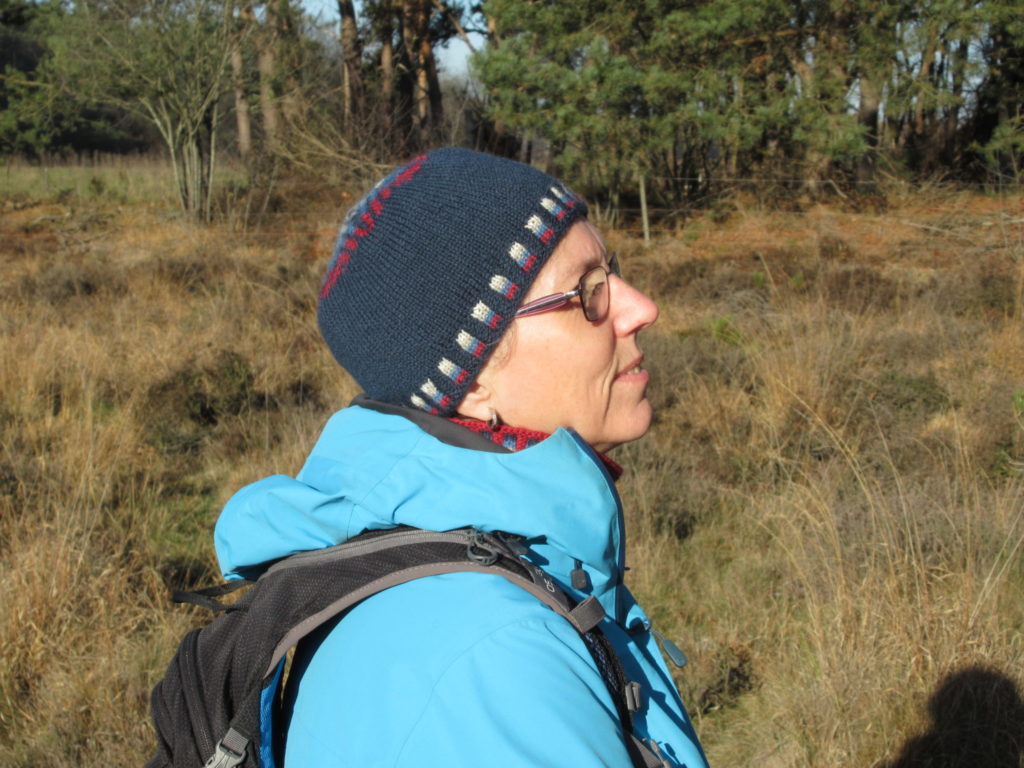
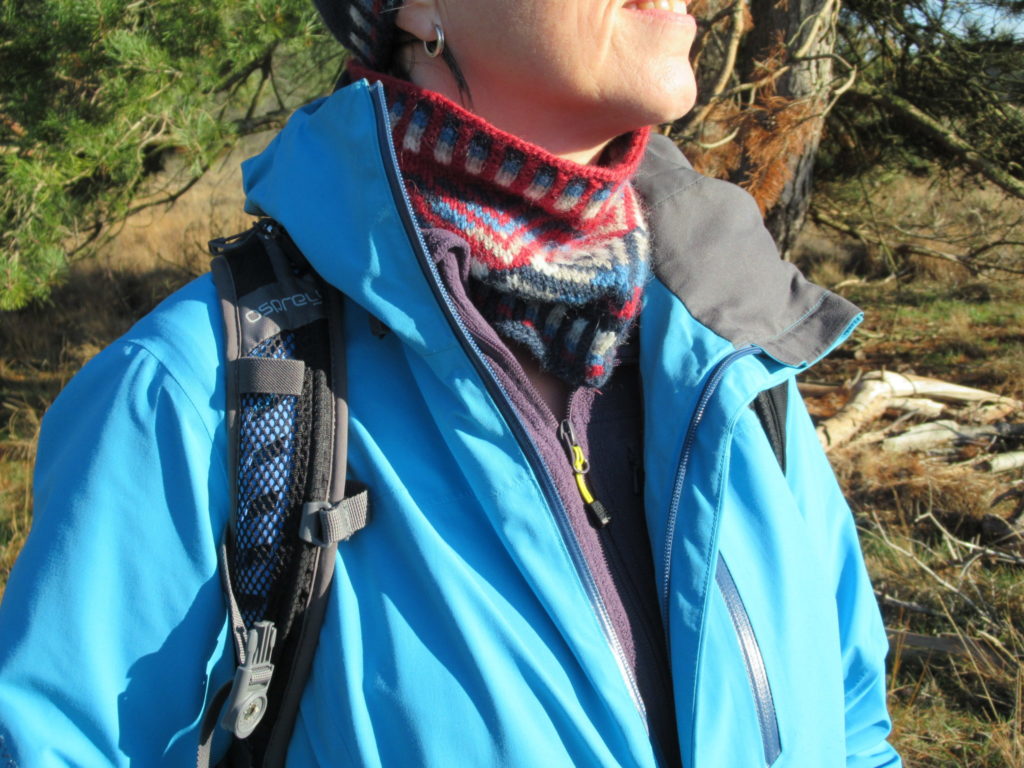
Aaahhh, bliss! I love this kind of weather. It makes me feel happy and energized. And what made me doubly happy on this morning was that I finally, finally got to wear the hat and cowl that I’d finished knitting in spring. Here’s the hat:
The hat
For the hat, I used a pattern called ‘Bunnet’ by Kate Davies, a writer and designer living along the West Highland Way in Scotland. Kate tells us that bunnet is ‘a colloquial Scots term for a hat’, and in particular ‘the headgear of an ordinary working man.’
To my mind, Kate’s bunnet is ideal for an ordinary walking woman, too, as it is the only hat I’ve ever owned that actually stays put. I think that’s largely due to the multi-coloured corrugated ribbing in the brim.
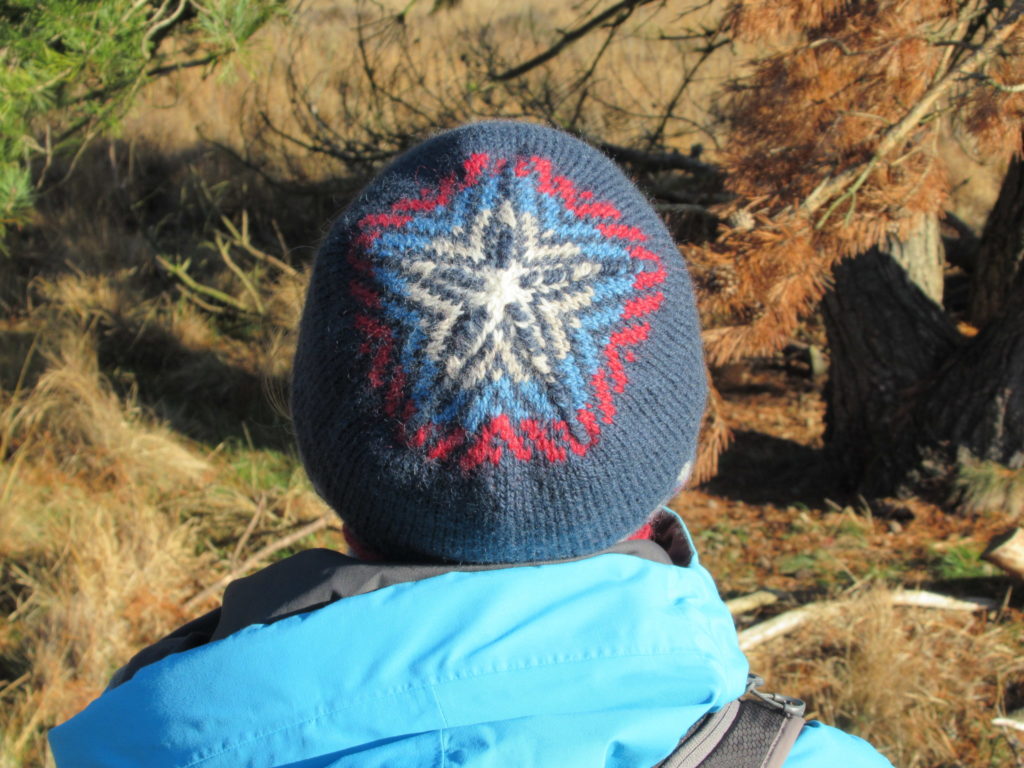
Apart from a colourful brim, the hat has a lovely star shape on the crown.
The yarn
I knit the hat in Kate’s own Buachaille, a wonderful warm, woolly yarn. Buachaille. It takes quite a bit of courage to choose a name that is so difficult to pronounce and remember for a yarn. But for me, as an ex-translator, it is an extra attraction. I love the shapes and sounds of words, and immediately delved into this one. It turns out that Buachaille is pronounced something like boo-chal-ya and means herdsman or shepherd. The yarn comes in 11 colours, with lovely names like Moonlicht Nicht (the deep blue main colour of my hat), Ptarmigan (natural white) and Between Weathers (sky blue).
The cowl
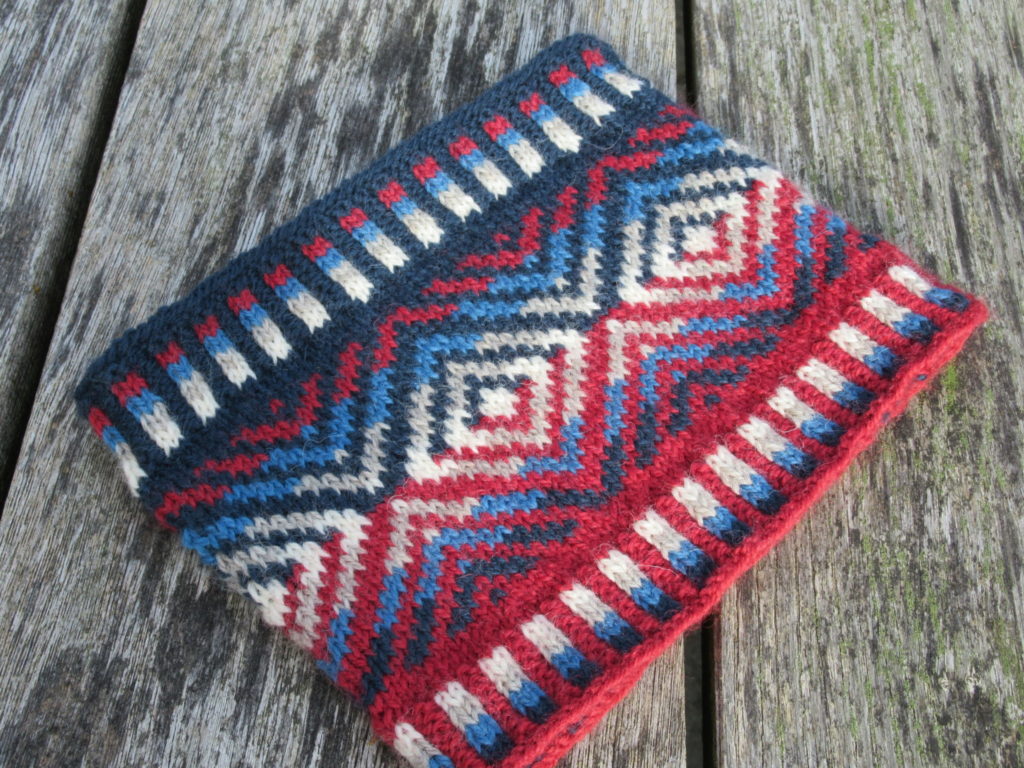
When I’d finished the hat, I decided that I would like a matching cowl. So I looked closely at Kate’s pattern and came up with this:
I also photographed the cowl flat, so that you can see the pattern more clearly.
I started and ended with the same corrugated ribbing as in my Bunnet. In the middle I used the pattern from the crown, with diamonds inserted between the ‘arrows’ and the entire pattern turned upside down for the second half.
For a little extra interest I knit one half with dark blue Moonlicht Nicht as the background colour, and the other half with raspberry red Macallum.
You can find more details about the hat and the cowl as well as some extra photos on Ravelry.
For anyone who’d like to make their own Bunnet, the pattern is from Buachaille: At home in the Highlands, a book with twelve knitting patterns, several Scottish recipes and a route for a walk in the West Highlands.
Walking on
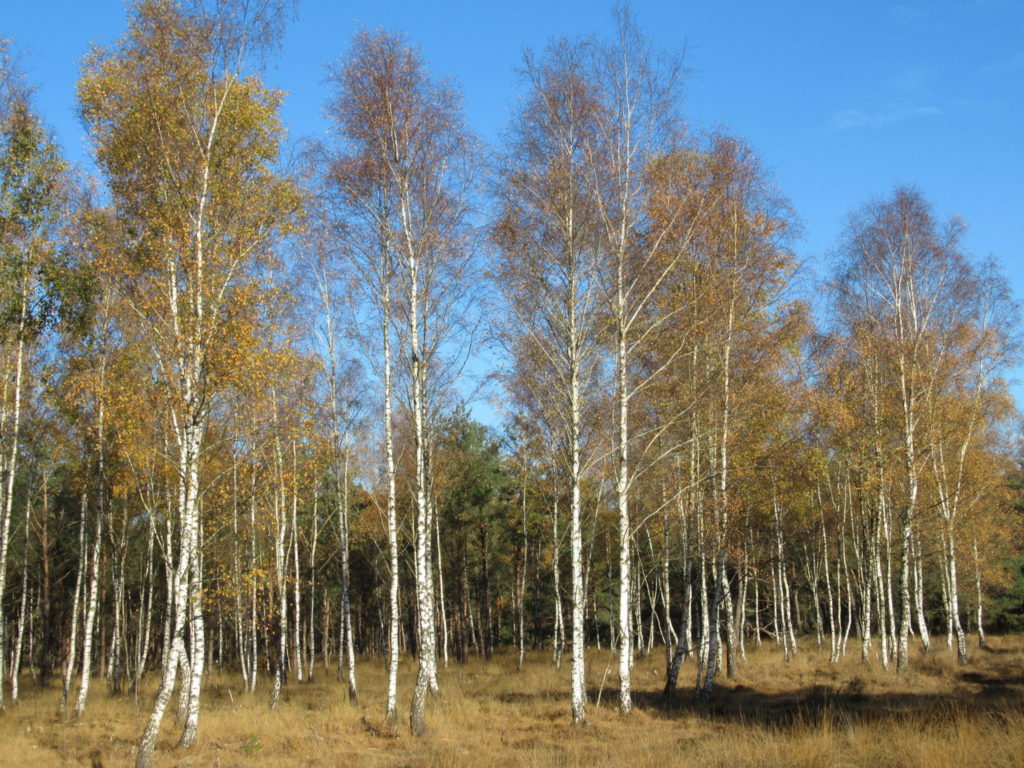
After taking pictures of the hat and cowl we continued our walk. First the path led us through a wood…
Then along a stand of birches, with the bright sunlight accenting the white of their trunks.
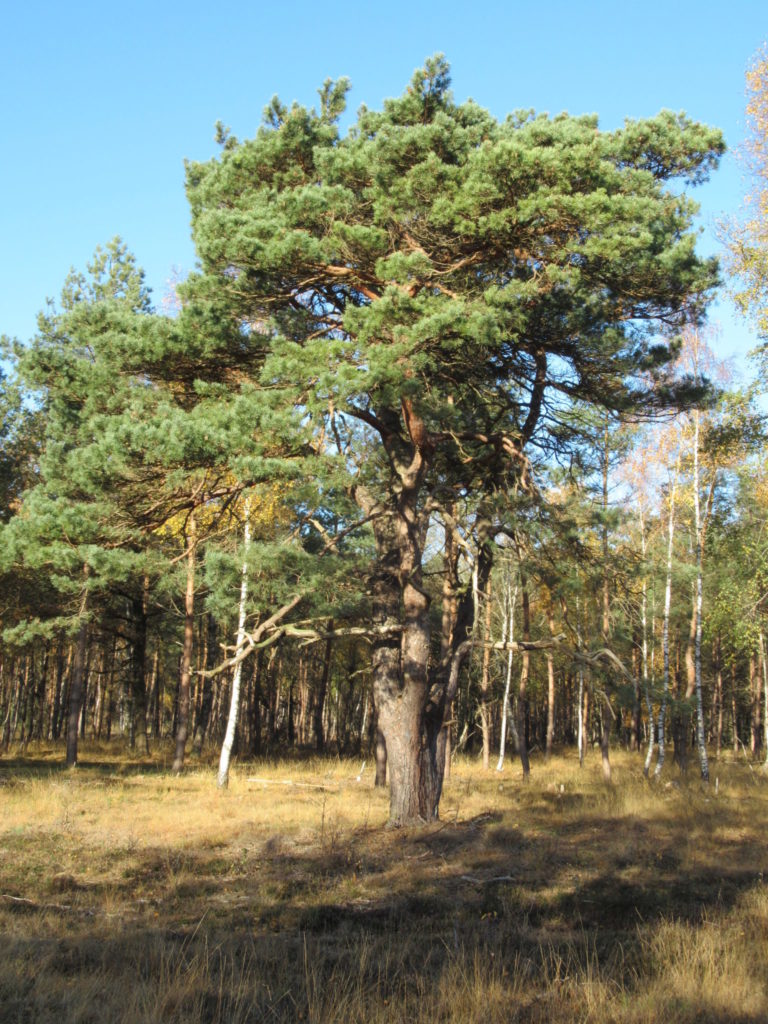
On past a majestic pine tree.
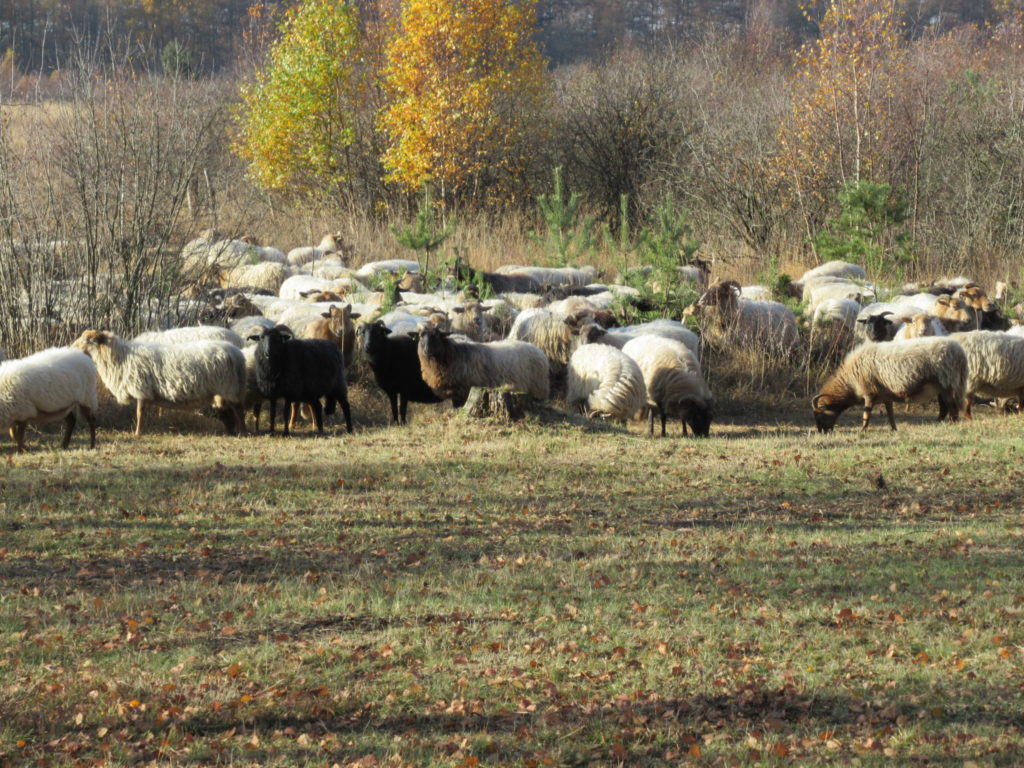
And finally across some heathland, where we stumbled on these beauties:
One of our local flocks of sheep. We had an interesting chat with one of the shepherds, but this blog post is long enough as it is, so I’ll keep that for some other time.
Note: This post is not sponsored in any way. I write about things I like just because I like them.