Hello again, and thank you for your ideas, both on and offline, about last week’s grey yarn. More about that project soon, but today’s blog post is about something completely different.
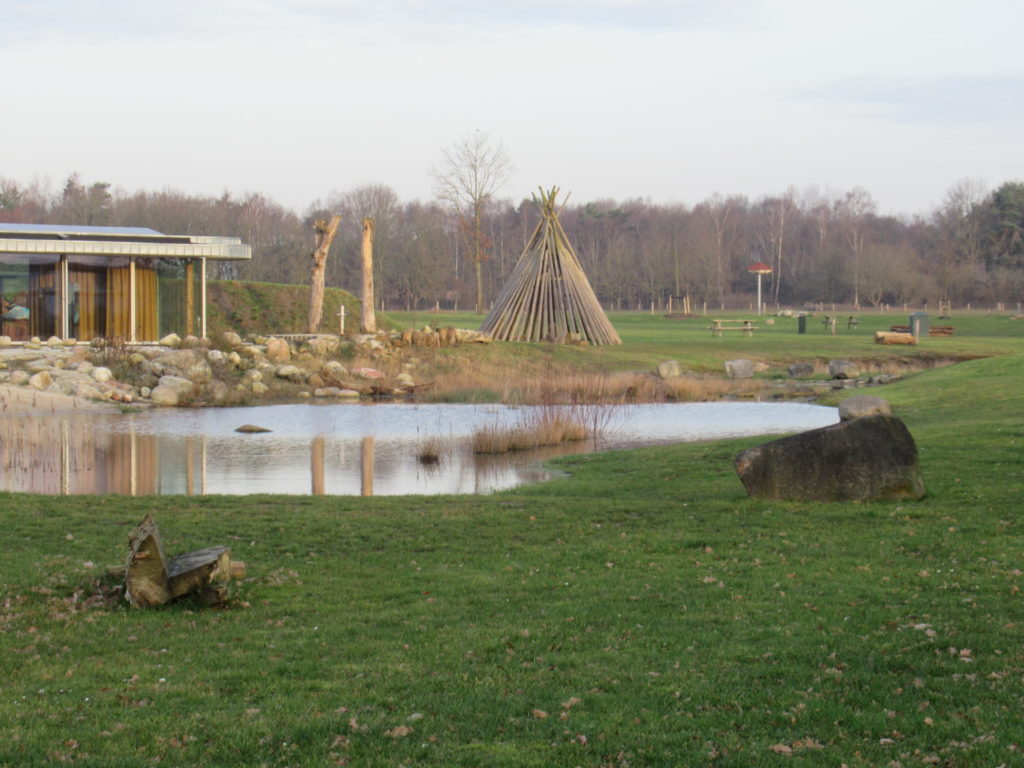
If you’ve been reading my blog for a while, it won’t come as a surprise that making things is an important part of my life. It’s usually something to do with yarn or wool, but I also enjoy excursions into other mediums now and then. Recently I spent a Saturday morning at a nearby visitor centre (above) making something with clay.
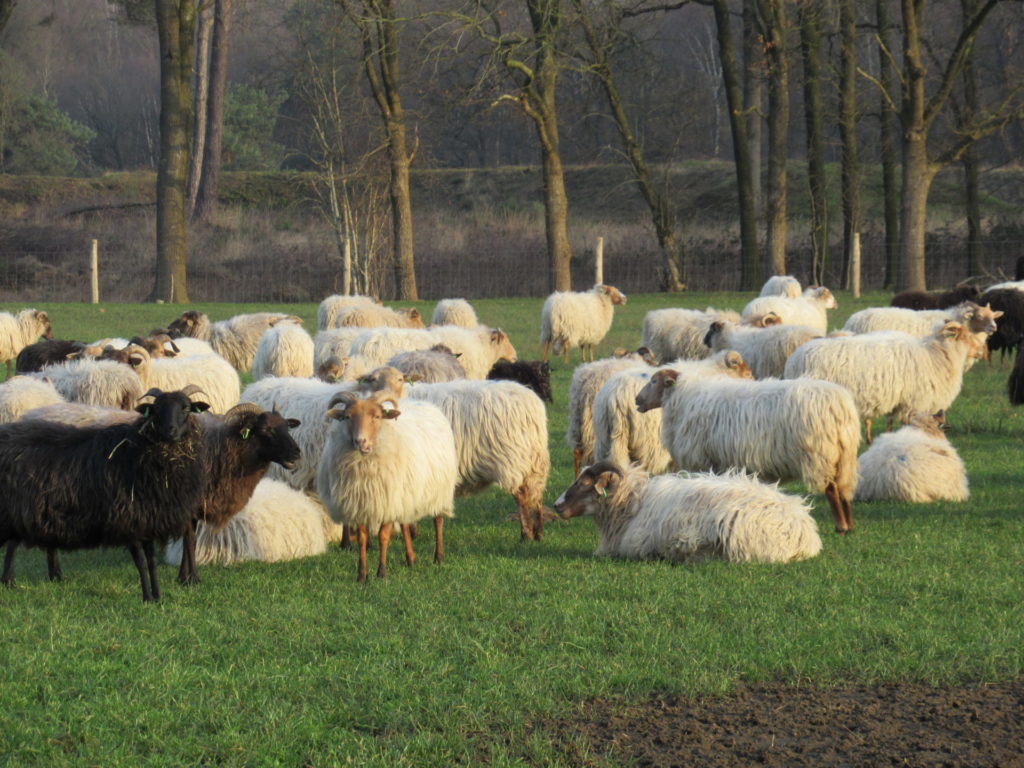
The visitor centre is in the same area where I once had an interesting chat with a shepherd. It is, in fact, next to the sheep fold, so I arrived a little early to say hello to the sheep. Good morning!
The sheep didn’t answer, but quietly kept munching grass and hay before starting their daily walk on the heath.
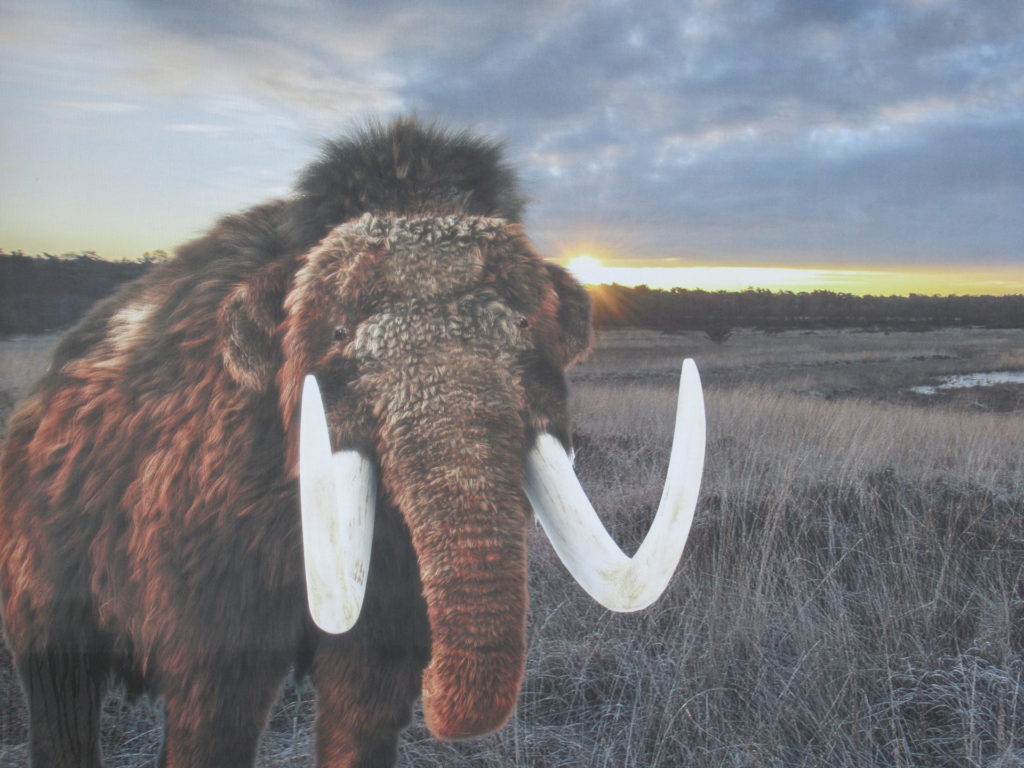
Walking on, I ran into this big guy (or gal). Whoa!
Fortunately it was just a print on a big banner on the outside wall of the sheep fold.
I’m not just including this photo here for fun, but also because this morning was about going back in time. Not quite as far back in time as this mammoth, but almost. Wikipedia tells me that the mammoth died out around 4,000 years ago. On this Saturday morning, we were going back to the funnel beaker culture, which started here around 3,400 years ago.
The morning began with a short talk about the people who became known for their funnel-neck pots, but also made pottery in other shapes. They were not the first inhabitants of this area, but they were the first farmers, and thousands of shards of their pots have been found around here. They are also the people who built the dolmens and tumuli that are still visible in our landscape today.
Well, I can’t tell you everything I’ve learnt, but I can tell you that it was fascinating.
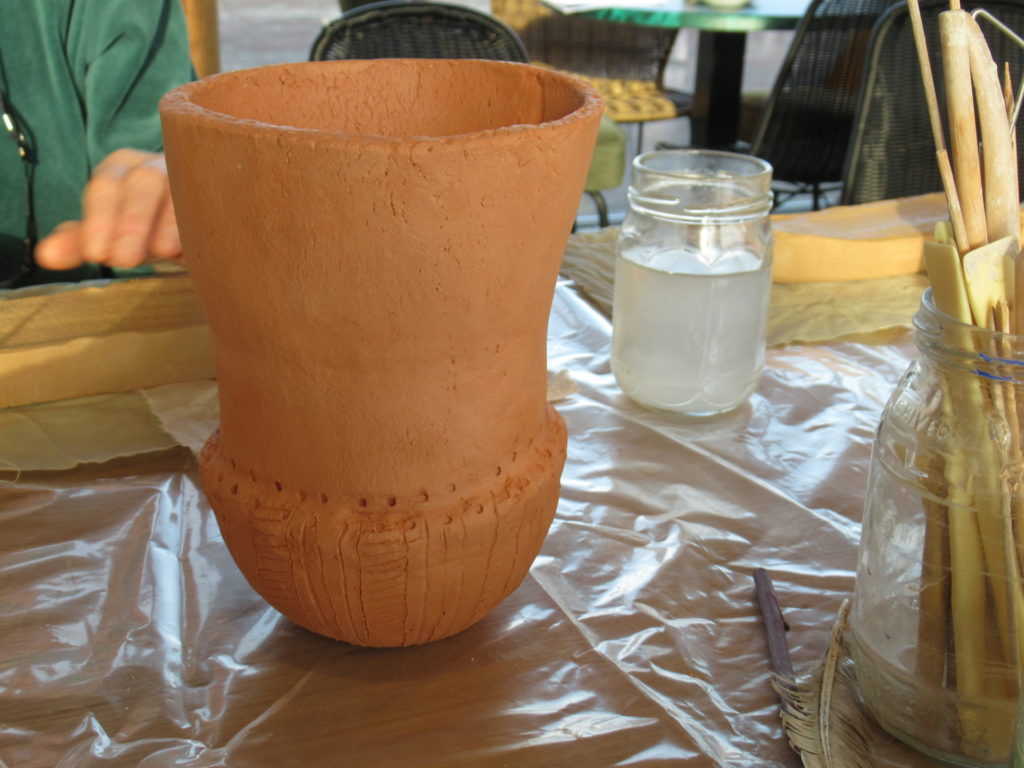
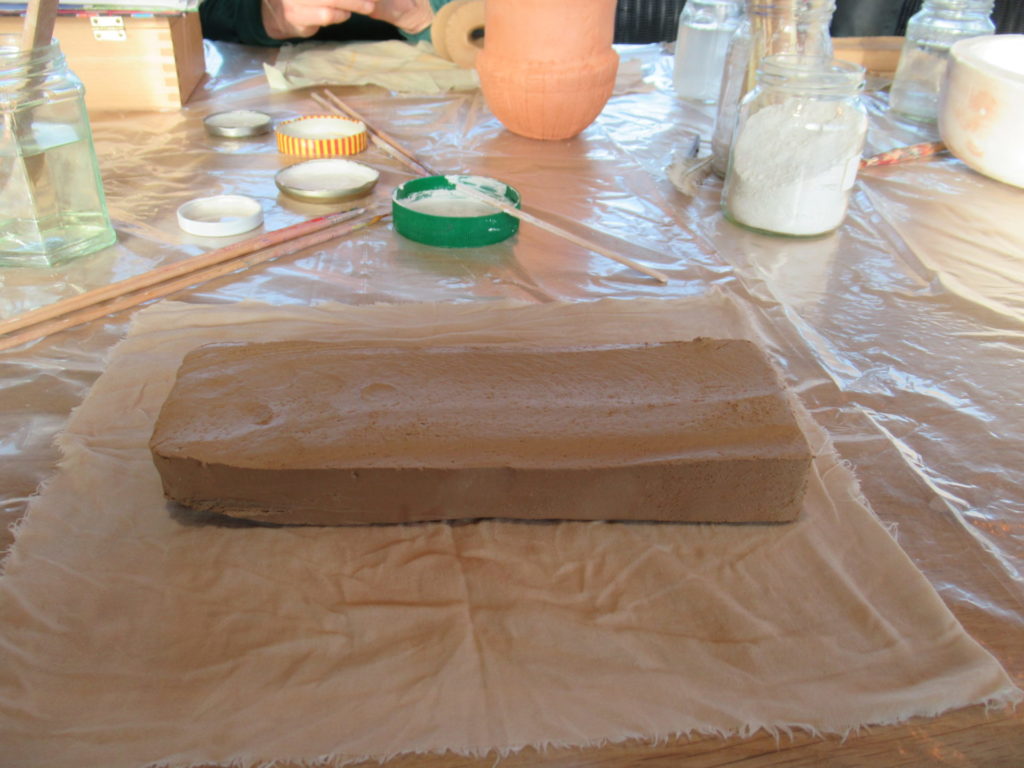
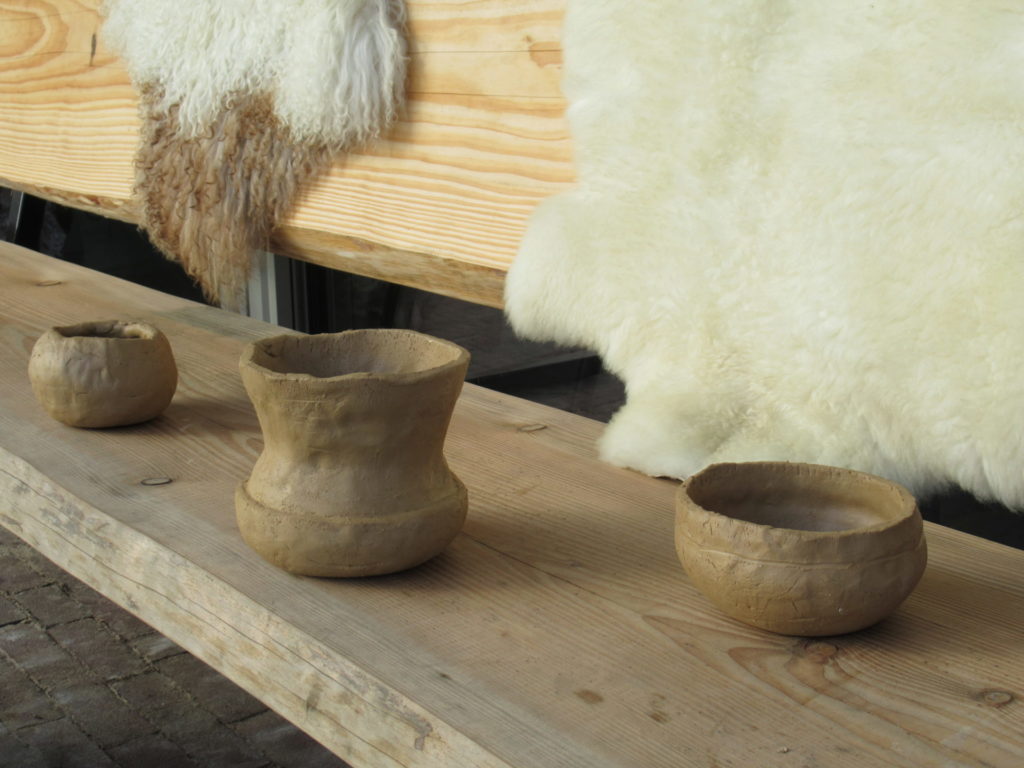
Then it was time to roll up our sleeves and make a funnel beaker ourselves. The artist who gave the workshop had made two examples. This is one of them:
Unlike the original funnel beaker makers, we didn’t have to travel a long way to find the right kind of river clay for our pots. We were given a slab of a similar clay…
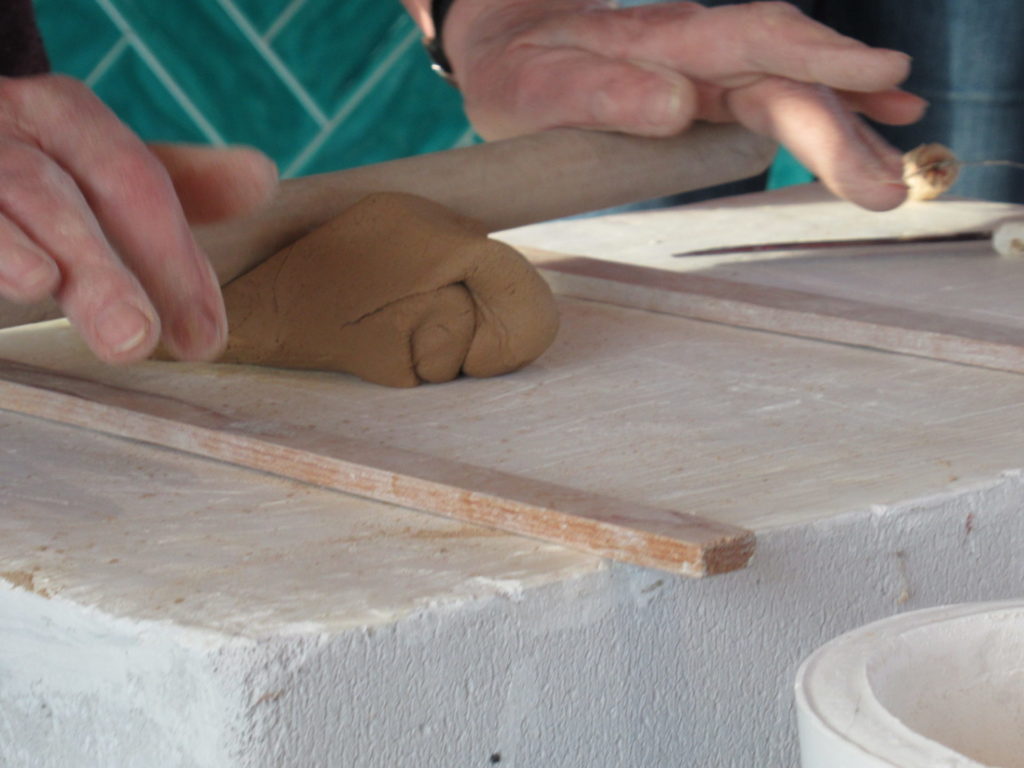
… and started by rolling it out.
Originally the base would have been shaped by hand, and that’s what some of the more experienced participants also did. For those of us with little or no experience (like me) there were moulds to use.
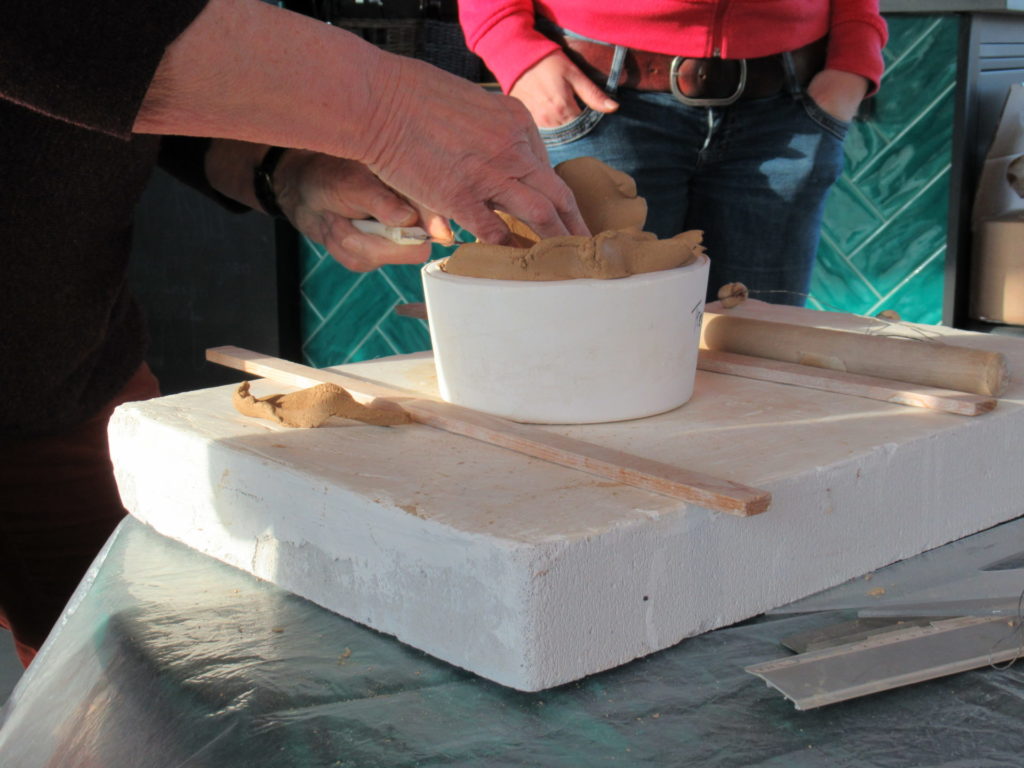
My neighbour at the table was more experienced and had shaped her beaker in no time.
I used too much water to ‘glue’ the next layer onto the base and had to place the beginnings of my pot on a bench outside to dry a little before I could continue, next to those of two other beginners. Mine is on the right.
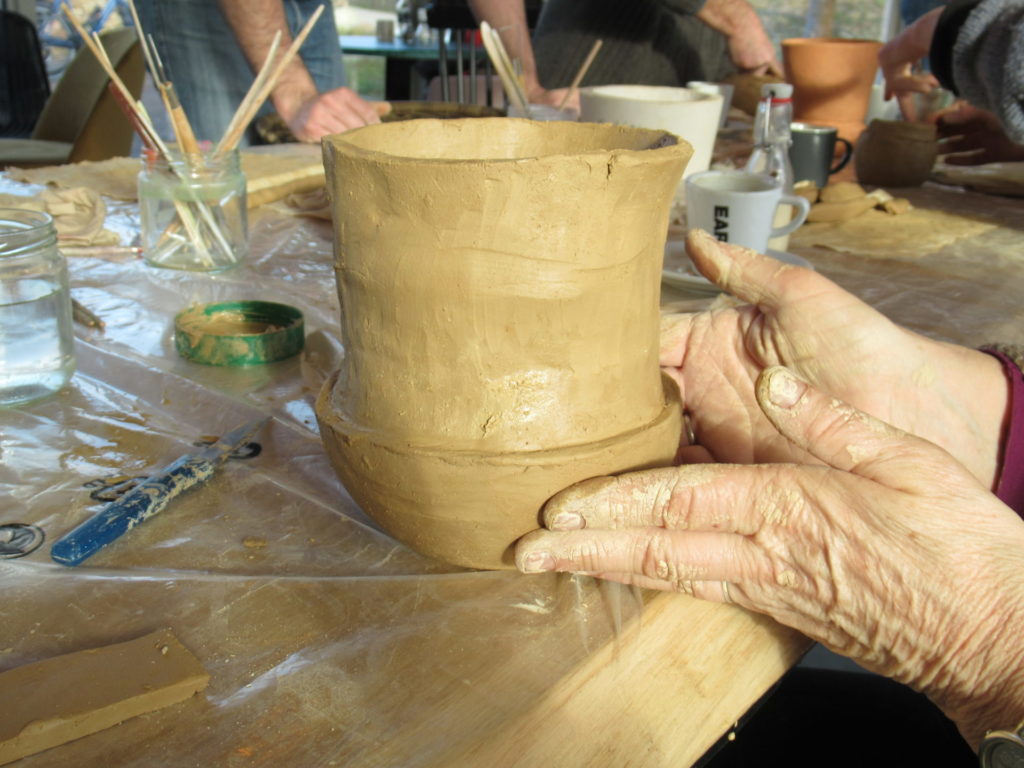
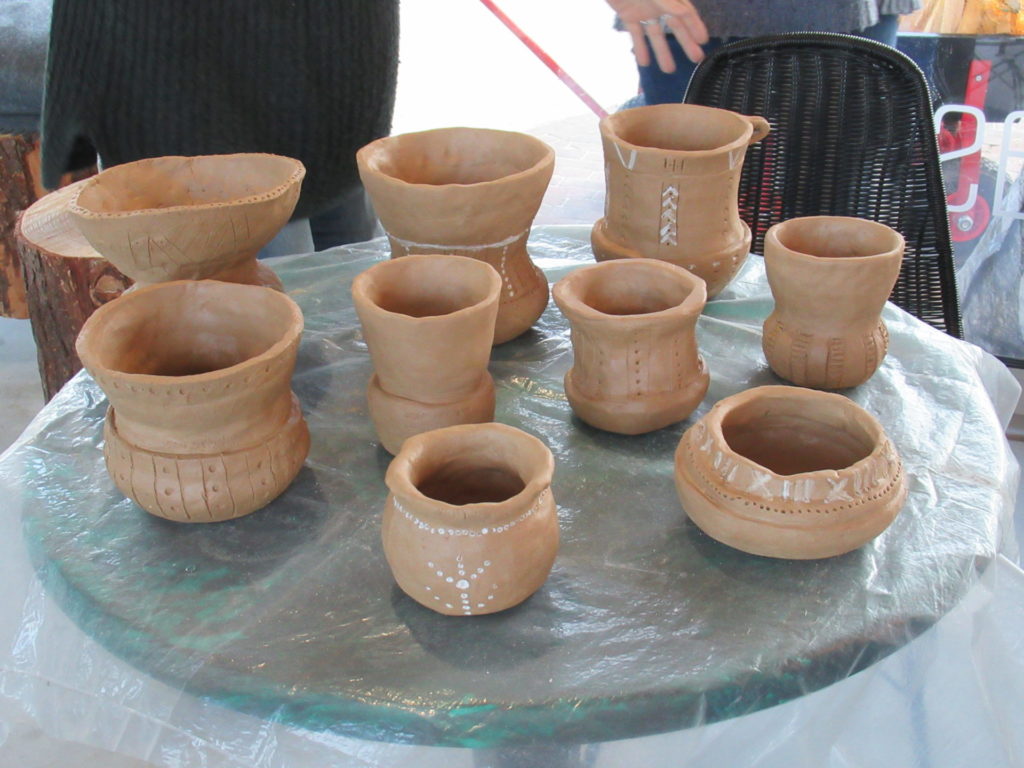
Several hours later we had all made something that looked more or less like a funnel beaker. Some of the pots were fairly small, like the ones that would originally have been used to store seeds. Others were a lot bigger, like the ones used to hold water or as cooking pots.
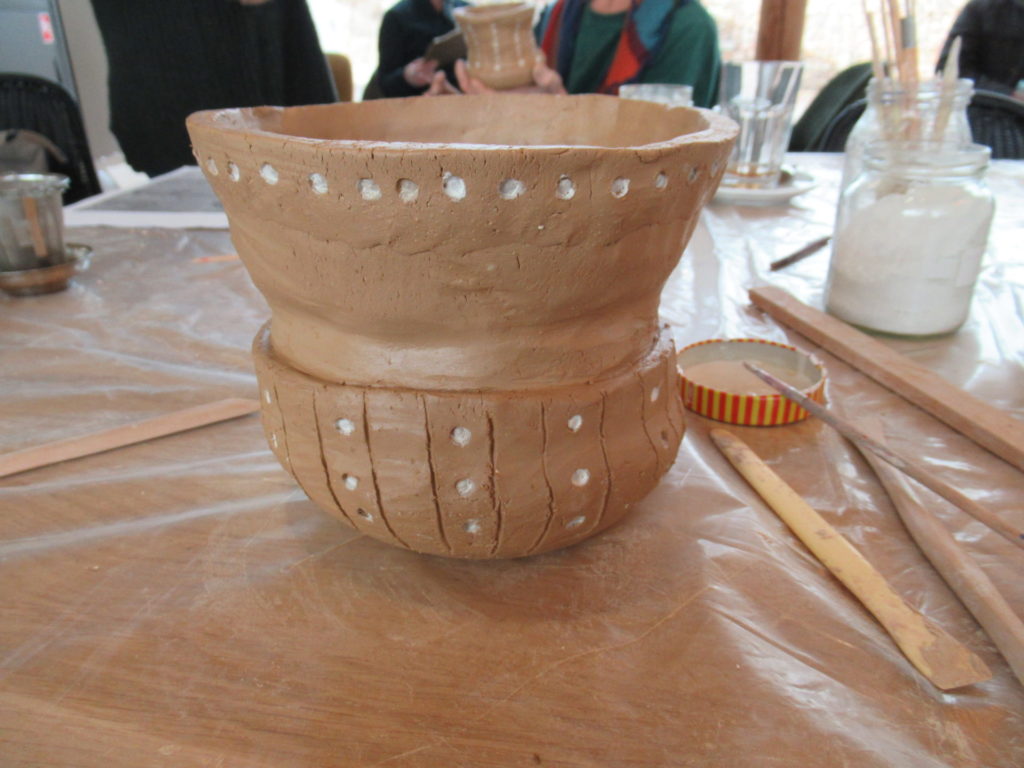
The pottery shards of the funnel beaker culture found around here are often richly decorated. In the past, people used feathers, pieces of wood or bone and their fingernails to make the decorations. I used a spatula for the lines and a stick for the dots on my pot.
It was while I was carefully pressing my stick into the soft clay to make dots, that I suddenly felt transported back a few thousand years. In my mind, I was sitting outside, in front of a wattle and daub dwelling, decorating my pot. There was a piercing wind, but dressed in animal skins, I didn’t feel the cold. I could hear sheep bleating and pigs grunting, and I could smell the sweet smell of the cows grazing nearby. I was looking forward to our meal of lentils and foraged greens. Life was hard and uncertain, but it also had its good moments.
Fast forward to the present, I finished my pot by adding a few details in white. Originally a substance made from ground bones and some kind of binder would have been used, but we used a modern paint of which I’ve forgotten the name.
Now my funnel beaker is drying in the artist’s studio, waiting to be fired in her kiln. It should be a soft rosy colour when it comes out. I’m really looking forward to seeing how it’s turned out.
Links:
The talk about the funnel beaker culture was held by someone from the Oermuseum, a small but interesting museum with archaeological finds and information about how people lived and worked in the north of the Netherlands from the last ice age to the iron age.
The artist who kindly and expertly taught us how to make a funnel beaker was Elisa van den Berg.
For my Mum it was necessary to make things because they weren’t available in shops or she couldn’t afford to buy them. For me and for my daughter’s generation it’s different. We don’t need to make things and it is, in fact, often less expensive to buy ready-made things than to buy the materials to make them ourselves. So, why still make things?
As always, I can really only speak for myself, but I think we all agree that a home-cooked meal tastes much better than any ready-made meal from the supermarket. There is nothing we can buy that comes close to a hand-knit pair of socks. And would you ever treasure a shop-bought bed covering as much as you do the quilt or the crocheted blanket your grandmother made?
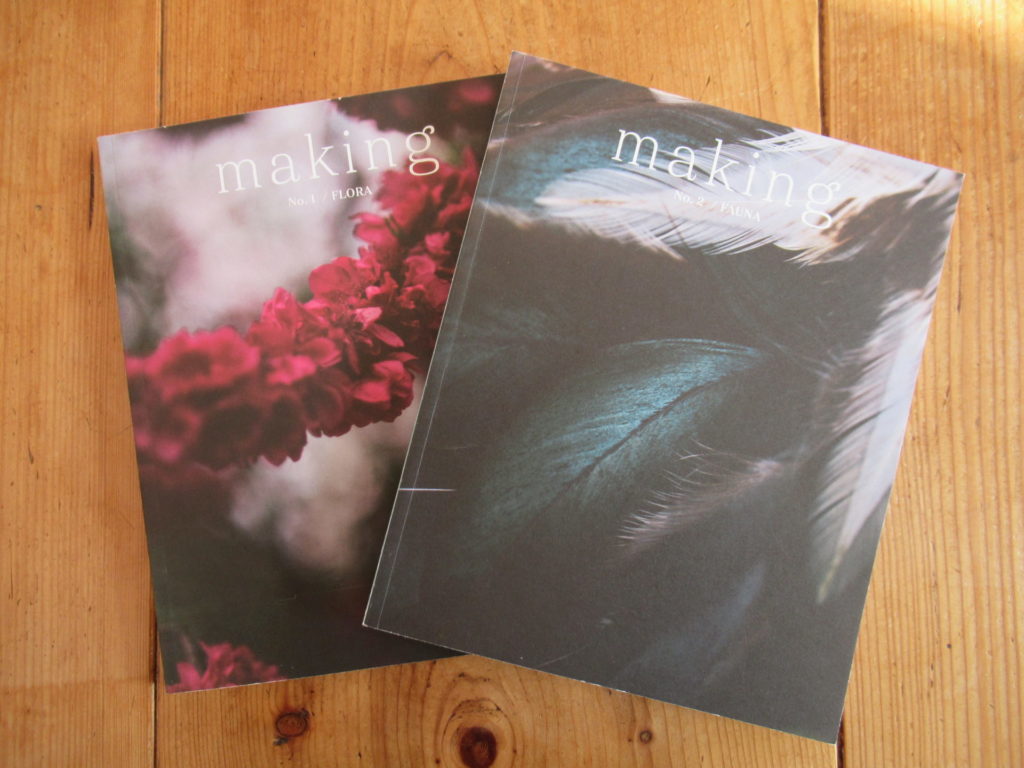
It may sound cheesy, but for me, it’s all about love. Love of the materials, love of colours, love of the people I make things for, love of the process of making. That’s why Making appeals to me so much. Everything about this bi-annual magazine speaks of the love of making things.
In the US one issue costs $ 26,00 and it is around the same price in Euros in the Netherlands. That’s a steep price for a magazine, but… it was love at first sight. And what’s more, the first two issues were themed Flora and Fauna.
How could I resist?
The people at Making always work with themes. There are always two related themes following each other: Flora and Fauna, Dots and Lines, Color and Black & White, Desert and Forest. I love the whole idea, as well as the projects, the photographs, the stories, the styling and even the ads (there are just a few, they are only on the last few pages, and they are in keeping with the theme).
Knitting is only one of the crafts in Making. There is also weaving, sewing, embroidery, dyeing, felting, rug hooking and much more, as well as a recipe now and then and essays about all kinds of interesting subjects. Some of the projects are small and simple, others a little more complicated.
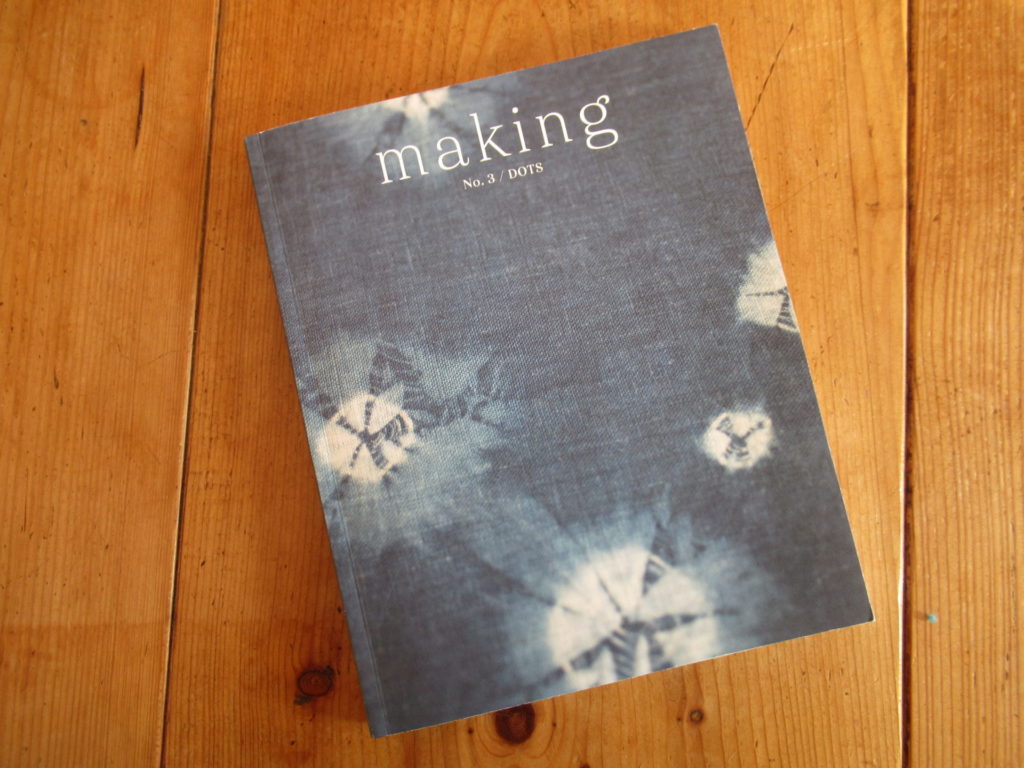
I brought the third issue, themed Dots, with me on a holiday to Germany a few years back.
I enjoyed leafing through it when I woke up early in the morning. And I enjoyed studying the photographs and reading the essays in the evenings on the covered porch of our Ferienwohnung, after we’d come back from one of our long walks.
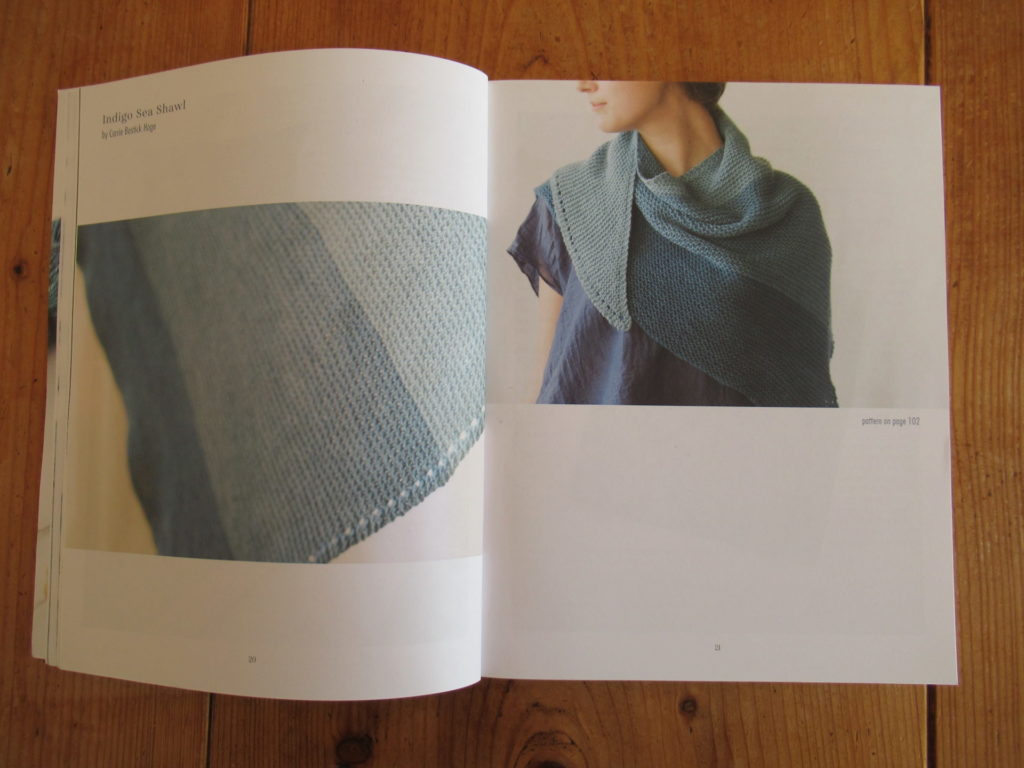
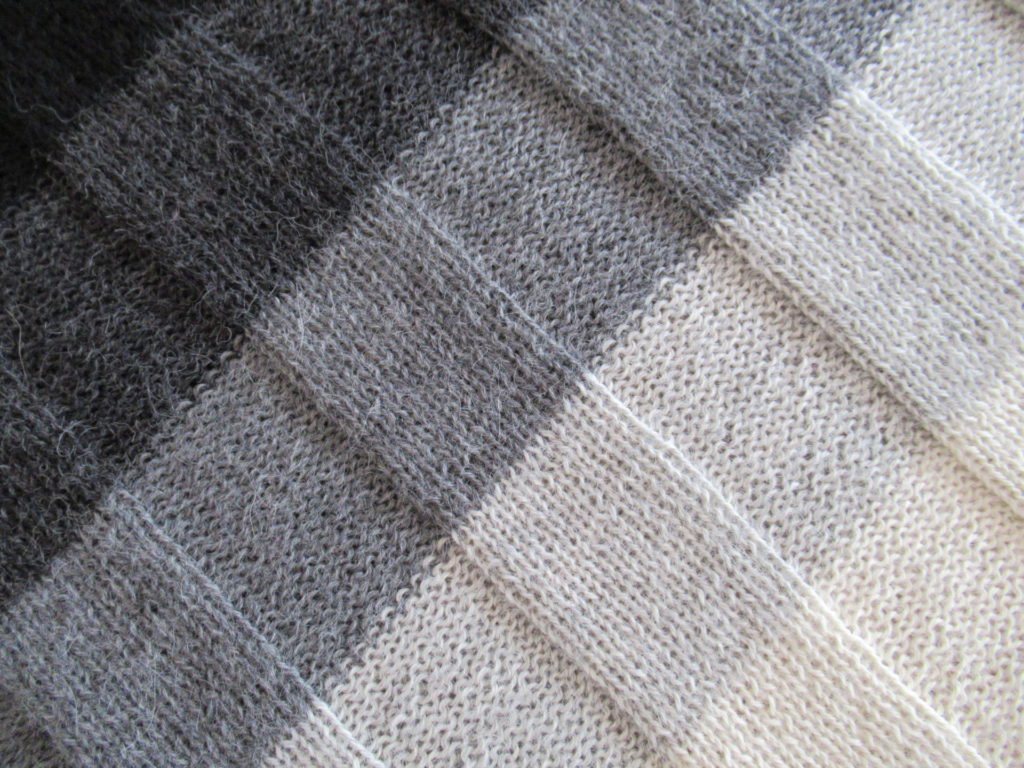
Everything in this Dots issue is in shades of indigo blue or undyed. It isn’t as if everything is covered in polka dots – the dots theme is much more subtle than that. In one of the knitting projects, the triangular Indigo Sea Shawl, the dots take the form of a row of eyelets along one side:
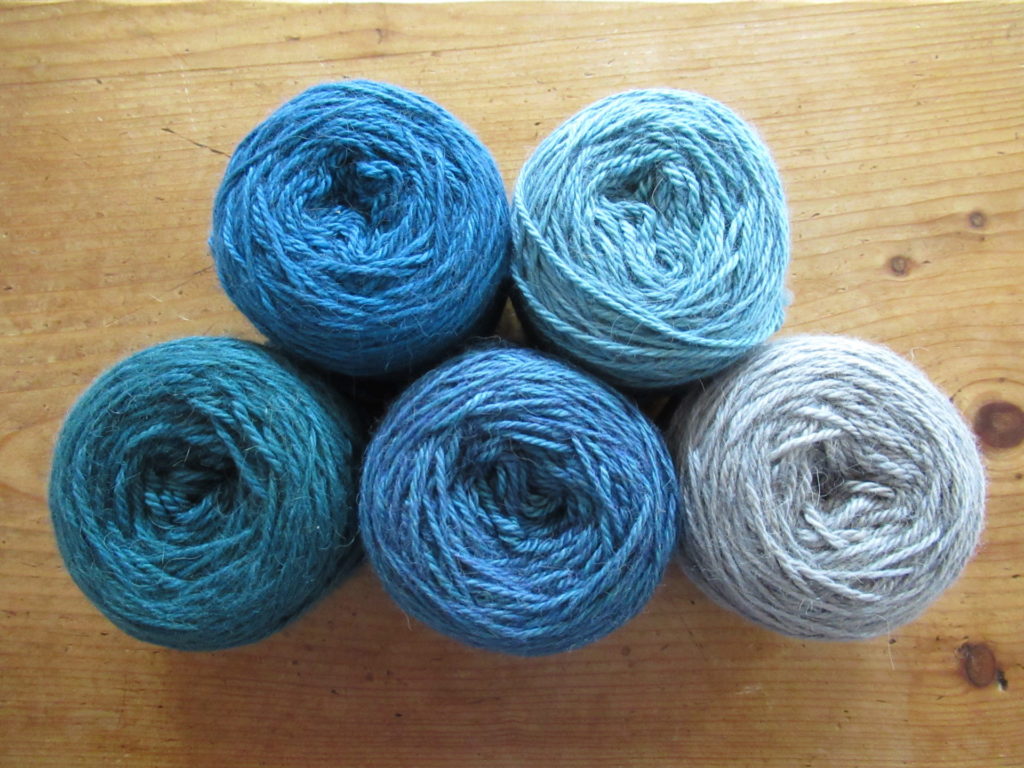
During the same holiday in Germany, I bought yarn for this shawl in a very special yarn shop in a former smithy, a few miles from our holiday home. The pattern specified three 50-gram skeins of a sport weight yarn. With a wingspan of just over a metre it was too small to my liking, so I bought four skeins.
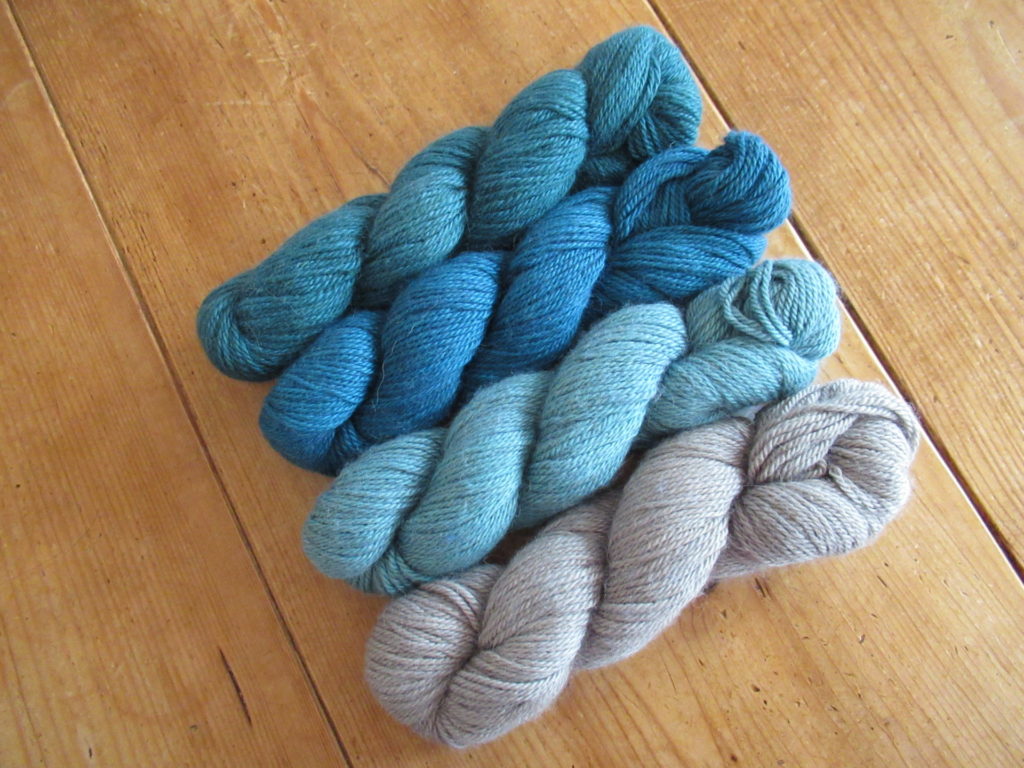
I chose three shades of blue-green (what else?), and then added a grey one for a little contrast.
After we got home, I regretted the grey. (It is muddier than in the photo, with a hint of brown.) I didn’t love it and had the feeling that it sucked the colour out of the blue-green shades. I couldn’t go back to change it for a different colour, so I put it away until I knew what to do.
I dug out the yarn for the utterly simple Indigo Sea Shawl recently because I’m desperately in need of another in-between-projects project. Why?
Well, although I love making things, it isn’t always plain sailing. Just as in any important relationship, there are struggles and setbacks from time to time. Right now, I’m puzzling over a new design that isn’t working out as I at first envisioned it. I’m struggling to finish a UFO. And after weeks of waiting, the yarn I’ve ordered for a sweater for our daughter still hasn’t arrived.
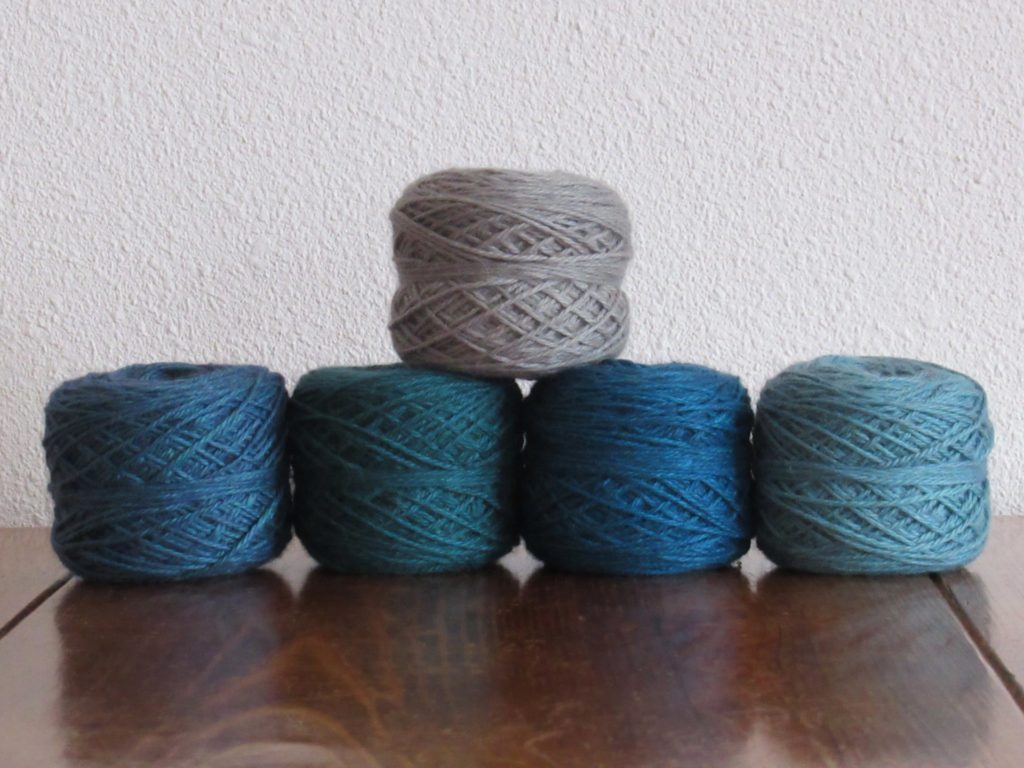
So when I saw that Juffrouw Lanterfant (the yarn shop I wrote about last week) stocked the same yarn, I decided to replace the grey with another shade of blue. I photographed the skeins, wound the yarn into balls and took more photographs.
And then, looking at the photographs, I thought: hmmm, perhaps that grey isn’t so bad after all. I still don’t love it, but I don’t hate it anymore either. Maybe it will work in combination with the blues. Maybe it will even be a valuable addition.
So, what shall I do? Embrace a colour I’m not really in love with and give it a chance? Or tell it that I don’t see a future for us together and take it to my knitting group’s yarn swap in March?
Unfortunately the Dots issue is now out of print. The other issues are still available from some yarn shops and on the Making website.
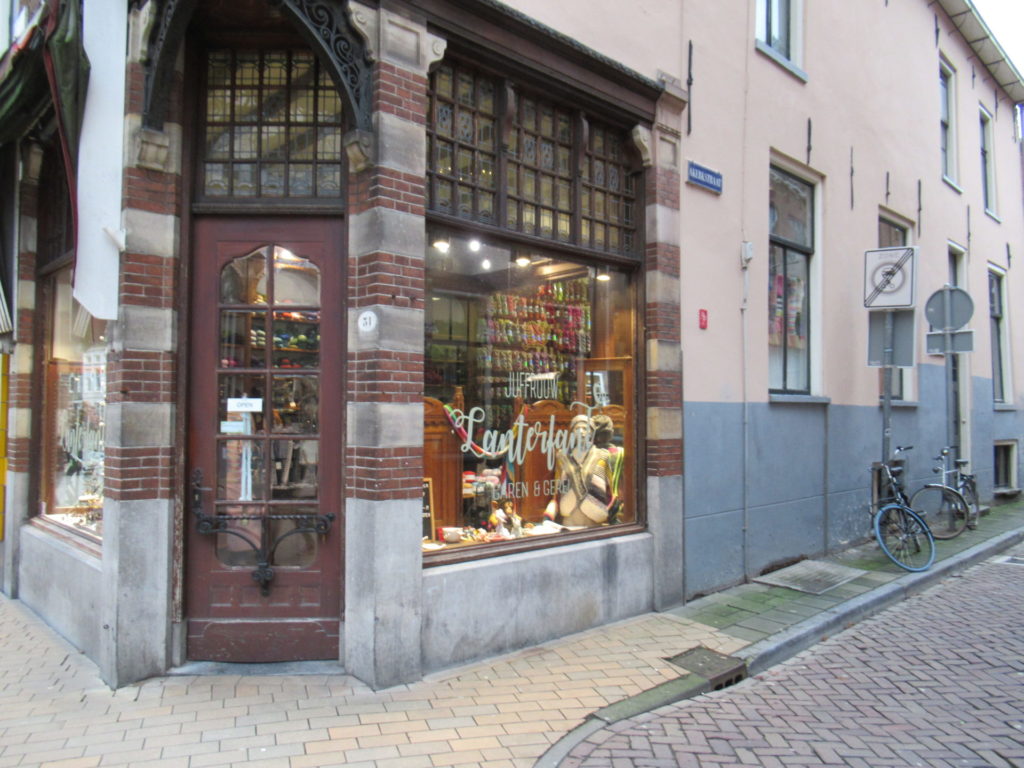
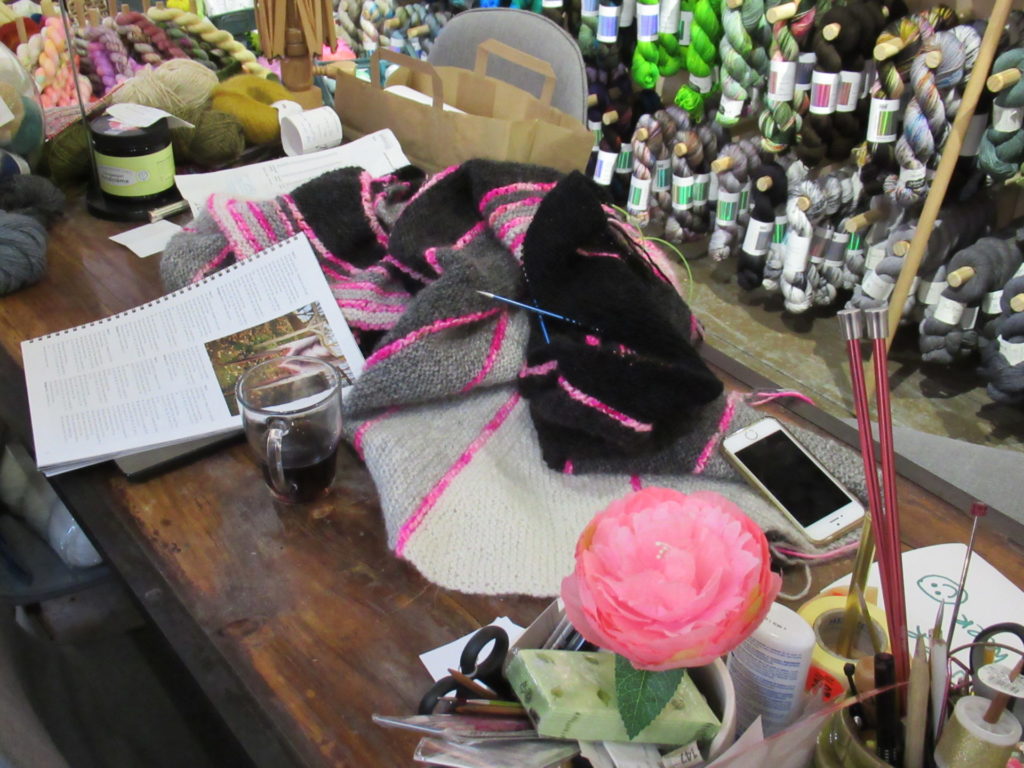
The route to the meeting I was going to attend in the city of Groningen ran right past a yarn shop. Because it isn’t every day that I visit Groningen, I packed my camera and took an earlier train to have some time to browse around and take pictures.
After a short walk from the railway station, I stood in front of Juffrouw Lanterfant (which translates into something like Miss Lazy Daisy). It is a corner shop with an old, tall and narrow door and other lovely old details.
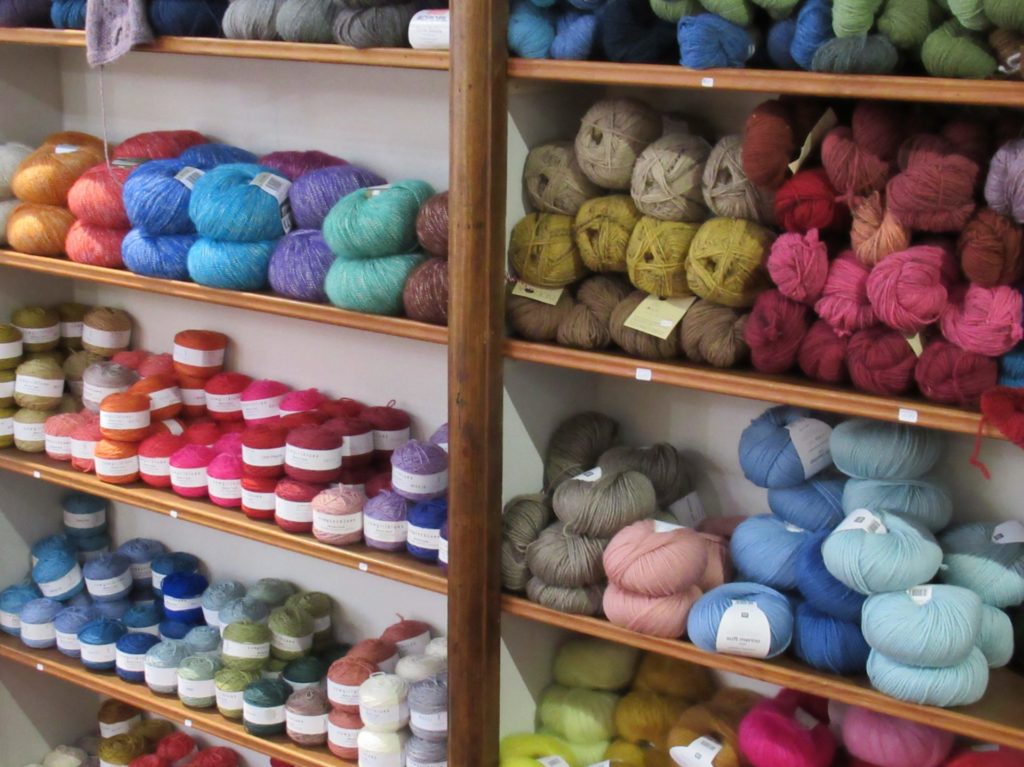
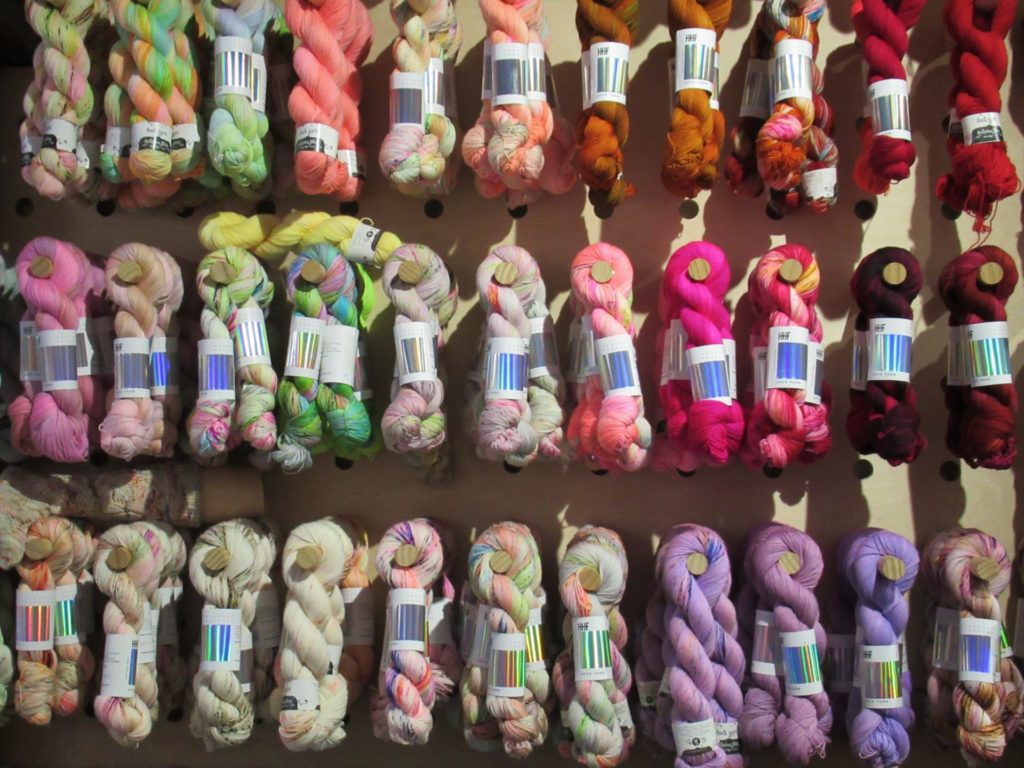
As soon as I entered, I was dazzled by the wall of brightly coloured skeins of yarn. I’m not entirely sure, but I think these are from Hedgehog Fibres:
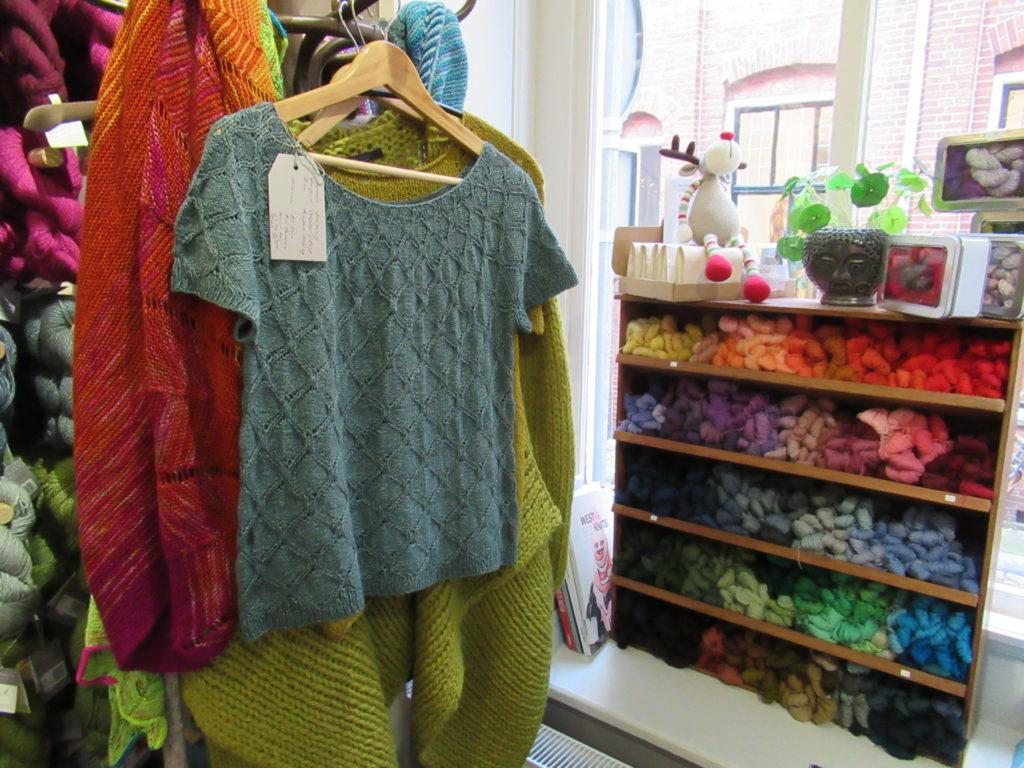
Just the thing for a Stephen West design. I have met Stephen several times and know first-hand that he is a very friendly person as well as an incredibly prolific designer. Although we have very different tastes, I think what he is doing is really, really interesting and highly original.
On a coat rack there were several shop samples of shawls, loops, cardigans and sweaters. The short-sleeved top with the attractive all-over pattern and lovely neckline is ‘Sanctuary’ from Pompom Quarterly #29.
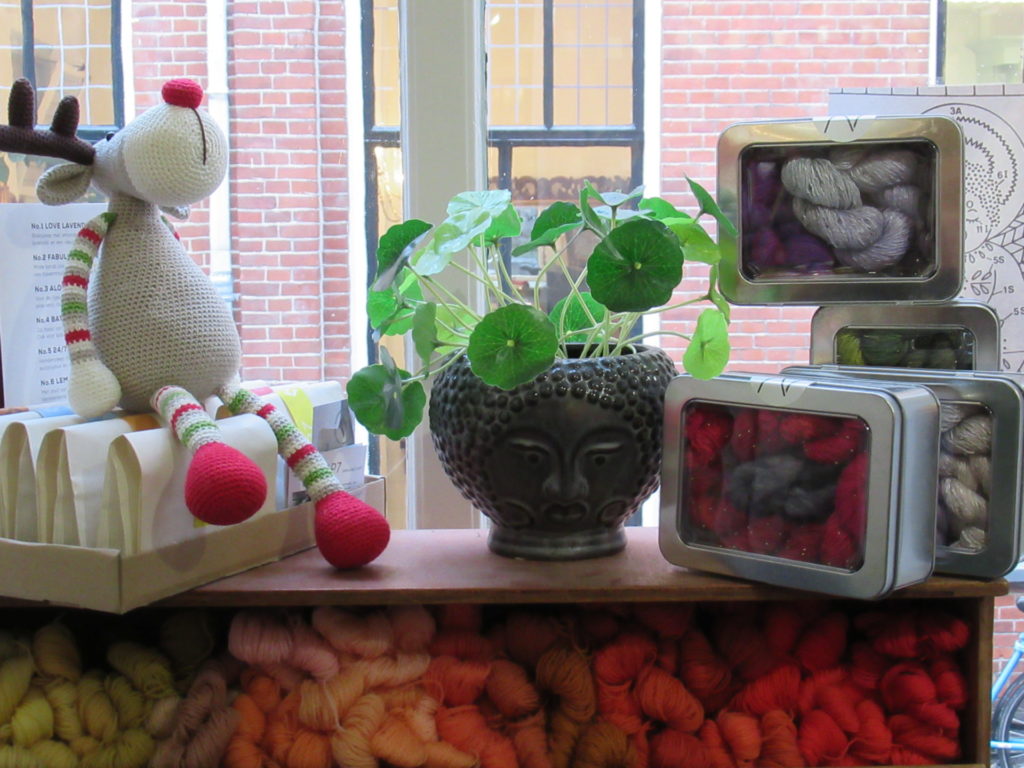
And, oh, that beautiful rainbow of colours in the small cupboard to the right of it! That must be Appletons crewel wool.
And what do I spy on the top shelf?
Several gift boxes filled with ArtYarns’ luxurious fibres embellished with beads or sequins. I once splashed out on one single skein of those, a silvery yarn with beads AND sequins. ArtYarns are a bit too blingy for an entire shawl to my taste, but in combination with other, quieter yarns – yum!
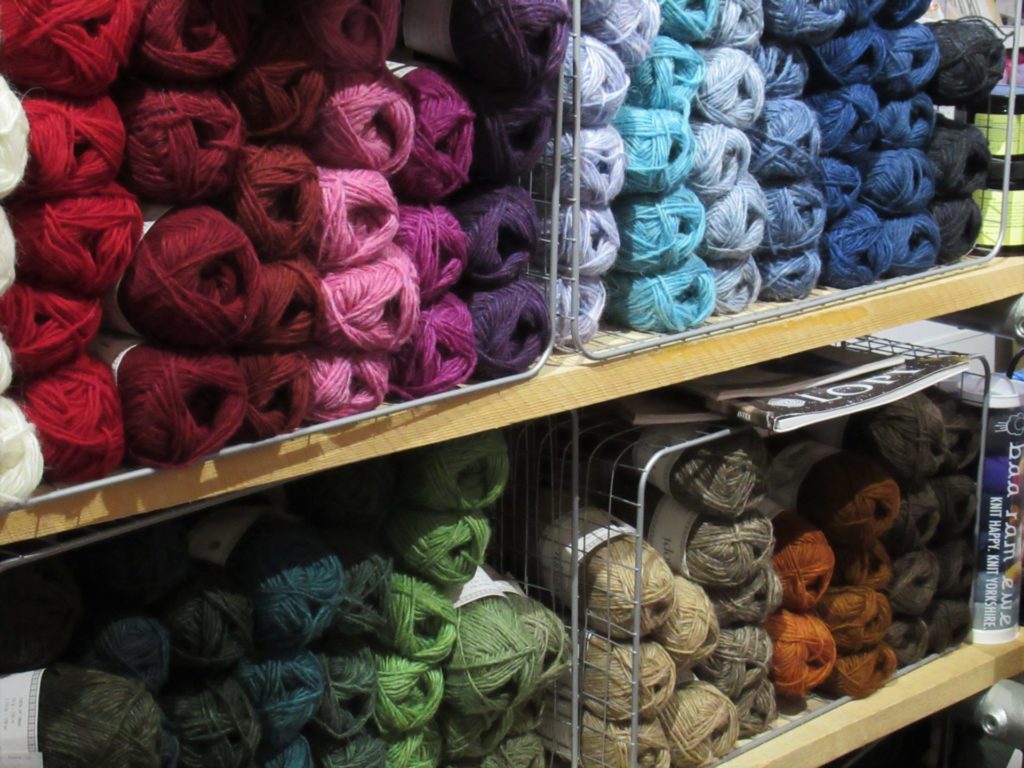
At the other end of the spectrum, the shop also stocks Icelandic Létt Lopi. A rustic, really woolly, sheepy yarn.
The shop lady was knitting a humongous shawl from it, in black, grey and white with fluorescent pink accents. She said it would be about 4 metres long when finished. Here it is, laid out on the reading table:
I love it when a yarn shop has a big table like this, even though (or perhaps especially if) it is rather messy. Nowadays, yarn shops aren’t just about buying yarn. They are also great places to find inspiration, leaf through new knitting books and meet other makers.
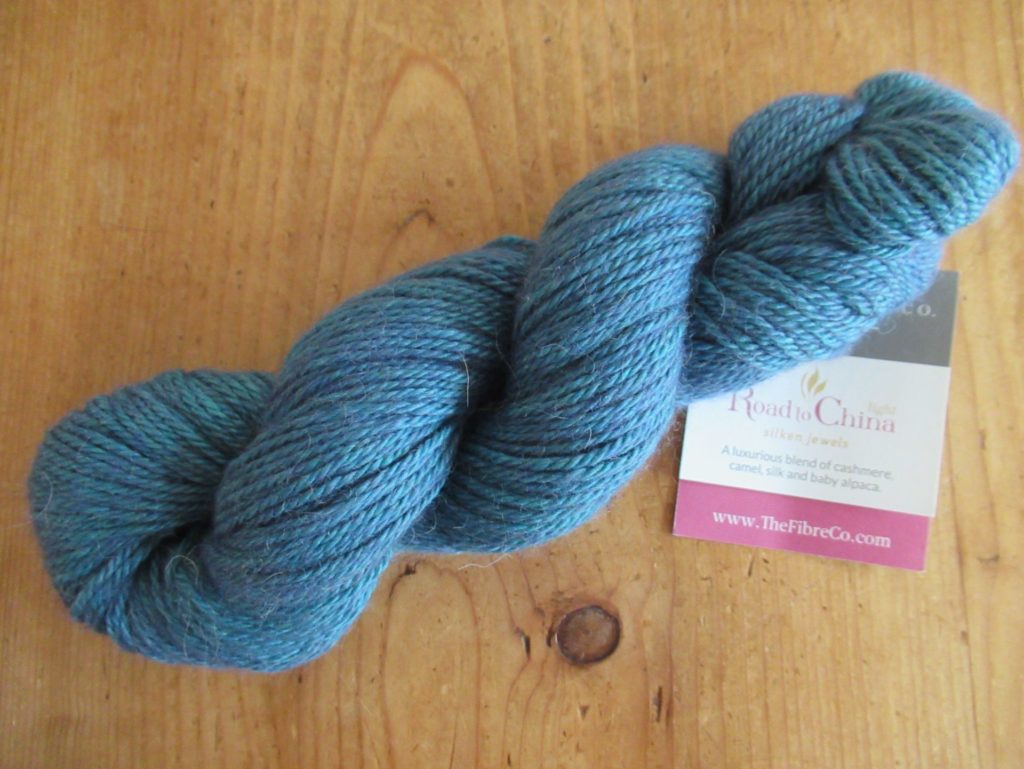
Having said that, I did buy something – one beautiful skein of yarn to complement several others I once bought in Germany:
If you’re ever in the area, do pop into Juffrouw Lanterfant. Their address and most (but not all) of the yarns they stock are on their website.
This blog post isn’t sponsored in any way. I sometimes write about yarn shops because I love chatting about the materials I choose and use, and also because I think it may be of interest to other knitters. I feel a bit silly repeating this every time, so I have now altered my ‘About’ page to explain once and for all that I don’t have a hidden agenda.
Pale, medium and dark grey, with a some clear blue thrown in now and then – that’s February skies. For people in the Southern hemisphere, like some of my relatives and friends, it’s a different story, of course. But if you’re in the North and tired of dreary days, I hope this blogpost will work as a spot of colour therapy.
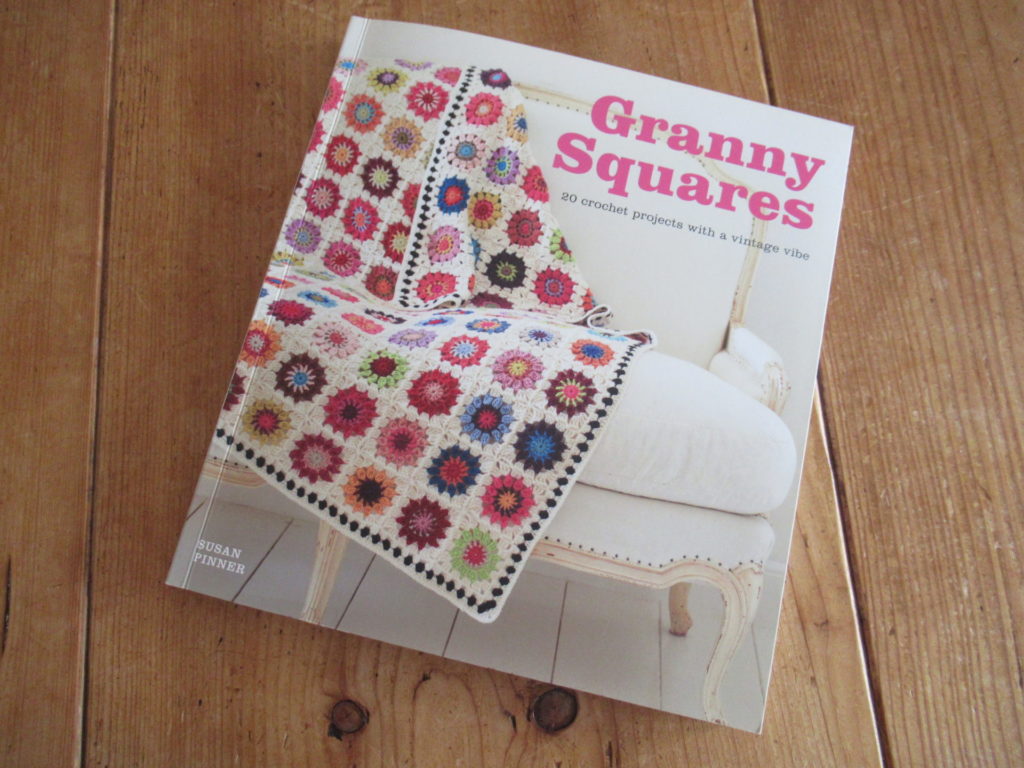
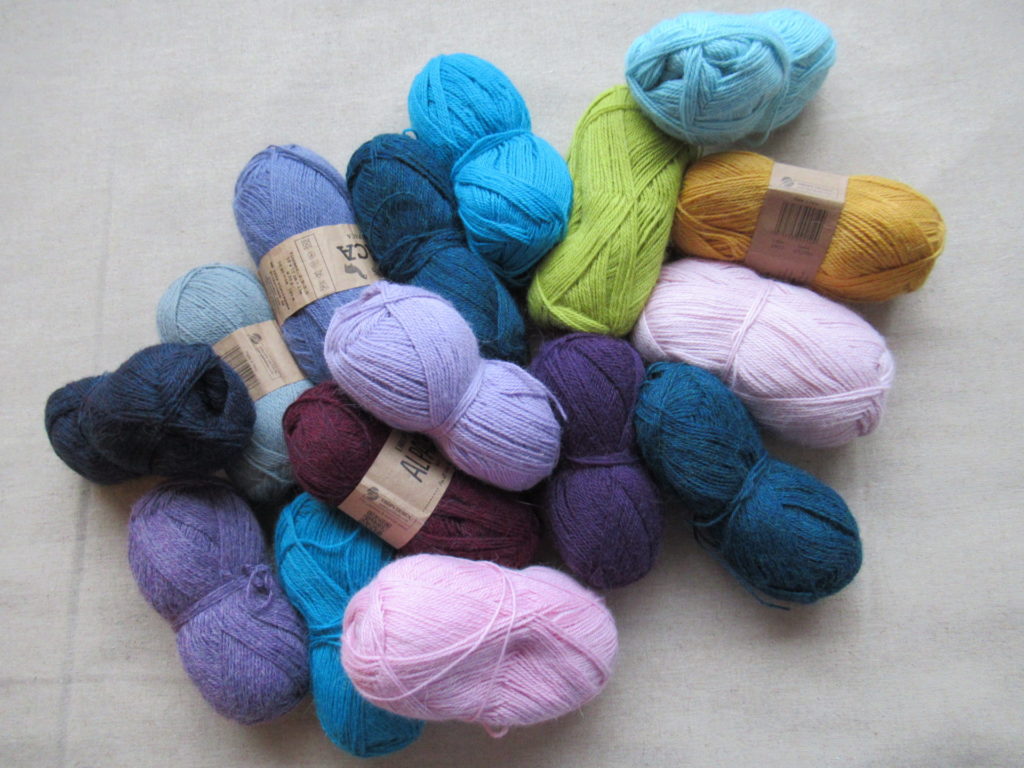
A long time ago, I bought a big bag full of alpaca yarn. Single balls in many different colours and some neutrals to offset all that brightness. I was going to crochet a granny square blanket, something like this:
After crocheting just a few squares I realized that the yarn wasn’t suitable. At least not to my taste. It had zero elasticity, which meant that it lacked the squishiness and coziness factor that a blanket needs. It was also very smooth and slippery, and I was afraid that all those woven in ends would soon unravel.
I put the yarn away until I had a better idea for it.
Many years later, I thought of starting an ‘in-between-projects project’ – something simple to knit while I was finishing another project, to prevent that from becoming a UFO. Something that I could easily put aside when I was ready to start something new, and pick up again when that was at the finishing stage. It needed to be rather boring, or I would still be in danger of creating more UFOs.
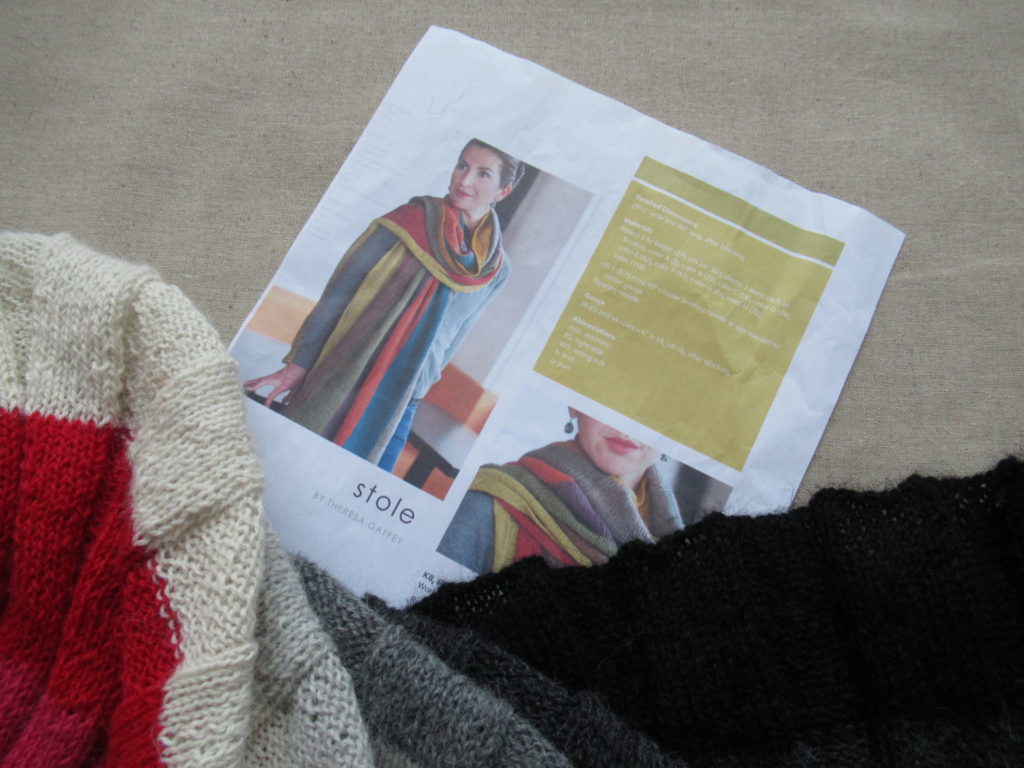
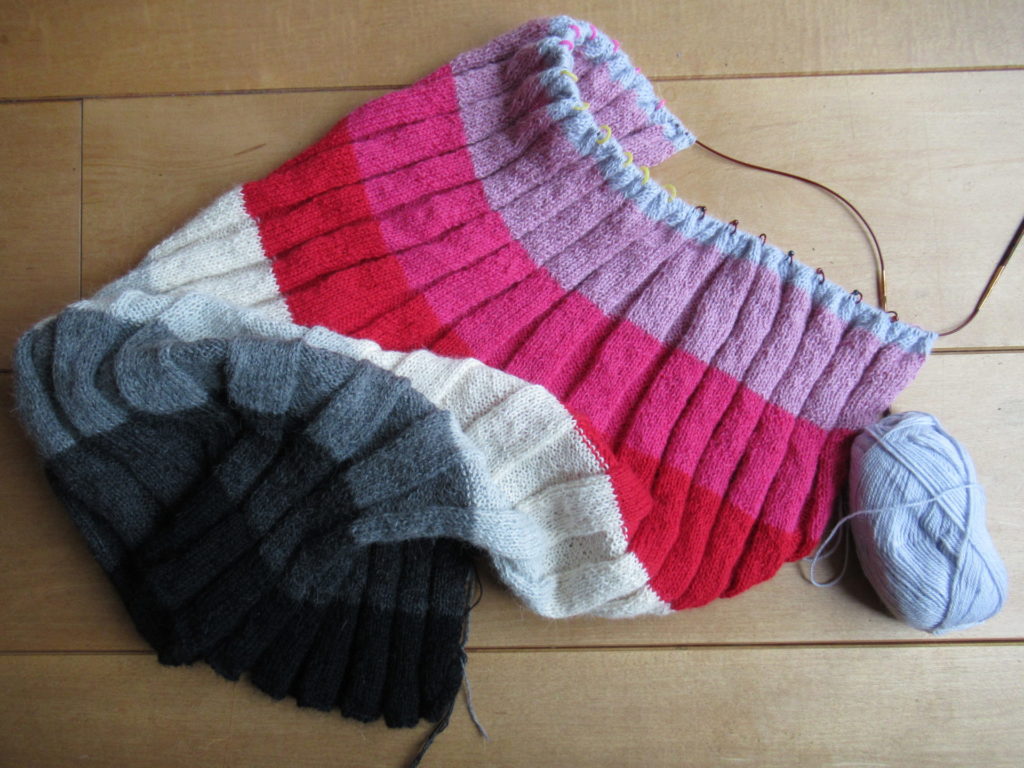
I chose this pattern:
It is simply called ‘Stole’ (Ravelry link) and was designed by Theresa Gaffey. Basically it is no more than a huge expanse of ribbing. My alpaca yarn would be ideal for it – nice and drapey. There wouldn’t be too many ends to weave in that could come undone. And I had many colours to choose from.
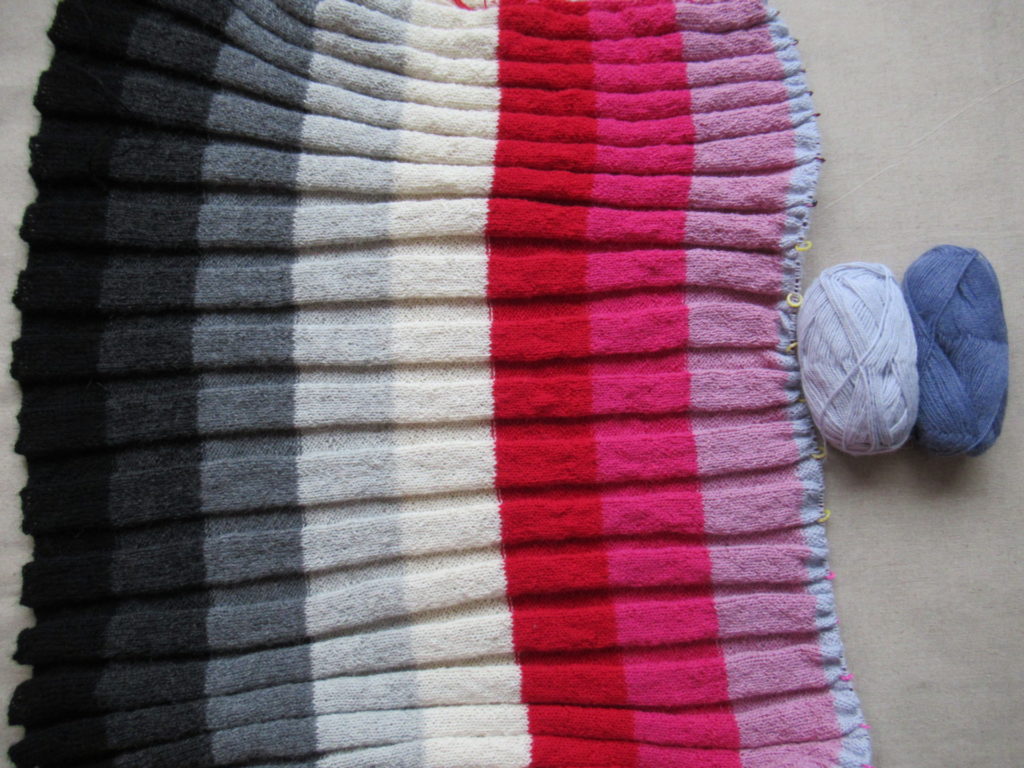
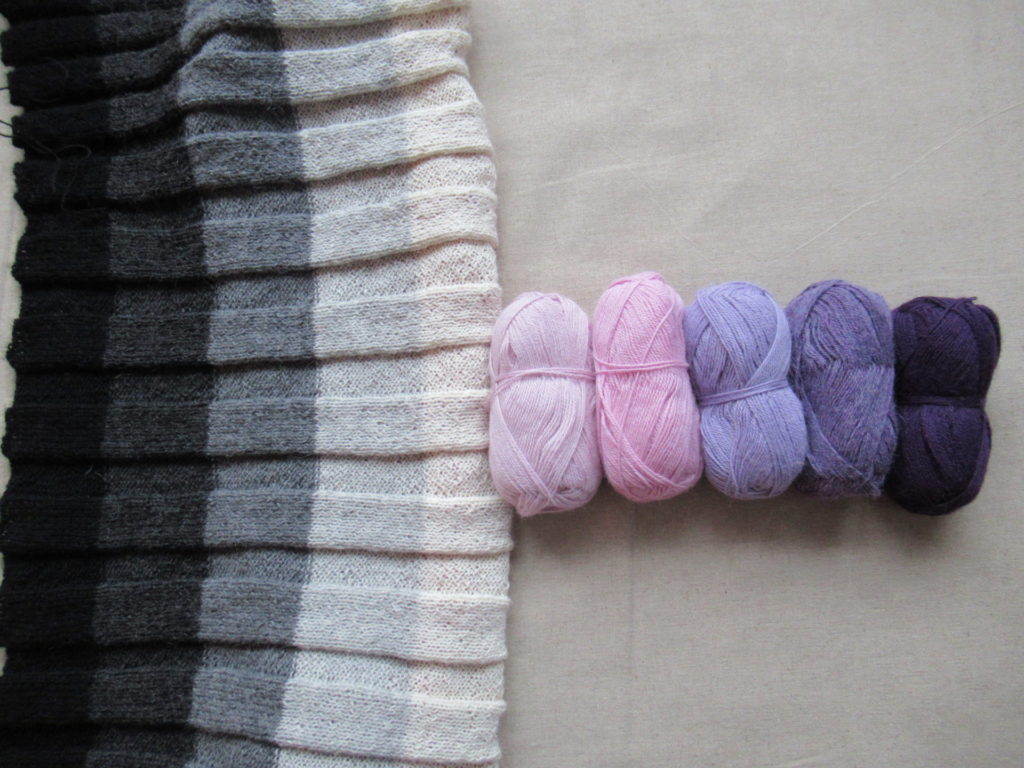
I thought it would be nice to do one half in neutrals (black and greys) and one half in cheerful colours. This was my original colour choice:
But when I was on to the last colour but one, I wasn’t happy. The medium pink looked ‘dirty’ beside the bright fuchsia, and the whole thing seemed out of balance. So I tried out all kinds of alternative colour combinations, always keeping the neutral half intact.
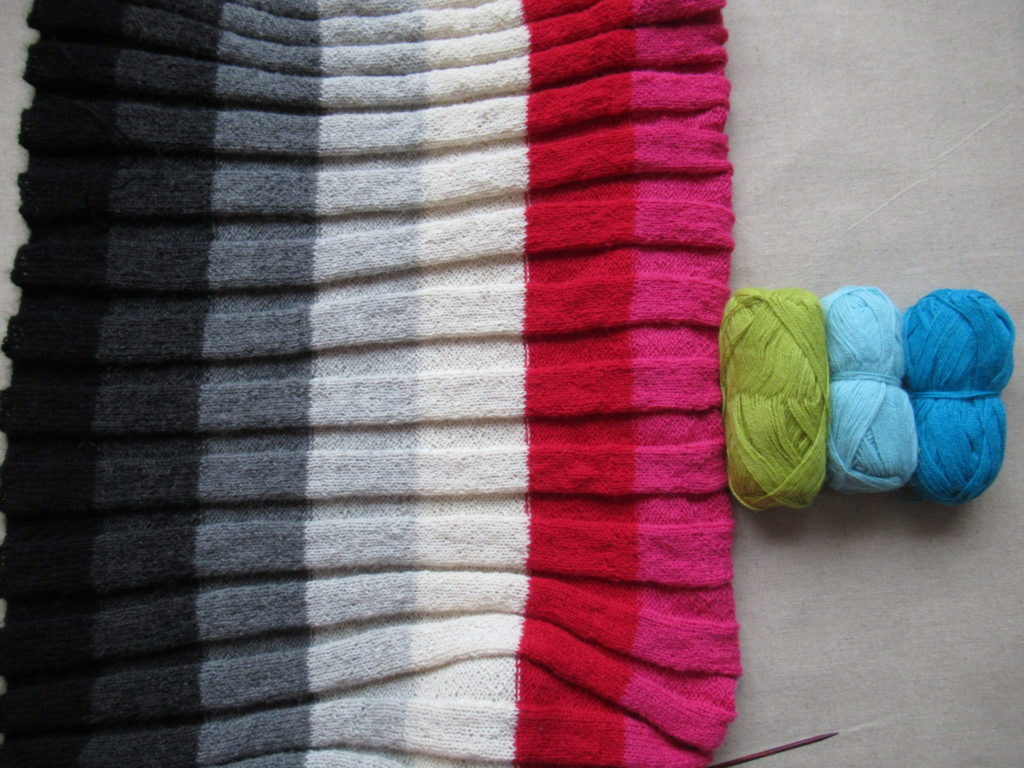
I tried some very bright colours next to the original red and fuchsia. Cheerful, and a lovely contrast with the neutral half…
… but not really ‘me’.
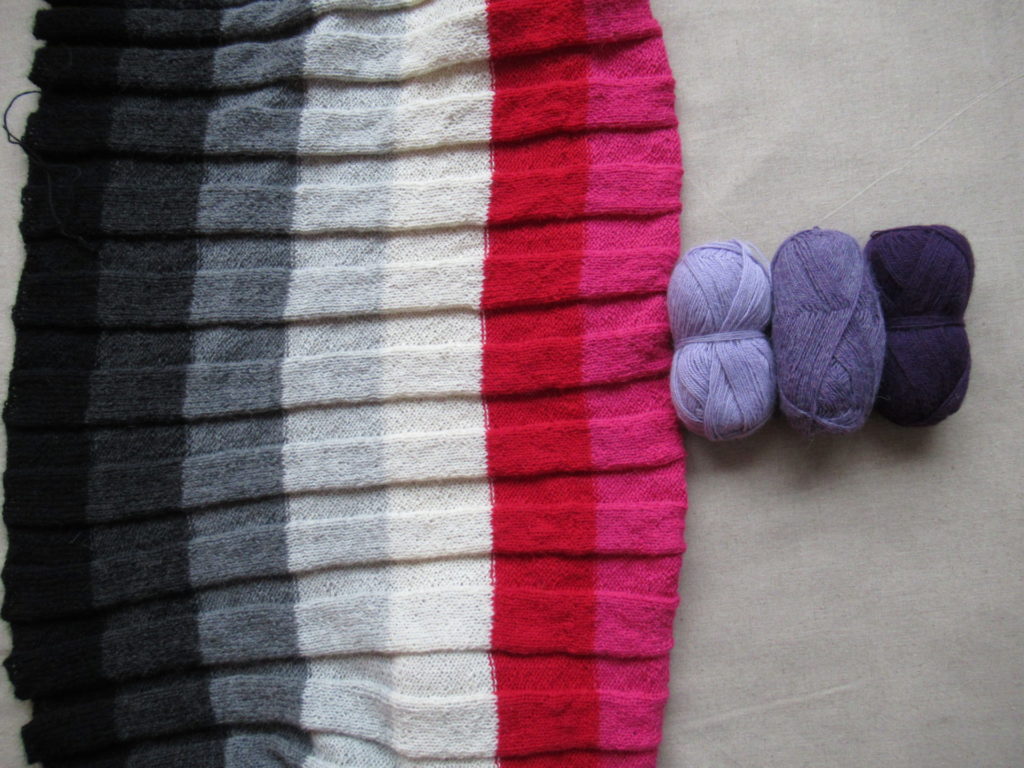
Some purples next to the red and fuchsia then?
Not bad, but not great either.
Okay, what if I ripped out the red, fuchsia and pink entirely? That would mean many, many hours of knitting down the drain (there were 400+ stitches on my needles), but I didn’t mind. This wasn’t about finishing something quickly.
So, what if I chose a gradient of pinks and purples, mirroring the gradient of neutrals?
Nice. Well- balanced. But I wasn’t in love with it.
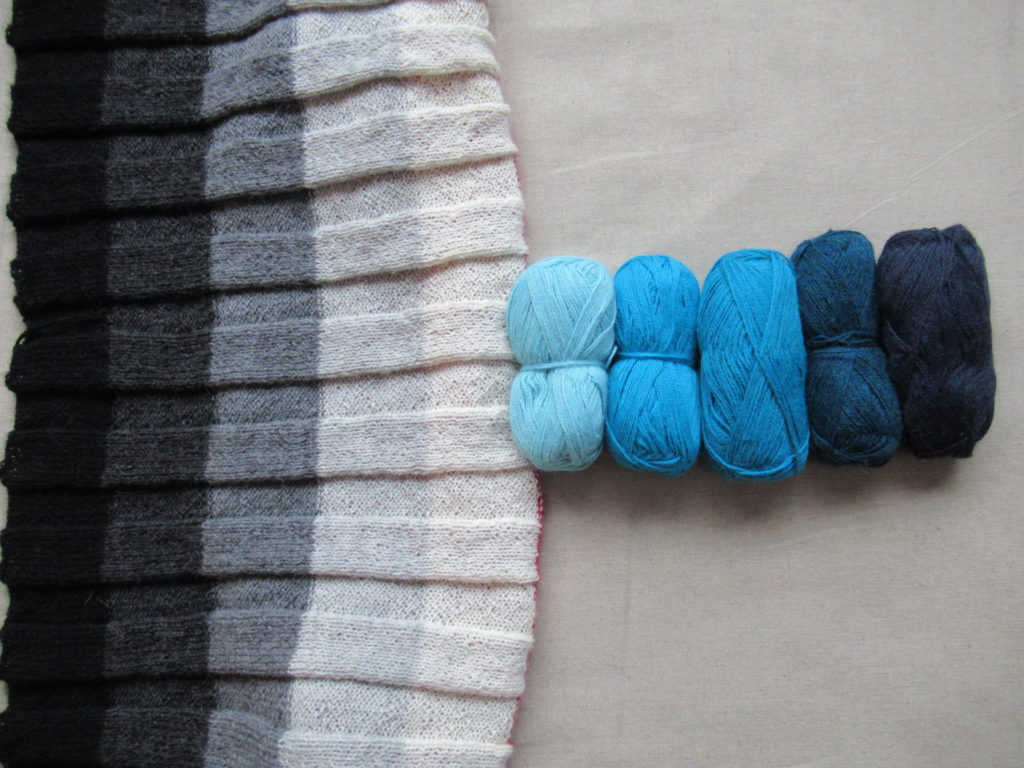
How about a gradient of blues instead?
Ahhh, yes, that felt good. But, really, blues again? Very predictable and not very exciting.
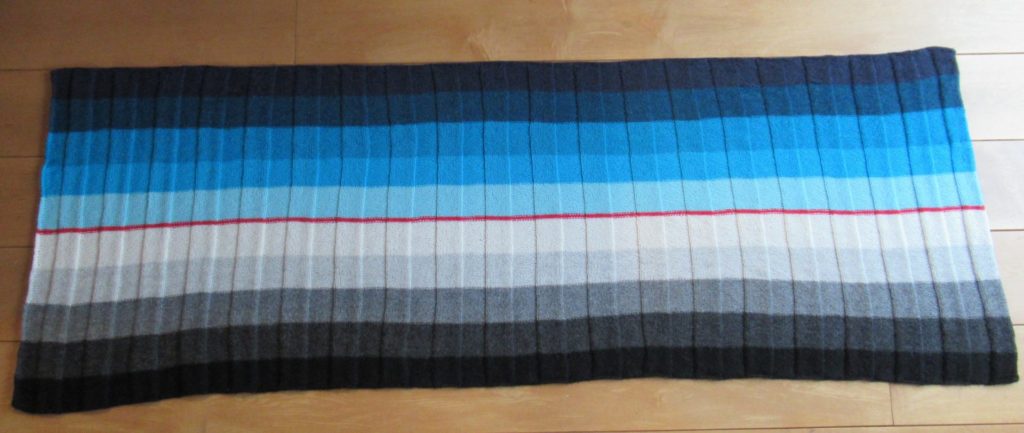
In the end I went with the blues anyway. I ripped the stole back almost entirely to the neutrals, but decided to make it a little more exciting by leaving in a very narrow band of red.
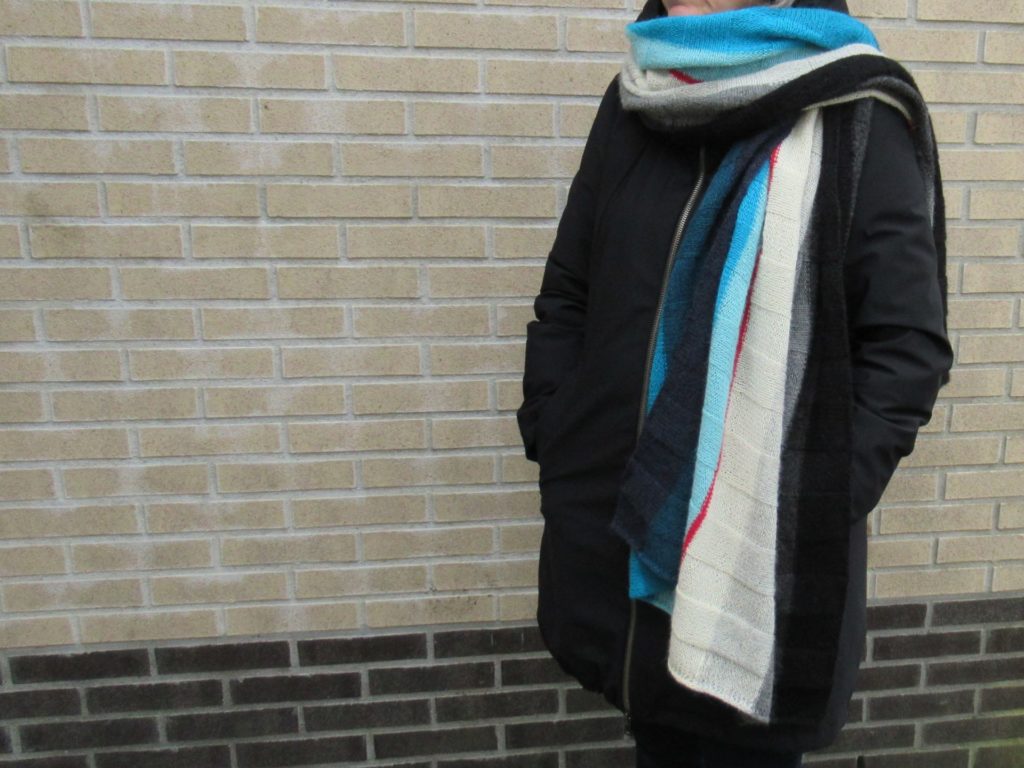
Here is Theresa Gaffey’s Stole finished: (I wasn’t feeling very photogenic and cut my head off. Don’t worry – just in the photo.)
Well, it is no longer Theresa Gaffey’s stole, but very much mine. I used her pattern as a starting point, but cast on more stitches, made the ‘ribs’ several stitches wider, added I-cord edges, chose a very different colour combination, and used 11 colours instead of her 9.
That’s one of the nice things about knitting. You don’t need to be hugely creative to make a project your own. Just choose different colours, tweak a few details if you like, and you end up with something unique.
With its 0.70 by 2.20 m / 27’’ by 87’’ it is a huge stole – almost a blanket.
I didn’t use blocking wires to stretch the knitting out. I just soaked the stole in a no-rinse detergent for 30 minutes and put it in the spin-dryer. Then I stretched it out on the floor, using my hands to smooth and stretch the knitting as much as possible. As an alternative it could be stretched out on a bed, or perhaps even folded double and stretched out over a drying rack. Warning: Some colours may bleed!
Now I still have more of the alpaca left.
Would I like to make another stole like this? Hmmm, maybe later. I loved the meditative nature of this project. And my idea behind it seemed to work – I haven’t created any new UFOs for quite a while. (I haven’t finished any old ones either, but I’m working on that.) But I think I’ll first choose something else as my next in-between-projects project.
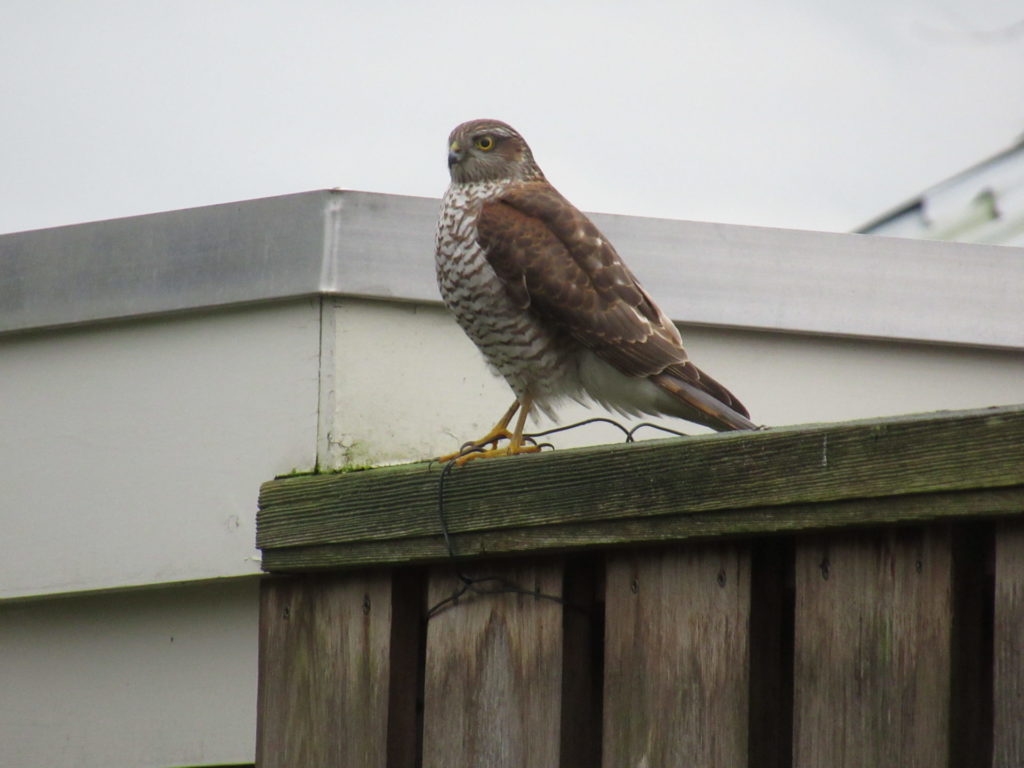
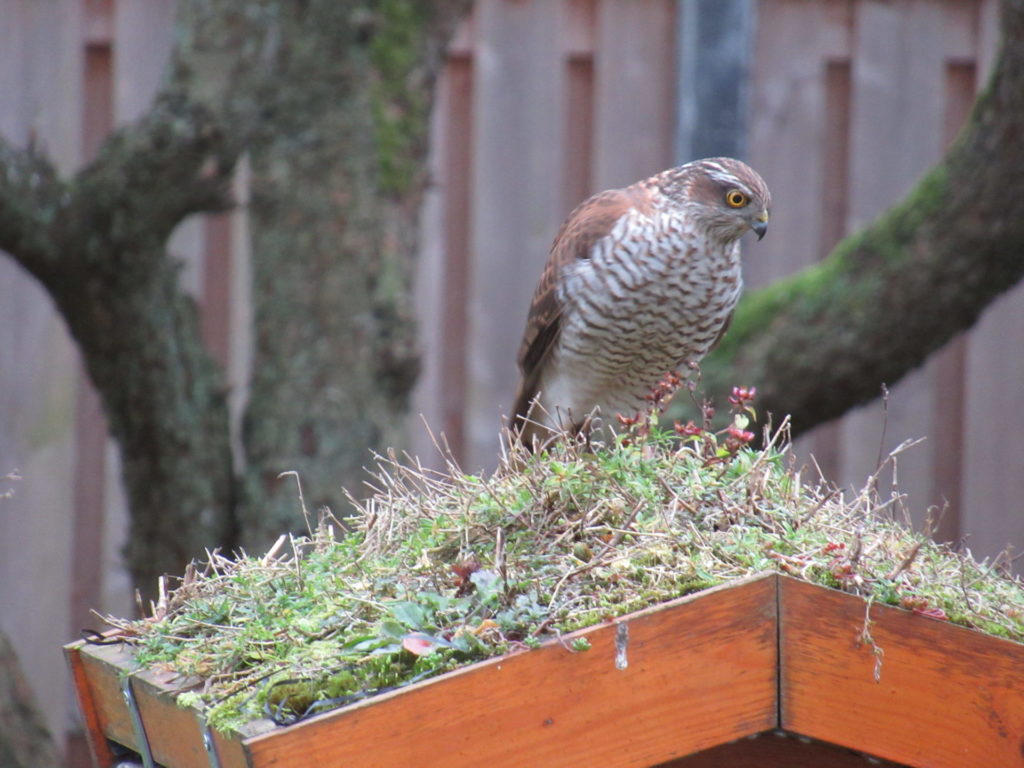
It was on a Saturday morning while I was vacuuming the living room that I saw him, the main character of this story – a sparrowhawk. He (we think it’s a young male) was sitting on the fence close to the house. I’d seen him several times before recently, but always in a flash.
This morning, he gave me all the time in the world to get my camera and take pictures. Many pictures. Before I show you some of them, here’s the ‘scene of the crime’:
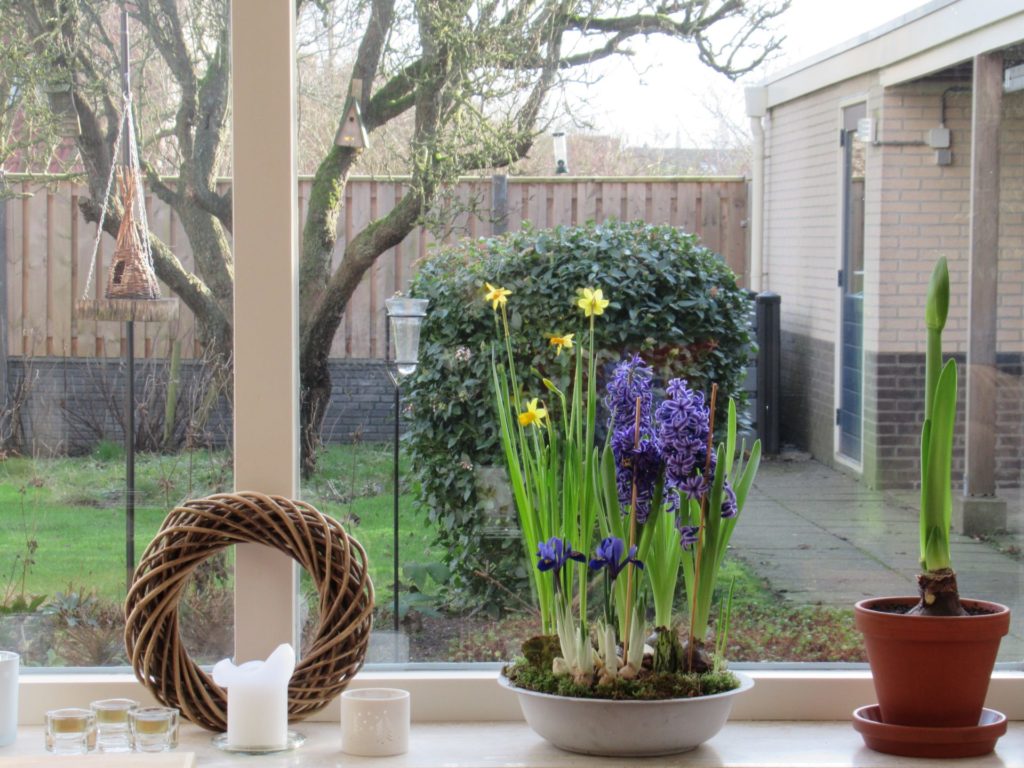
Looking through our living room window you can see an evergreen shrub, behind the hyacinths. It plays an important part in this story. To the left of it there’s a rain meter, to the left of that a tepee filled with sunflower seeds, and further to the left (not on the photo) there’s a bird table.
That’s where it all happened.
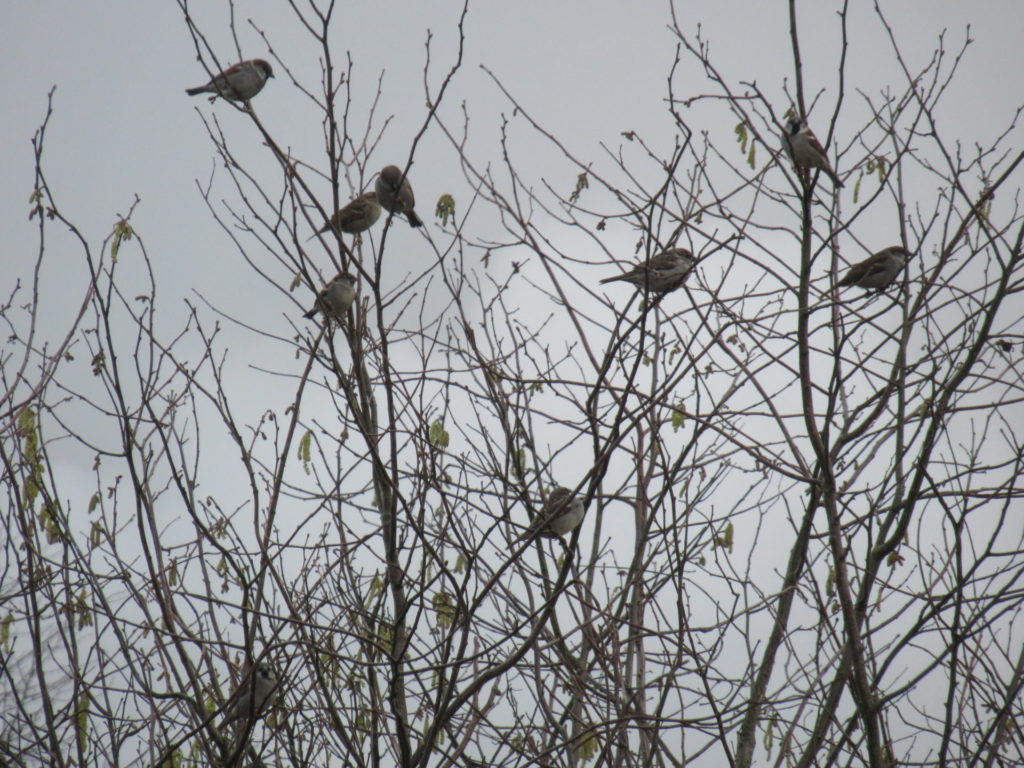
And here are some of the other characters in the story – a large and noisy family of house sparrows:
The sparrows love the sunflower seeds in the tepee, the seeds and grains we put out on the bird table and the peanuts in another feeder. They have lived in our garden for years, but it is only now that the sparrowhawk seems to have discovered them.
A sparrowhawk isn’t called sparrowhawk for nothing. It doesn’t care for sunflower seeds or grains. And peanuts? Blech! Their favourite food is… sparrow!
As soon as the sparrowhawk flies over the garden, the sparrows and other garden birds are gone. They hide in the beech hedge or in the evergreen shrub in front of the living room window. The garden seems deserted.
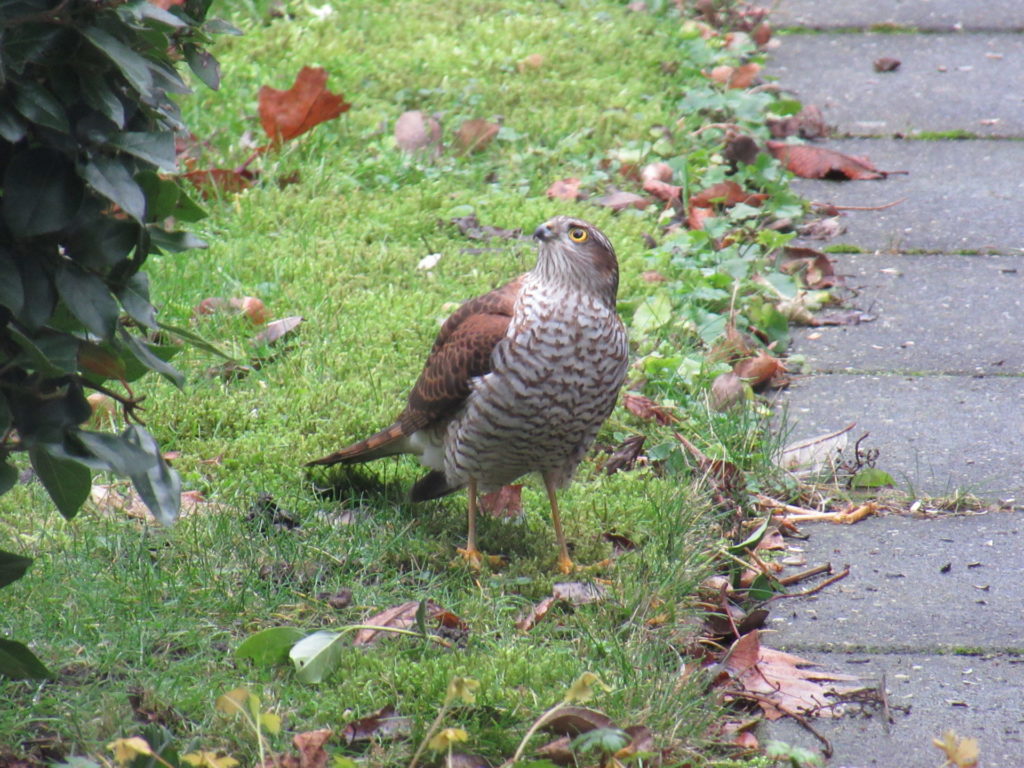
For the sparrowhawk, it takes a while to sink in. Where are they? Normally there are lots of sparrows on this bird feeder:
He looks down. No, no sparrow in sight.
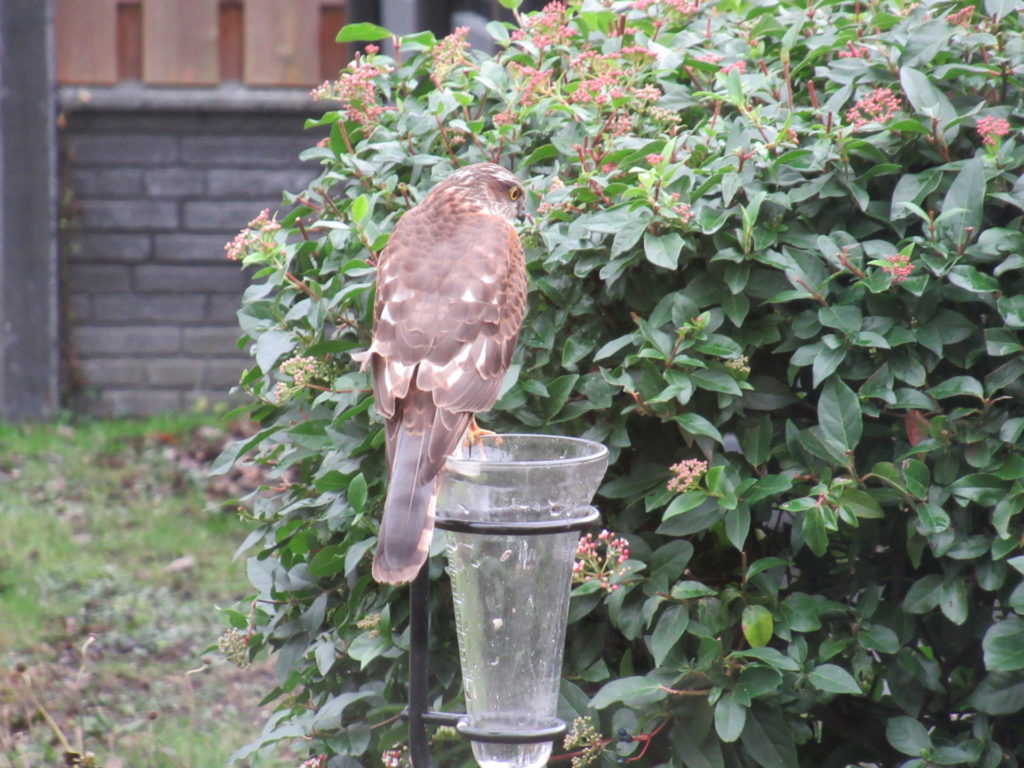
Then he seems to hear something in the evergreen shrub. Aha, there they are. He looks at it from the rain meter. No, he can’t get at them from there.
Then he tries a different approach. Sitting on the grass he looks up. Hmmmm…
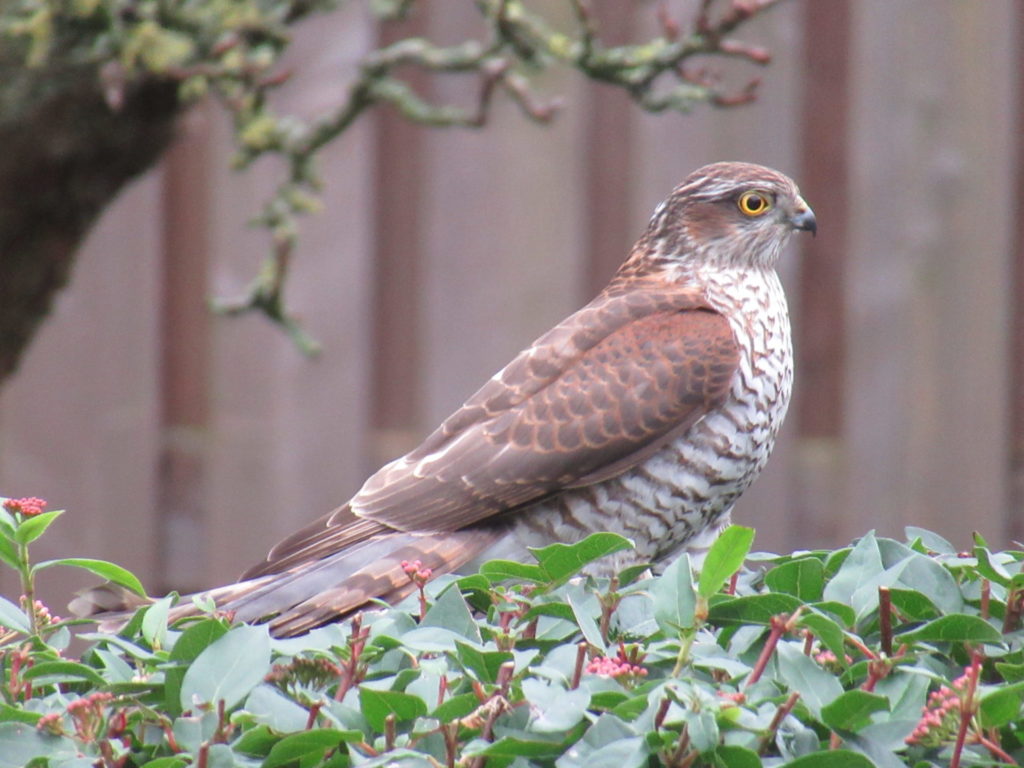
He walks around the shrub and looks and looks. But there’s no way he can get at the sparrows.
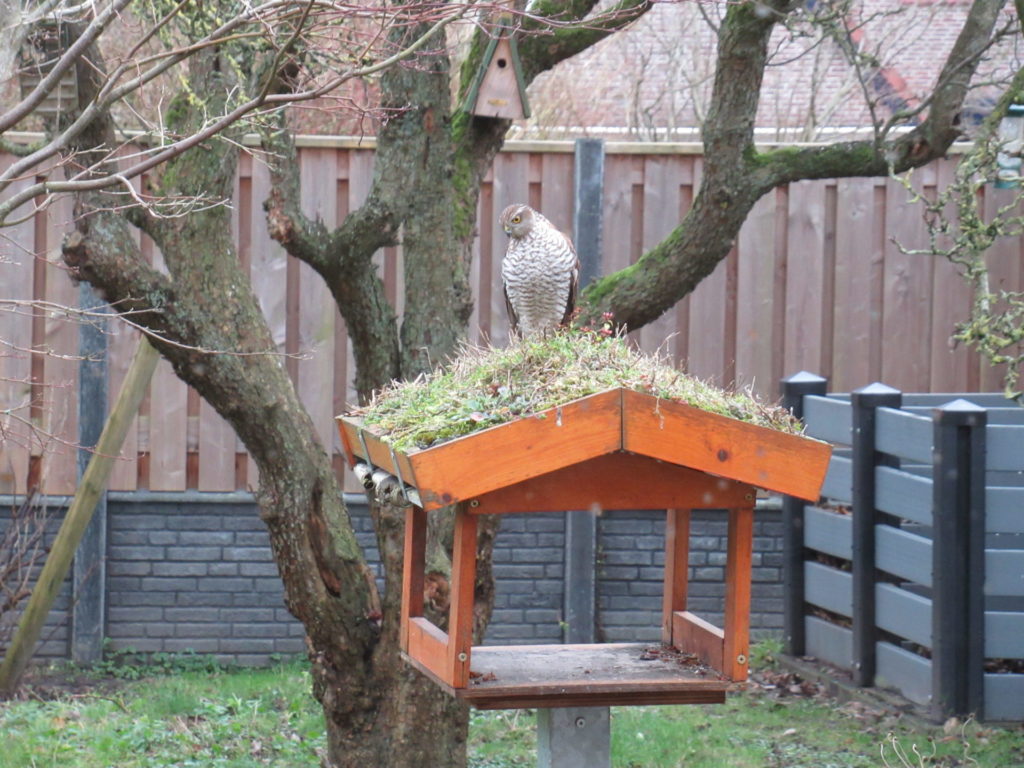
Finally he perches on top of the shrub, waiting patiently for the sparrows to come out of their hiding place.
Beautiful bird, isn’t he?
The sparrows wisely stay where they are. But suddenly, whoosh, the sparrow hawk grabs another hapless little bird from the honeysuckle against the fence. It went so fast that I could hardly see it, let alone photograph it.
Wow, what an amazing bird.
Apart from the birds, there isn’t much to see in the garden at this time of the year. The only other thing that catches the eye is the witch hazel we planted last autumn.
I’m very grateful for its cheerful yellow flowers.
Everything else is brown and grey, with a little bit of green here and there. If I want more colour, I have to look for it elsewhere. Fortunately there’s always yarn! (More about what I did with it soon.)
I can only show you static photos of the sparrowhawk here, but there’s an amazing 3-minute BBC video of a sparrowhawk if you’d like to see it in flight.
Knitters love abbreviations. An experienced knitter will be able to instantly visualize an instruction like ‘K2, yo, *(k2tog) 3 times, (yo, k1) 6 times, (k2tog) 3 times; work from * to last 3 sts, yo, k2tog, k1’.
Now, please don’t run away screaming if you’re not all that into abbreviations. For this post it’s enough to know just these three:
FO = Finished Object – This speaks for itself. Any piece of knitting that is completed (including weaving in the ends and sewing on buttons) is an FO.
WIP = Work In Progress – This refers to a piece of knitting that is actively worked on, or at least is still in the forefront of the knitter’s mind.
UFO = UnFinished Object – A UFO is an incomplete piece of knitting that has been abandoned, hidden away in a dark cupboard or even completely forgotten.
Note: the line between a WIP and a UFO may be thin.
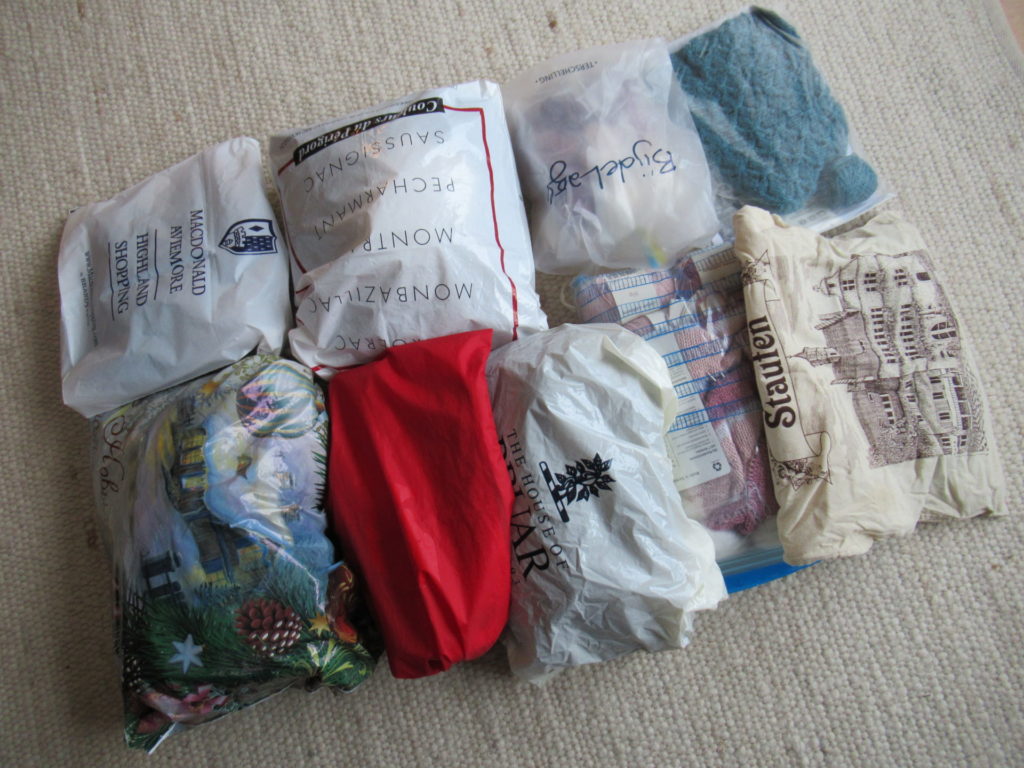
As I told you last week, I have more than a few UFOs. Some of them have lived in a dark cupboard for quite a while. Here they are:
There are 9 items in total: 4 cardigans, 2 scarves, 2 cowls and 1 crochet project.
Embarrassing? Yes, slightly. But there are worse skeletons to have in one’s cupboard, aren’t there? And I can’t be the only one, surely?
My resolution is to finish them all in 2020, or rip out the ones that I don’t want to finish anymore and repurpose the yarn. I’ll write about them here, now and then, hoping that they’ll provide some inspiration, or an interesting or funny story. The only rule I’m imposing on myself is that they should all be gone (finished or repurposed) by the end of the year.
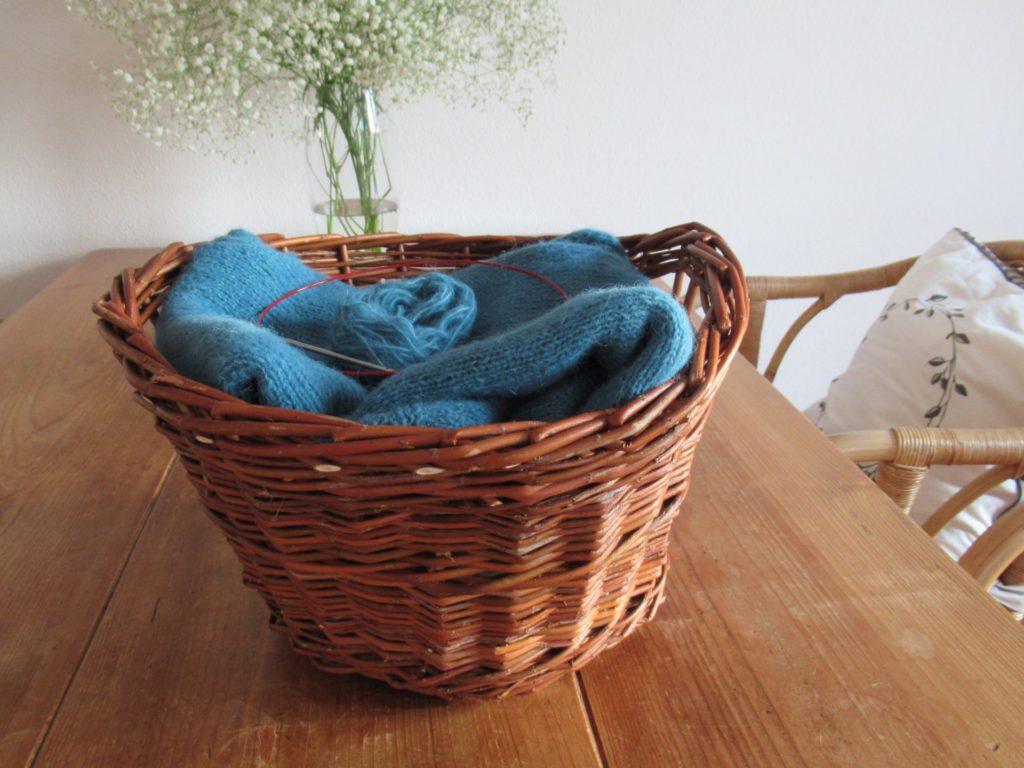
I plan to take the UFOs out of their hiding place one at a time, and transfer them, one by one, to the basket I made last year. I’ll place the basket in plain sight, so that I won’t forget it.
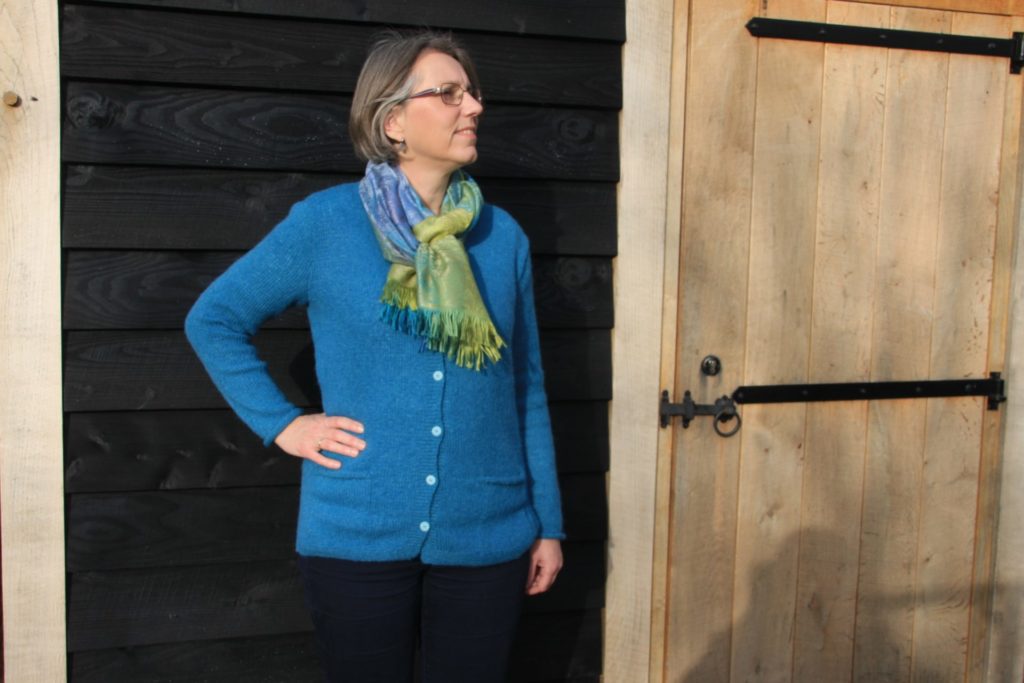
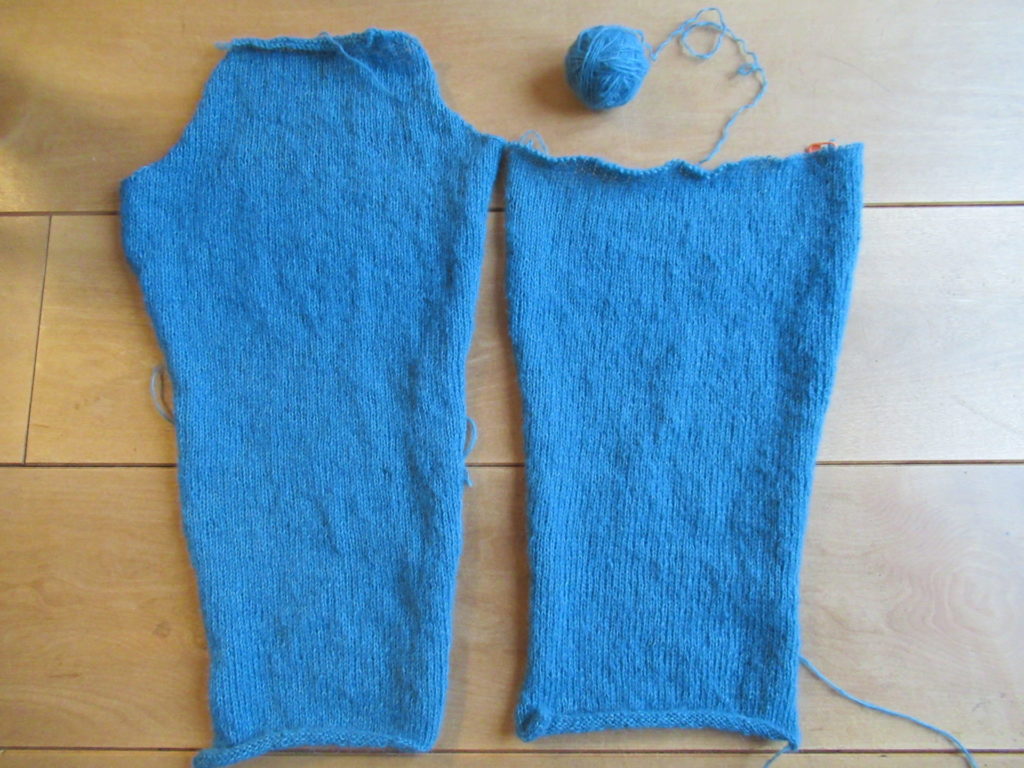
But first I needed to free up the basket. So to start with, I’ve finished my blue knitting project. This wasn’t a UFO but definitely a WIP.
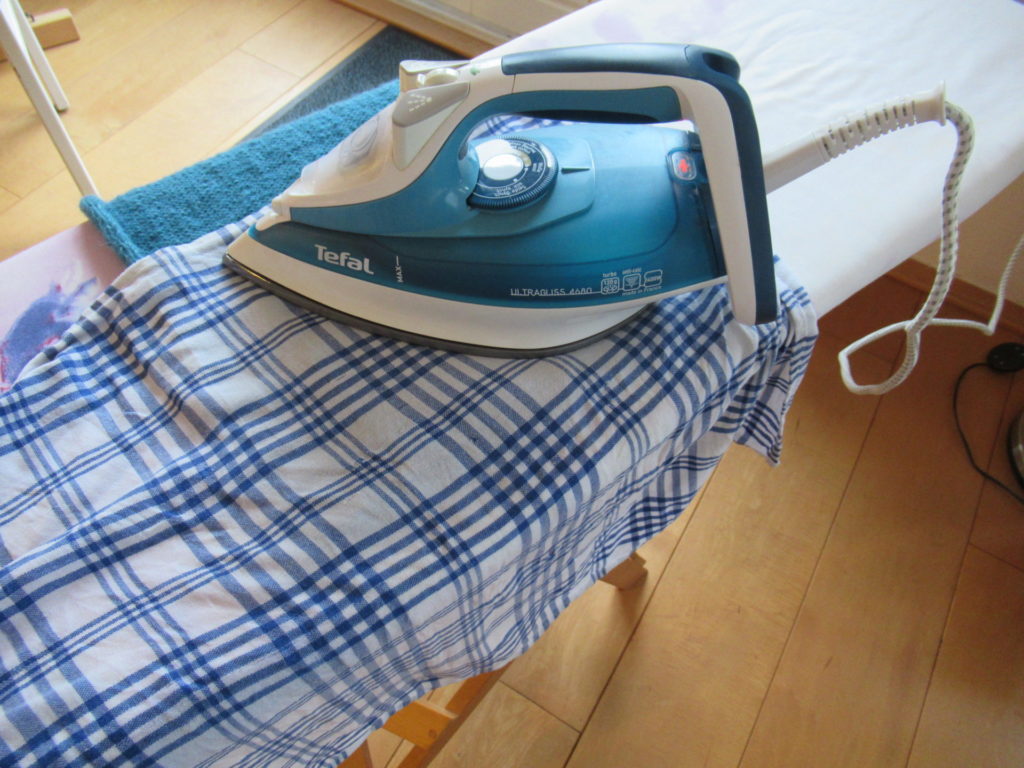
It is a long-sleeved cardigan with knit-in pockets. I chose this pattern by Kim Hargreaves because I wanted something simple for everyday wear.
Sometimes I block garment pieces, but this time I followed the designer’s instructions and pressed them. I placed the pieces on the ironing board, covered them with a damp tea towel and, with the iron on ‘wool’, carefully pressed them.
It’s a miracle what this does to the knitting:
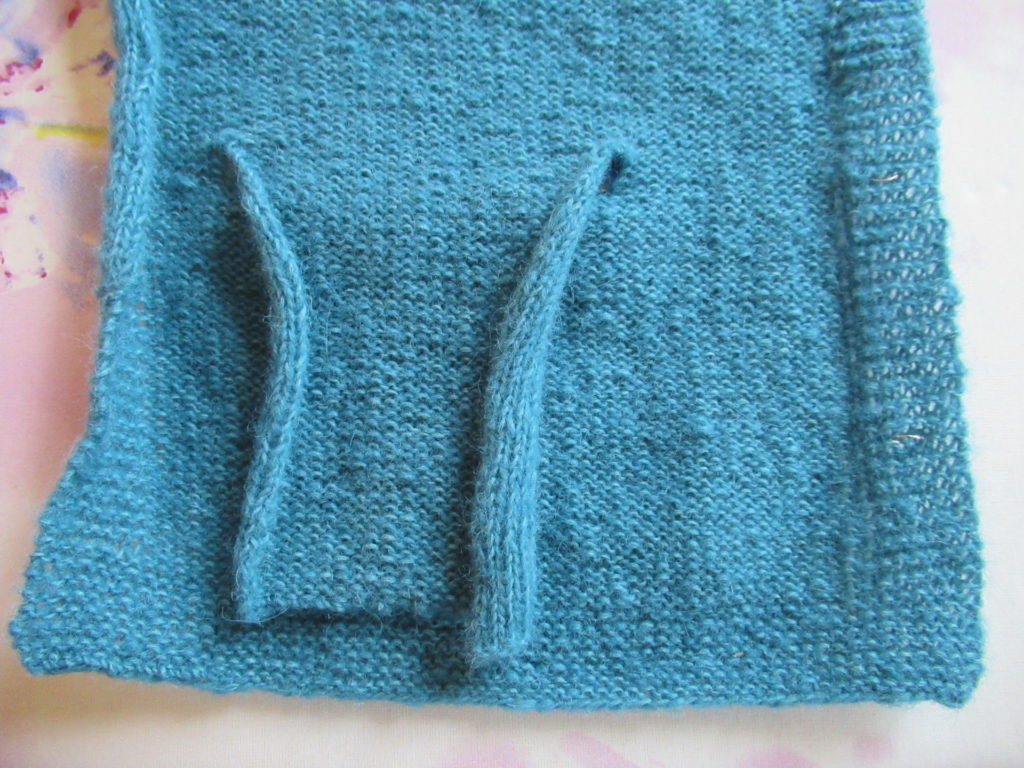
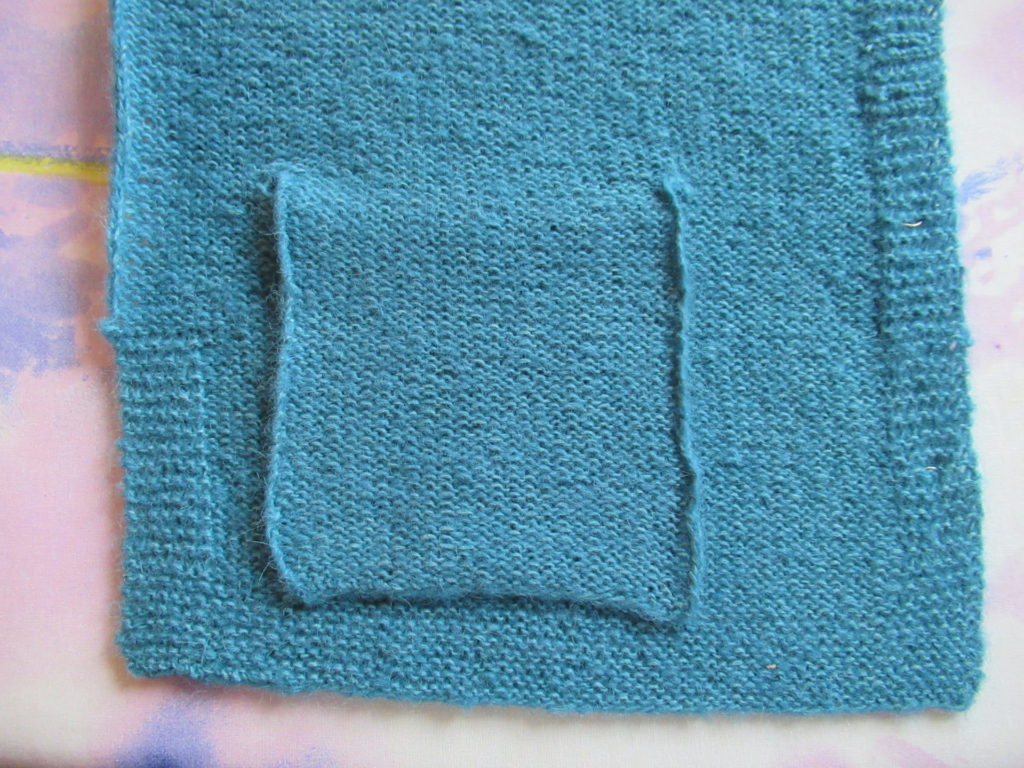
Inside of pocket before pressing...
...and after pressing
It’s very satisfying to see all the neatly pressed pieces hanging over the back of a chair:
For me, it is at the finishing stage that a WIP is most in danger of becoming a UFO. No matter how much positive self-talk I use, I don’t enjoy the finishing part of knitting. But some music and a mug of tea help a little.
Invisibly sewing the pocket linings to the inside of the fronts took several attempts. After seaming the rest together and sewing on the buttons, the entire cardigan was done. A WIP turned FO.
Am I happy with it? On the whole, yes, but there are two things I’m not entirely happy with. The first is that the cardi twists slightly to the right, as you can see in the photo below.
It’s not that I put it on hastily. I already noticed that the pieces were slightly askew while I was still working on them. It must be something in the yarn that makes the fabric behave this way.
The yarn (Rowan ‘Alpaca Classic’) is made with a new technique. The alpaca fibres are blown into a cotton tube, resulting in a soft and airy yarn. I’m not an expert, but perhaps the cotton tube needs a tiny bit of tweaking?
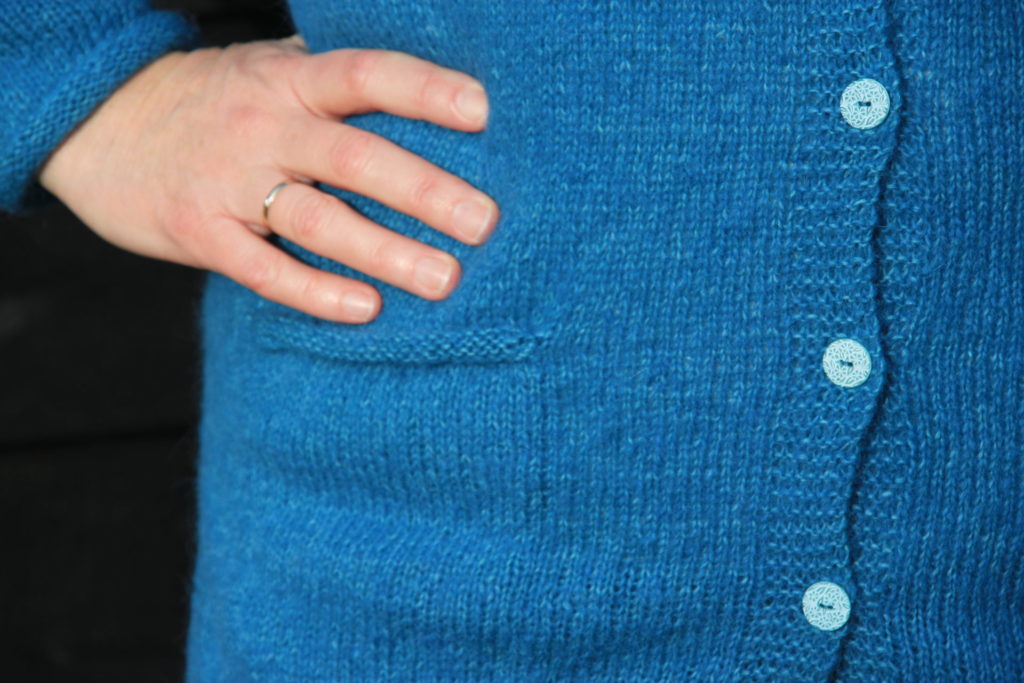
The second thing I’m not happy with is that the button bands gape. Look:
The button bands don’t overlap as they should. This isn’t because the cardi is too tight – it has enough ease as you can see from the back.
It’s always hard to get narrow button bands right. Maybe they gape because the yarn is so very, very soft and airy. Oh well, I’ll usually wear it open anyway.
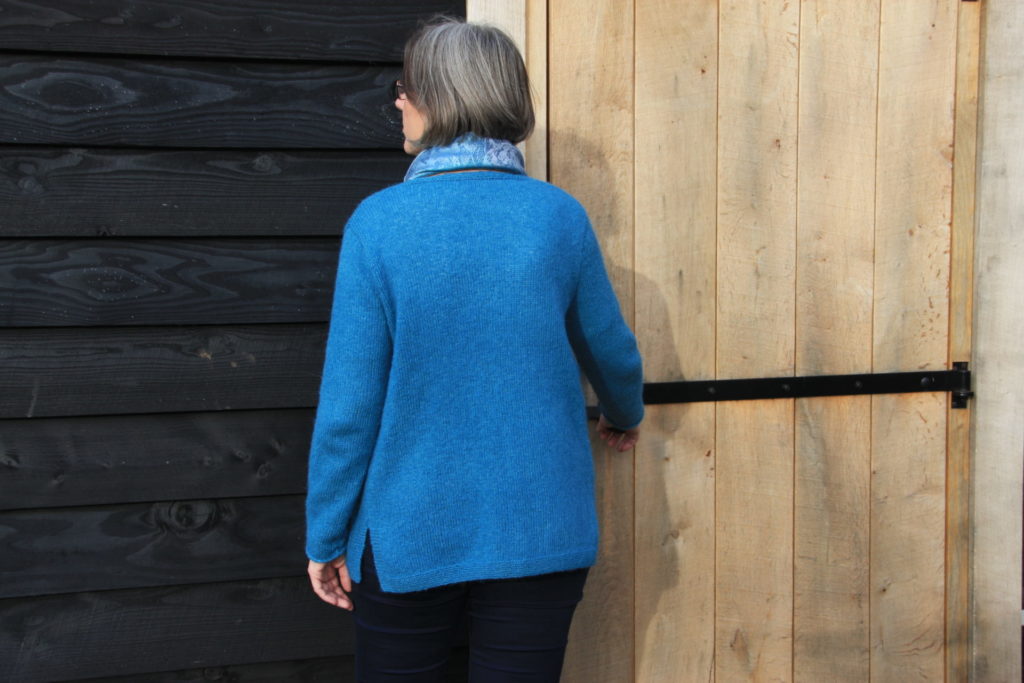
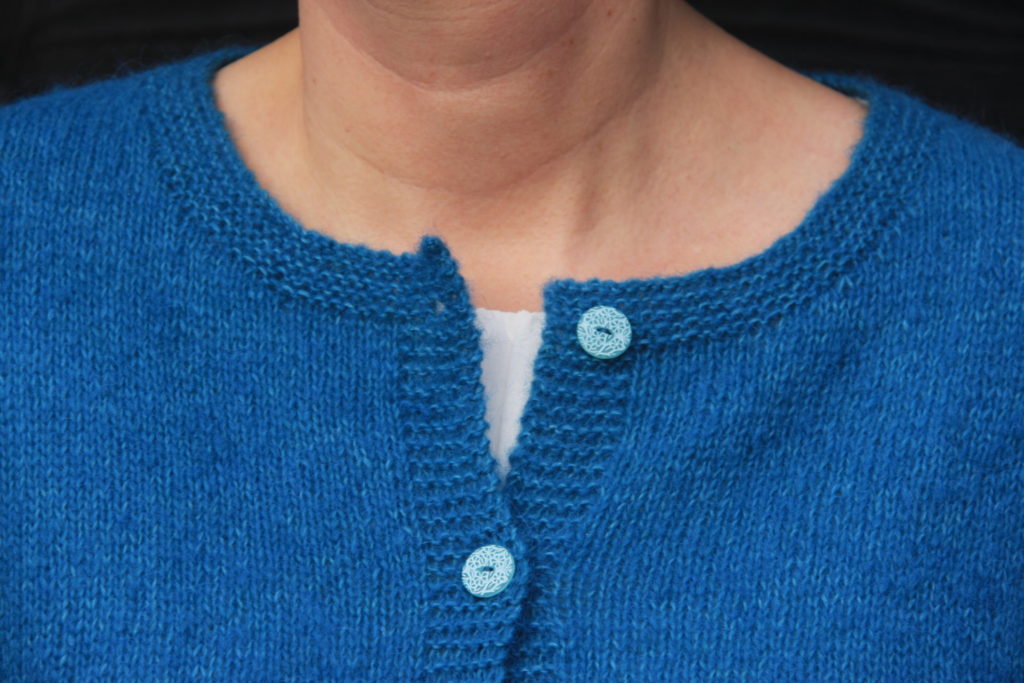
The things I do like are the simple, round neckline…
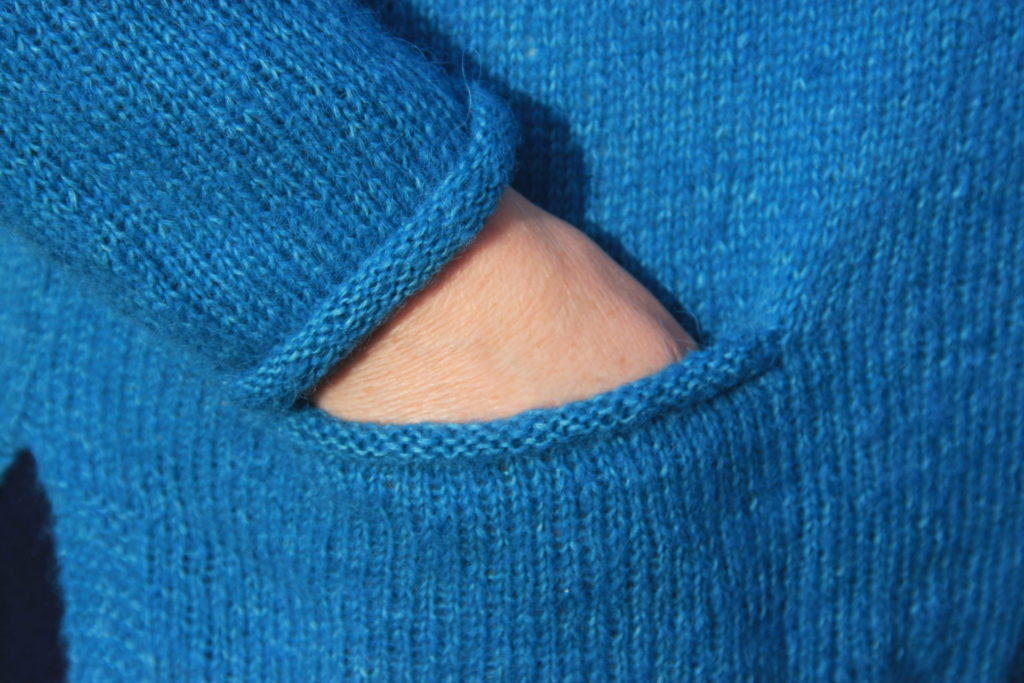
… the rolled sleeve hems and pocket tops…
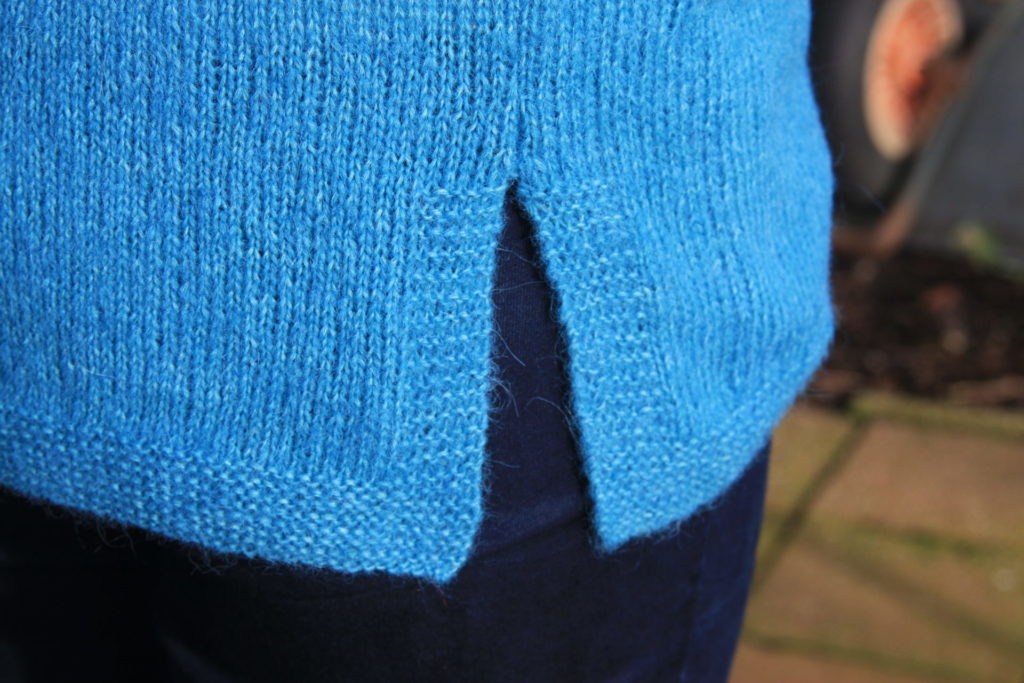
… and the side vents with their neat garter stitch borders that are exactly the same width as the border along the bottom of the cardi.
I love this kind of attention to detail. But what I love most of all about this cardi is that it is incredibly soft and lightweight. It weighs just 250 grams! Very simple and very wearable.
Kim Hargreaves is an independent British designer. Her patterns have given me many hours of knitting pleasure over the years. The pattern of the cardigan above is called ‘Fair’ (Ravelry link) and comes from Kim’s book Pale.
At the end of 2019, I was suddenly assailed by doubts. I think it was partly the time of year, and partly my first blogiversary that involuntarily made me look back and look ahead. Questions that went through my mind were: Where am I going with my knitting and my blog? Should I be going anywhere with my knitting and my blog? Shouldn’t I be doing something more important or useful?
Fortunately, I received some lovely comments that really helped me put things in perspective. Some of them said things along the lines of ‘giving people pleasure with your blog is worthwhile in itself.’ I’m really grateful for these remarks, because they reminded me of why I started blogging in the first place – the hope that some of the things that make me happy will make others happy too.
Others commented about the importance of asking questions and suggested that I could, perhaps, try some slightly more controversial writing. Thank you for all of those comments – they have given me food for thought.
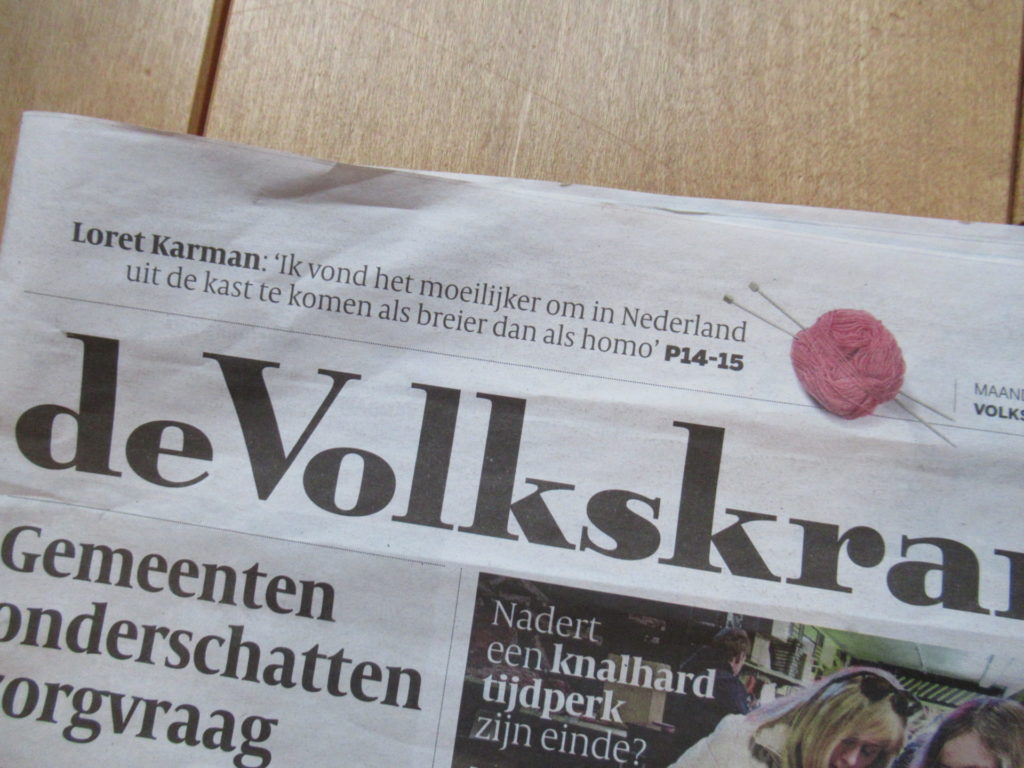
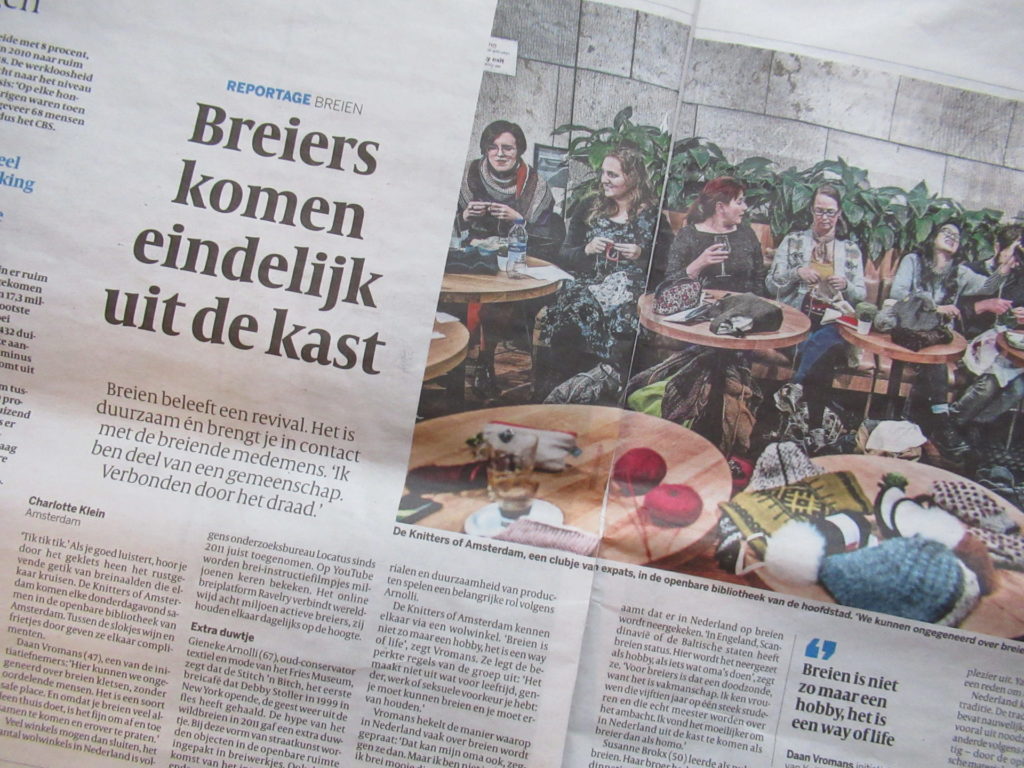
Then, on December 30th 2019, De Volkskrant, a big national newspaper in the Netherlands, published an article about knitting that provided me with more food for thought. It was even introduced on the front page!
The article, entitled ‘Knitters are Finally Coming Out of the Closet’, was about a knitting group in Amsterdam. Here are some thought-provoking quotes:
‘Knitting isn’t just a hobby, it’s a way of life.’ (Is it? How?)
‘In Britain, Scandinavia or the Baltic states knitting has status. Here it is seen as a mere hobby, as something grannies do.’ (Do people in those countries really feel that knitting has status, or does it just look like that from the outside? And what’s wrong with grannies anyway?)
‘Coming out as a knitter was harder for me than coming out as a gay person.’ (I think/hope this means that it isn’t very hard for people to openly be themselves in this country. But why this huge embarrassment about knitting? Is it a typically Dutch phenomenon?)
‘The Netherlands do not really have a knitting tradition.’ (?)
‘If you have spent three entire weeks knitting a sweater, you aren’t going to discard it after one season.’ (This was about sustainability, of course, about not throwing things away thoughtlessly. An extremely important issue. But my first, unworthy thought was: Three weeks? An entire sweater in just THREE weeks?!? Further on in the article there is even someone who knits a sweater in two weeks. How?)
More question marks. Interesting.
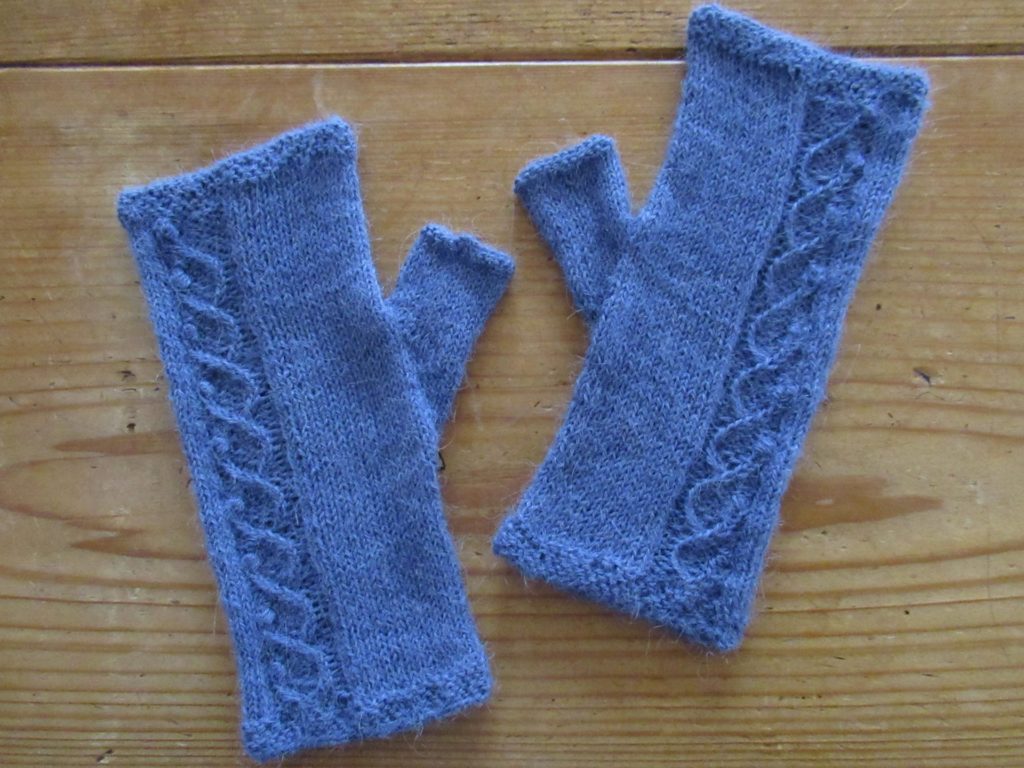
In between al this pondering, family gatherings, meals with friends etcetera, I actually also managed to do some knitting. I finished a pair of fingerless mittens for our niece’s 17th Birthday. We chose the pattern and the yarn together.
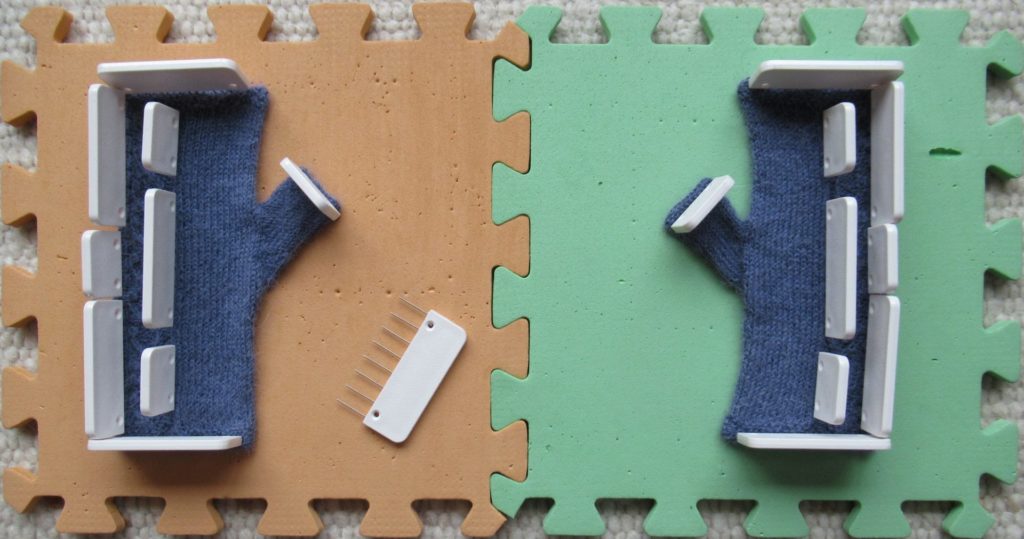
After finishing the knitting and darning in the ends, I soaked and blocked the mittens.
I placed the damp mittens on two foam mats and pinned them into shape with ‘knit blockers’. These nifty tools look a little like combs and come in boxes of twenty blockers in two sizes.
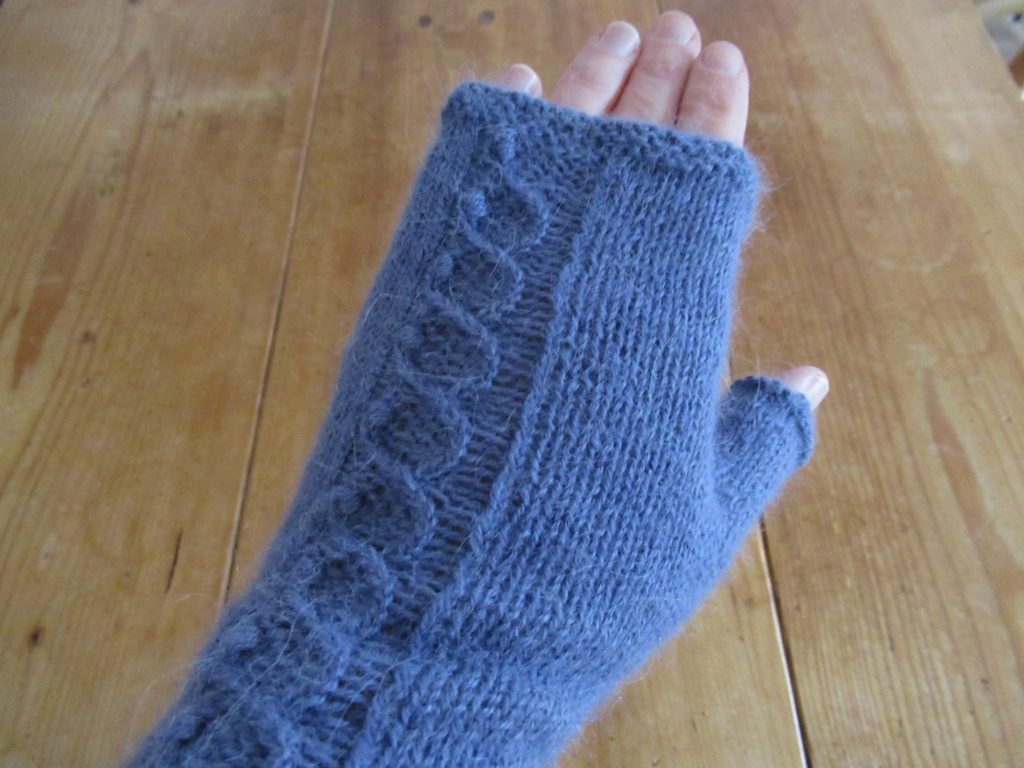
This step is not essential, though. Before blocking, the cable was more or less hidden in a ‘ditch’ between two areas of stocking stitch. Blocking made the cable stand out better and the knitting look more even, which is nice for something meant as a gift. But when worn, the mittens will stretch and the cable will become visible anyway.
The pattern I used is Kujeillen, by Finnish designer Tiina Kuu. I asked Tiina what Kujeillen means and this is what she wrote:
‘Kuje’ could be described as a harmless prank or joke that has warm and positive vibes – ‘kuje’ makes you giggle! The form ‘kujeillen’ can be roughly translated as ‘pranking/joking’ – or ‘as a prank/joke in mind’ – keeping in mind that the action has absolutely no bad intentions.
Kuje was also the name of the LYS for which I originally designed the pattern, thus the name.
A fun knitting project with a fun name, Kujeillen is a free Ravelry pattern. Tiina has published lots of lovely patterns on Ravelry and also writes a blog. I can’t read Finnish, but enjoyed looking at the photos of her beautiful sock designs.
The mittens are long – they cover the little finger almost entirely. For myself I would have made them one repeat shorter, but the recipient thought they were nice and warm like this.
The yarn I used was less than one ball of Drops ‘Alpaca’. It is really soft, but next time I’d use a different yarn, because I think the nupps (bobbles) will ‘pop’ more in a bouncier sheep’s wool yarn.
There, my first FO (Finished Object) of 2020.
And that brings me to UFOs (UnFinished Objects).
While I was looking ahead, and thinking of where I’d like to go with my knitting, I could feel something bubbling in my belly, and it wasn’t the Christmas pudding. I mean figuratively, like new ideas. But that ‘something’ felt very vague and elusive. So I asked myself, ‘What is it that makes this so? What could help me to bring it more to the surface?’
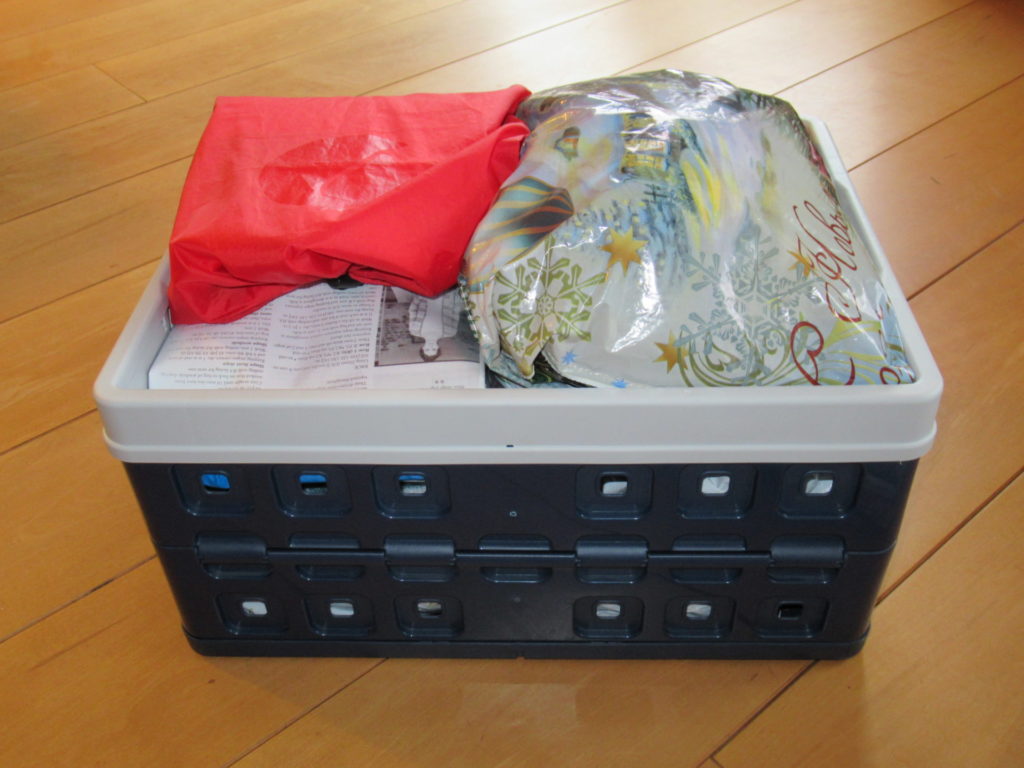
And suddenly a small voice inside me said, ‘You need to make room for new things by finishing some old stuff.’ I immediately knew what this small voice was referring to – this collapsible crate filled with UFOs:
I have quite a few UFOs. That never really bothered me, but it is starting to bother me now, so now I’m going to do something about it.
I haven’t made any New Year’s resolutions since I was a teenager. For a long time they have felt like too much to add to my already crowded to-do list. But this year I’m happy to make this my New Year’s resolution:
In 2020, I’m going to either finish or frog all of my UFOs.
Just one New Year’s resolution. That should be doable, right?
Hello again! 2020 has well and truly started. Maybe it is ‘officially’ too late for New Year’s wishes, but, really, can it ever be too late for good wishes? So, I wish you a very happy, healthy and fulfilling New Year!
In my last blog post of 2019, I asked myself some questions. I would have liked to start this year with some answers, but I haven’t organized my thoughts enough for that. And I am not ready to write about the things I have been knitting either, so I thought I’d ease into the New Year with an impression of our visit to the Dutch Open Air Museum during the Christmas Holiday (focusing on knitting and other fibre-related things, of course).
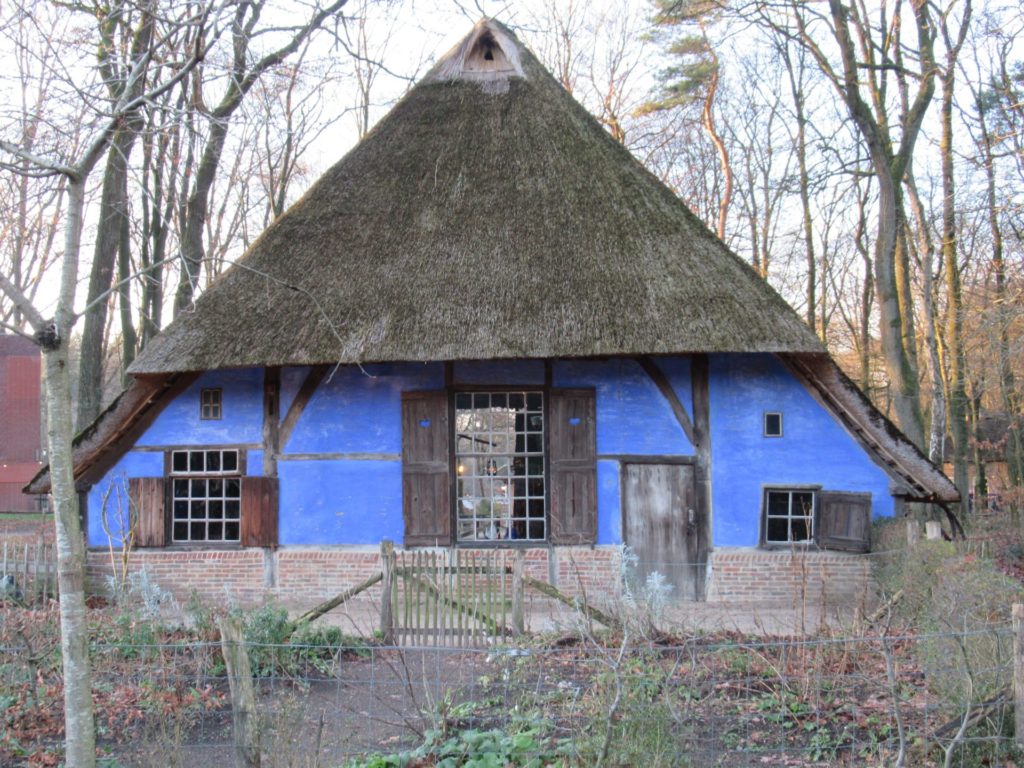
Houses, farms and other buildings from different periods and from all over the country have been moved to the museum over the past 108 (!) years. The first building we entered was this blue farmhouse from the east of the Netherlands:
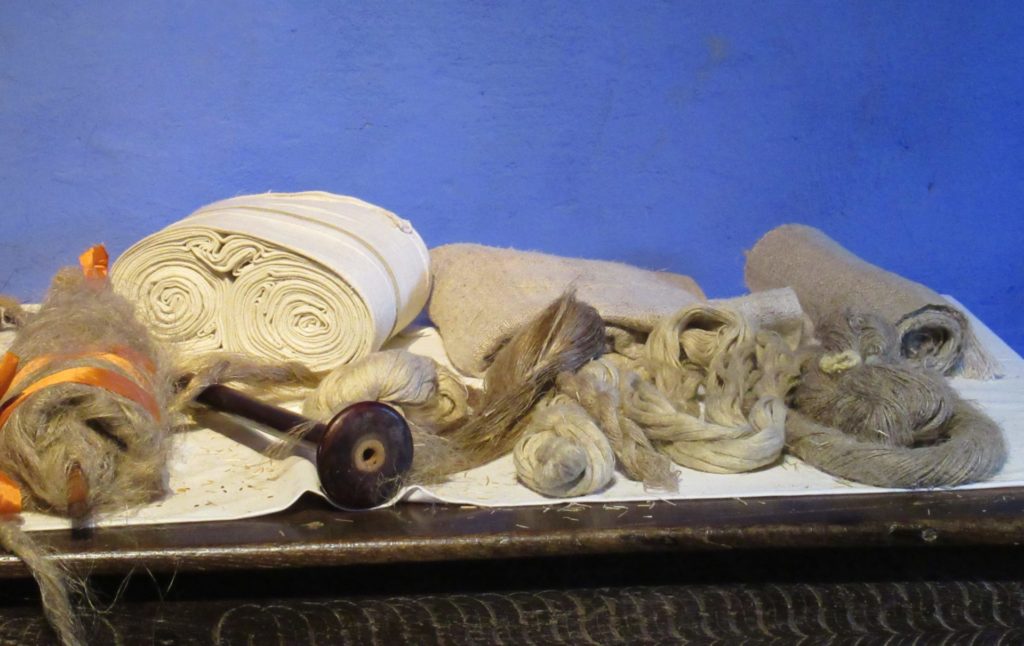
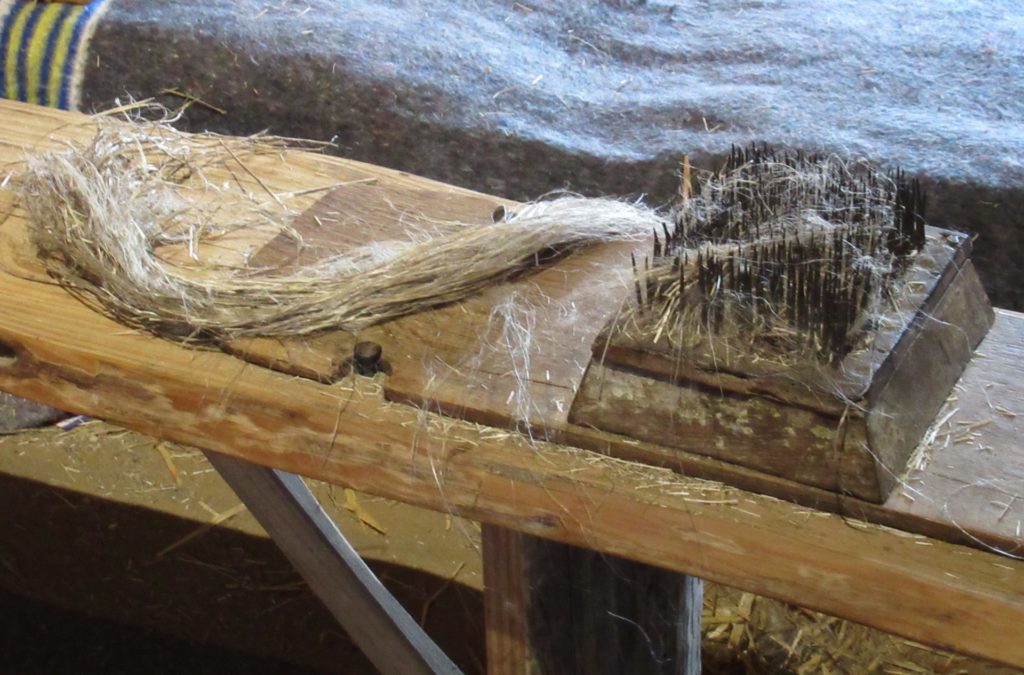
The museum’s theme at this time of year was ‘Winter Jobs’. When there wasn’t a lot of work to do outside in winter, people did all kinds of other jobs. In this particular farmhouse the focus was on spinning (wool and flax) and knitting. There was a display of flax in different stages…
…from unspun fibres in different qualities to woven linen, from coarse and brown (right) to very fine and bleached (left).
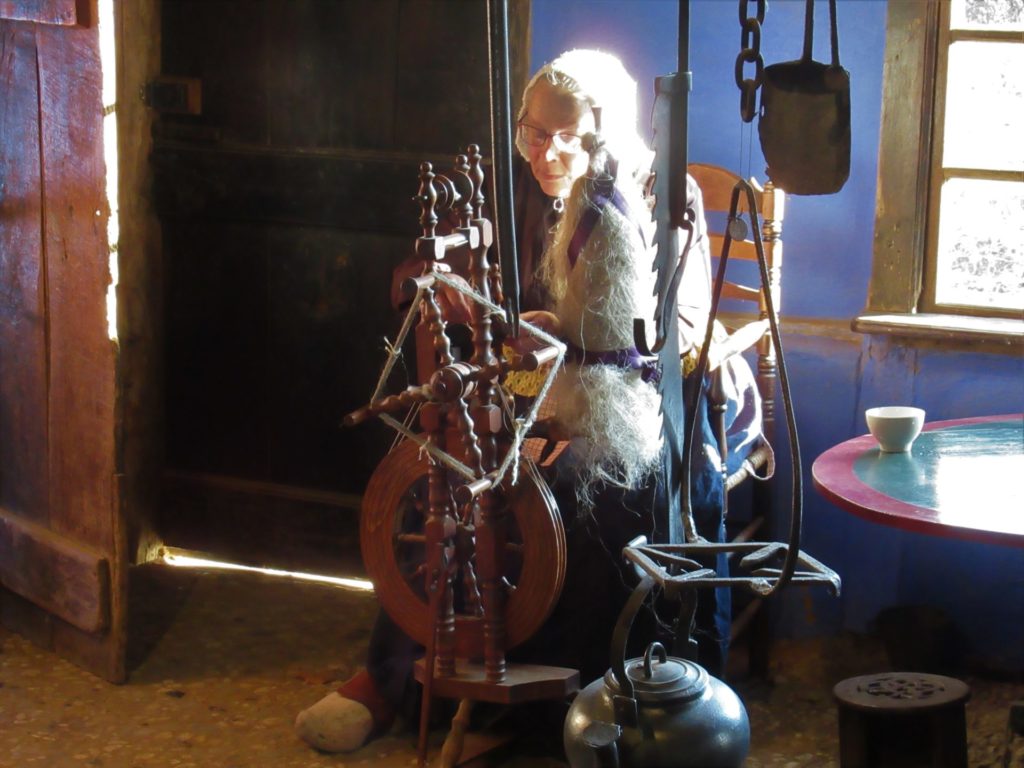
One of the volunteers, dressed in period costume, was spinning flax on a traditional spinning wheel.
She showed us how long flax fibres are – much longer than any wool fibres.
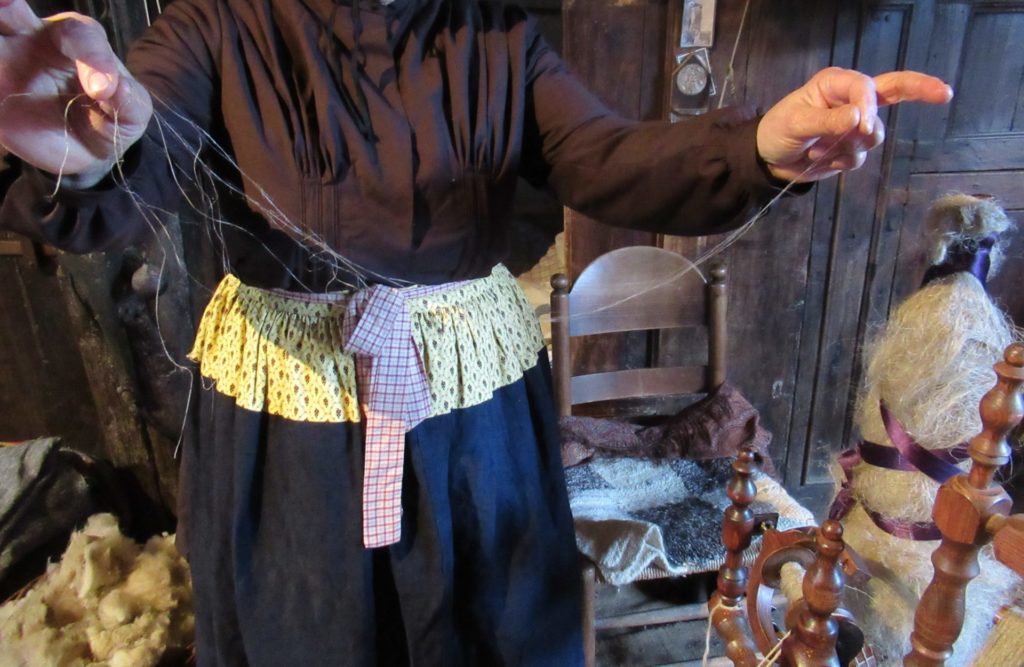
Before flax can be spun and woven into linen cloth, it goes through many stages. The last stage before spinning is hackling. With a hackle like this one…
… the short fibres are removed from the long ones.
All this preparation before flax can even be spun! And then hours and hours of spinning and weaving. No wonder a woman’s linen cupboard was her pride and joy.
I could have spent an entire afternoon in this farmhouse alone, and if the museum wasn’t so far from where we live, I’d love to work here as a volunteer. But there was more to see, so on we went.
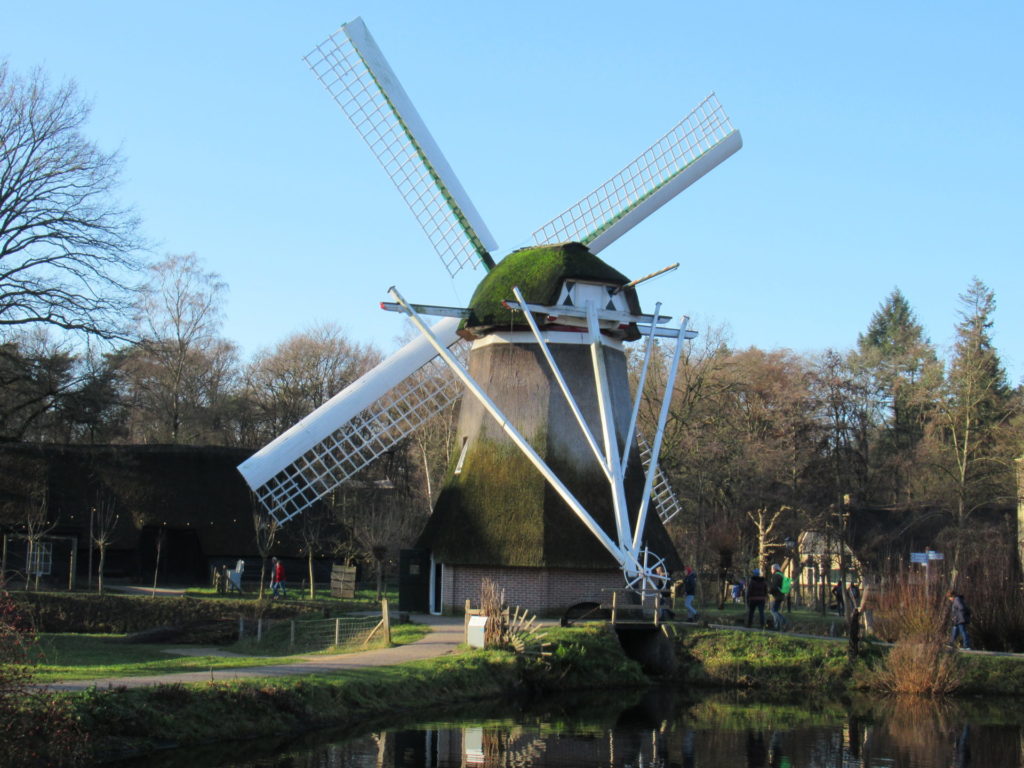
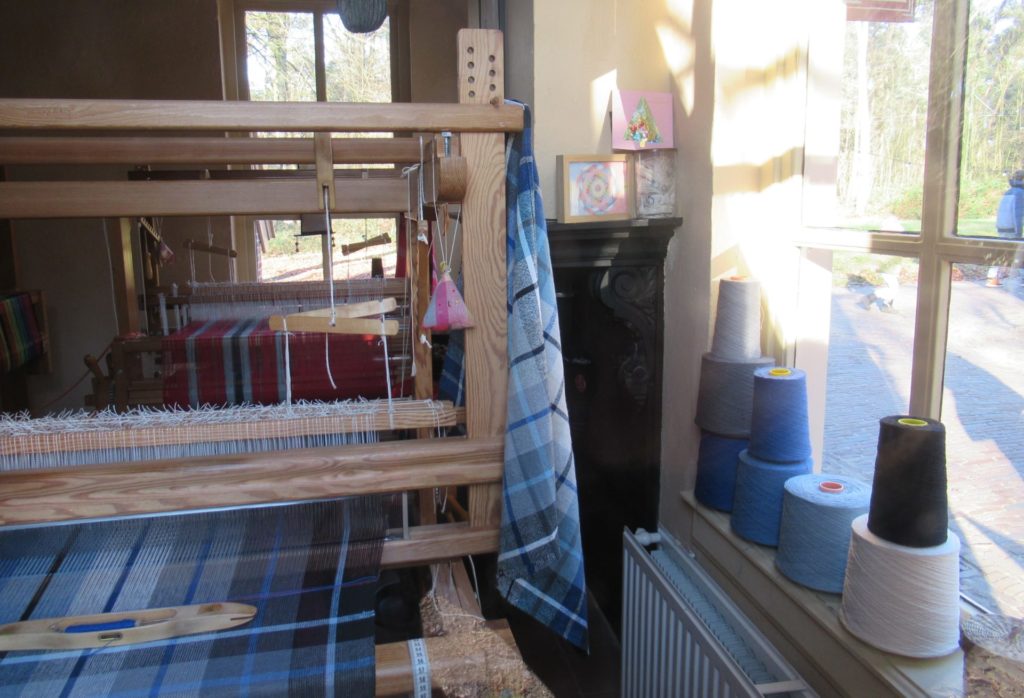
We saw several iconic Dutch windmills, of course, like the thatched one at the top of this post, used for pumping water, in order to drain wet low-lying areas, and this wood-sawing mill:
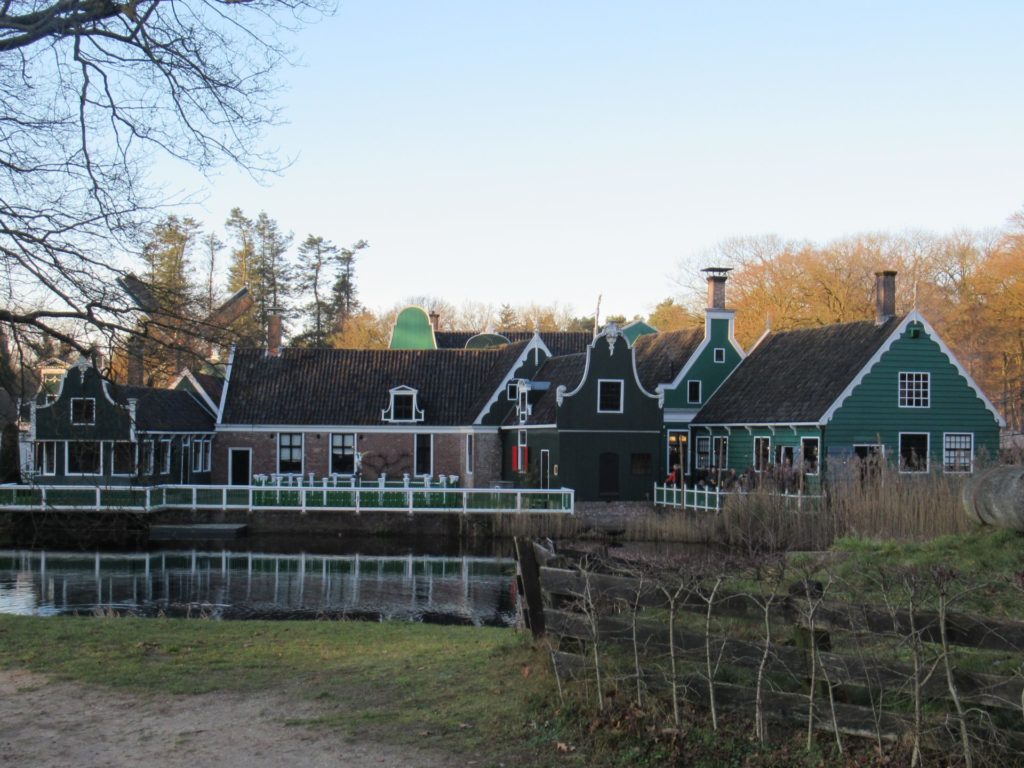
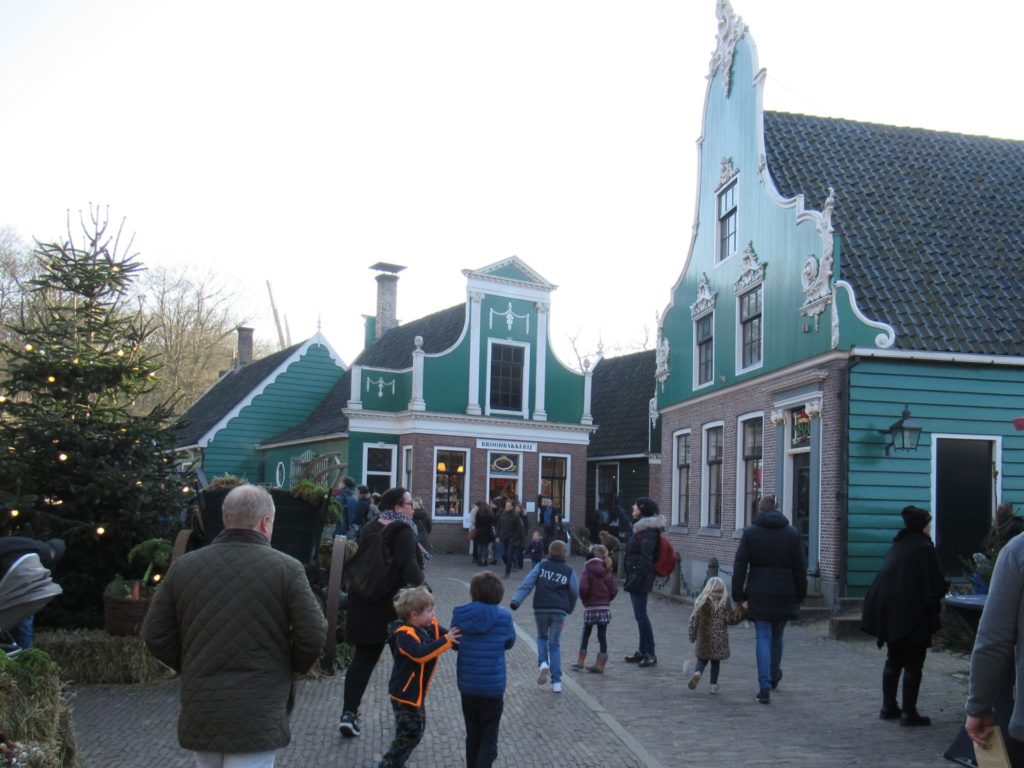
One of the parts of the museum I remember best from when I visited here as a child is this collection of green wooden houses from the Northwest of the country.
We were not the only ones who had this great idea of visiting the museum. In fact, it was one of the busiest days of the year.
I was dismayed when I saw the crowds at the entrance, but the park is so big that it could easily absorb us all.
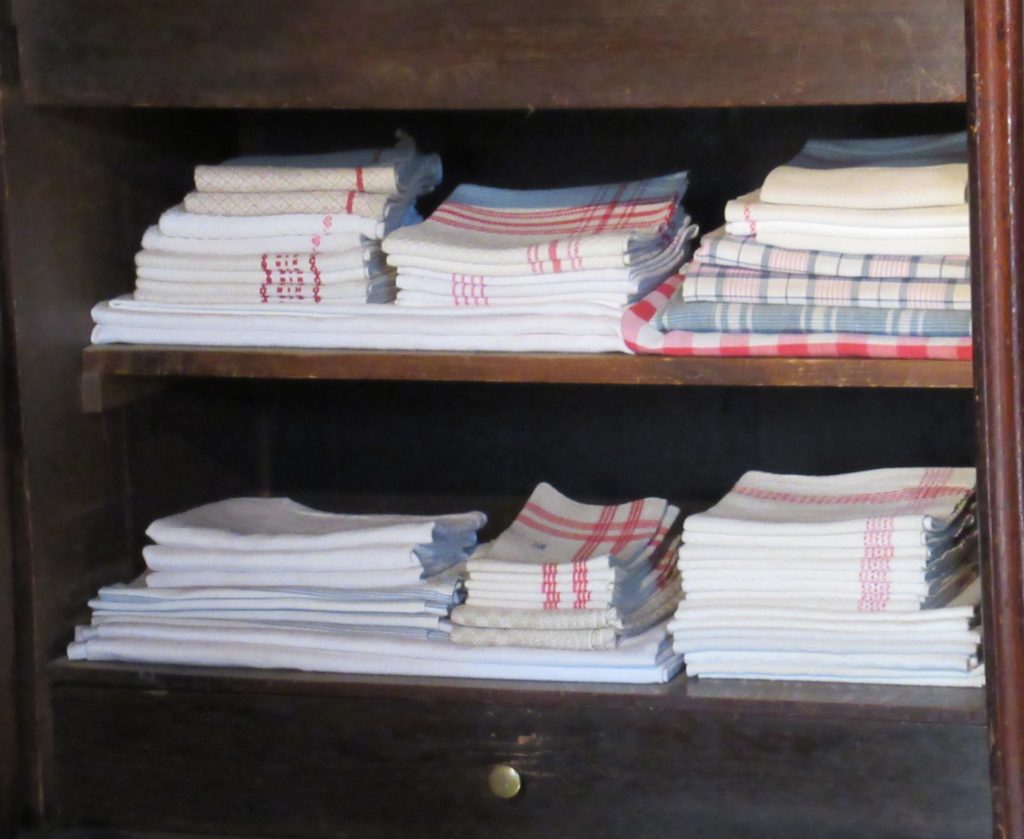
The weaving shed was closed, but I peeked in through the window…
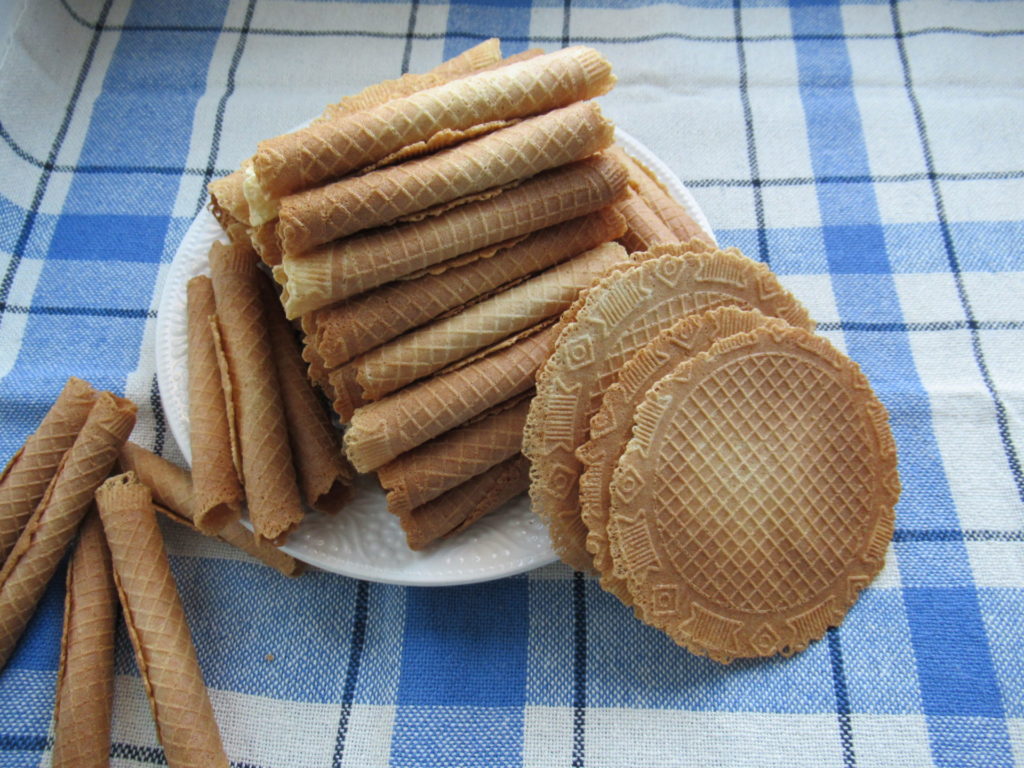
… and later bought two of the weavers’ lovely checked tea towels in the shop. This is one of them with some of the wafers I always bake on New Year’s Eve:
They are called ‘knieperties’ and are very thin, slightly sweet and have a hint of cinnamon.
Uh-oh, this is becoming quite a long blog post. I intended to make them shorter this year, but somehow there is always so much to tell. I hope you have a few minutes more.
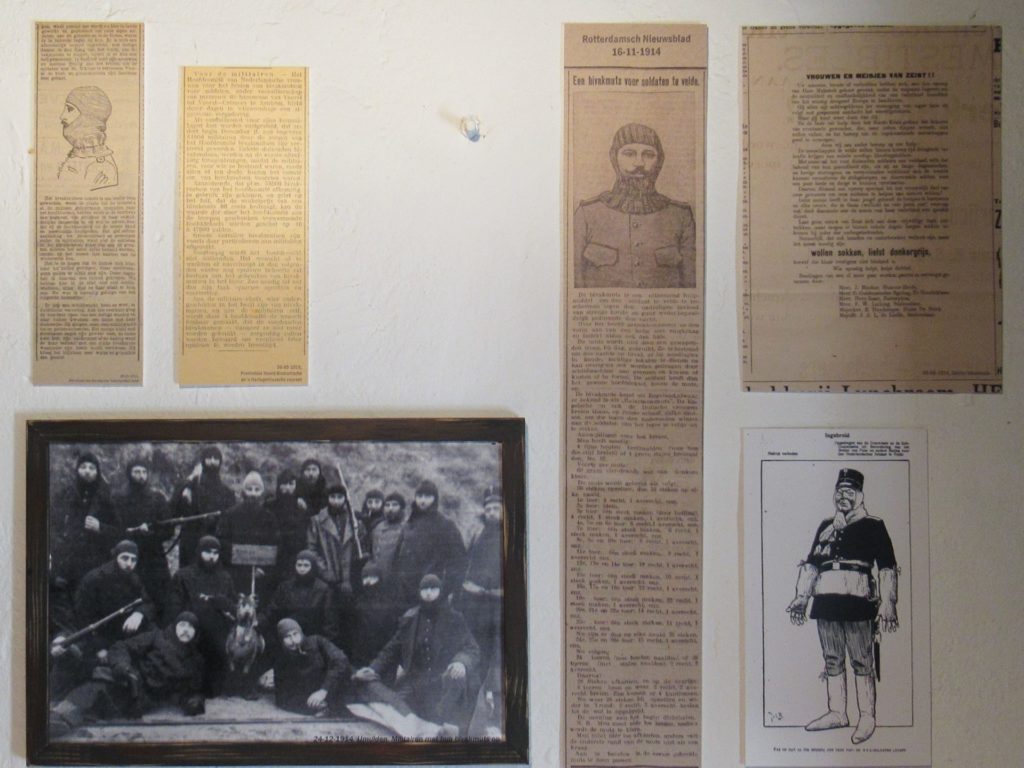
Let’s hurry on to the cottage dedicated to knitting in World War I. On one wall there was a display of newspaper cuttings with articles urging women and girls to knit for our soldiers.
They were asked to knit scarves, mittens, socks (preferably dark grey) and balaclavas. The photograph on the left shows a group of soldiers wearing knitted balaclavas. And here is one in progress:
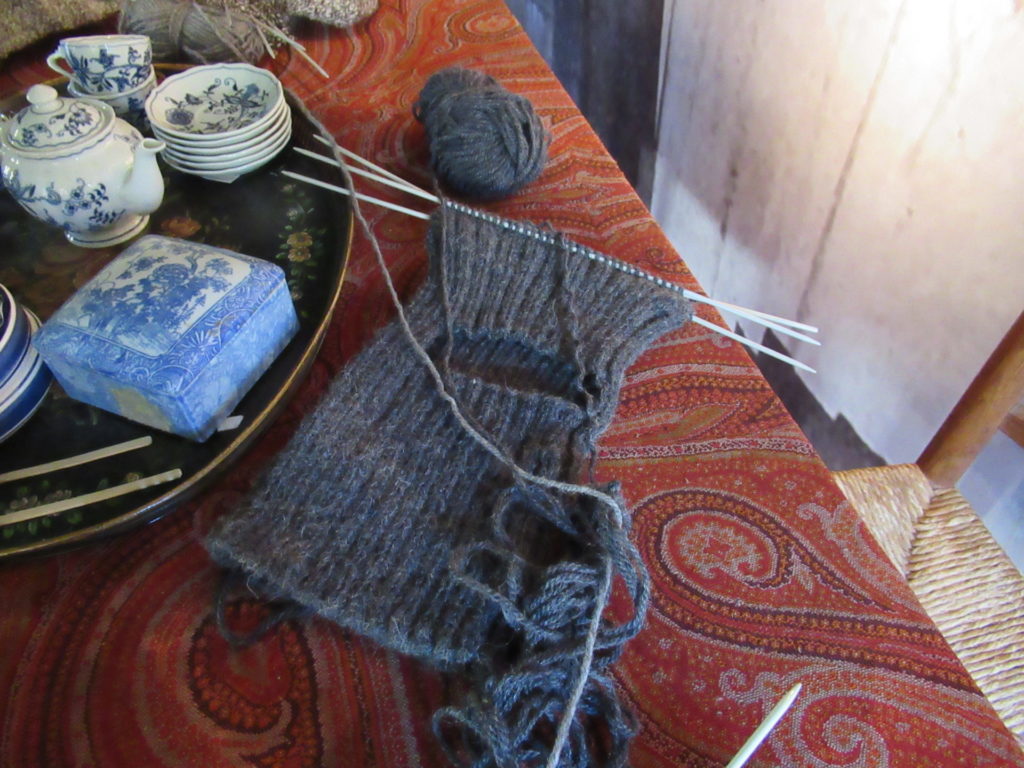
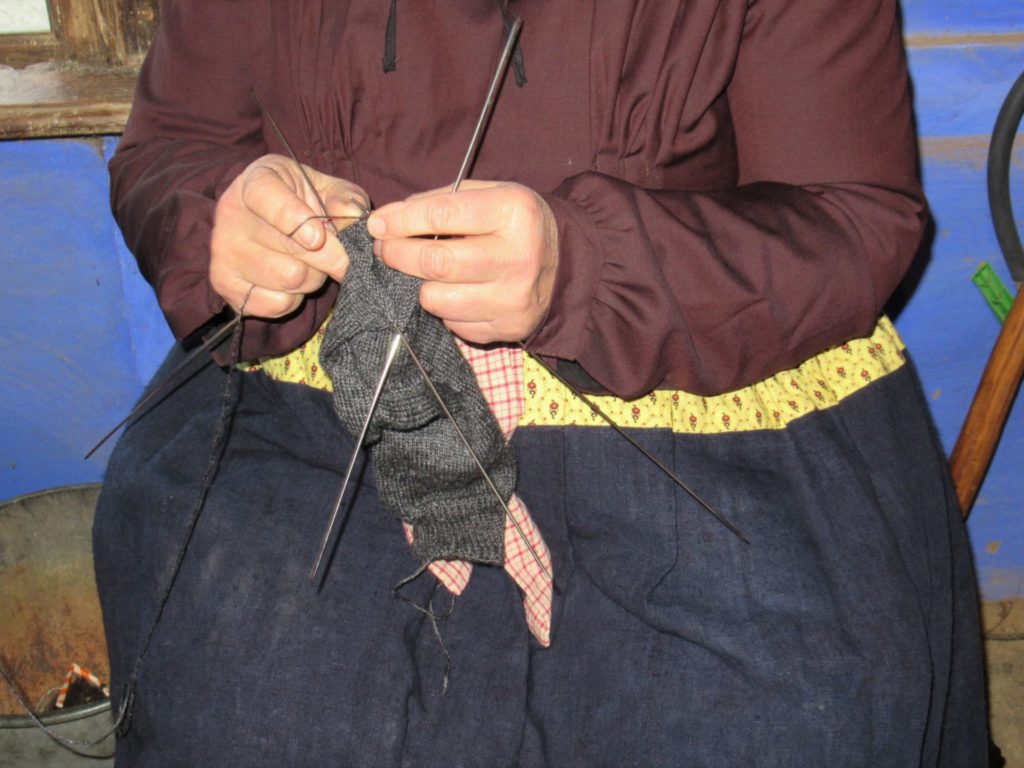
At the end of the afternoon we walked back to the blue farmhouse. The volunteer who sat there spinning earlier, was now knitting. She was knitting a sock in exactly the same way my mother and grandmother did and how I was taught to knit them.
Nowadays, I use a set of five short lightweight sock needles, with the stitches distributed over four and knitting with the fifth. But here you can see how it used to be done. Only four needles (long steel ones) are used, with the stitches on three needles and the knitting done with the fourth.
At this time of the day it was much quieter in the farmhouse and the volunteer had time for a nice chat about spinning and knitting. (It’s always so nice to chat with kindred spirits!)
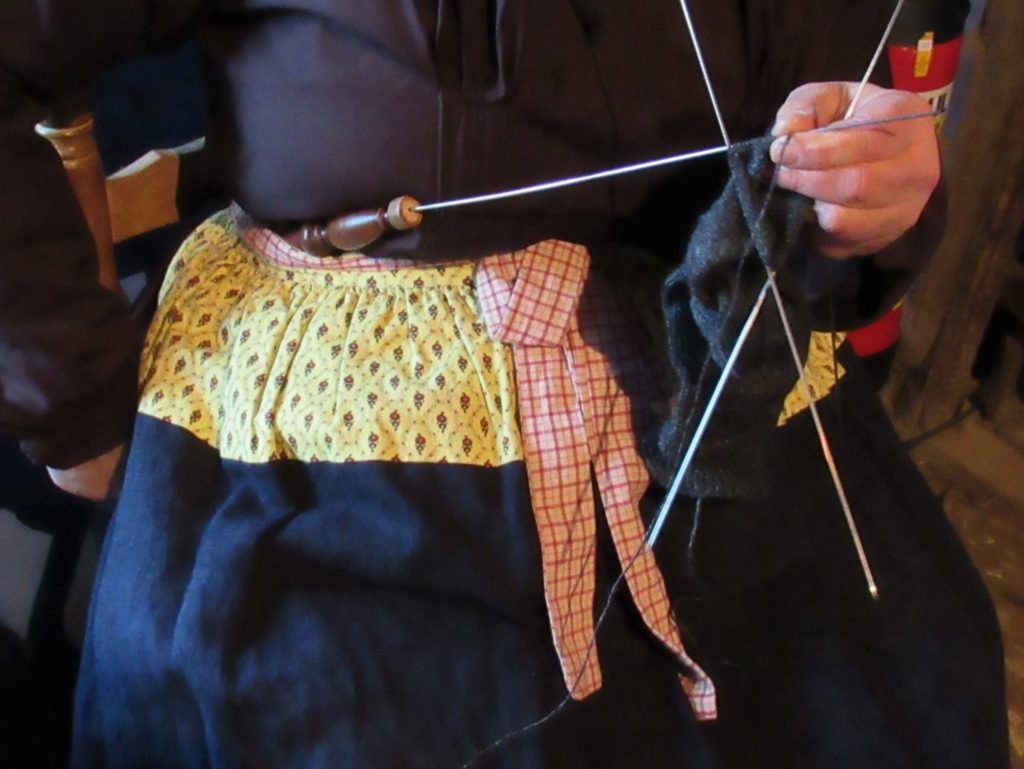
She also showed me something I had never seen in action before – a knitting sheath. It’s a wooden stick with a hole in it, tucked into the knitter’s waistband. It was rather dark inside the house, so I hope you can see it:
The knitting sheath supports the working needle, carries the weight of the knitting, protects the knitter’s clothes from the sharp needle point and speeds up the knitting. Very interesting. I’d like to try that someday.
Well, that’s all for today. I hope to be back with a post about my own knitting soon.
For more information about the Dutch Open Air Museum, please visit their website. There is much, much more to see than I’ve shown you here.
Hello! It’s good to see you here. I hope your life is not too frantic in the run-up to Christmas.
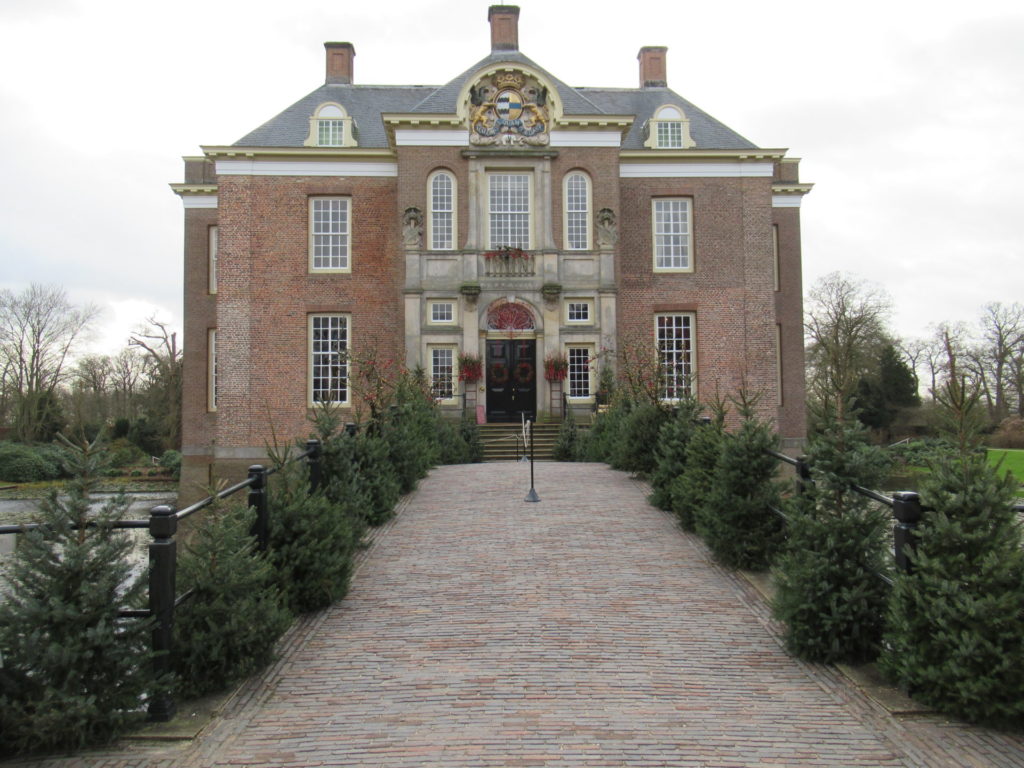
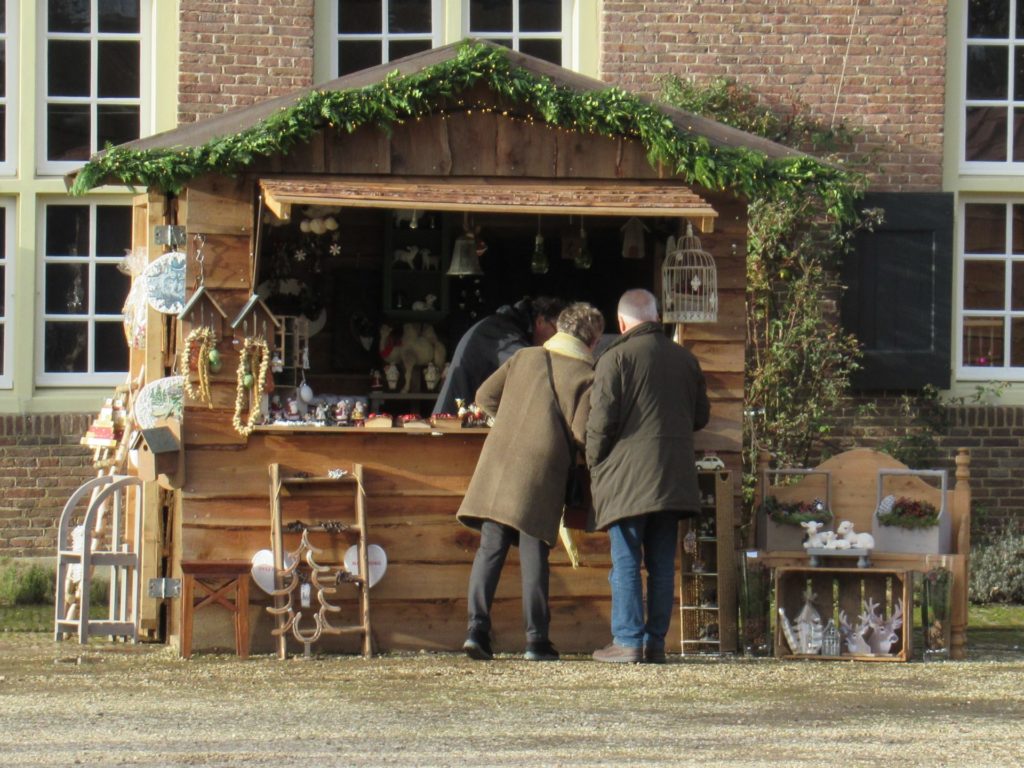
There’s quite a bit of pre-holiday preparation going on here. And some knitting, too. And some mulling, not just of wine, but also in the sense of pondering. But before I get to that, I’d like to take you on a mini-trip to the castle in the picture at the top of this post – Middachten Castle. It’s a private property that only opens on special occasions. The Christmas opening is one of these occasions and we visited it last weekend.
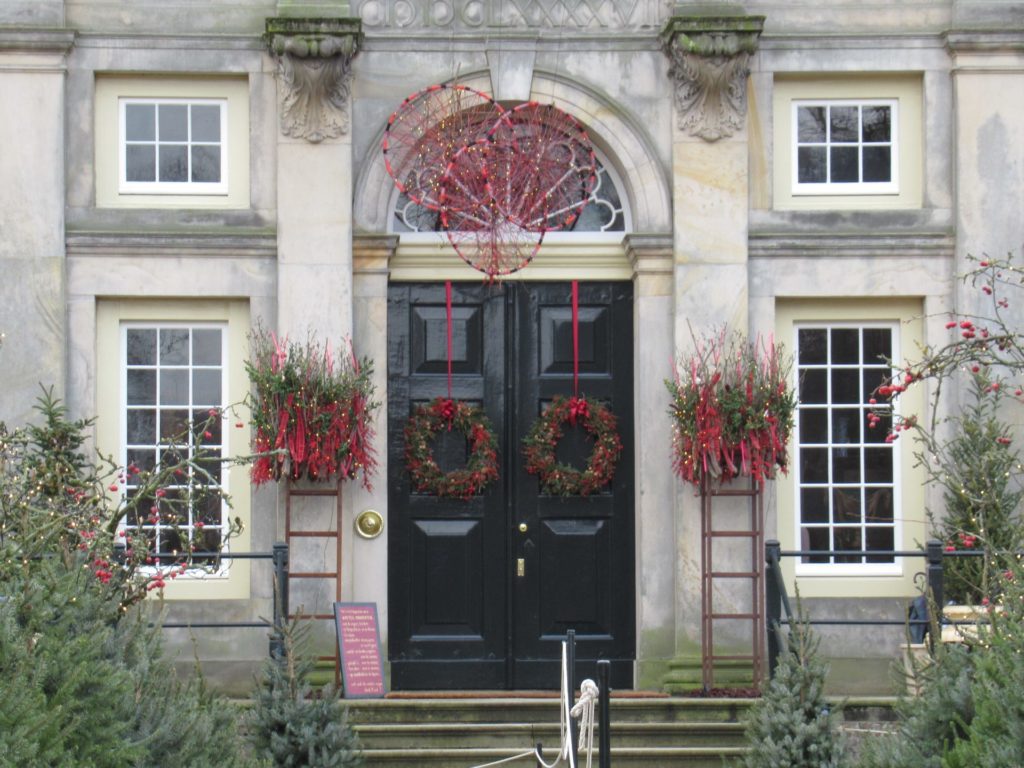
Although the castle has medieval roots, the current building dates from the 17th Century. There’s a moat all around it and a bridge leading to the front door. Or, rather doors. The two glossy dark green doors were decorated with beautiful wreaths flanked by other greenery.
Unfortunately photography wasn’t allowed inside, so you’ll have to take my word for it that the Christmas trees and flower arrangements were amazing. There was at least one Christmas tree in every room and the decorations were themed to the rooms. There were bunches of cigars in the tree in the smoking room, orchids sprouting from books and Christmas ornaments made from printed pages in the library and so on.
There was a Christmas market outside and in the outbuildings…
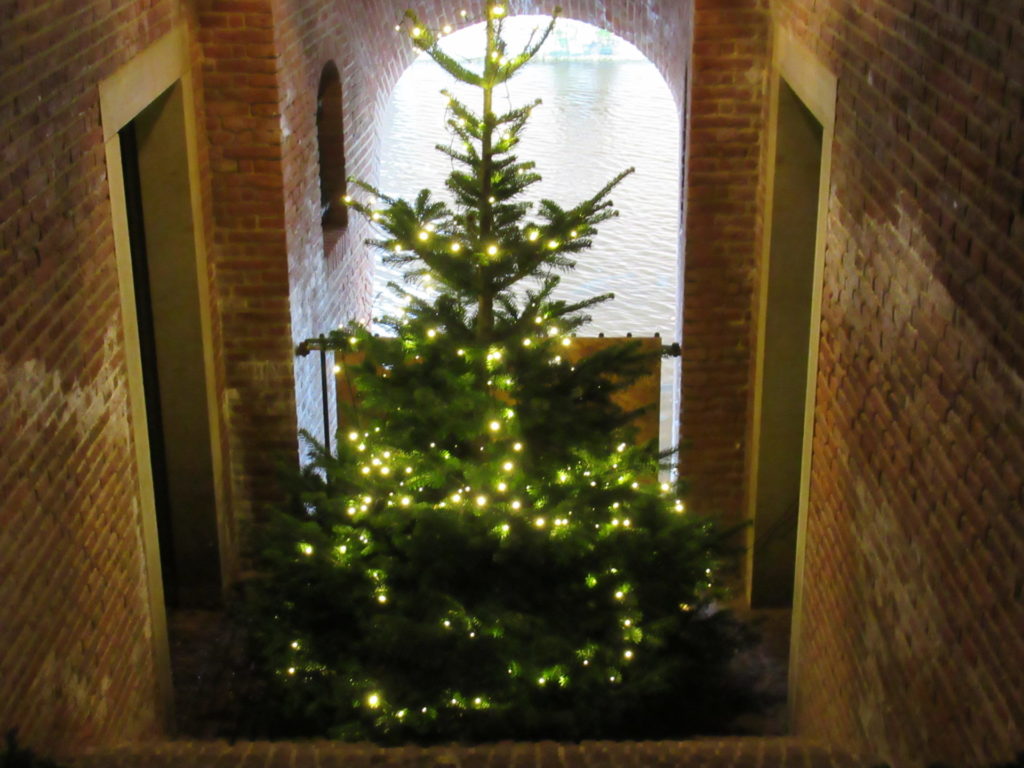
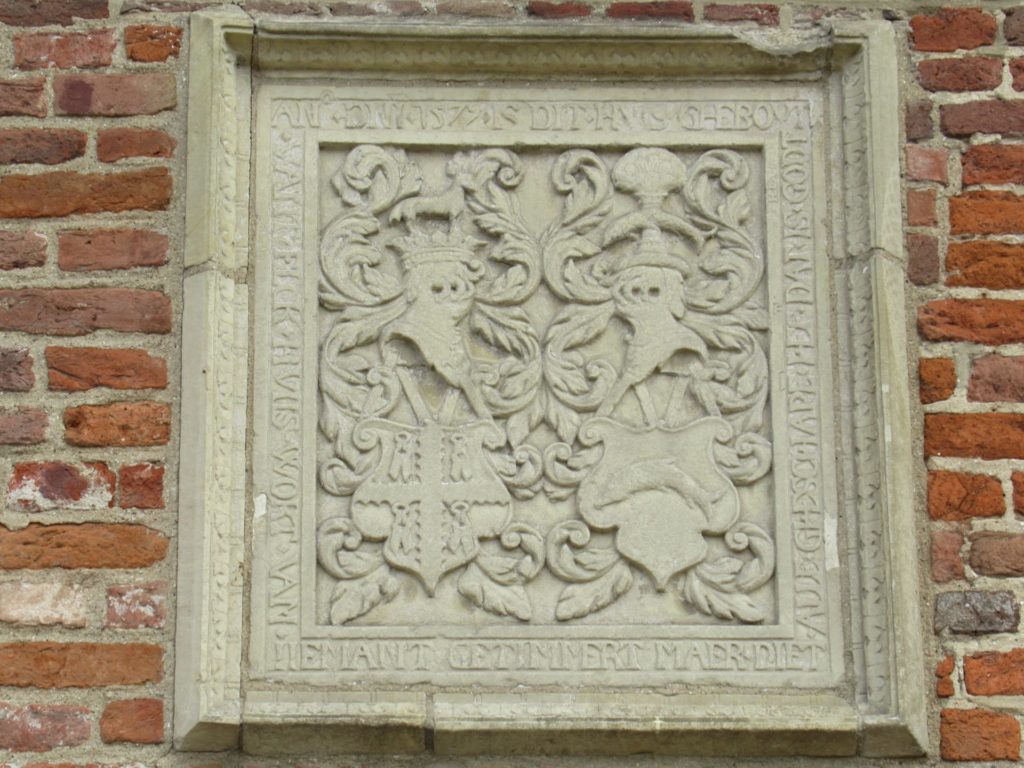
… but looking through my photographs, I see that I was more drawn to the quiet corners…
… and architectural elements.
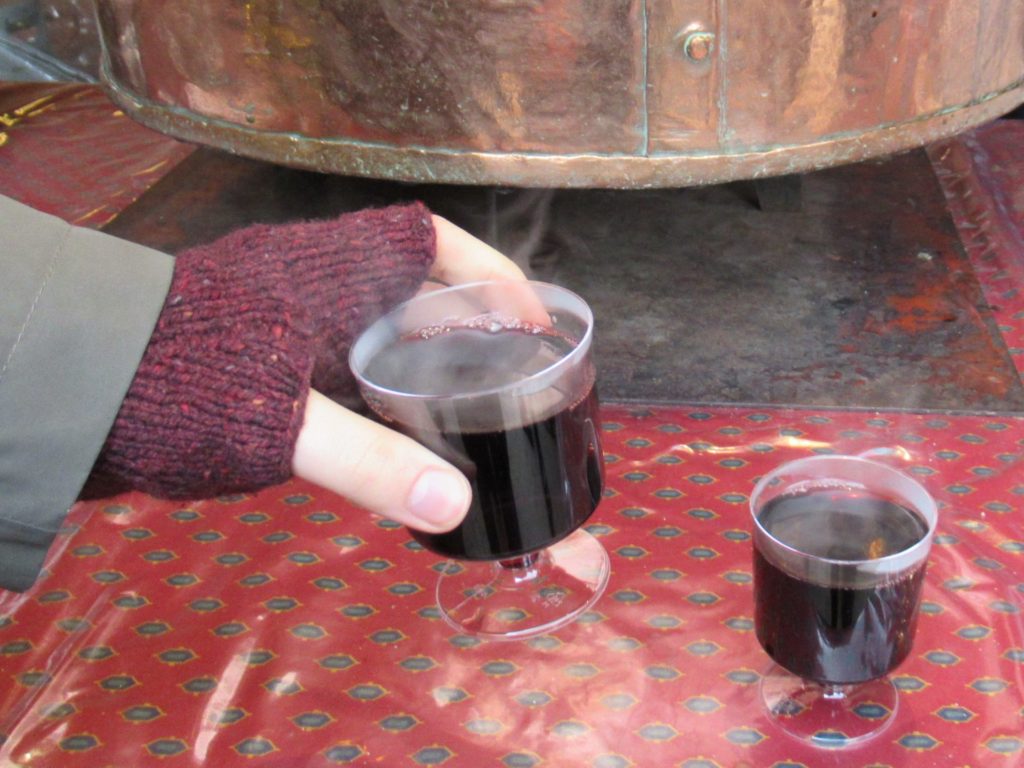
We ended our lovely visit with a shared bowl of barbecued mushrooms and tiny potatoes and some piping hot mulled wine.
Our preparations here, at our own modest abode, are far less elaborate than those at the castle, I’m glad to say.
Taking the Christmas tree decorations out of their box is always a special moment. I put on some music first, to get into the mood. This time it was A Christmas Together, starring John Denver and the Muppets, with The Christmas Wish as one of my favourites. It always really moves me when Kermit sings in his funny voice:
I don’t know if you believe in Christmas, or if you have presents underneath the Christmas tree. But if you believe in love, that will be more than enough for you to come and celebrate with me.
Well, back to decorating, here’s one of my oldest ornaments:
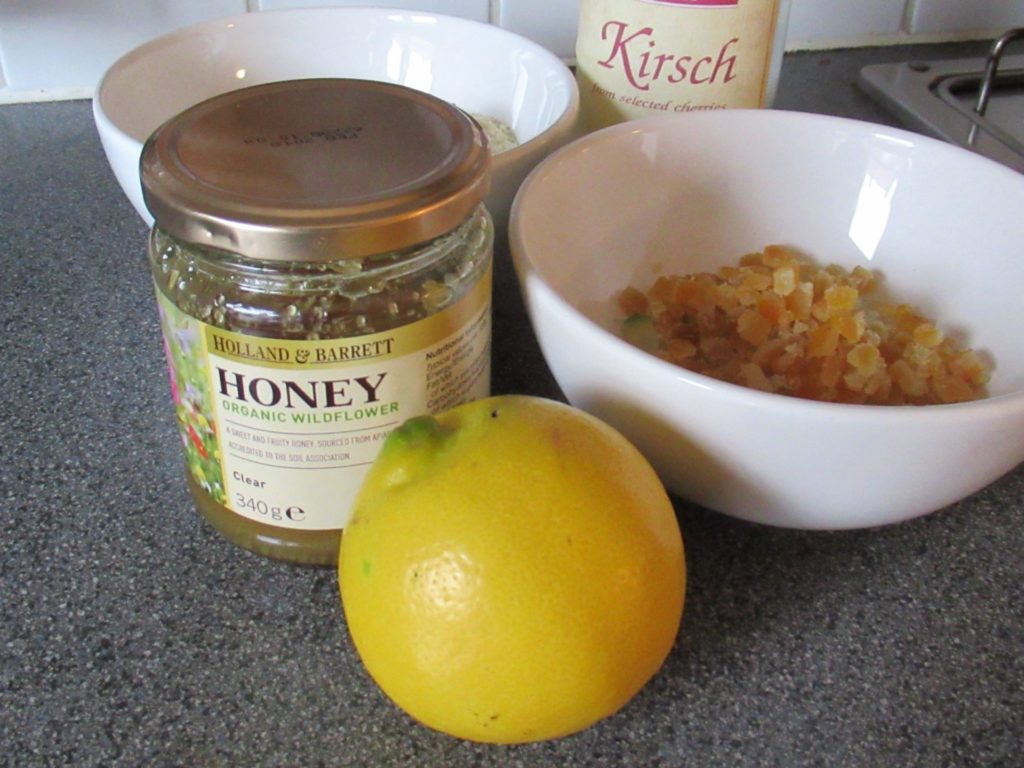
With a little more time on my hands than in the past few years, I also did some baking. I looked up an old recipe for Basler Leckerlis, a kind of gingerbread from Switzerland made with honey, candied and fresh citrus peel, ground almonds, spices and Kirsch liqueur.
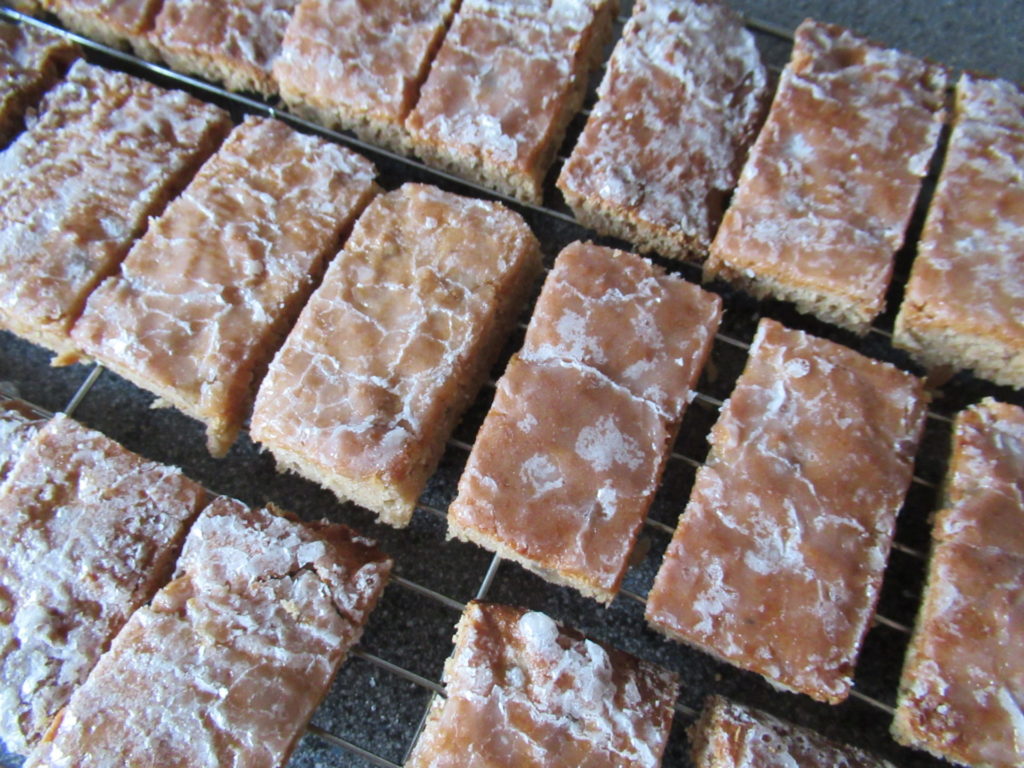
After baking, the leckerlis are iced with a mixture of icing sugar and more Kirsch. The heavenly warm, spicy aroma alone is worth the effort. Here they are cooling on a wire rack.
A while ago, someone said that my blog exudes a feeling of contentment – that I must be a very contented person. Scrolling through the blog posts I’ve written in the past year, I can see why people might get that impression. But contented is far from how I feel. I do feel grateful. But also worried.
With everything that’s going on in the world around us, I sometimes feel like pulling up the drawbridge, closing the shutters, and withdrawing into my castle, figuratively speaking. But then again, I don’t think that is the answer to anything.
While I’m knitting, I’m mulling over better answers. Pondering on how to make this world a better place. And on the place of knitting, and blogging about knitting, in it. So far, I’ve mainly come up with question marks. Where am I going with my knitting and my blog? Should I be going anywhere with my knitting and my blog? Shouldn’t I be doing something more important or useful? Should I go into politics? Answer to the last one: No, I’d be totally useless as a politician. I’ll ponder on the rest for a little longer.
Meanwhile, I just keep knitting.
I’m knitting a pair of fingerless mittens for a gift. They have a lovely little cable with tiny nupps (an Estonian term for delicate bobbles).
I can show them here because the recipient already knows that I’m making them. She chose the yarn and the pattern herself, in fact.
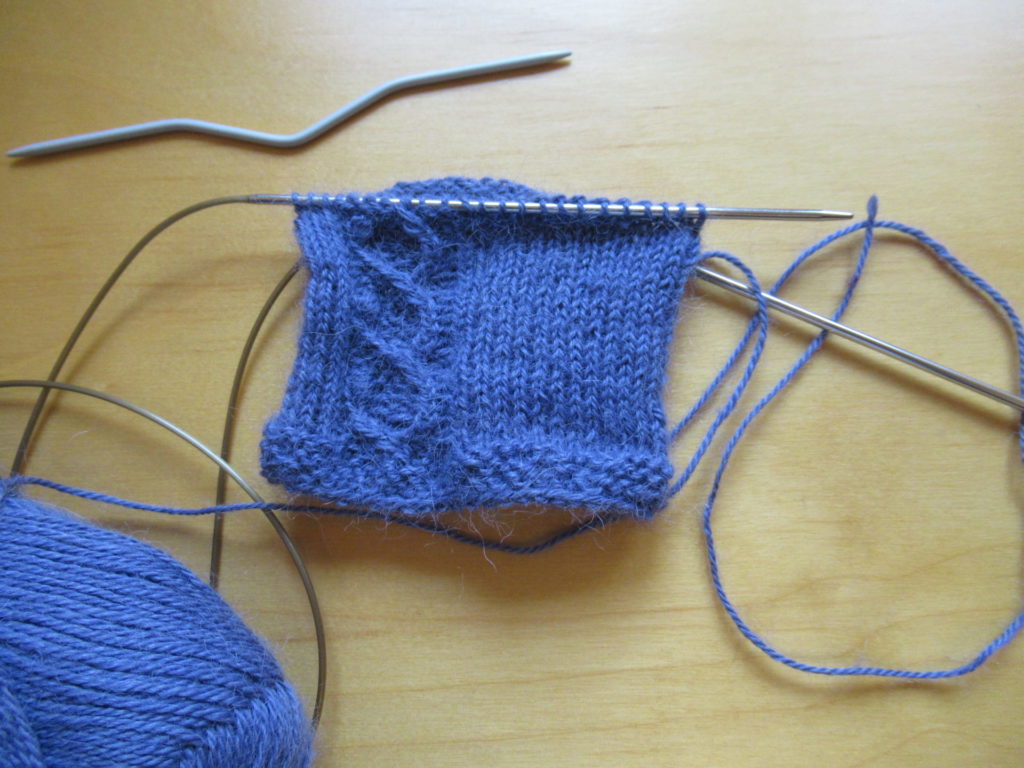
I’m also still knitting the blue cardigan I’ve been working on for quite a while. I had almost finished the second sleeve when I realized that I wouldn’t have enough yarn for the neck band and the pocket tops. Pinning the parts together to find out what could be done, I saw that the sleeves were on the long side and unravelled them to a few centimetres below the sleeve cap (not much fun with this sticky yarn, I can tell you). The one on the left is now re-knit, and I’ll soon be able to finish the rest.
When I’m stuck on a knitting project, like with the sleeves above, I get out what I call my in-between-projects-project – a large stole.
I add a few rows or even an entire stripe to it when I have no inspiration for other things. But now I’m stuck on that too, because I’m not entirely happy with the last two colours I’ve added. I think I may rip them out and substitute them for different colours, but I’m not sure yet.
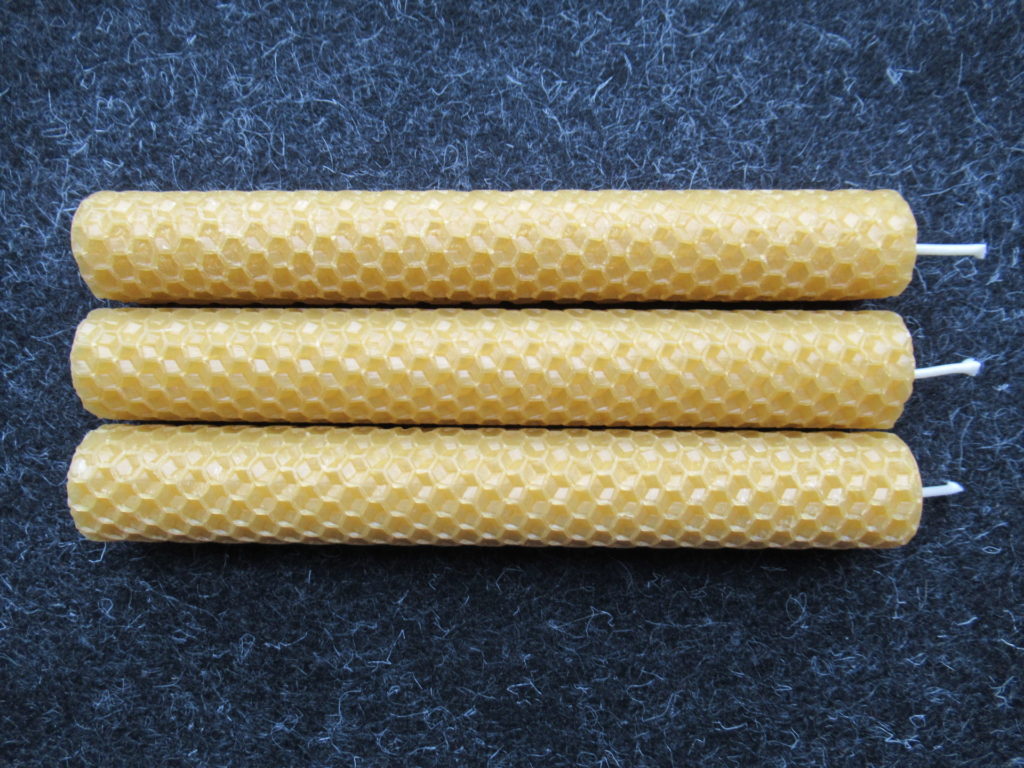
In between all this knitting and baking, I also made some beeswax candles. I’ll come back to those when I’ve experimented more and can find the time to write up a post about them.
These at least literally make life a little lighter.
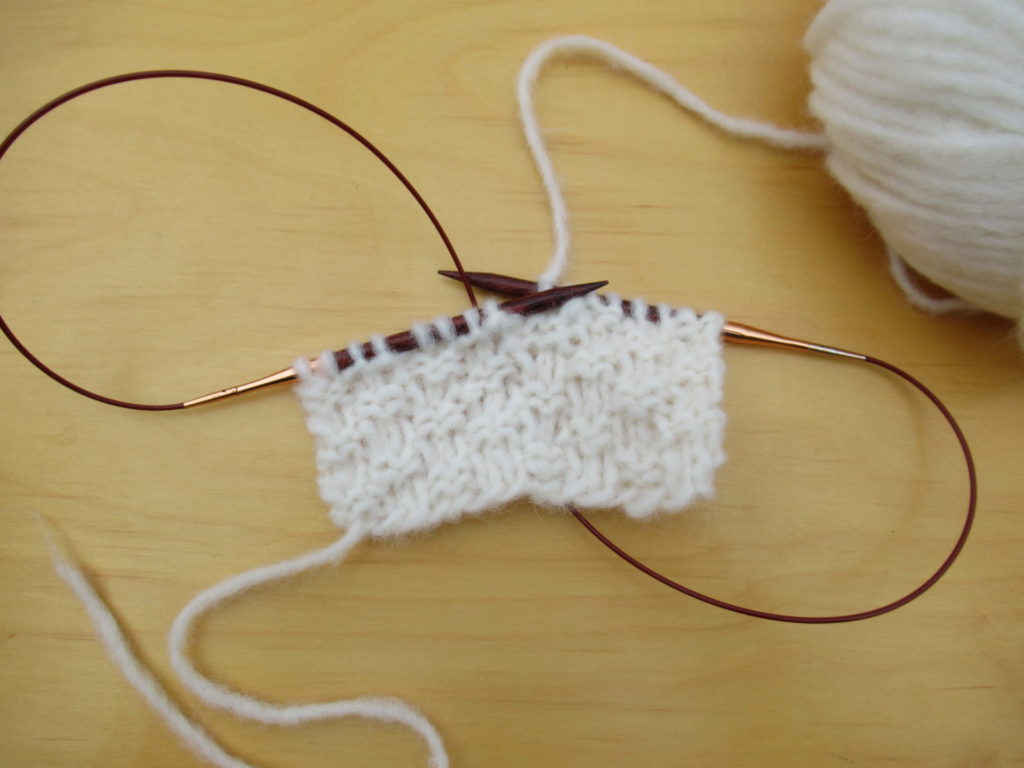
And finally, I’m knitting some swatches for a new design idea I have. If it works out the way I envision it, I’ll show you more sometime in the New Year.
Well, this is my last blog post for 2019. I’m taking some time off to eat, drink and be merry first. And then some time to knit, read, take naps and go for walks, so it may be a while before I’m back.
I wish you a lovely Christmas and hope to see you here again in 2020!
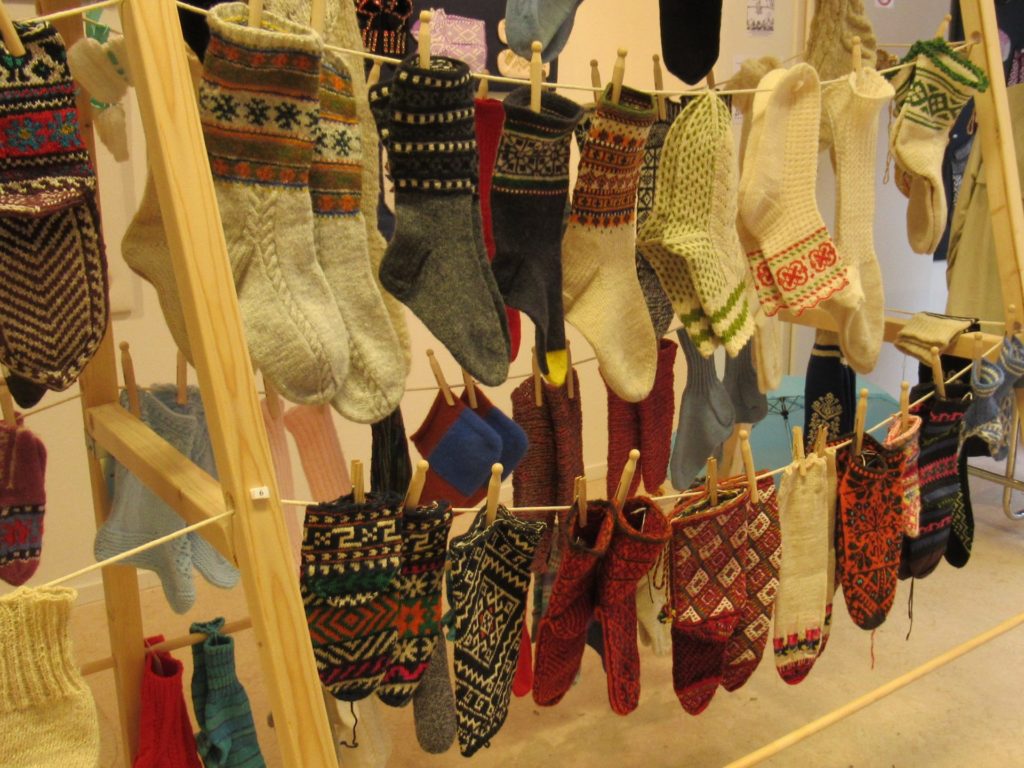
Washing line upon washing line filled with colourful handknit socks greeted me as soon as I opened the door. A cheering sight on a dismal day. We’re back at the same exhibition at the Textile Research Centre in Leiden where I saw the stockings I wrote about last week.
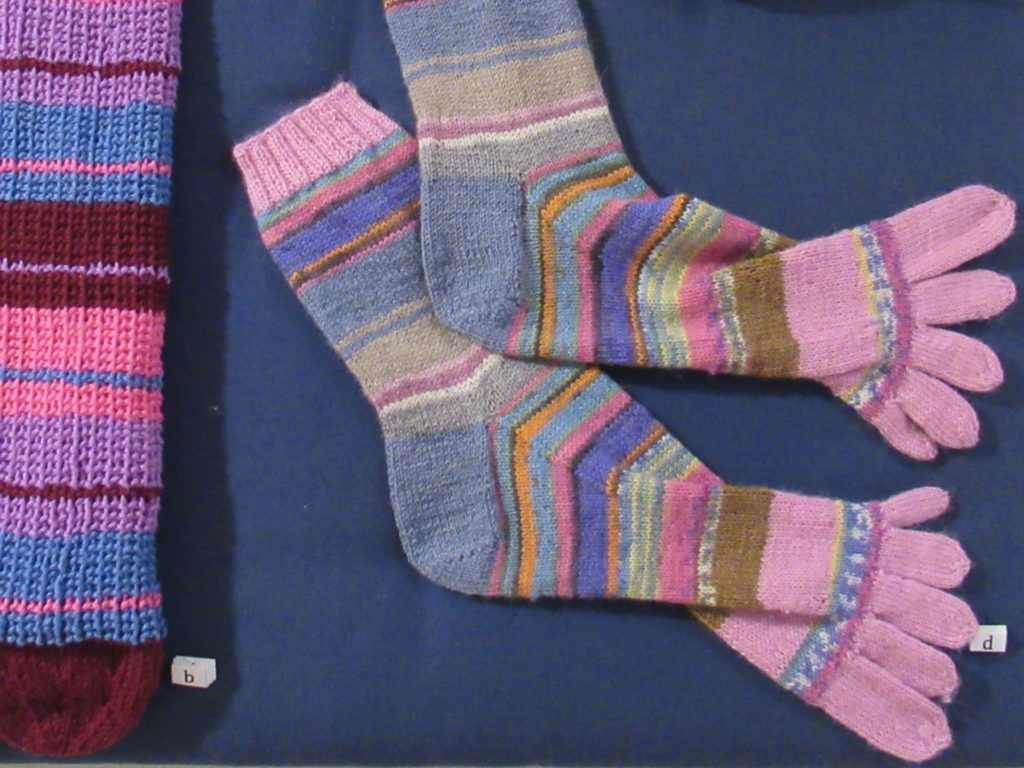
Today I’m focusing on the huge variety of socks on display. Old socks, new socks, simple socks and intricate socks. There were socks with separate toes:
Fun, but apart from the toes, fairly simple.
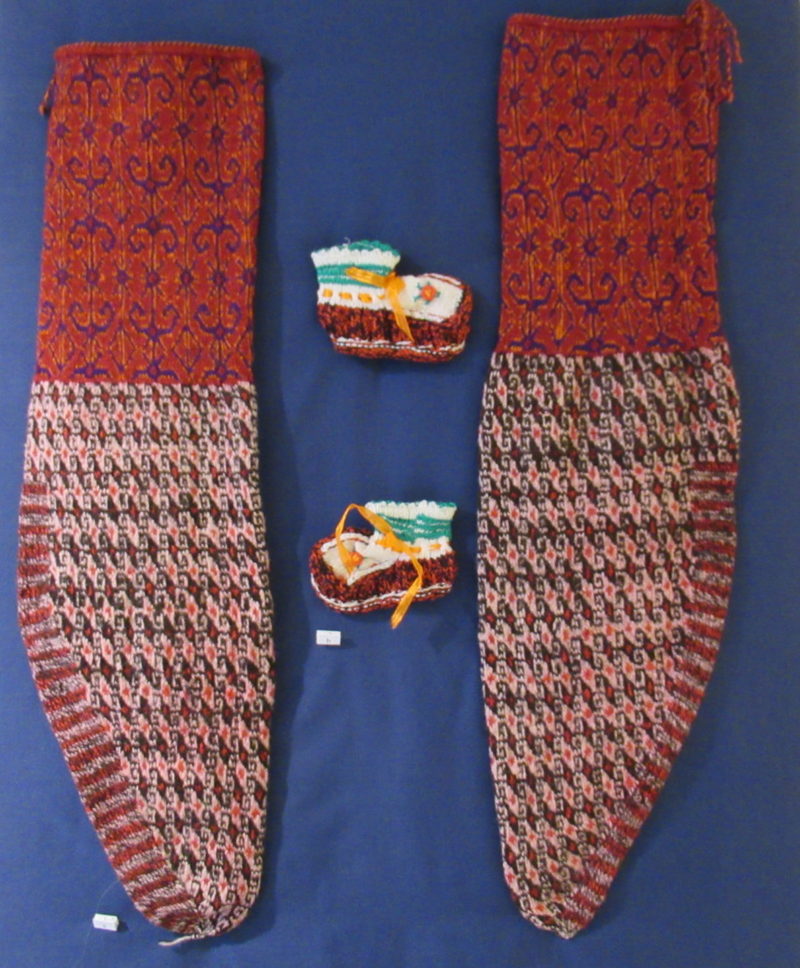
On the other end of the spectrum there was a very, very elaborate pair from Tajikistan (below). The baby booties next to them give an indication of their size. They’re huge! And they don’t even look much like socks at all.
The information sheet says that these kind of socks ‘sometimes reached halfway up the thigh’ and ‘were held in place by tying them at knee height with a woollen cord or belt, or by pulling on the knitted threads at the top.’
The sheet also gives us information about the way the yarn was dyed, the names of some of the motifs and the knitting techniques used.
For a knitter, the wonderful thing about this exhibition is the wealth of information provided about materials, patterns and techniques.
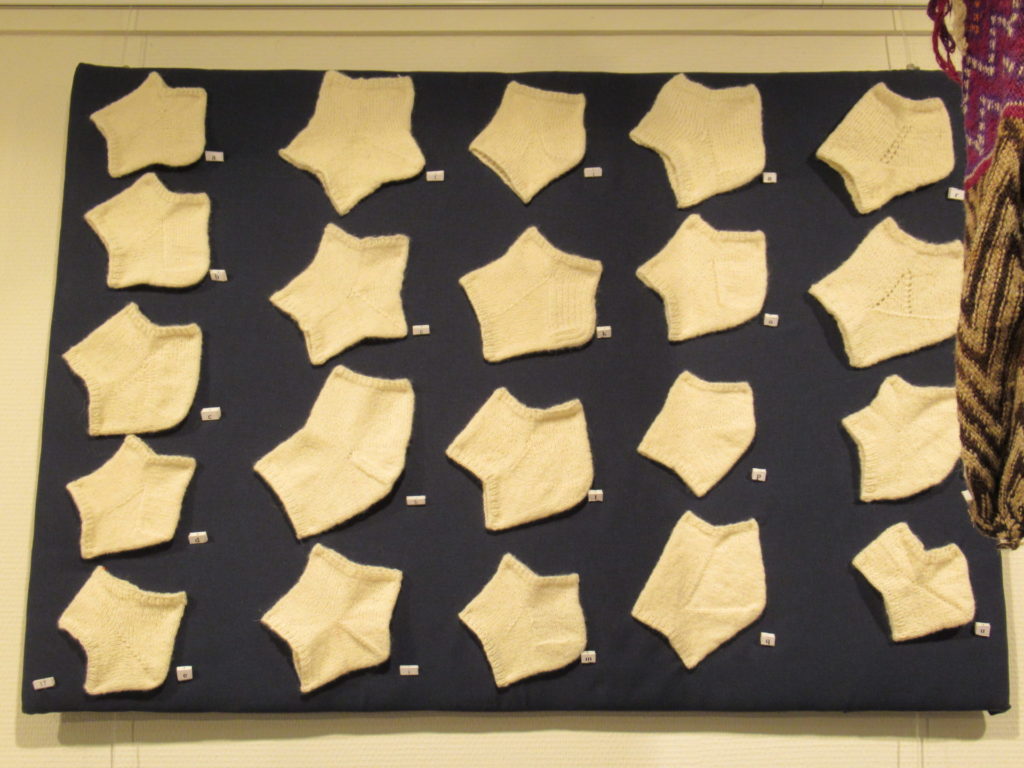
Speaking about techniques, there was a board with examples of over 20 different ways to knit sock heels.
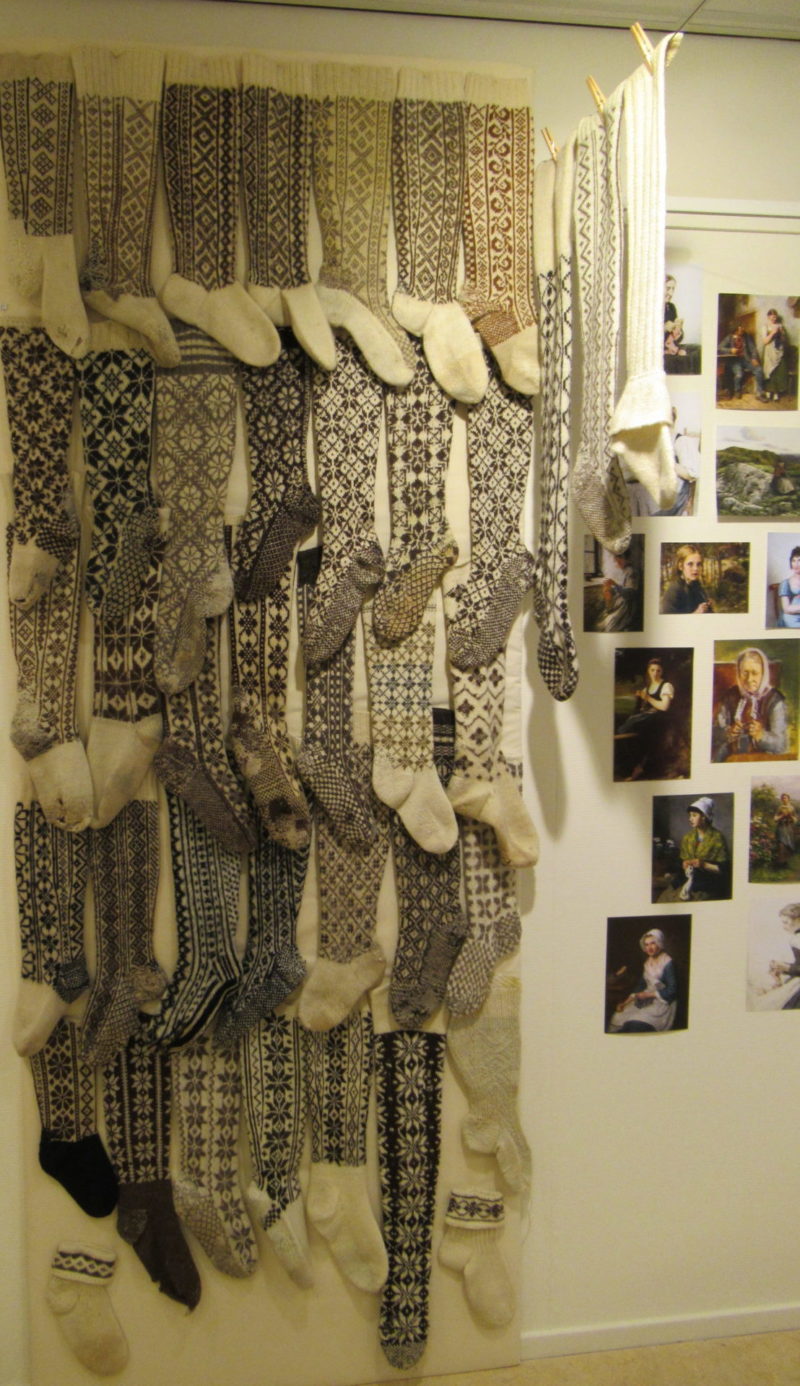
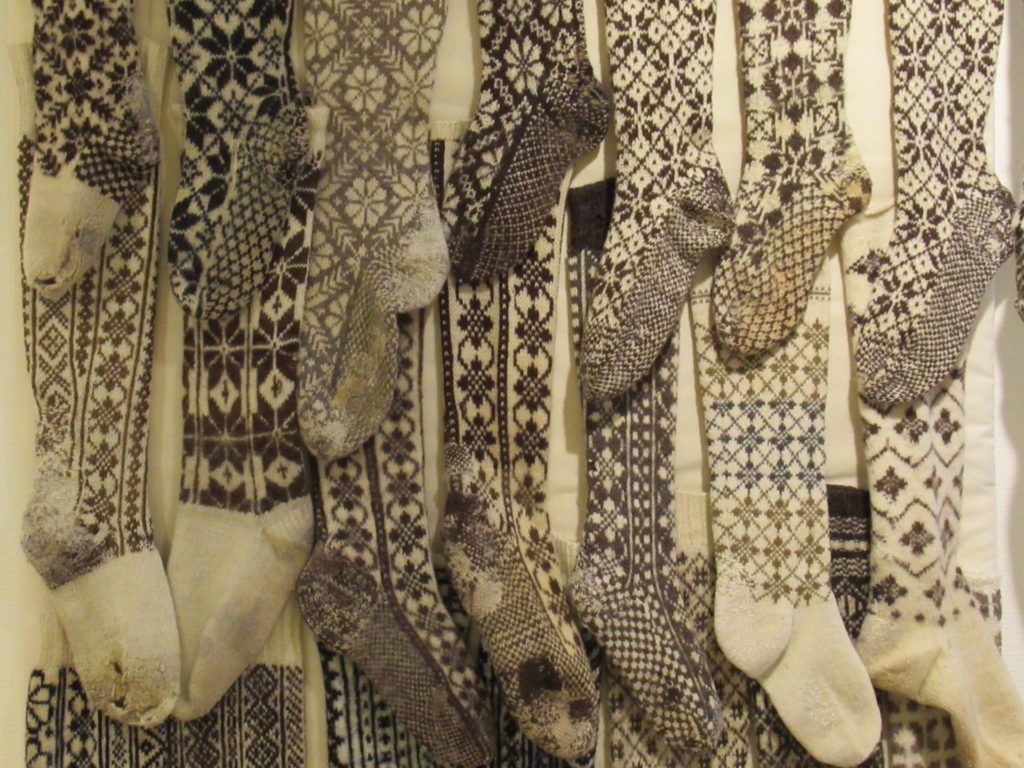
And as for patterns, just look at this cascade of stockings from Norway:
From floor to ceiling, they’re all knit in neutral, natural colours. Still, they are all different because of the patterns used. Many of them (or perhaps even all of them?) have variations of a pattern called ‘åttabladsrosa’ or eight-pointed star.
Some are covered entirely in a pattern, including the foot. And some of them have a plain, unpatterned foot. Why knit a complicated pattern when it is hidden inside a shoe anyway? Or perhaps the foot was re-knit in a single colour because it was worn out?
These stockings are just a small part of Annemor Sundbø’s collection, or her ‘rag pile’, as she calls it. If you’d like to hear more, she is giving a lecture at the TRC on December 18th 2019. There’s more information here (please remember to register beforehand).
Looking closely at these stockings, you can see that they are well worn and that some of them have been mended…
… which brings us to the mending corner.
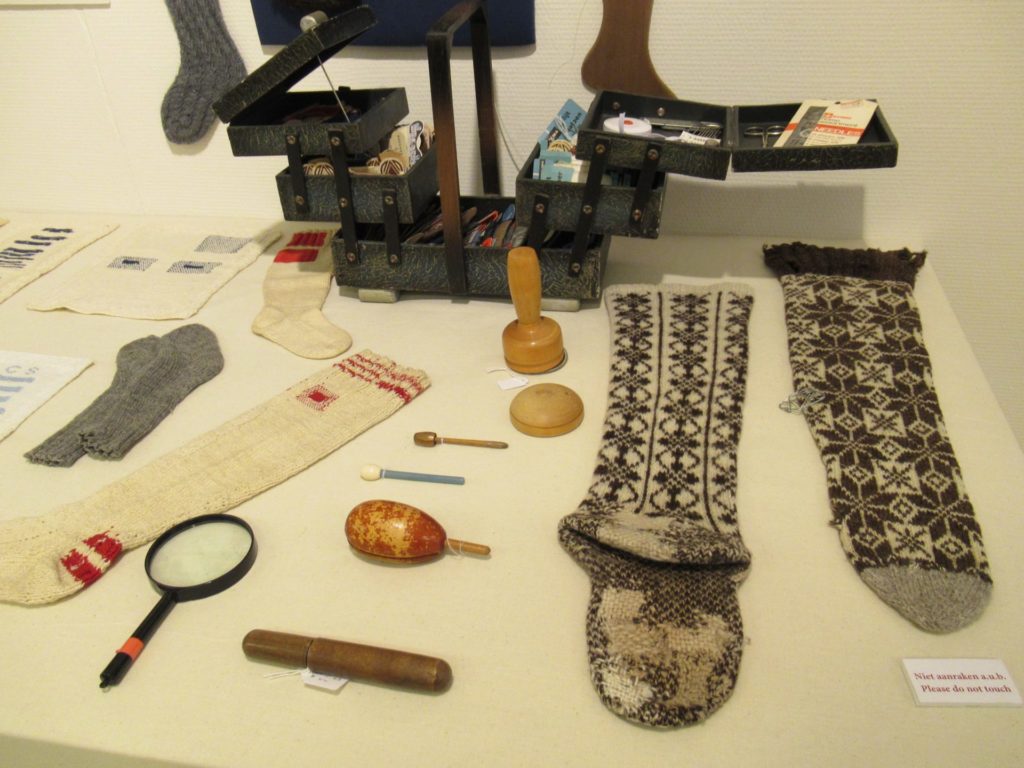
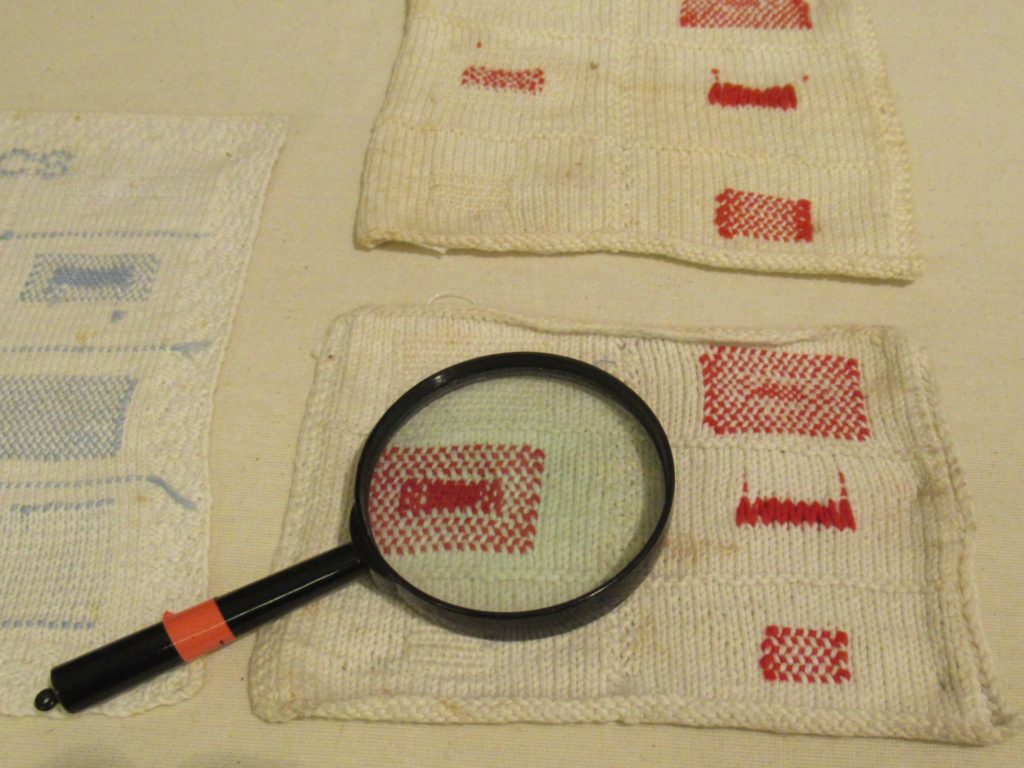
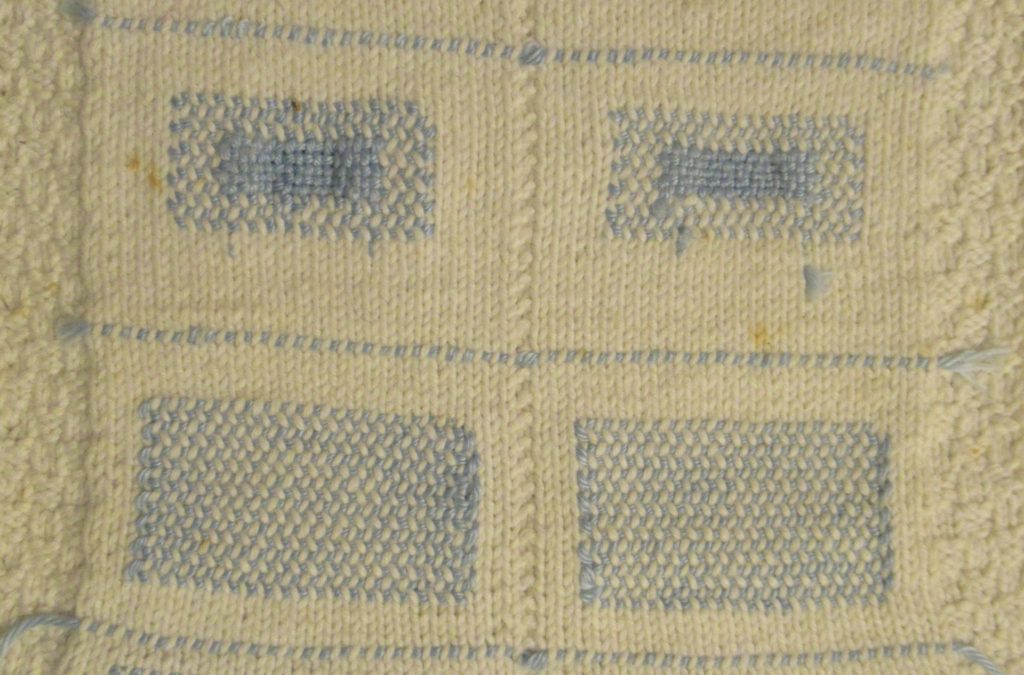
What I loved about this exhibition was its friendly, open accessibility. There are several signs telling us not to touch things, but nothing is behind glass and everything can be studied in detail from close up.
I zoomed in on the bit of blue mending you can see below. I learnt the weaving technique in the middle of the two rectangles at the top from my Mum. But the technique around it and in the two rectangles below, picking up alternately the left and right leg of the knit stitch, is new to me.
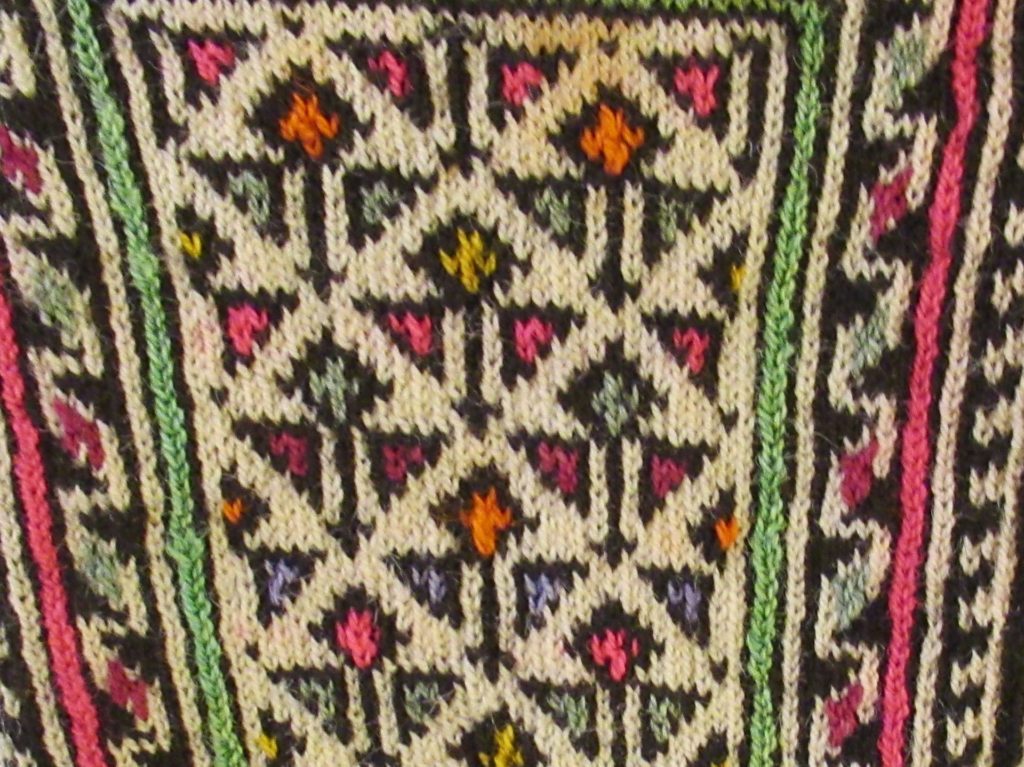
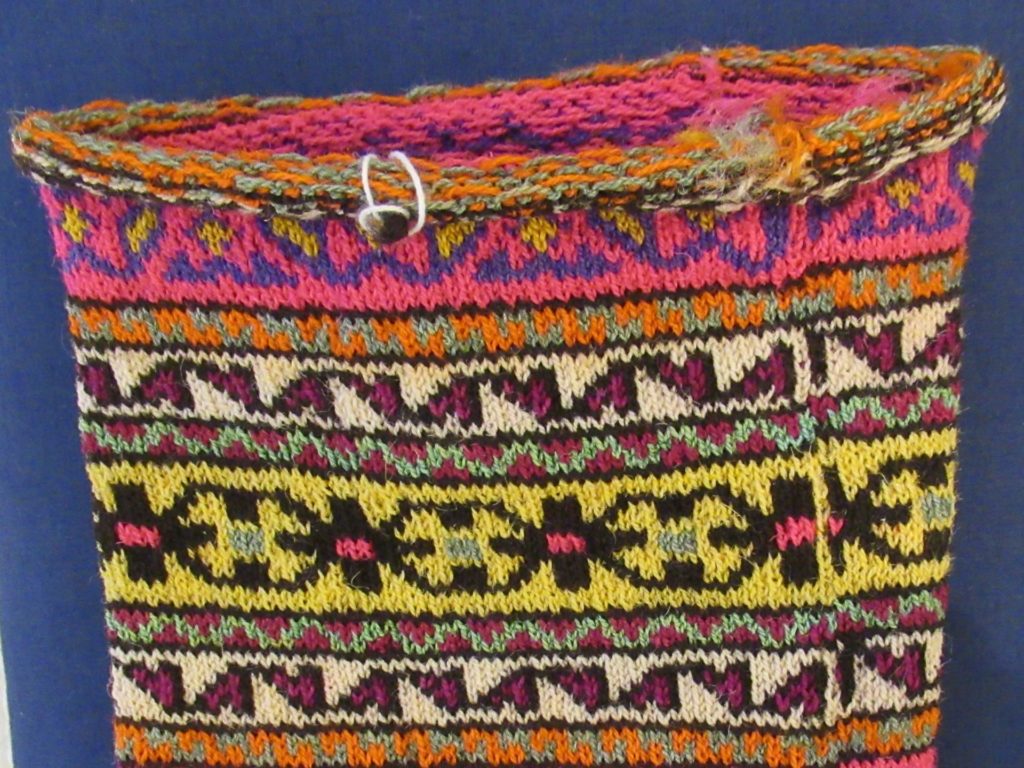
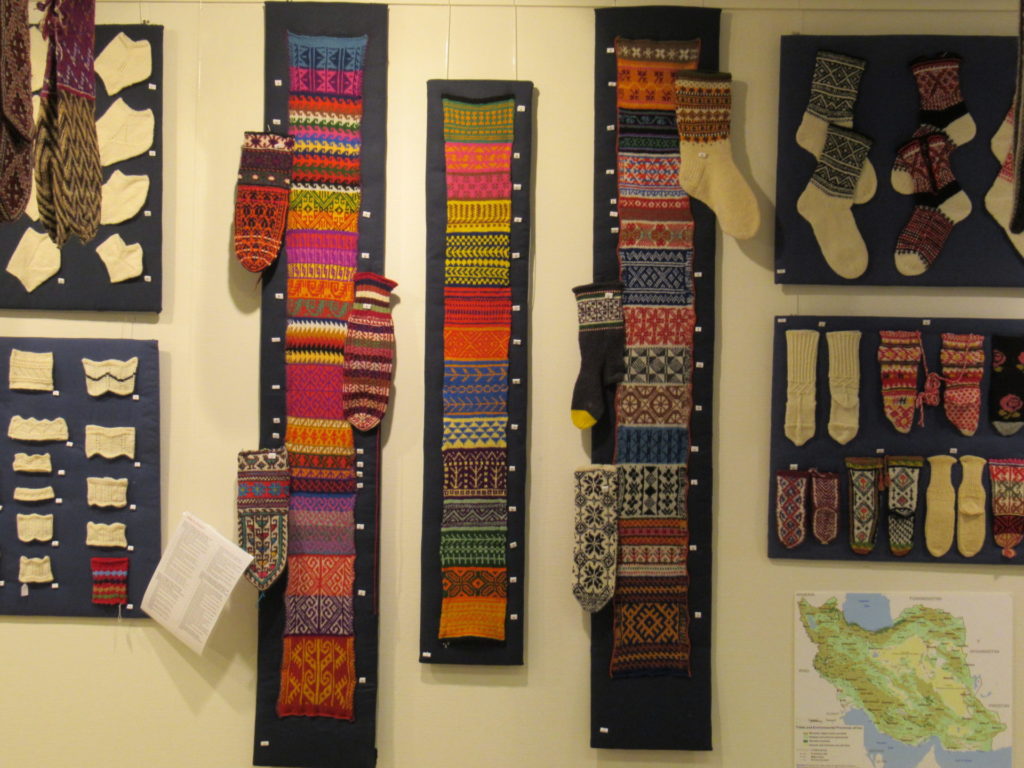
Apart from new things to learn, there was also a lot of inspiration to be found. There were many motifs and other elements that I could use in my own knitting. Take for instance the pattern on the foot of a pair of socks from Iran:
The black shapes filled with bright colours could easily be multiplied into an all-over pattern for a larger surface.
And one or more of the bands on the cuff would make a lovely border for all kinds of projects.
For more inspiration, there were three colourful samplers with many beautiful patterns:
Very, very inspiring. And humbling too. We tend to think that we’re always making progress, knowing more, doing things better and more efficiently. We can certainly produce socks more efficiently. But for the rest, we’re fortunate to have museums and other centres to preserve the knowledge and expertise about making things by hand for us.
I’ve only given you a taster of the exhibition here. You can still visit to see more if you don’t wait too long – it’s open until the 19th of December. And if you are unable to go, because you can’t find the time in the busy month of December, have the flu or live too far away, there’s always the TRC website. Their online collection catalogue can be viewed at any time or place.
My day in Leiden has given me much inspiration and food for thought. In addition to visiting the sock exhibition, I also took a needle binding workshop on the same day. I need to digest everything I learnt there before I can write about it, but you’ll probably hear more about that later.