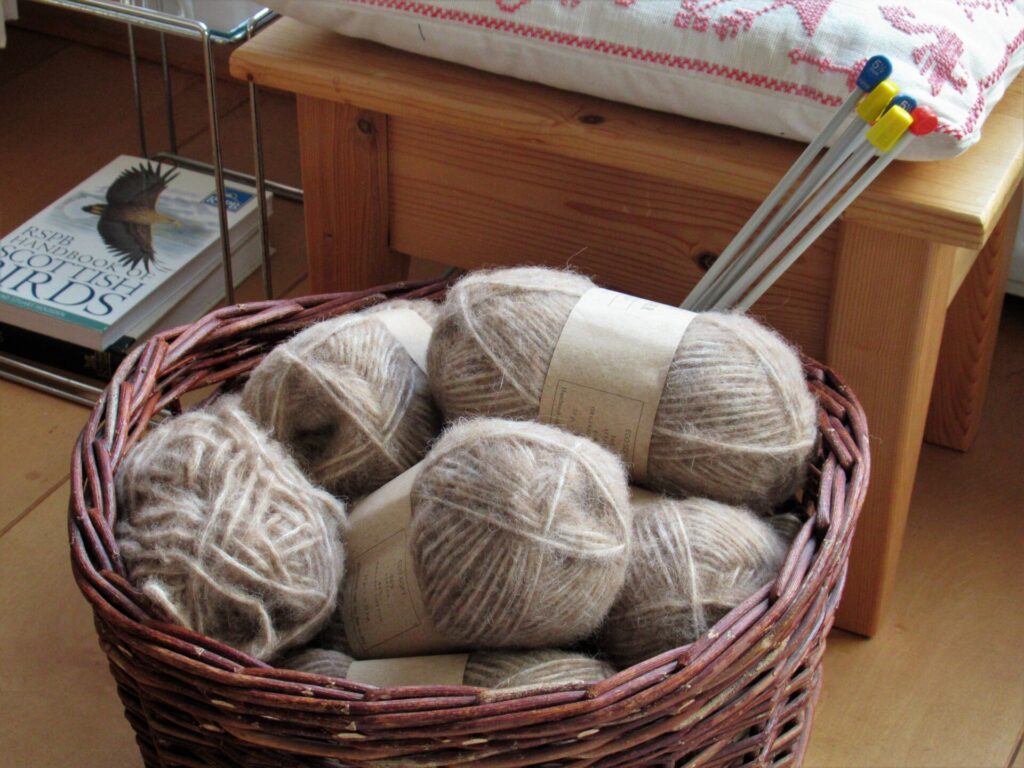
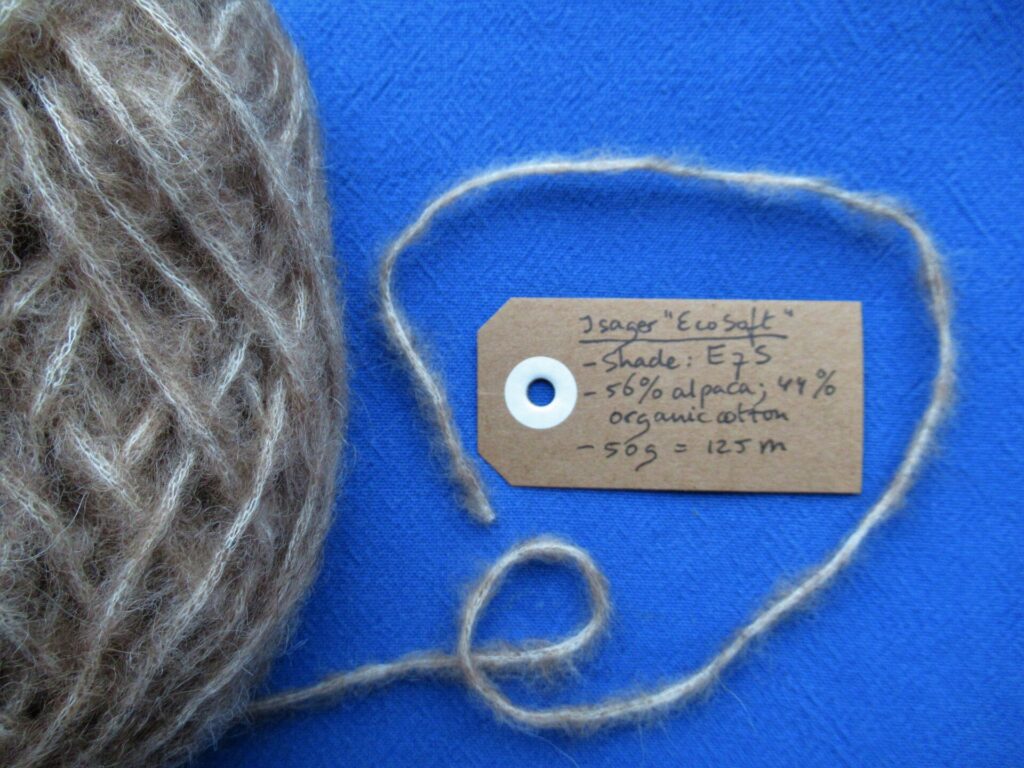
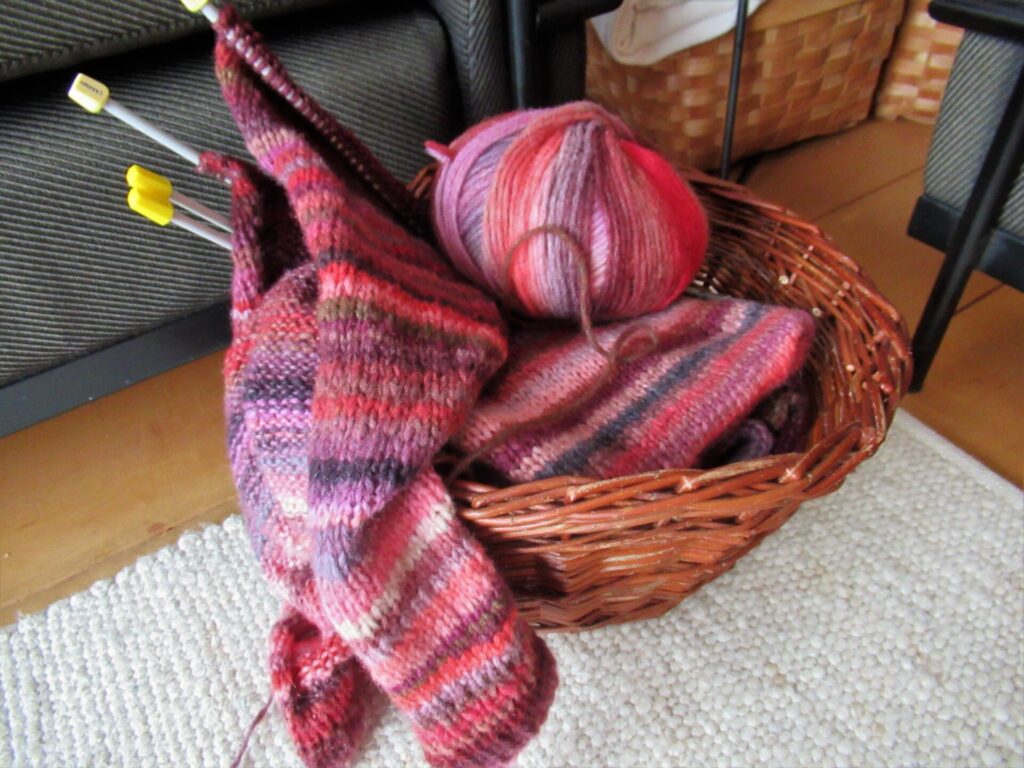
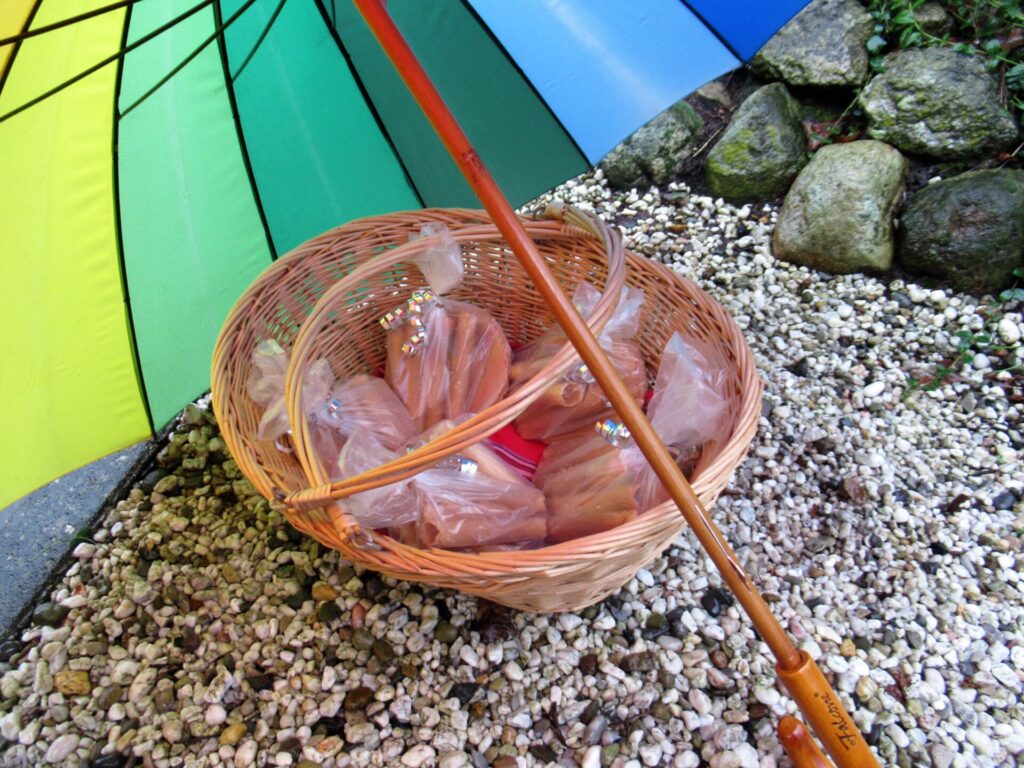
Do you remember our trip to Harlingen last autumn, and my visit to the local yarn shop? That’s when I bought the yarn in the basket above. It is Isager ‘Eco Soft’ from Denmark – a bulky yarn of 56% alpaca and 44% organic cotton. It is very soft indeed.
I bought it on a whim, with the idea that it would be perfect for a cosy cardigan for our daughter. Other than that I didn’t have a clue as to what it was going to look like or what pattern I was going to use. Or how much yarn I’d need (I hope I’ve bought enough).
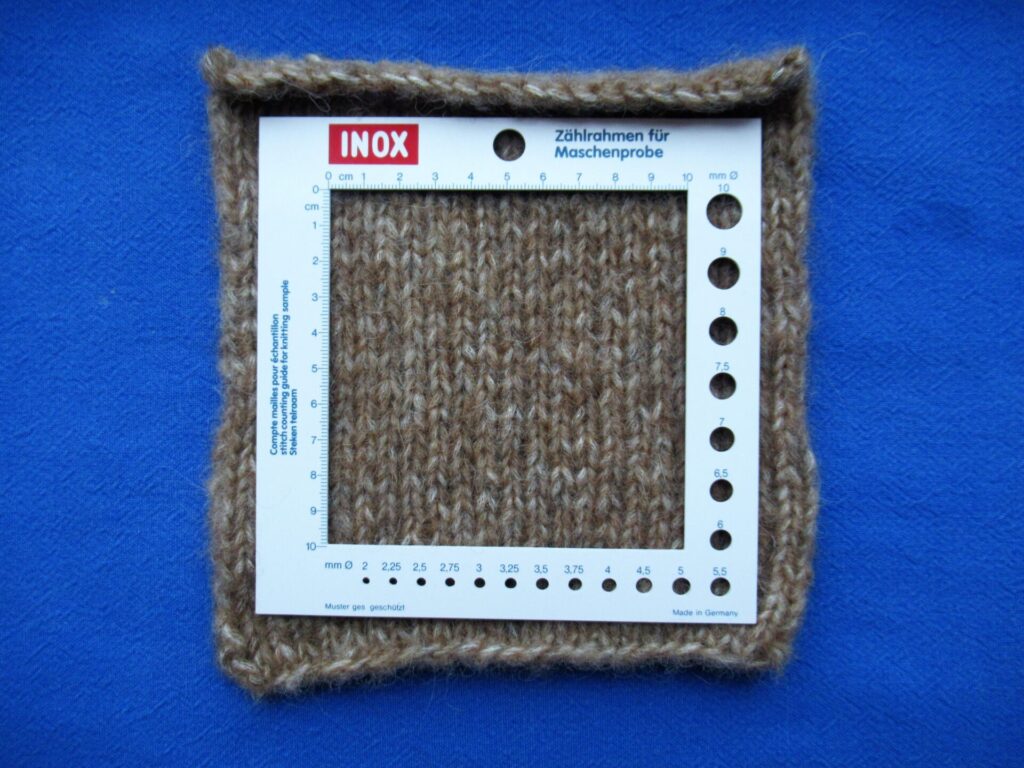
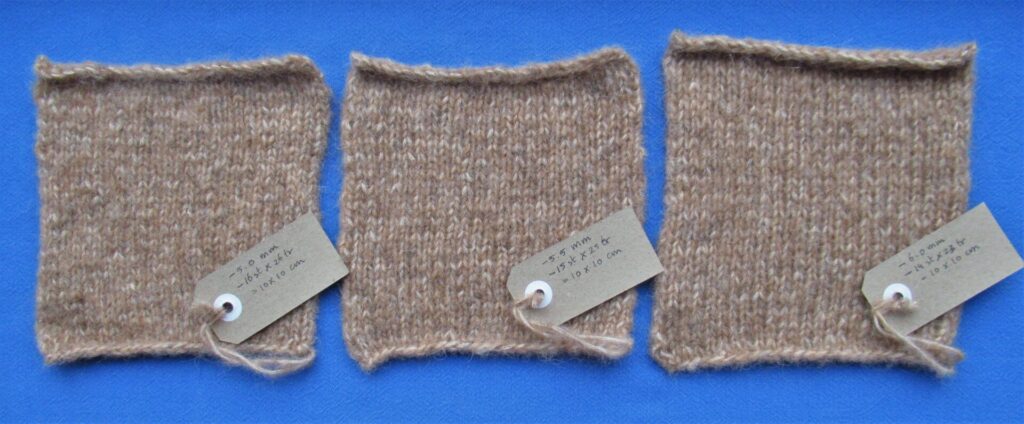
The ball band didn’t give any clues about needle sizes to be used or gauge suggestions, which is very unusual. So, I started swatching. I have a handy tool for determining how many rows and stitches go into 10 x 10 cm/4 x 4 inches.
It isn’t really necessary. A measuring tape will suffice, too, but it makes things easier.
I took the swatches along to our daughters place. She is way past the age that I buy clothes for her, and I never push any knitwear on people that they may not want. So my first question was, ‘Would you like a sweater in this yarn? I was thinking of a cardigan, but if you don’t like it, please feel free to say so and I’ll find a different destination for it.’
I was glad to hear that yes, she would love to have a cardi from this yarn.
Eco Soft is a brand-new yarn, and I soon found out that only 4 patterns using it have been published to date, all for children. I could have looked for a pattern in a similar yarn, but decided that it would be more fun to think up something myself. A bespoke cardigan, so to speak.
I thought it might be nice to show you how I go about it. (Fingers crossed that I’ll end up with a wearable cardi.)
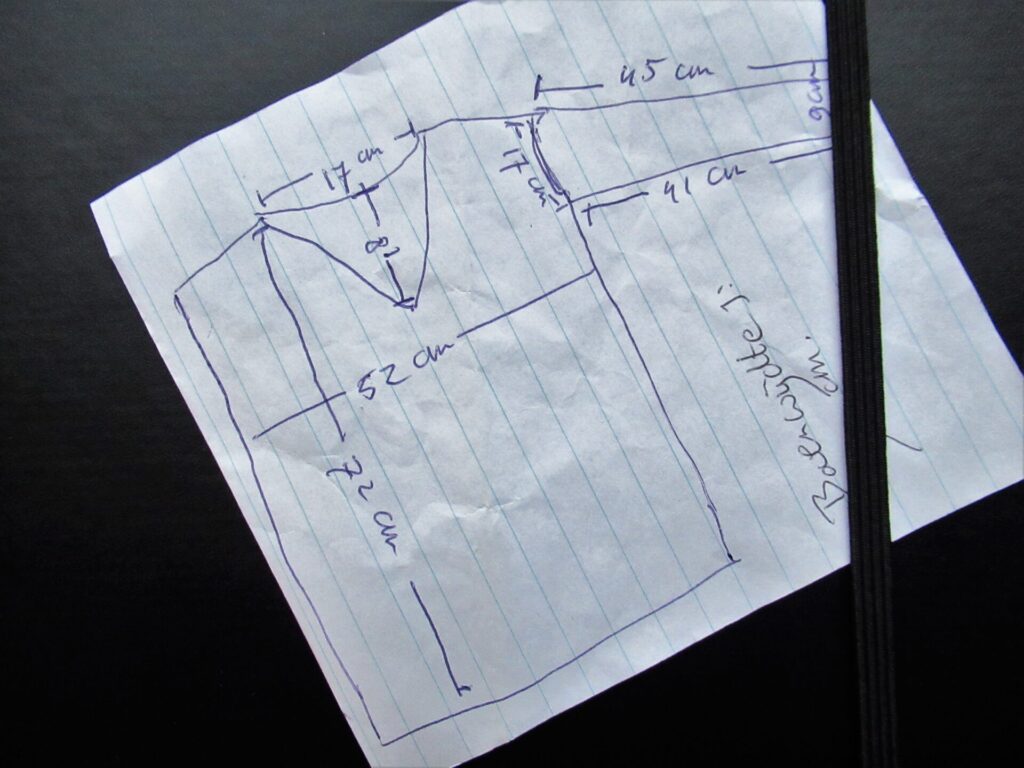
First, I quickly made a schematic drawing of a favourite, shop-bought sweater with approximately the kind of fit she wanted. It wasn’t a cardigan but a pullover and made from a very thin yarn, but that didn’t matter. This was just to get a general indication of the fit to aim for – oversized, but not hugely so.
I also asked her a few questions about shape, neckline etc, and these were the clues she gave me:
Simple
Stocking stitch
Straight silhouette (so no tapering, A-line or waist shaping)
No pockets
Round neckline
Buttons
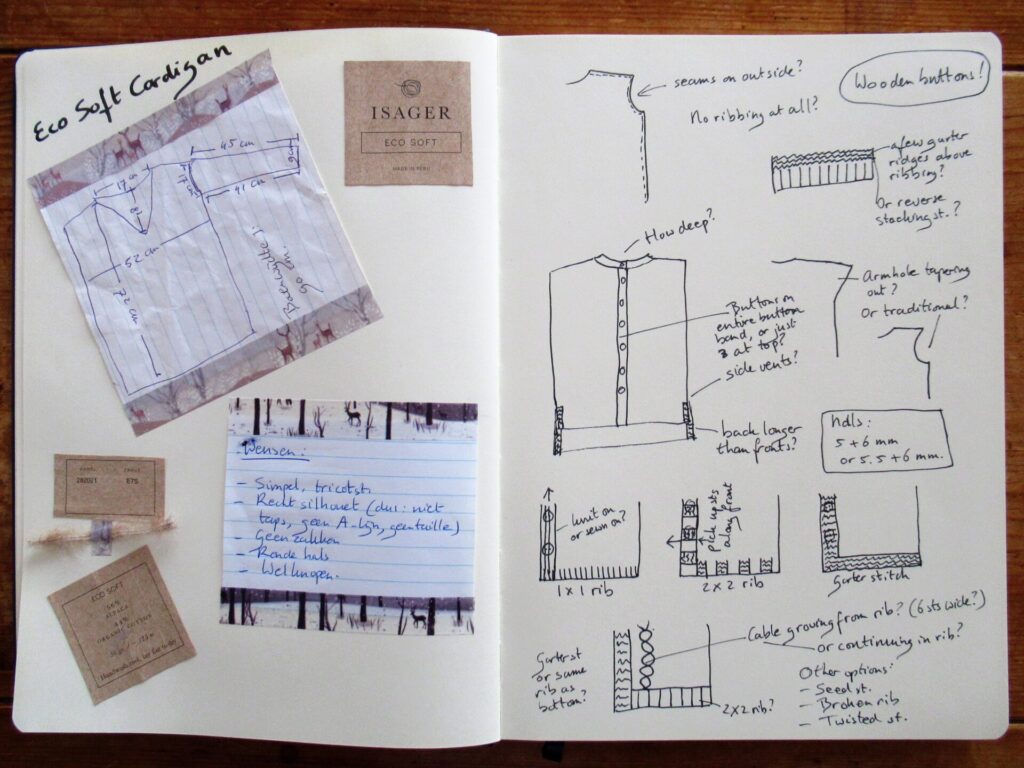
I have a sketchbook for brainstorming about knitting ideas, and these are the pages I made for this cardi.
Next steps: knit more swatches, make decisions.
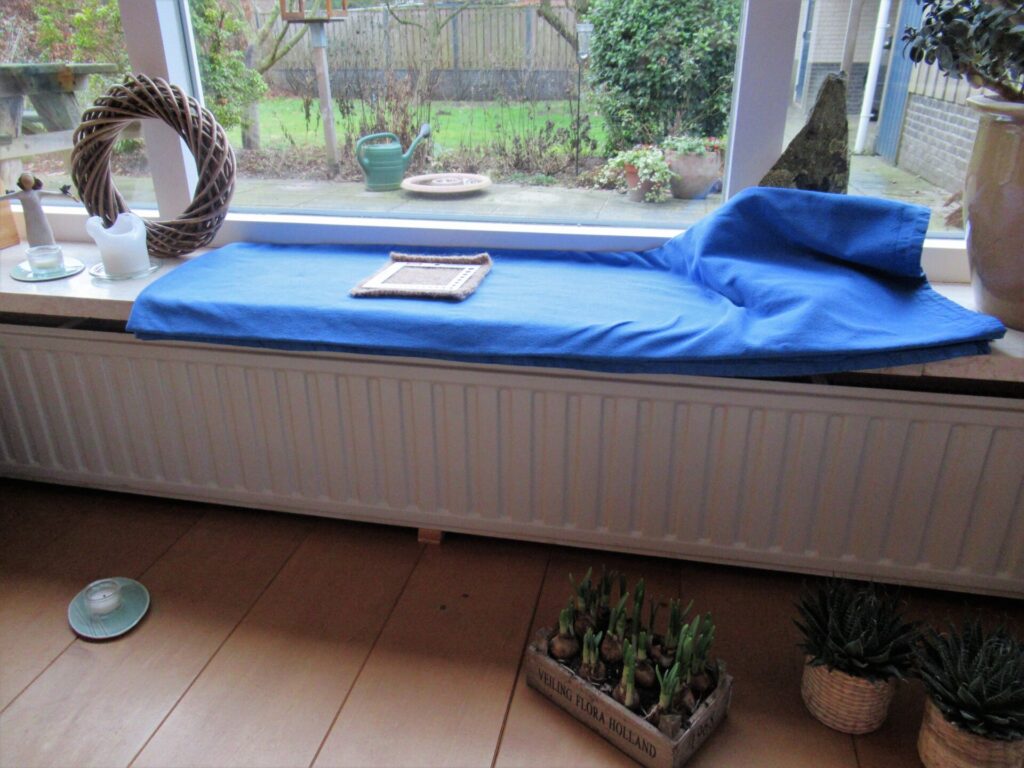
Many January days are so cloudy and dark that I often take my knitting outside to photograph it. This time, I removed some plants and things from the window sill, and covered it with a folded table cloth. It is the lightest place inside and fine for photographing small items.
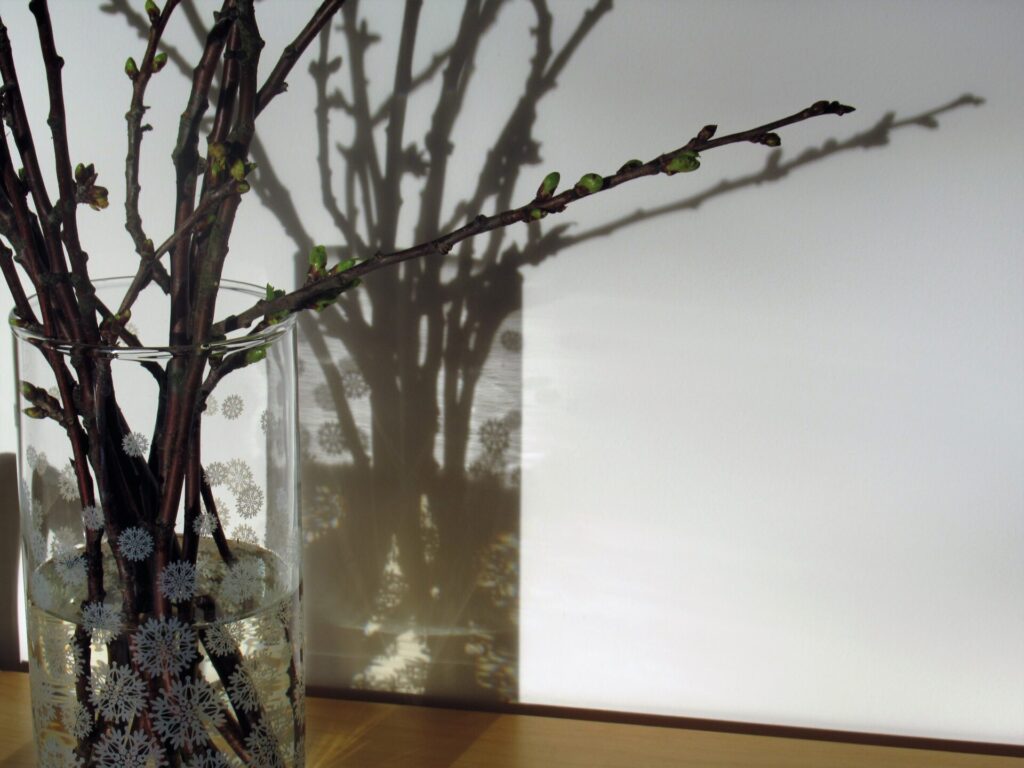
Fortunately, those dark days are interspersed with lighter and sometimes even sunshiny ones. One morning, sunlight streamed through the windows and suddenly there were two vases of cherry branches – the real one and its shadow.
It’s always uncertain whether the buds on branches like these will open, but this time we were lucky. White cherry blossoms against a white wall – simply beautiful.
I’ll tell you more about the cardi-with-a-few-clues-now when I’ve made some progress. Bye for now and take care!
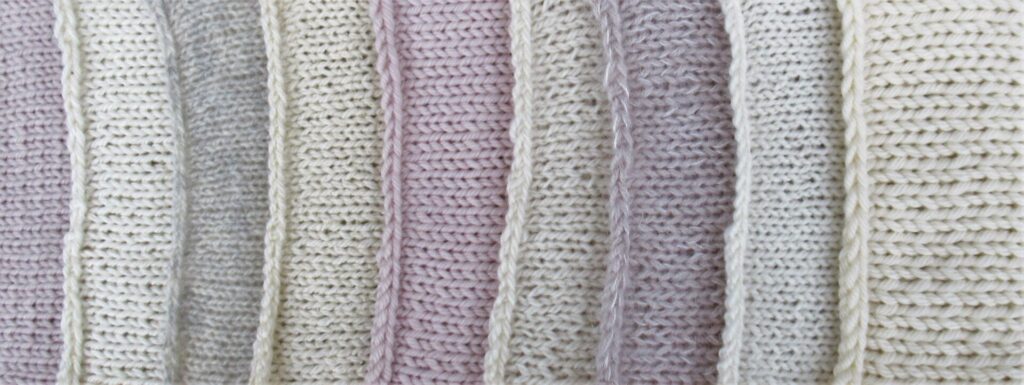
Today’s post isn’t about UFOs, FOs, WIPs*, or even about starting a new knitting project, but about the stage before that. It’s about exploring and studying yarns.
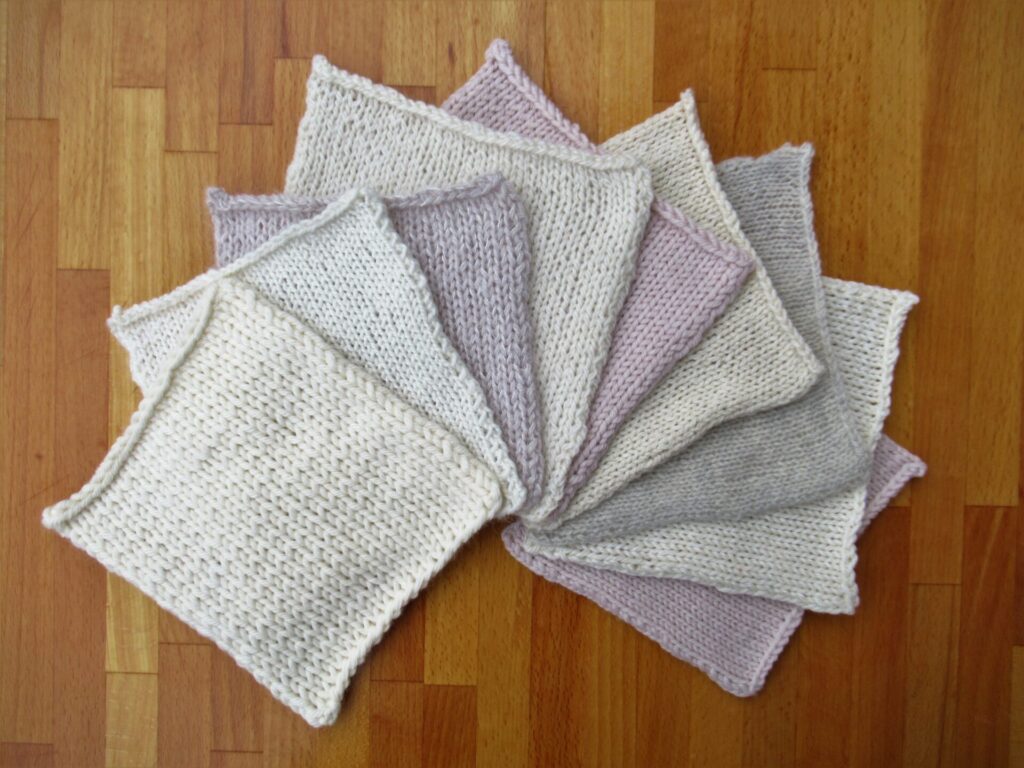
The yarns I’m trying out at the moment are all organic or otherwise sustainable. Over the past few years, I’ve picked up a ball here, a skein there in yarn shops and at crafts fairs. Now I’ve finally taken the time to knit swatches with some of them. Here is a first impression.
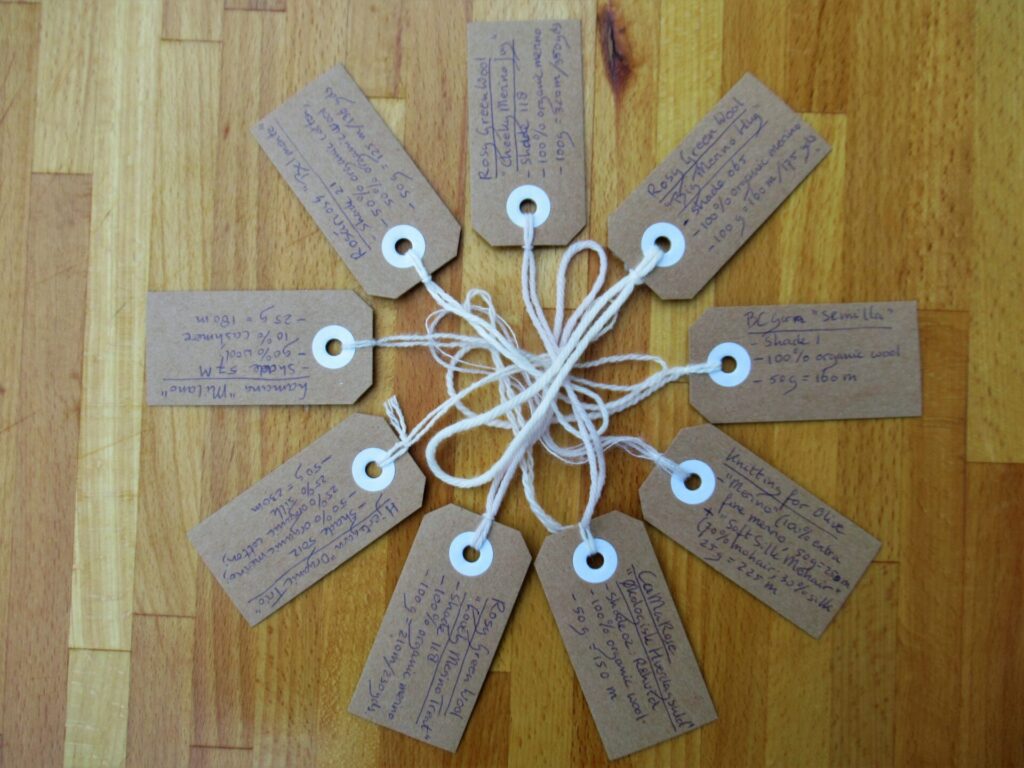
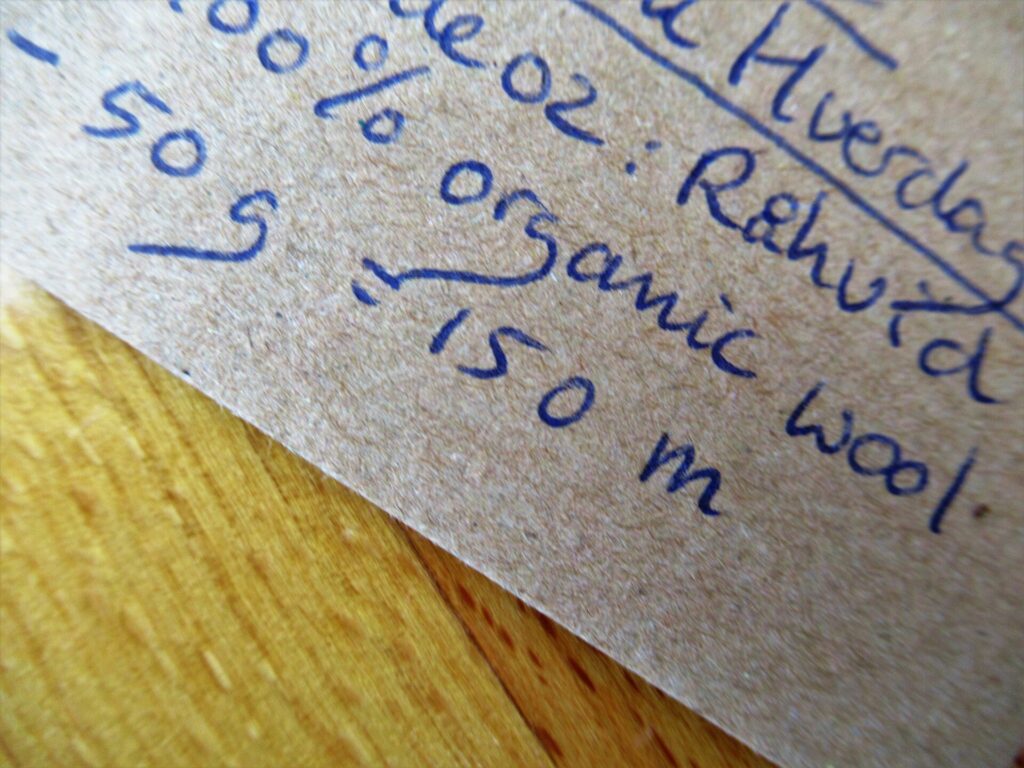
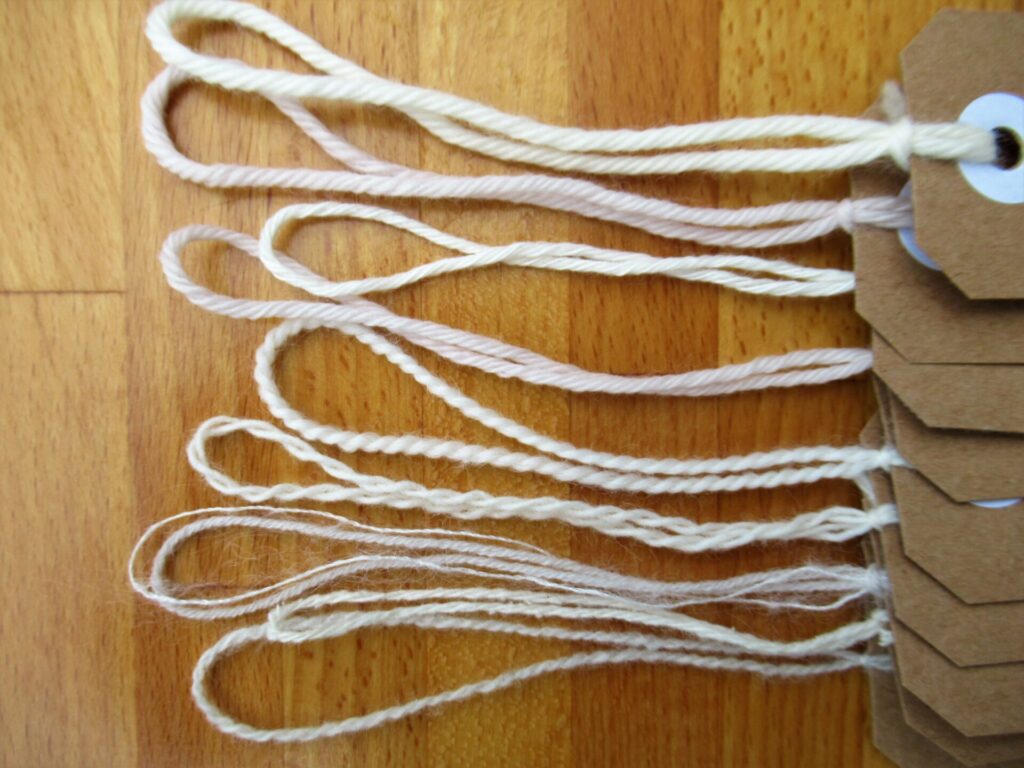
I label all my swatches.
On the front I write information about the manufacturer, yarn name, fibres, weight, and meterage/yardage. On the back I add info about the needles used and gauge.
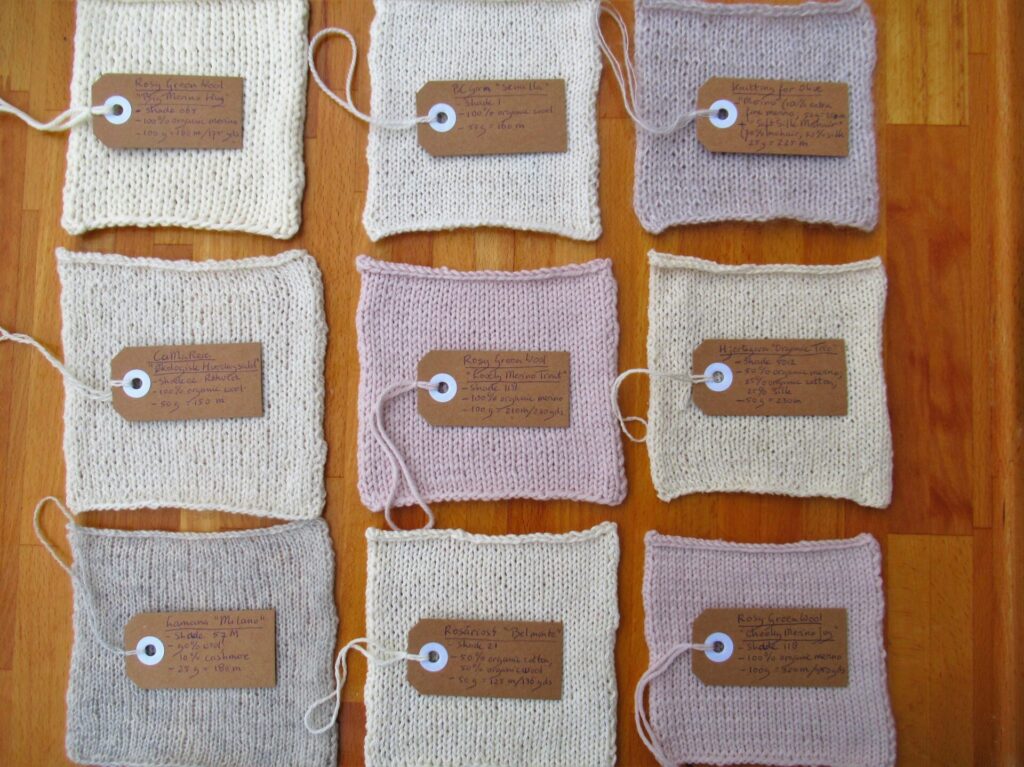
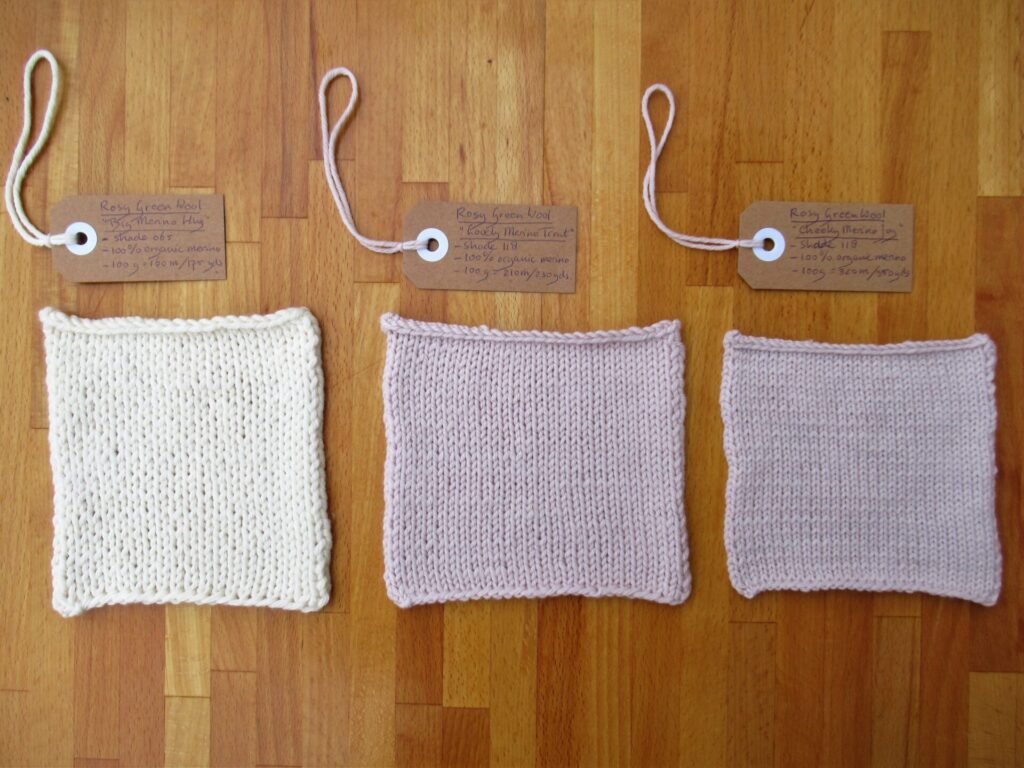
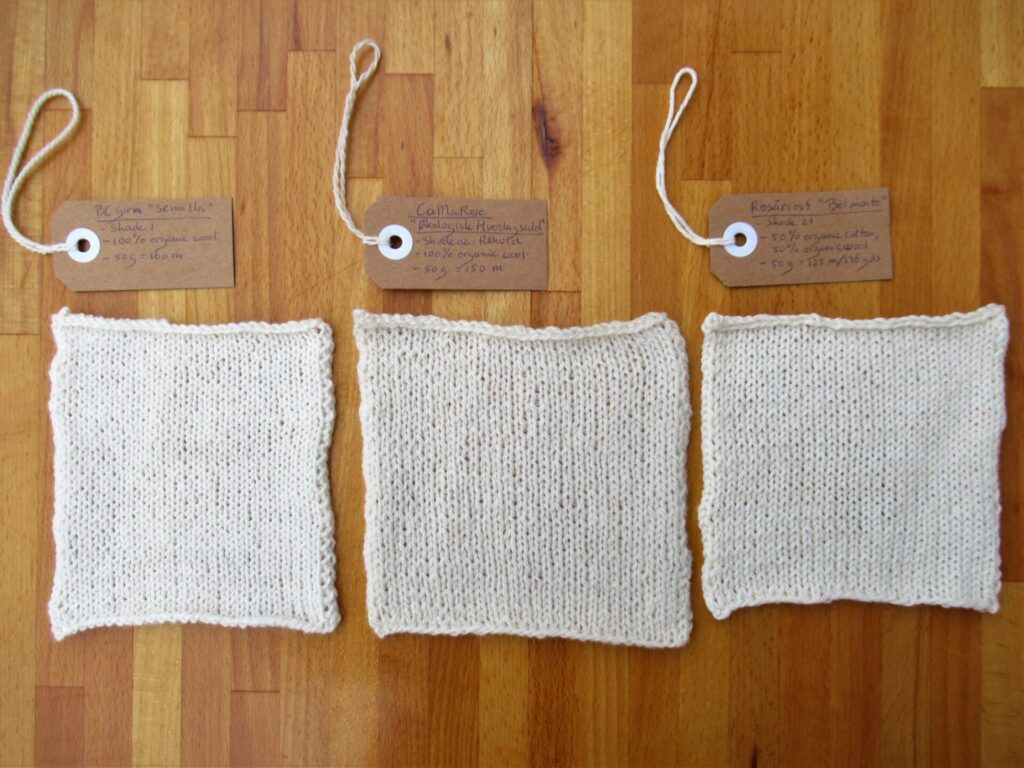
Below, the yarns I’ve tried out so far (from left to right).
To start with, Rosy Green Wool ‘Big Merino Hug’, ‘Lovely Merino Treat’ and ‘Cheeky Merino Joy’:
Knitting for Olive ‘Merino’ + ‘Soft Silk Mohair’ (held together), Hjertegarn ‘Organic Trio’ and Lamana ‘Milano’:
BC Garn ‘Semilla’, CaMaRose ‘Økologisk Hverdagsuld’ and Rosários4 ‘Belmonte’:
CaMaRose ‘Snefnug’ on 3 different needle sizes:
These are some of the questions I’m asking myself about my Sustainable Swatches:
Do I like this yarn?
How do I like this yarn on this needle size?
Which yarns will be most suitable for colour work, cabling, knit-purl stitch patterns, lace?
Does the yarn feel stable, elastic, drapey?
Which of these would I choose for a shawl, sweater, mittens?
Are any of these yarns suitable for baby things?
And also:
How do I go on from here?
I’d love to hear from you if you have experience with any of these yarns, or suggestions for other sustainable yarns to try. Or if you have a question, or just feel like saying hello.
xxx
* UFO = UnFinished (knitting) Object; FO = Finished Object; WIP = Work In Progress
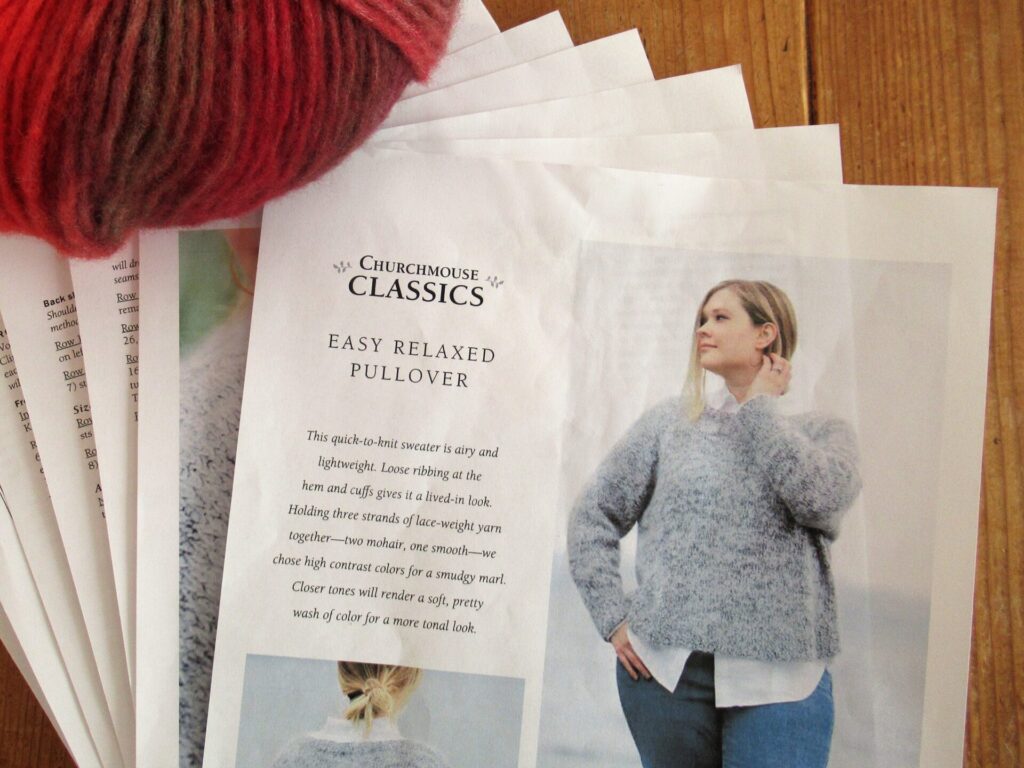
Easy and relaxed – doesn’t that sound like music to your ears? Life would be boring without any excitement or puzzles to be solved, of course. But as someone who tends to overcomplicate things and is far from laid-back, I often yearn for things to be easy and relaxed. So, how could I resist a pattern called Easy Relaxed Pullover?
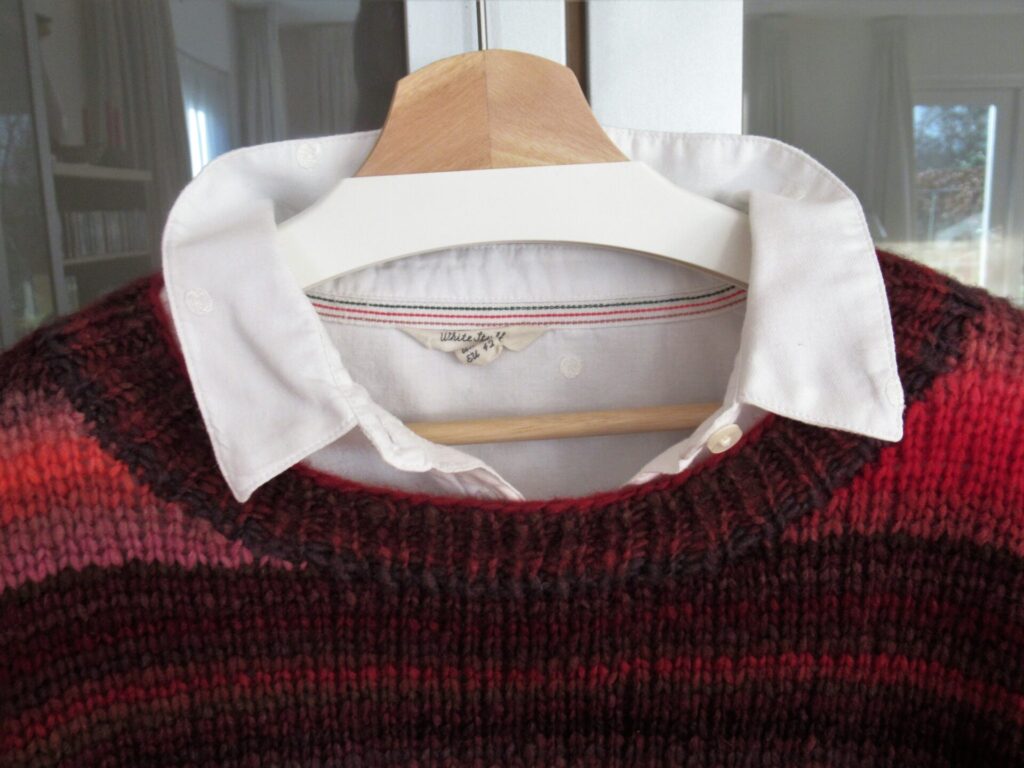
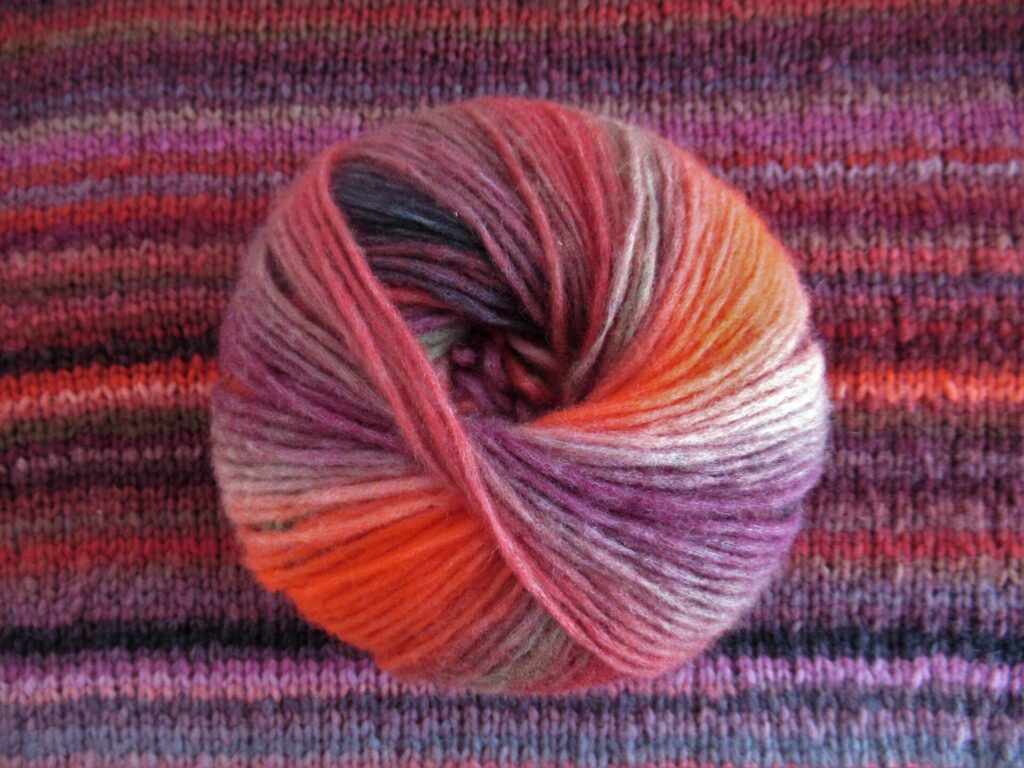
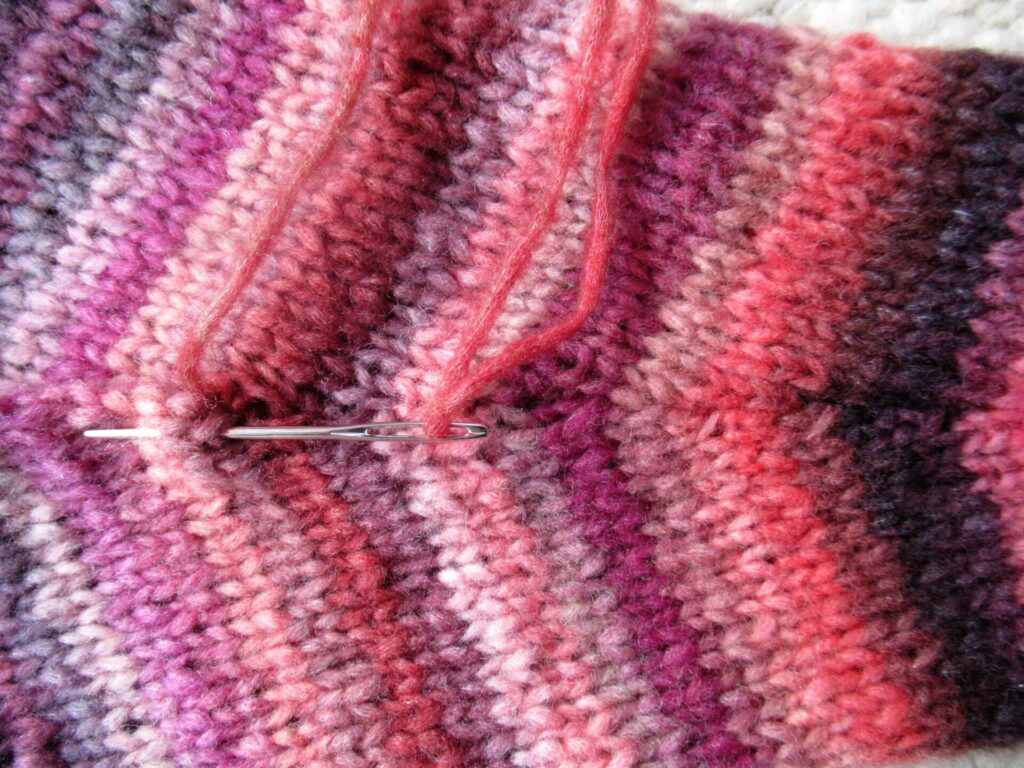
The original version is knit with 3 lace-weight yarns held together. I knit mine with one strand of a colourful bulky yarn.
It is Cloud from Lang Yarns, and is one of those new light-weight ‘blown’ yarns. One of the balls had a couple of knots in it, but on the whole, I am happy with the quality. I considered cutting the neon pink and bright orangey-red bits out, but I’m glad I didn’t.
It was a quick, fun, light-hearted project. The pullover is knit from the bottom up. The shoulders are joined with a 3-needle bind-off. Stitches are picked up for the sleeves, and those are knit from the shoulder down.
I seamed the side and sleeve seams using mattress stitch, worked from the outside. The stripes do not match up at the sides of the body at all, and that’s fine by me. But I did match up the stripes neatly on the sleeves.
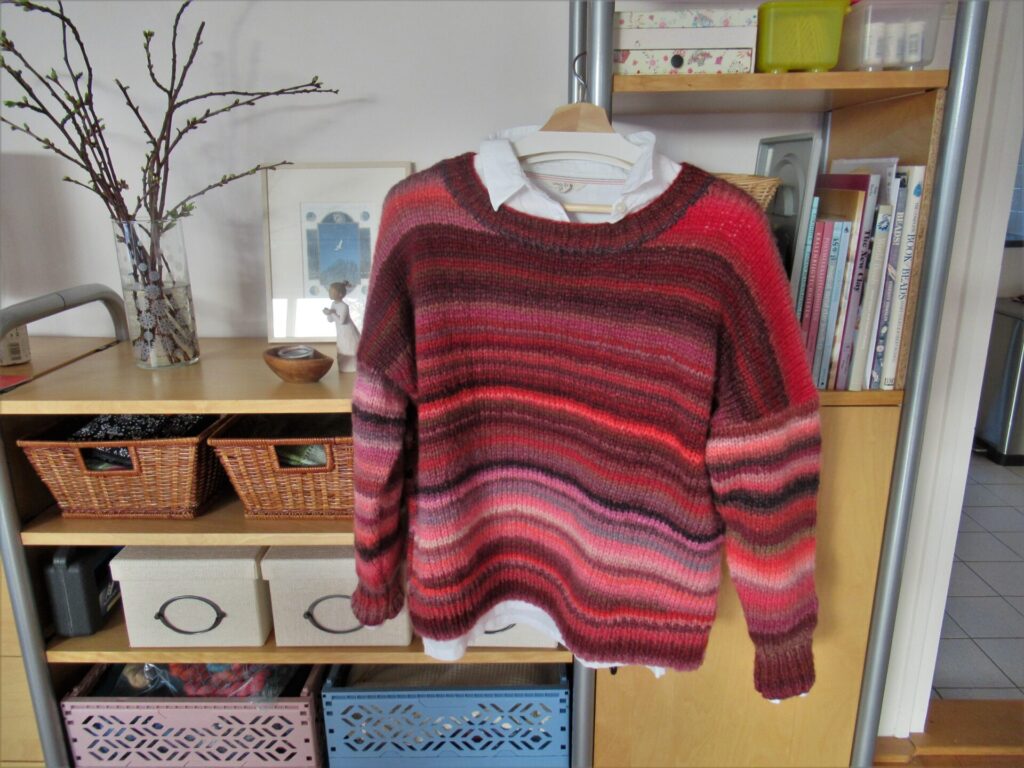
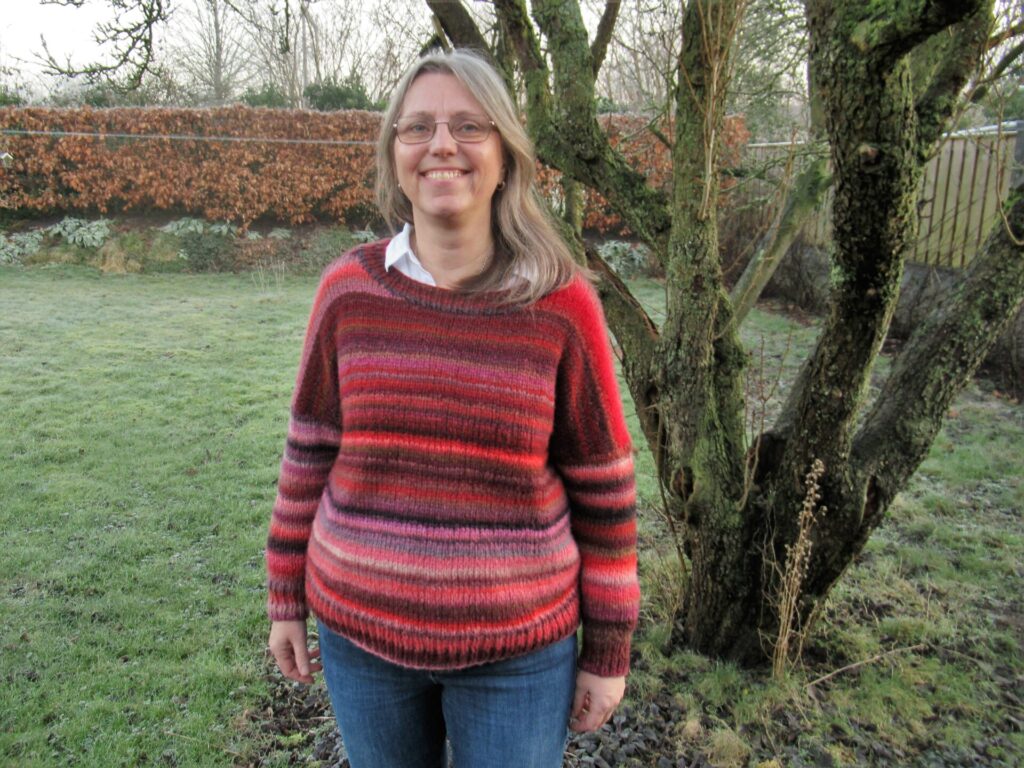
At first I thought I’d take the easy way out and just show you the pullover on it’s own. But how will you know how it fits without seeing me wearing it? So here we go, first the front:
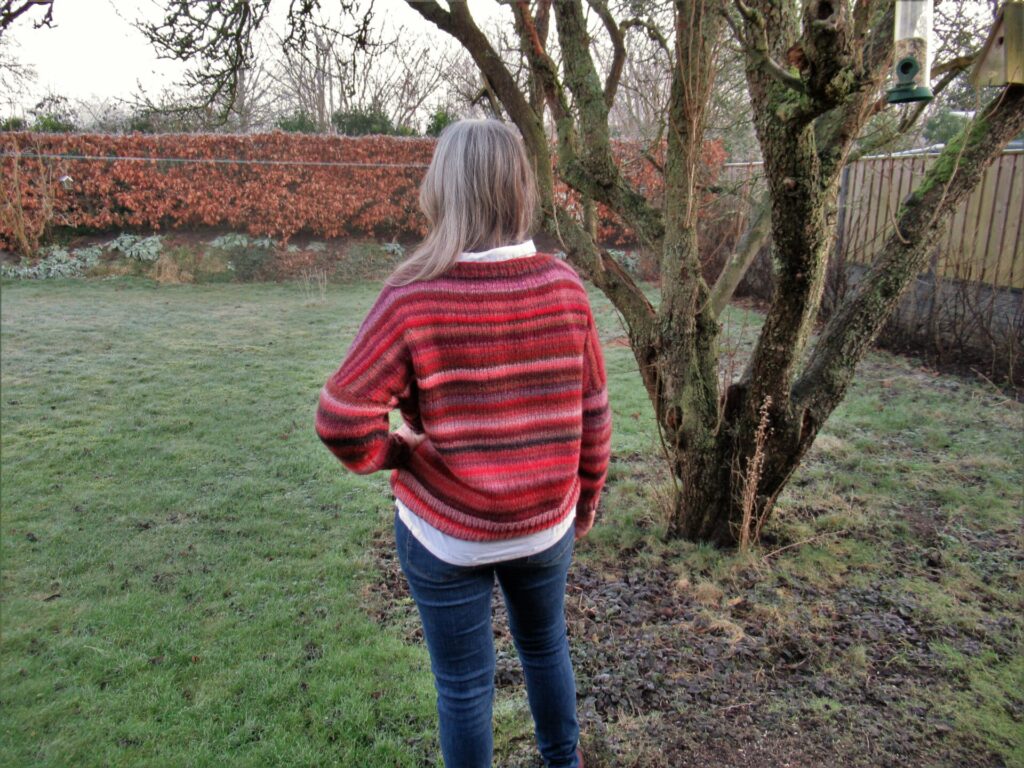
And then the back:
As you can see, it has a very relaxed fit, with arm’holes’ tapering out, which is why the sleeves start halfway on the upper arm. So, that explains the ‘relaxed’ part of the pattern’s name. As for the ‘easy part’, this is a very easy knit. Because of the short rows at the hem and the shoulders not very-first-knit-ever easy, but easy enough for a knitter with a little experience.
‘Work from home unless it’s absolutely necessary to attend in person’ is still the norm here. Some people seem to thrive on working from home while others struggle. I’ve worked from home for most of my adult life, and think I’m somewhere in between. I know all about the pros as well as the cons, and if there is one piece of advice I can give, it is this:
Go for a walk every single day!
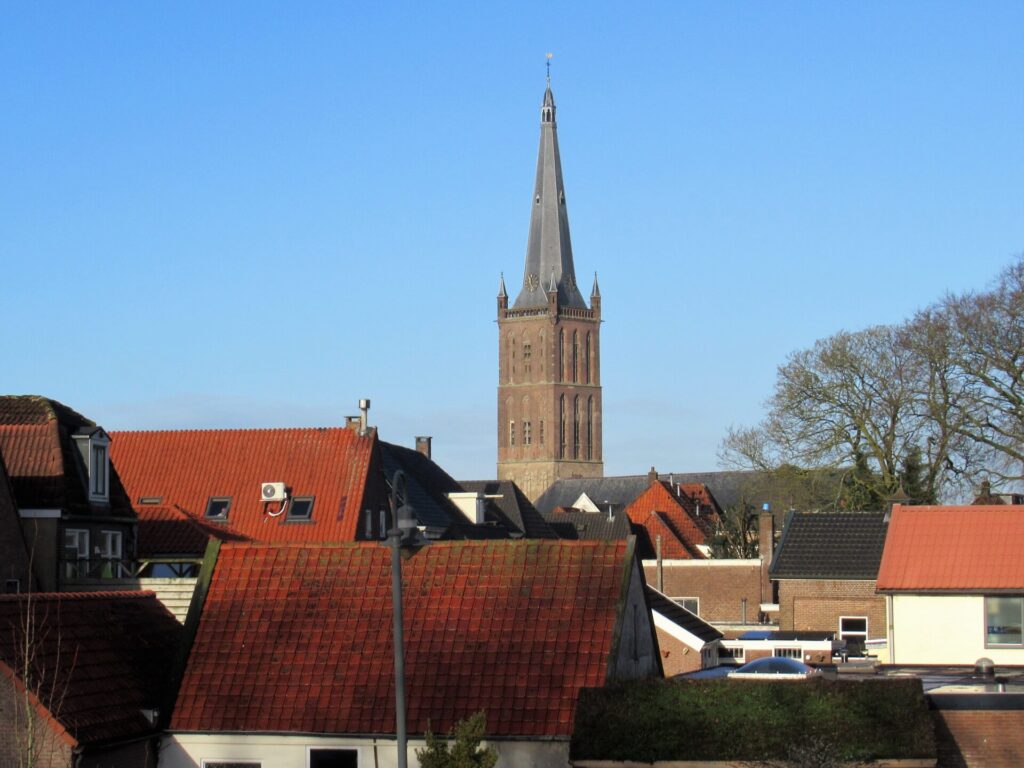
For some variation in my daily walks, I combined an errand in the town of Steenwijk with a walk and brought my camera. For anything but basic groceries we cycle to Steenwijk, and we can see its church steeple in the distance on most days.
Steenwijk is also the town of the historic house of last-week’s pop-up card. I passed by its art nouveau entrance gate.
This is by no means an easy and relaxed time for many. First of all, I’m thinking of everybody who is ill or has a loved one in hospital, and our hard-worked care-workers. Other groups that are hit hard are those working in cafés and restaurants, and shopkeepers.
Like just about everything else, all non-essential shops have been closed again since the mid-December.
Blessed is the country that considers flower shops essential.
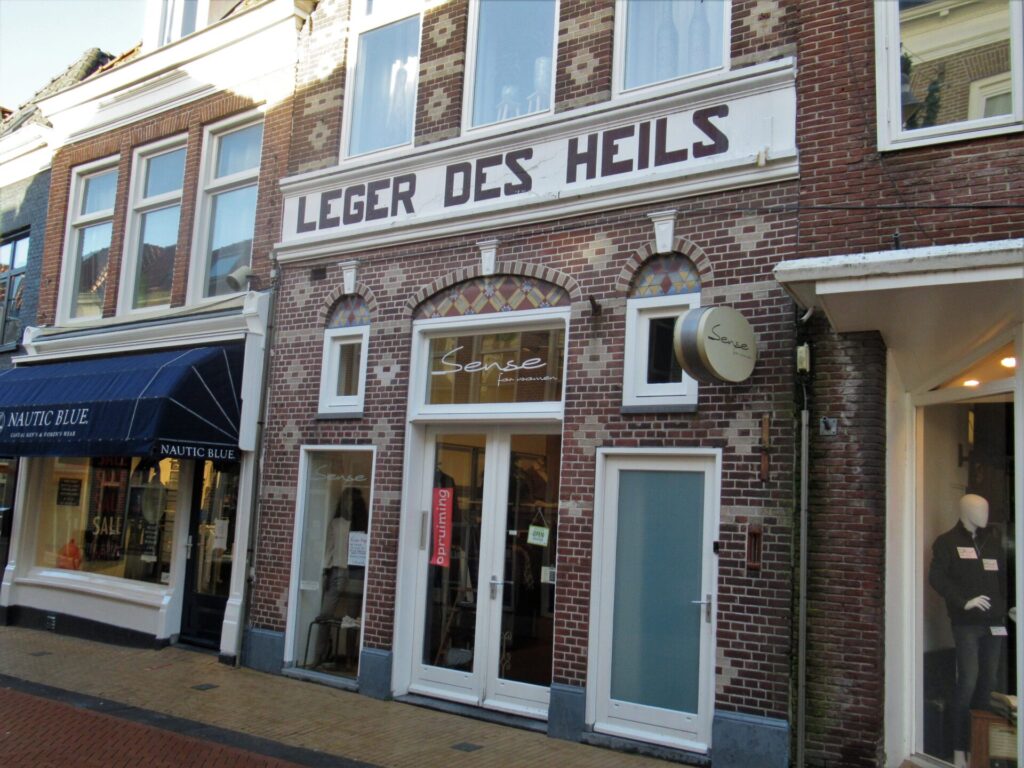
It’s strange to walk through the quiet streets. I notice different things, too. This shop is my first port of call when I need new clothes:
A funny detail I’ve never noticed before is that the building used to belong to the Salvation Army.
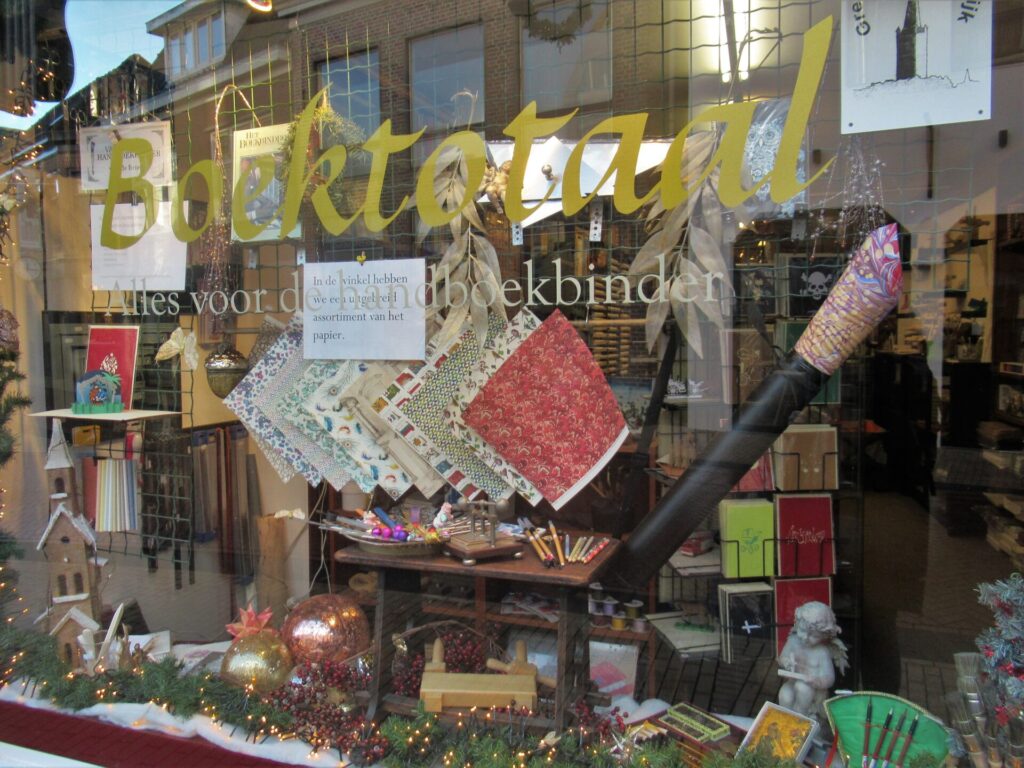
And here is something that I know will interest at least one of you reading this:
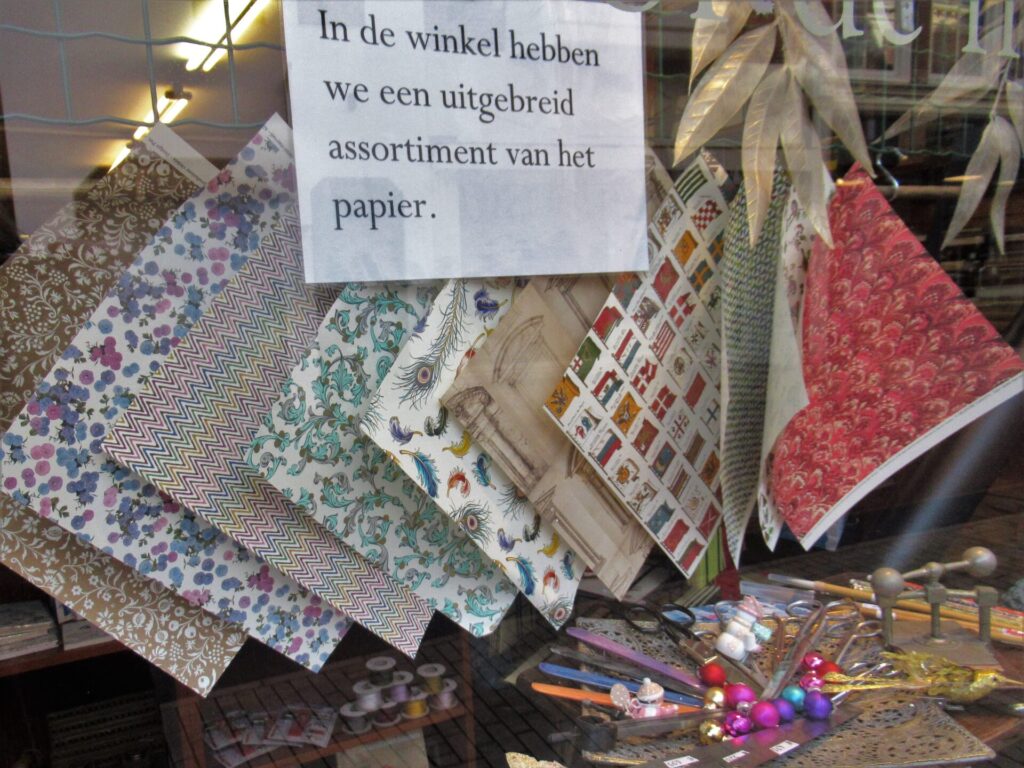
This little shop no longer sells second-hand books, but is now focusing completely on bookbinding materials and tools. I try to support our local shops as much as I can. And one of the small ways I can do that is by giving you a link to this shop’s website. Do pay it a visit if you’re interested in bookbinding or beautiful papers. There is a little flag at the top of their website for an English or German version.
I’m hoping for some good light this weekend to photograph the swatches I’ve been knitting. If all goes well, I’ll write about those next week. Hope to see you again then!
First of all, Happy New Year! It’s a bit late, I know, but I still want to wish you all the best for 2022.
We’ve had an uneventful but nice and relaxing week, and I hope you’ve had a good time, too. My Christmas Break knitting project is almost finished. I’ll share that with you next week when it’s all done (I hope).
What I’d like to share with you today is the recipe for knieperties, paper-thin waffles that are traditionally served on New Year’s Eve and Day in this part of the Netherlands. They can be eaten flat or rolled up. Similar ones are also baked in Germany, which isn’t all that far away from here.
Baking knieperties (pronounced something like kneepertees, with an audible k and stress on the first syllable) is a tradition passed on to me by a neighbour across the street. She baked stacks of them on New Year’s Eve for her extensive family and always brought us and other neighbours some, too. After she died about a decade ago, I decided to continue the tradition.
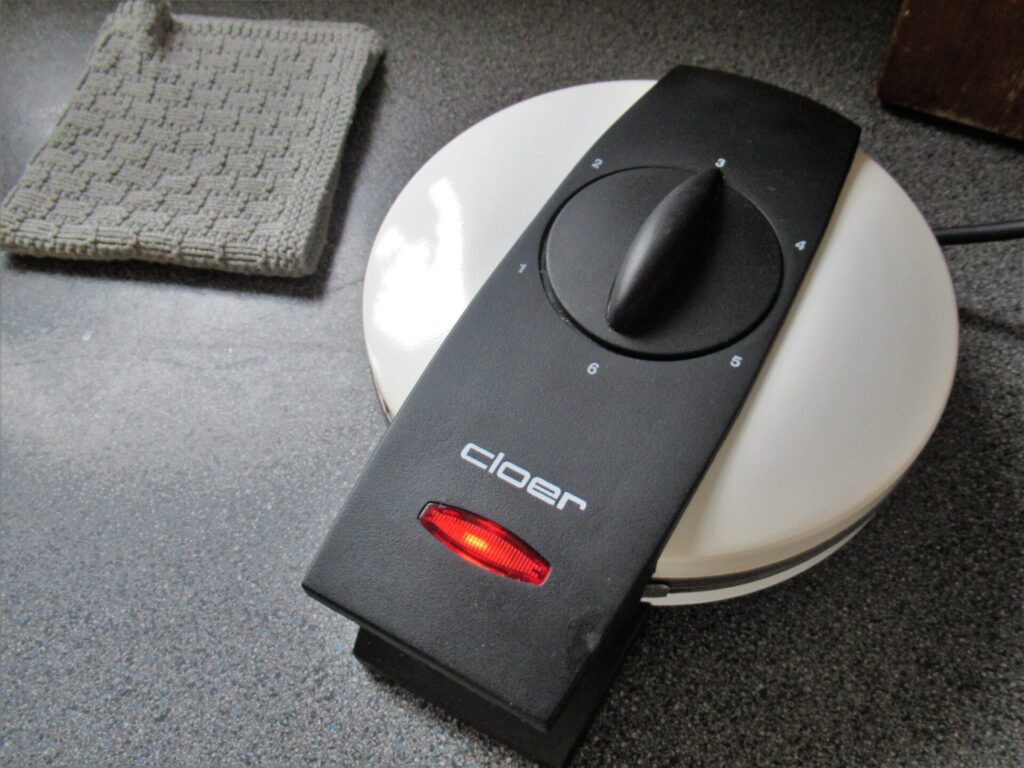
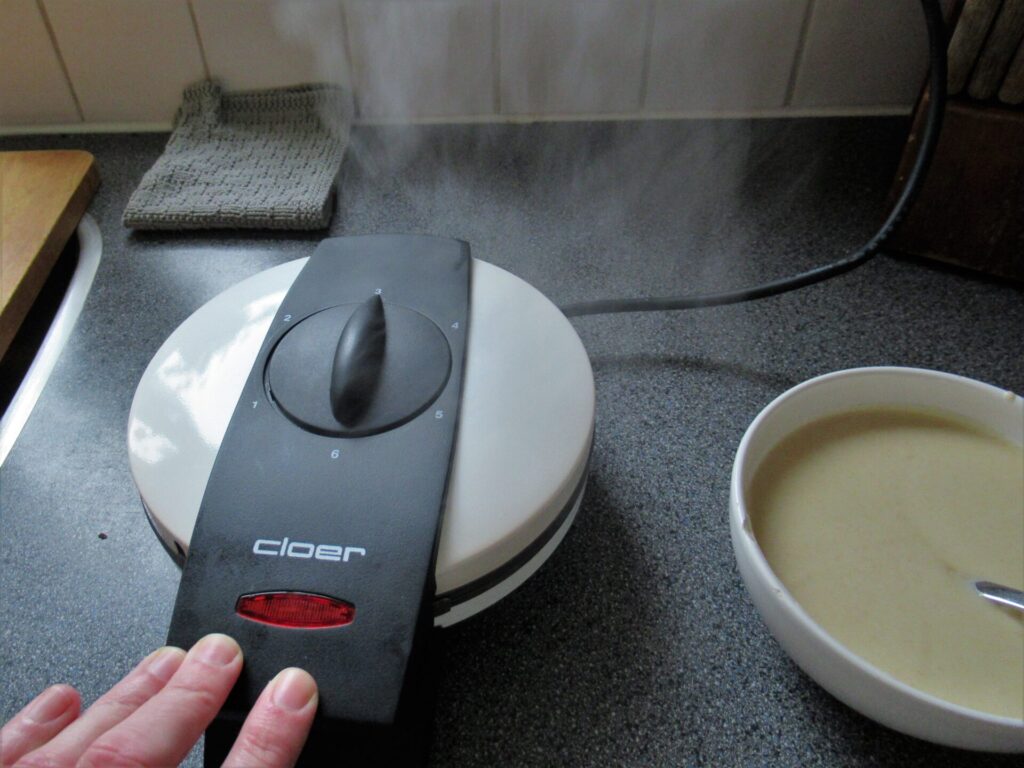
Traditionally knieperties were baked using a cast-iron waffle iron held over a fire, but nowadays everyone I know uses an electrical waffle iron. Mine is from German manufacturer Cloer.
INGREDIENTS: (makes about 100)
150 butter at room temperature
325 g fine caster sugar
2 eggs
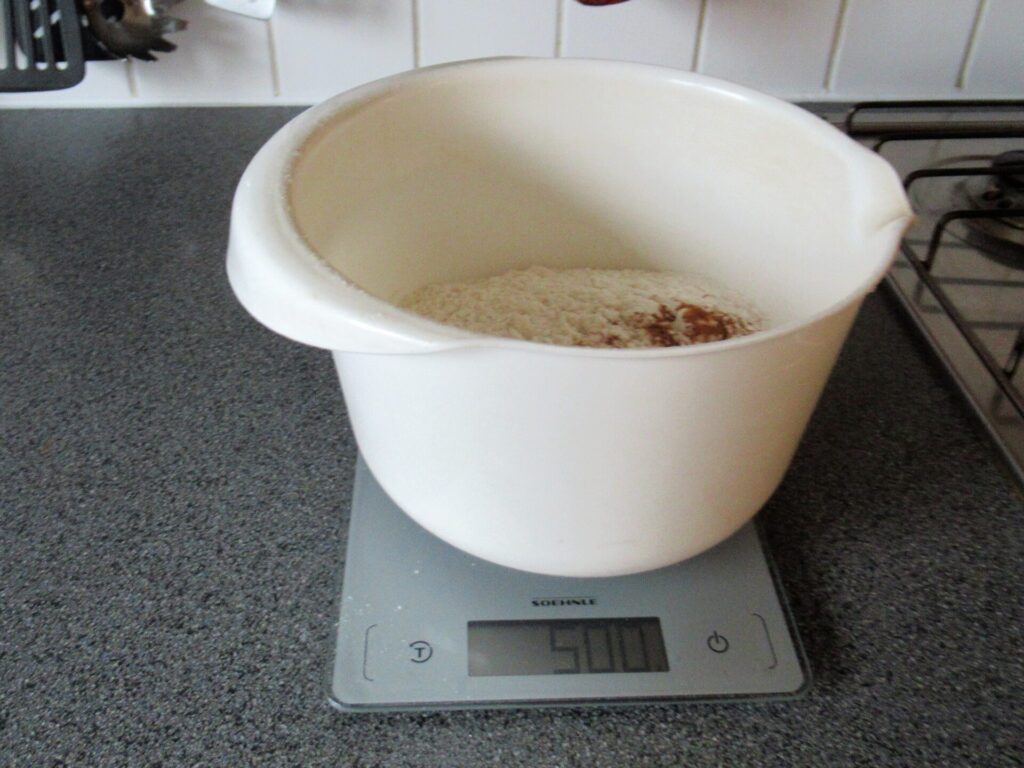
500 g flour
A pinch of cinnamon
600 ml lukewarm water
METHOD:
Cream the butter together with the sugar and the eggs.
Stir the cinnamon through the flour.
Add small quantities of flour and water alternately to the butter-sugar-egg mixture until everything is stirred in (the batter should be quite thin).
Preheat the iron for about 10 minutes until the little light switches off – heat setting 3 (middle top) works best for me.
Place one tablespoon of batter on the waffle iron. Close it and keep it firmly closed with your fingers. Hot steam will come out – take care not to burn your fingers!
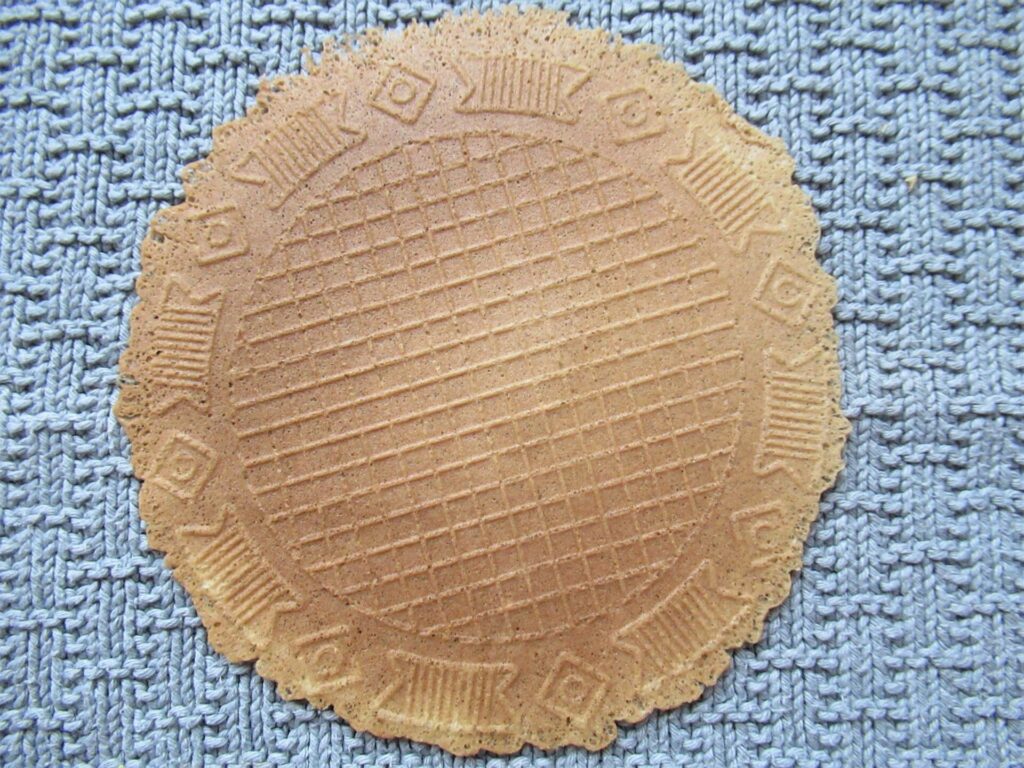
Open the iron when steam stops coming out. The waffle should now be a pale golden brown. Quickly transfer it to a chopping board.
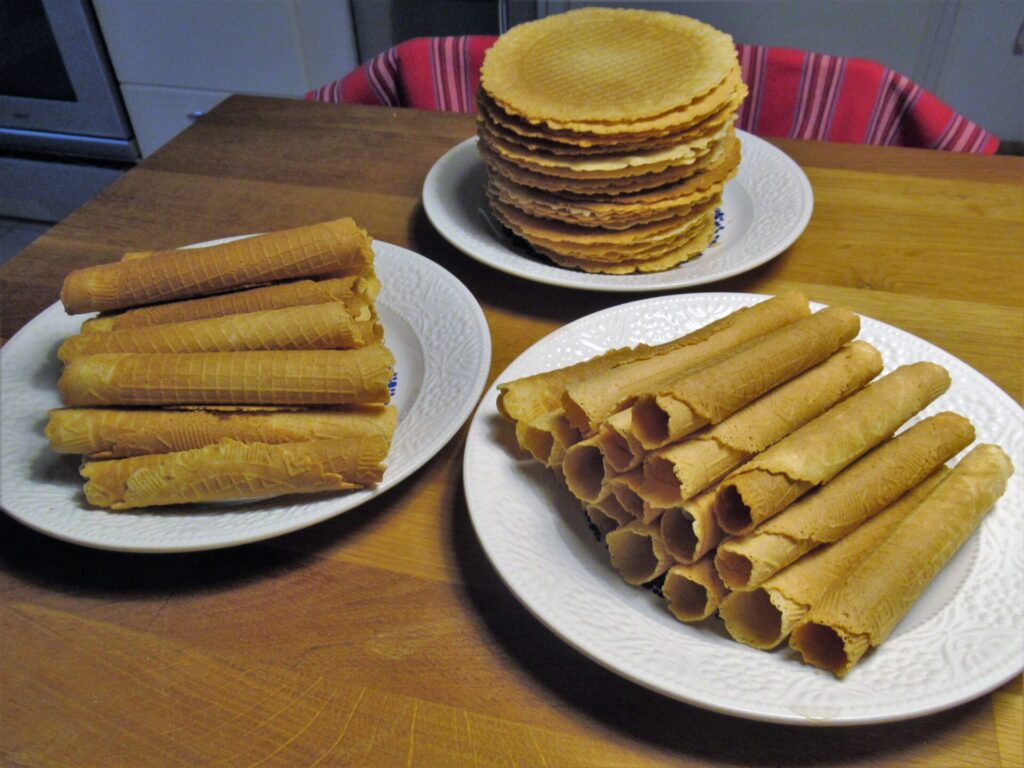
Leave to cool flat or roll up very quickly using the handle of a wooden spoon.
From start to finish, baking this quantity will take about 90 minutes to 2 hours.
Knieperties are deliciously crunchy and so thin that they are almost translucent.
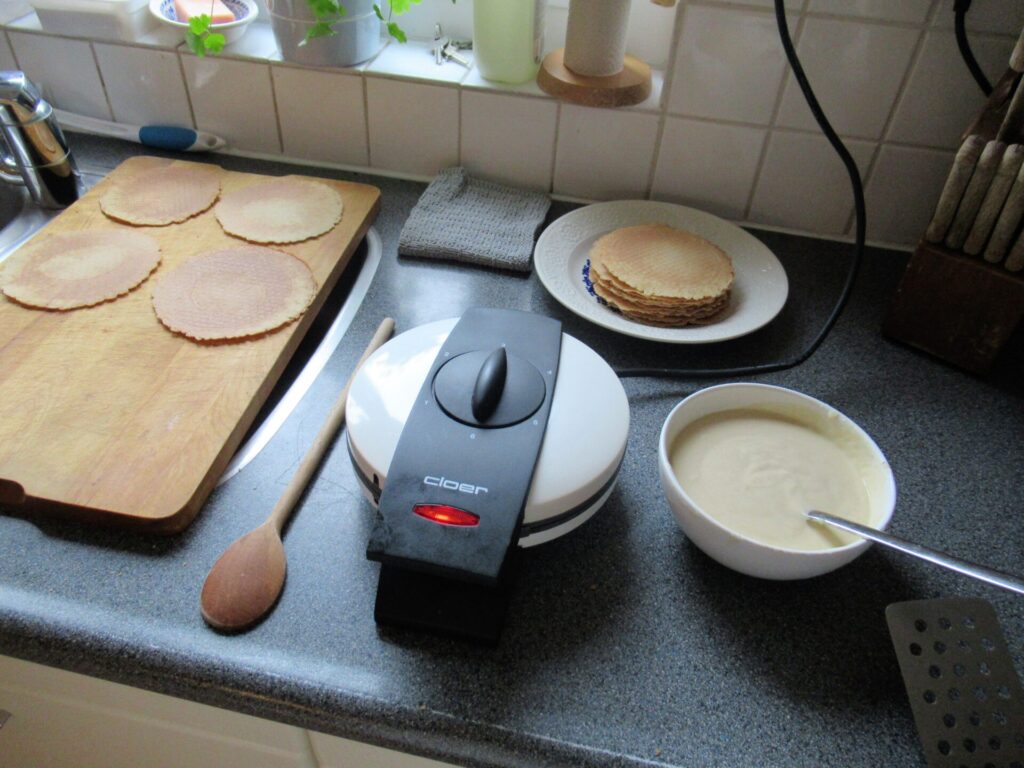
This is my set-up, with from left to right: chopping board for cooling knieperties, wooden spoon for rolling them, waffle iron, plate for stacking cooled knieperties, small bowl of batter (works easier than big mixing bowl; refill from time to time), pancake turner (bottom right-hand corner) for flipping knieperties from iron to board.
And this is the whole batch, excluding the ones that got eaten during the process. Rolled-up knieperties can be filled with whipped cream if you like.
In the pouring rain (we’ve had quite a bit of that here lately) I took them around to several neighbours. A great opportunity for catching up on the latest news.
Knieperties are not just served around New Year’s, but also on other special occasions.
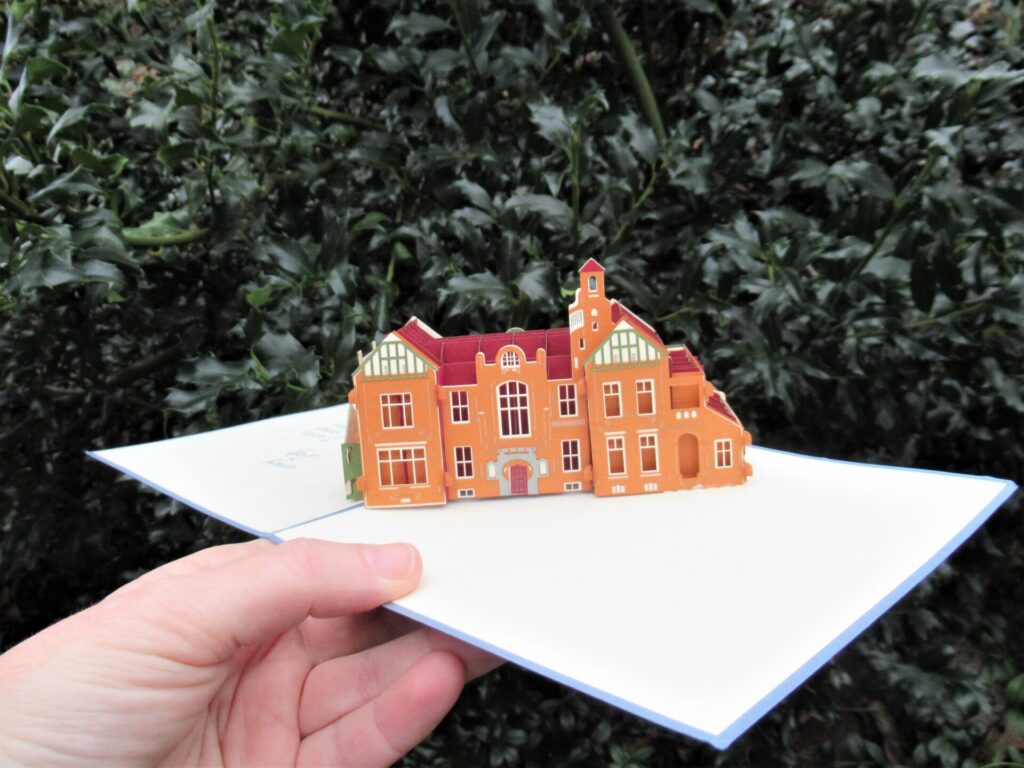
Instead of an ordinary Christmas card, dear friends sent us this:
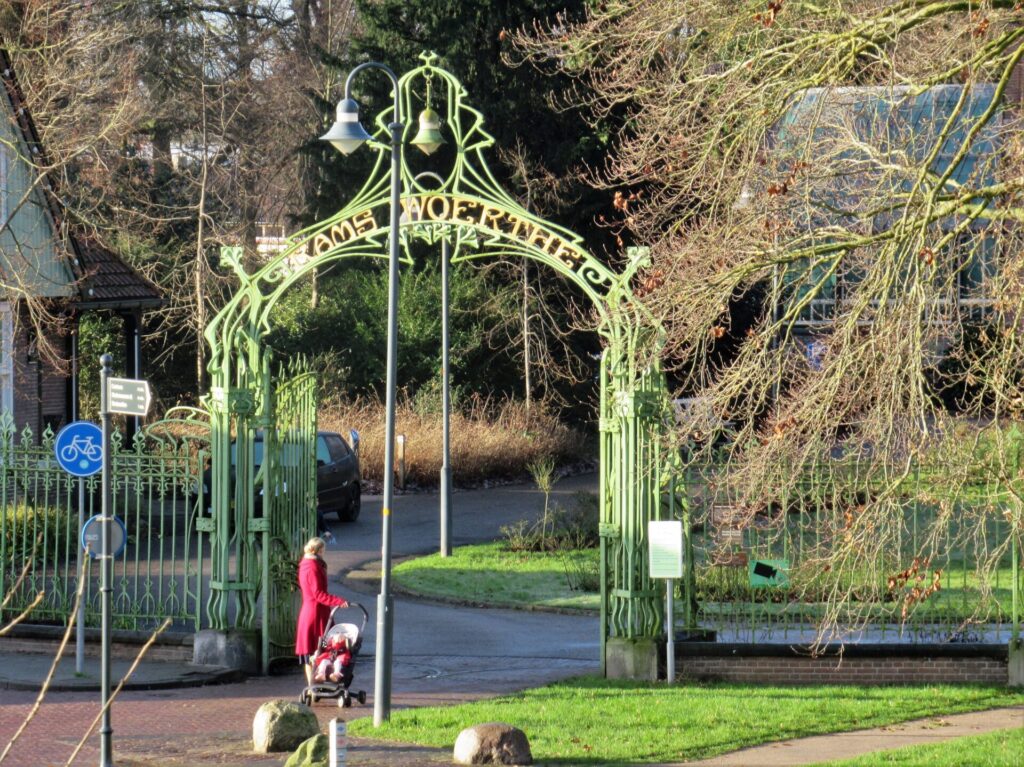
A wonderful pop-up card of Villa Rams Woerthe, a historic house in a nearby town. The last time we visited it, we were served tea and knieperties in the drawing room. ‘Must enjoy baking knieperties’ is high on the list of requirements for anyone who wants to work there as a volunteer.
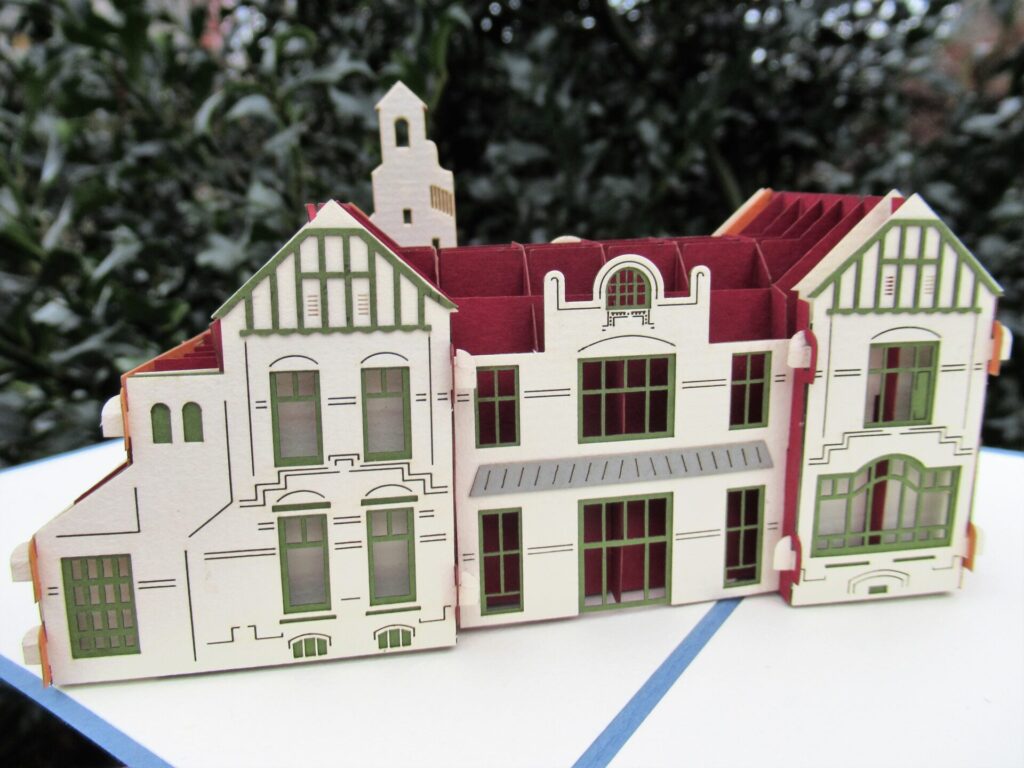
This is what it looks like from the back:
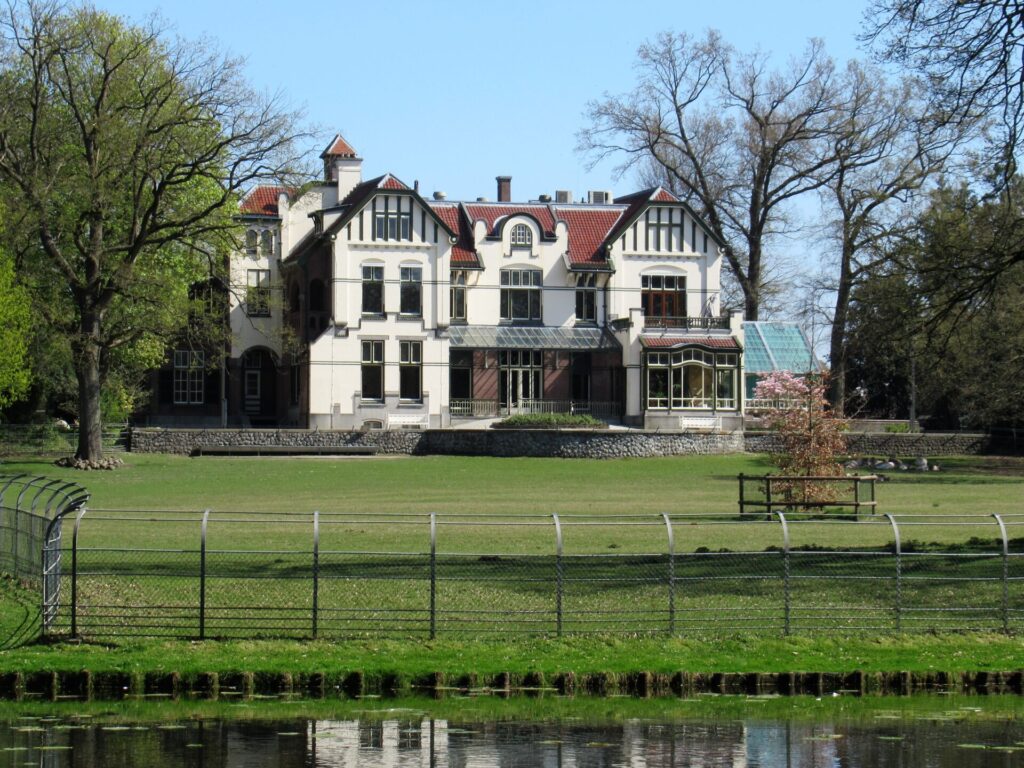
And this is what it looks like in real life (photo taken in spring):
I’d love to visit it again someday soon. Ah, so many plans and ideas for the New Year! I’ll try to share anything I think may be of interest and hope to ‘see’ you here often.
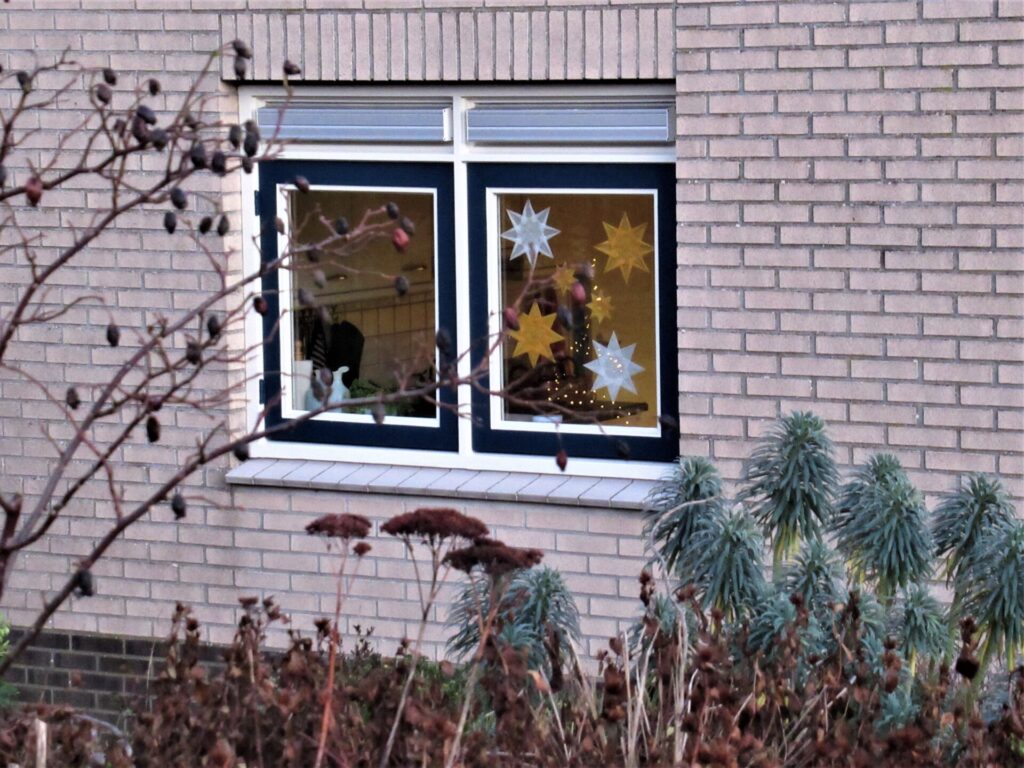
Hello, and welcome to the 3rd episode in the irregular series Places to Sit and Knit. For this Christmas special, I’m inviting you into our home. You’ll recognize it by the paper stars on the window.
What better place to sit and knit at Christmas than at home? Especially this Christmas. I don’t know what it’s like in your part of the world, but here in the Netherlands we’re in a strict lockdown again. Everything is closed, except essential shops (unfortunately the powers that be don’t count yarn shops among them) and other essential facilities. Let’s hope it’s enough to prevent black scenarios early in the New Year.
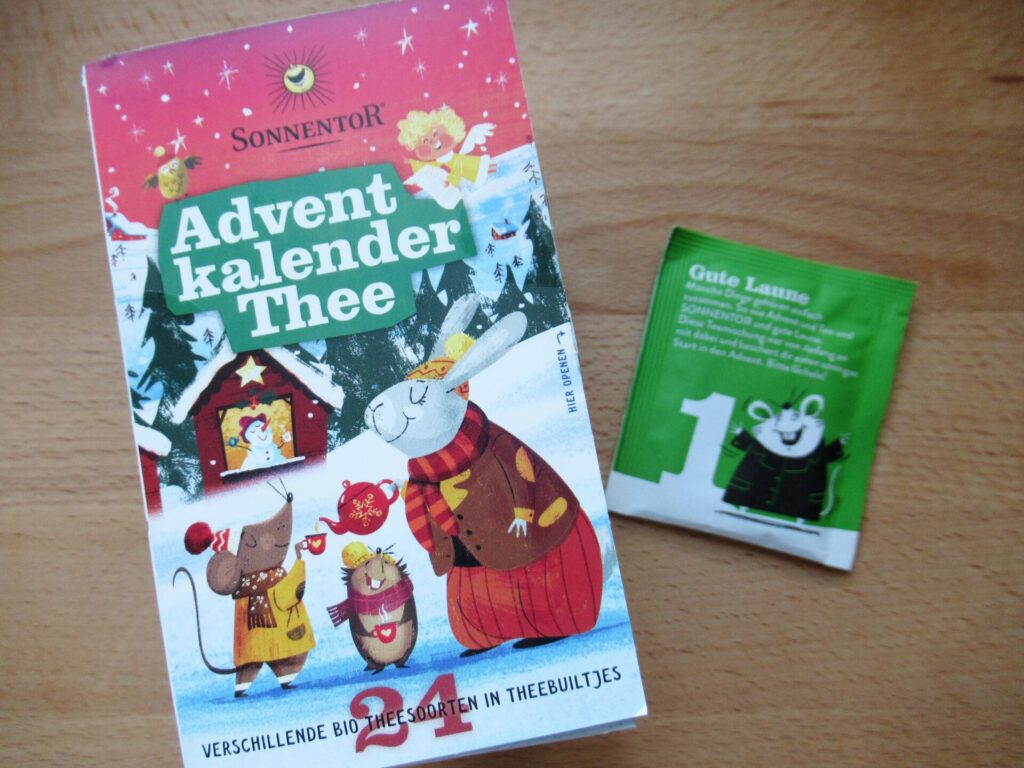
We’re only allowed 2 visitors a day (4 at Christmas) in real life. Fortunately the number of virtual visitors is unlimited, so come on in! Would you like a cup of coffee or tea?
I was given a box of Austrian Advent Calendar Tea at the end of November, filled with green, black, white and herbal teas. It started with Gute Laune (Good Mood) tea on December the 1st.
Today, the last offering is Heavenly Christmas Delight, a spicy blend with cinnamon, orange peel, apple and clove. It sounds delicious, don’t you think? Please take a seat while I make our drinks.
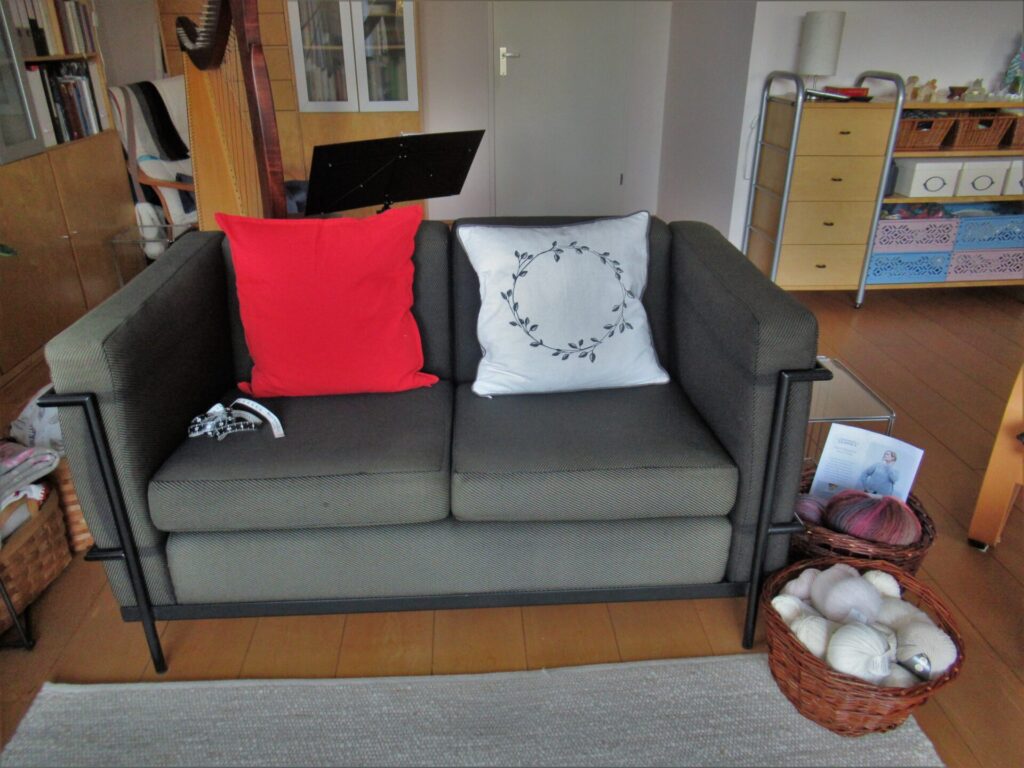
This is the sofa where I sit and knit at this time of the year.
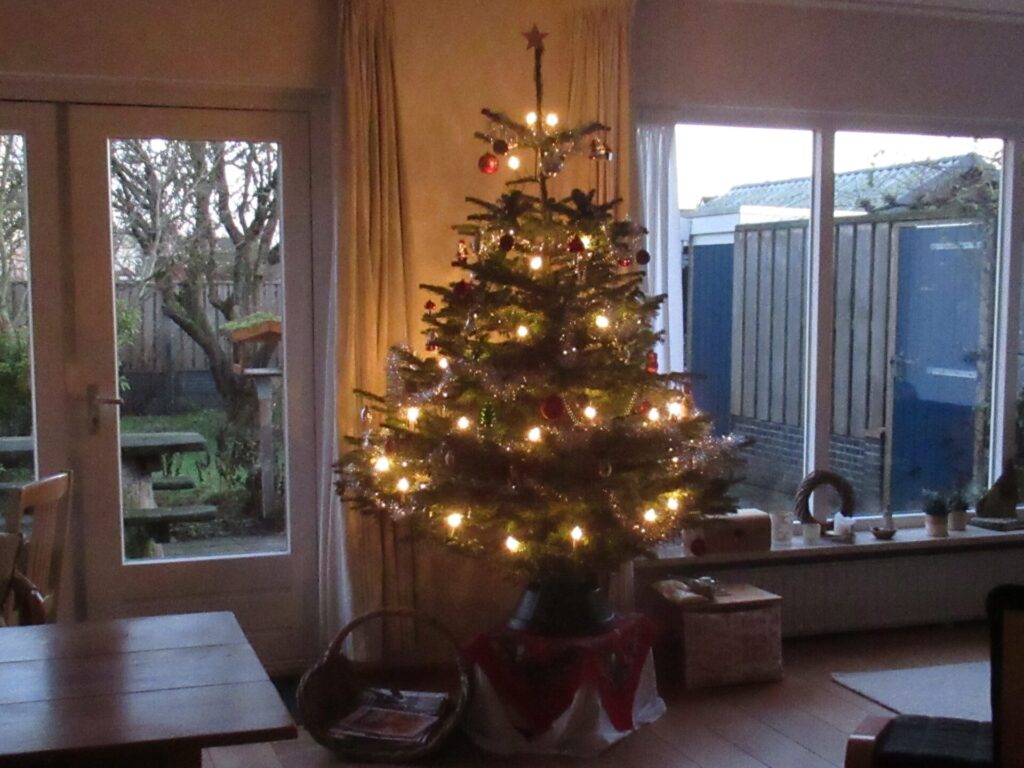
My knitting chair by the window was moved away to make room for the Christmas tree.
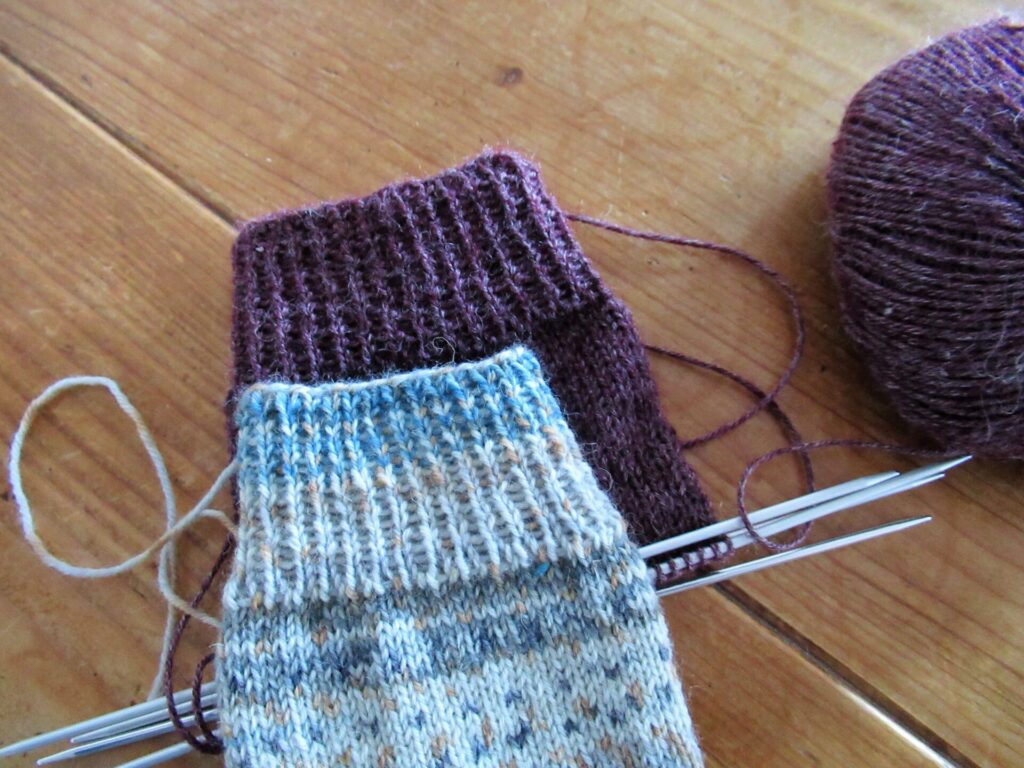
Apart from finishing several pairs of socks, I have finished the body of a roomy cardigan knit from two lace yarns held together. I have even blocked it before starting on the sleeves, which are knit from the shoulder down. It looks a dark grey in the photo below, but actually is a lovely teal.
I have also made a start on the socks for my friend, the ones from the yarn with nettle in it instead of nylon. This yarn (Onion Nettle sock yarn) knits up differently compared to the yarns I’m used to. Here it is next to a sock from a traditional sock yarn that I’ve just finished.
Using the same number of stitches I usually cast on, the cuff turns out much wider. The yarn is also less elastic. Knitting on like this, I wouldn’t be happy with the end result.
So what am I going to do: cast on fewer stitches, start anew with smaller needles and/or use a different stitch pattern? Twisted stitches in the ribbing, perhaps? Hmmm, need to give that some thought.
For the time being, I’m putting all my WIPs on hold to focus on two special Christmas Break projects. (There is that word again: focus, my word of the year 2021. Did I make any progress on that? Well, yes and no. I’ll try to write about that in January.)
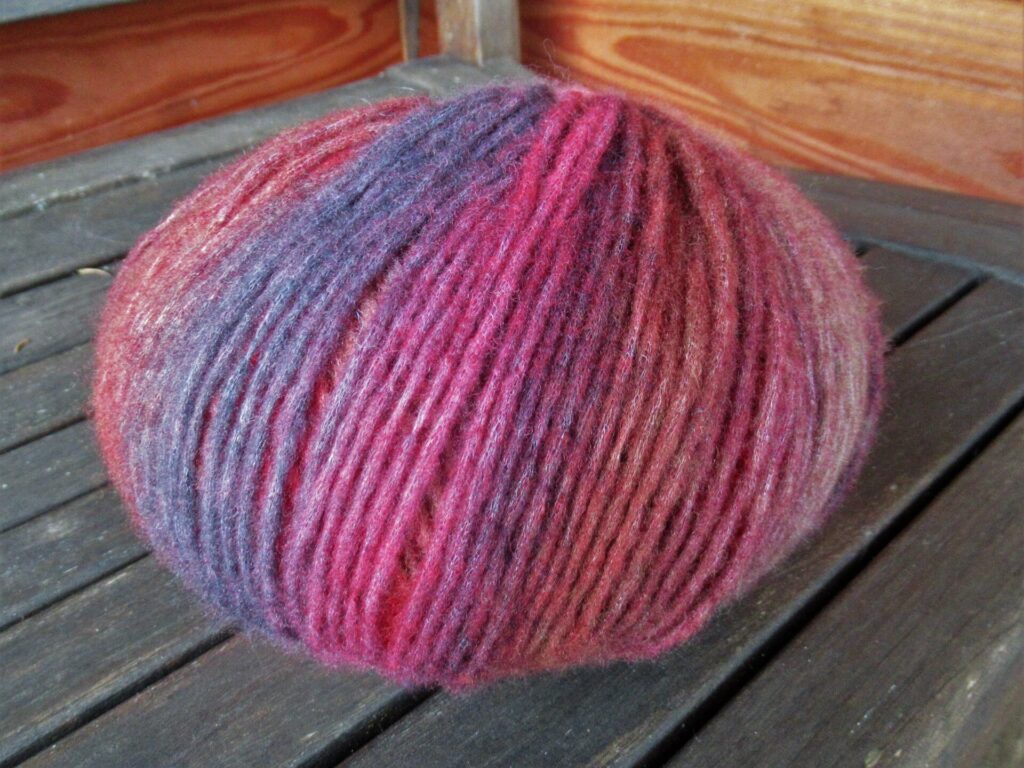
The yarn for these projects is already in the baskets beside the sofa. The first is a simple, oversized, comfy sweater in a lofty yarn – Lang Cloud – in many shades of red, burgundy, pink, purple etc. I’ve photographed it outside to do the colours justice.
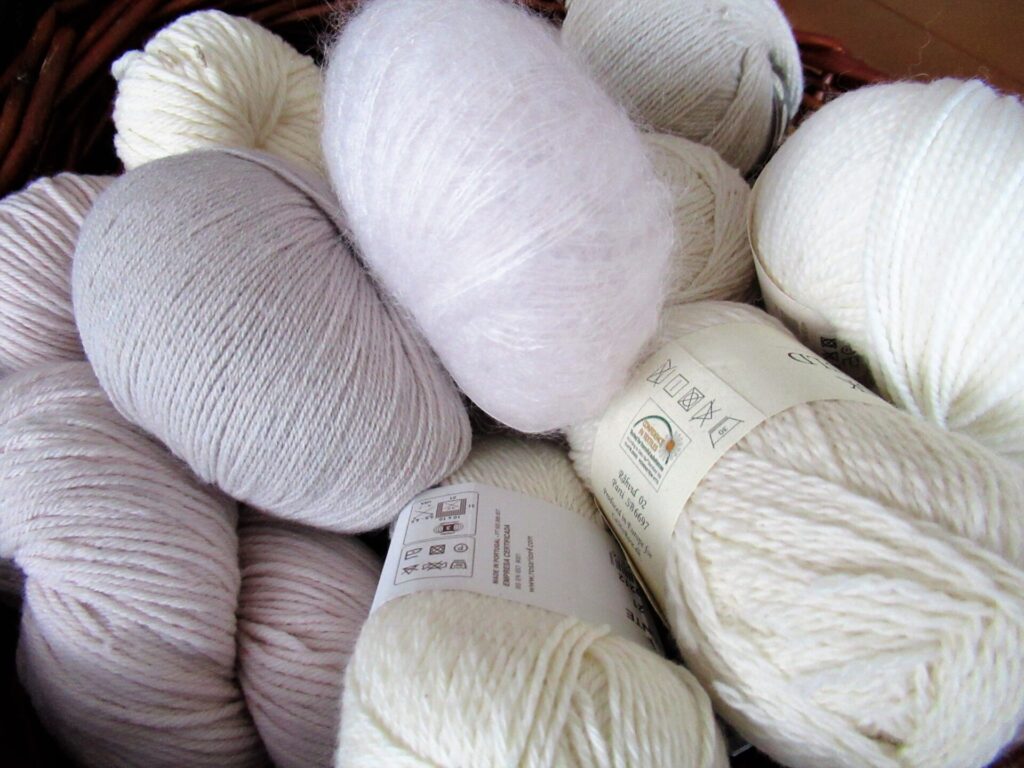
And my other Christmas Break project is knitting swatches. I’ve collected quite a few interesting yarns in undyed or neutral shades over the past couple of years. Somehow I never got round to them, and it feels like a real treat to finally get to try them out. My plan is to knit stocking stitch swatches on different needle sizes and try the yarns out in different stitch patterns as well, hoping that this will give me new ideas for things to design and make.
But that’s me nattering on. How are you doing? What is life like for you at the moment? Have you planned any special celebrations? Or are you working over the holidays, in health care or another essential job? Are you struggling to stay positive, like me? How do you keep your worries at bay? Do you have something nice on your needles? Any special knitting plans? I’d love to hear about them. Please leave a comment if you feel like sharing. It’s also perfectly fine if you don’t feel like it. I understand – I often feel too shy to leave comments, too.
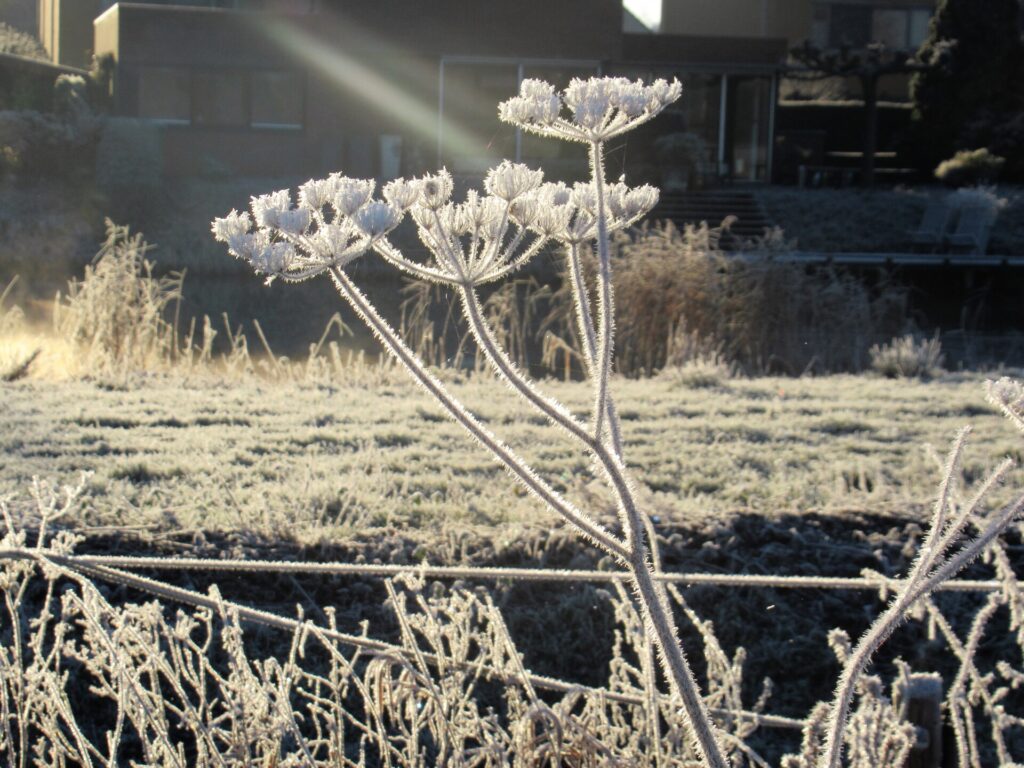
Now, how about some fresh air? Let’s go for a walk. (We can only go for walks in ‘groups’ of 2 at the moment IRL, but again, the numbers for virtual walks are unlimited.) It’s often dark and dreary here at the end of December, but this year it’s been a true Winter Wonderland on some days. So far, it’s only been hoar frost, but we may even get some snow over the coming days.
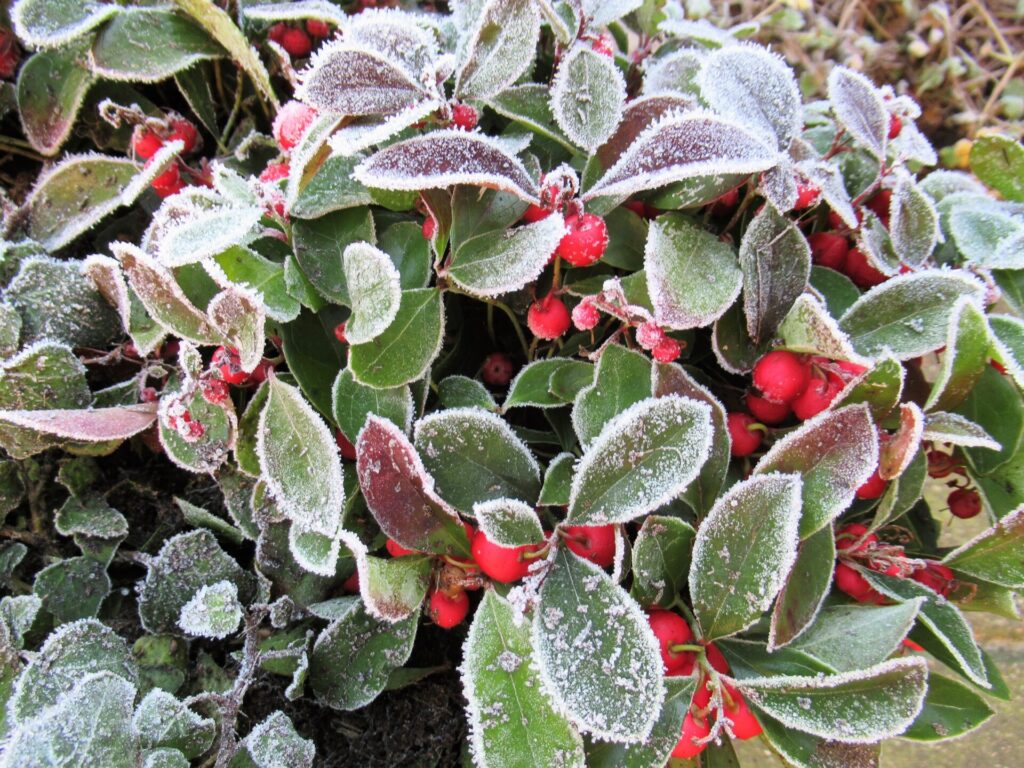
I’ve planted the pots around the house up with some mini conifers, ivy and checkerberry.
Almost every day, all year long, I take a stroll around our village. At this time of the year I love looking at other people’s Christmas trees.
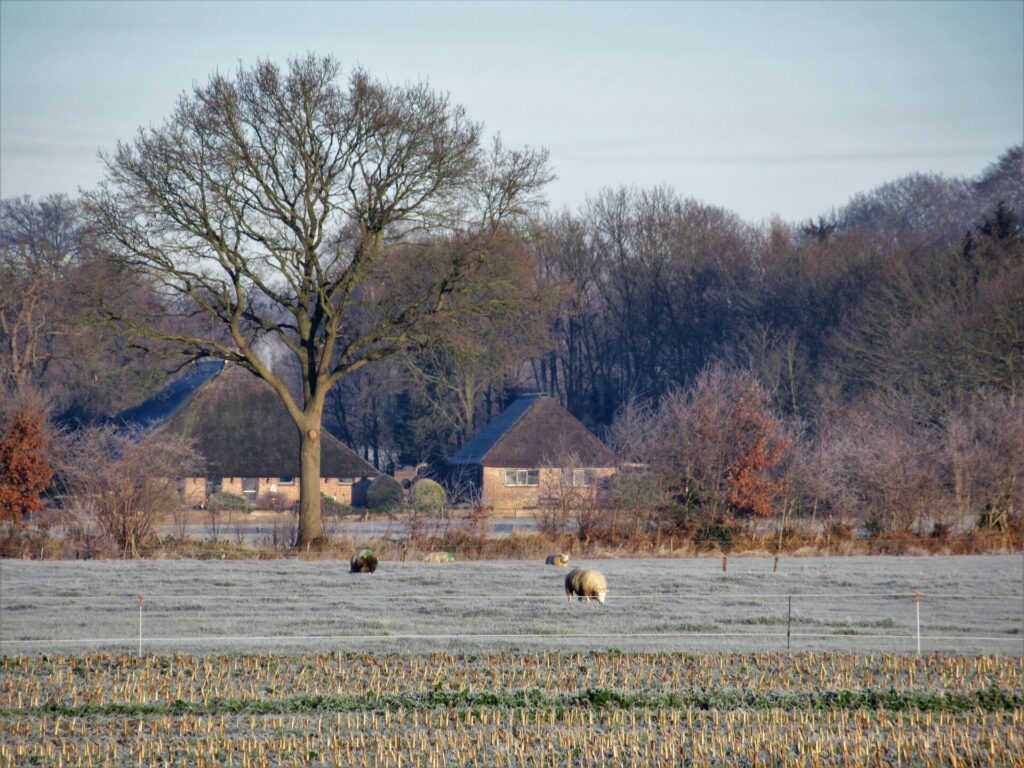
But on clear, frosty days it’s nicer to head out of the village. This is the view a two-minute-walk from our home.
We are very fortunate to live here, and I never take it for granted. It’s not all idyllic, of course. But on some days even the local factory gets a magical quality, mirrored in a stream.
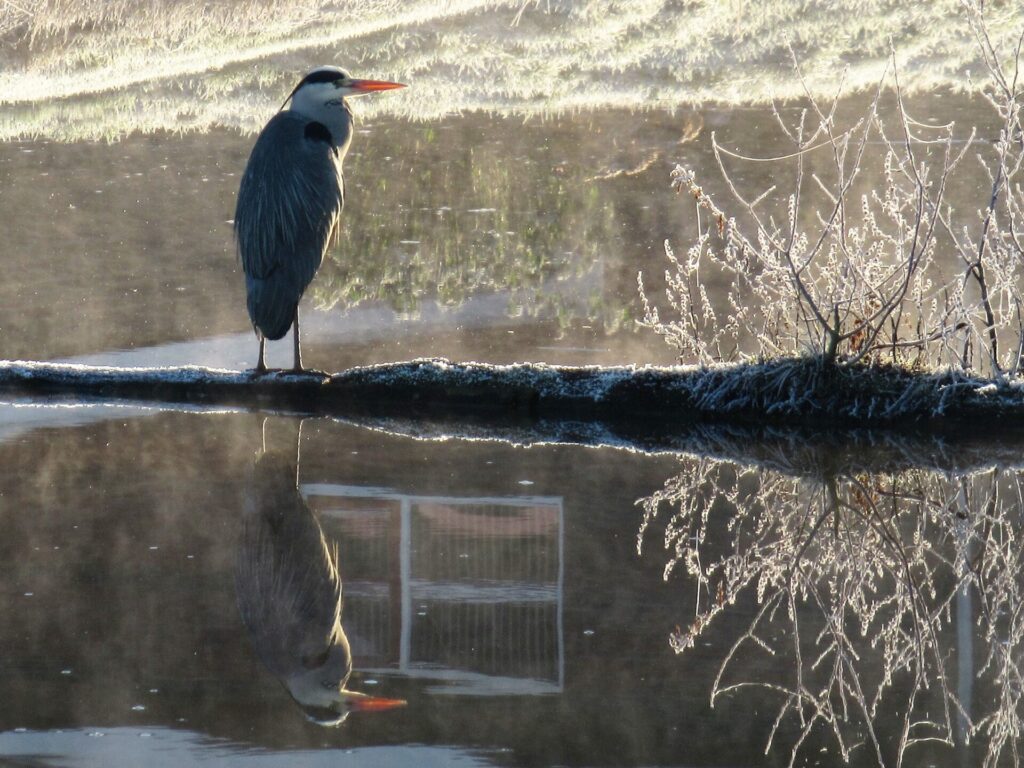
A little further on a blue heron is mirrored in the same stream.
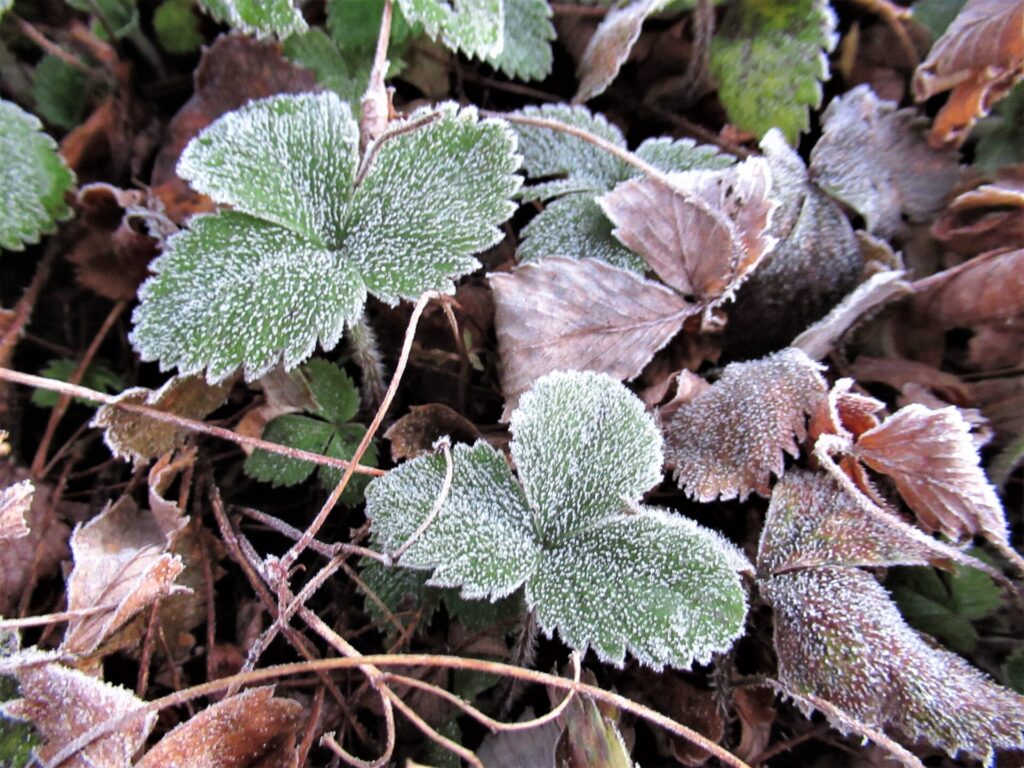
Father Frost has covered the plants with icy needles.
Truly magical.
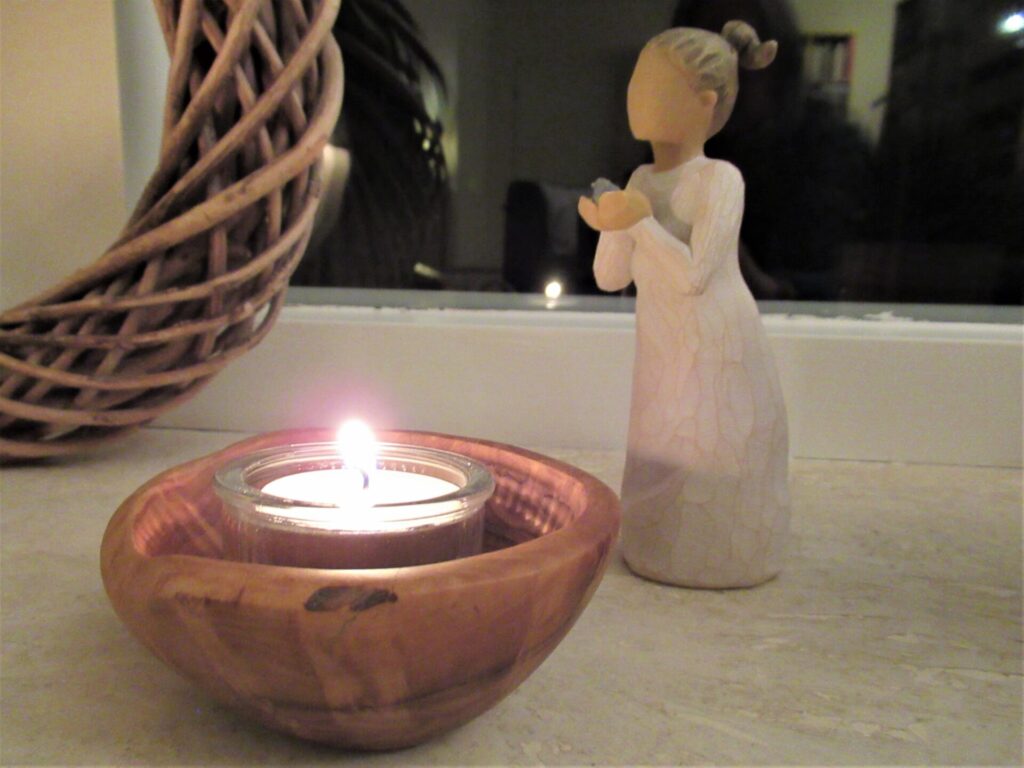
Well, I think it’s time to head back home and light a few candles. Thank you so much for stopping by – I really, really appreciate your spending some time with me here. Apart from all of you, we’re expecting very few real-life visitors over the coming days and weeks. Only two, in fact. And we won’t be going anywhere either. We love seeing friends and family and spreading good cheer, but we’d hate to spread the virus, so we’re keeping ourselves to ourselves this year.
I’m taking a break from my blog for a while, to just sit and knit (and read, go for walks, eat some delicious things prepared by my other half, and watch The Lord of the Rings for the umpteenth time).
All the best for a safe and peaceful festive season and I hope to see you here again in the New Year!
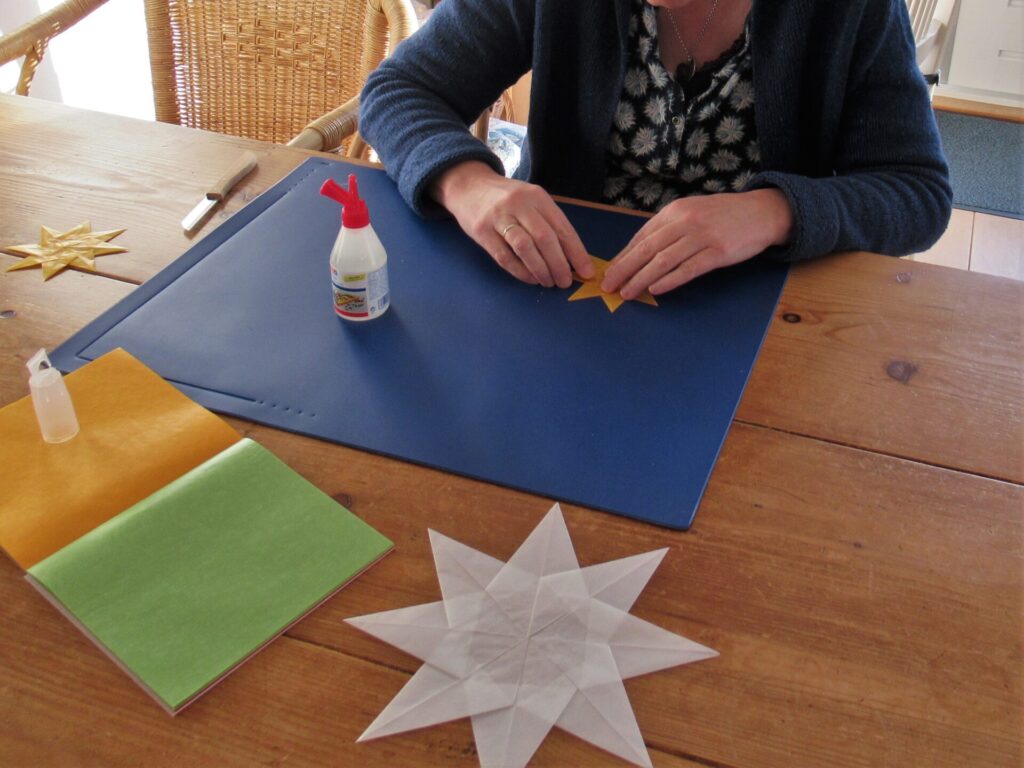
A long time ago a friend taught me to fold stars. Made from transparent paper, they showed lovely patterns when the light shone through them. Because this friend is going through a difficult time at the moment, I folded a small star and sent it to her tucked between a postcard with a personal message – a reminder of good times and a symbol of hope.
Then I folded some more to give away. Then I folded a few for our own kitchen window. And then I thought, ‘Why not share them with you here?’
What you’ll need:
Sharp paring knife
Clear glue
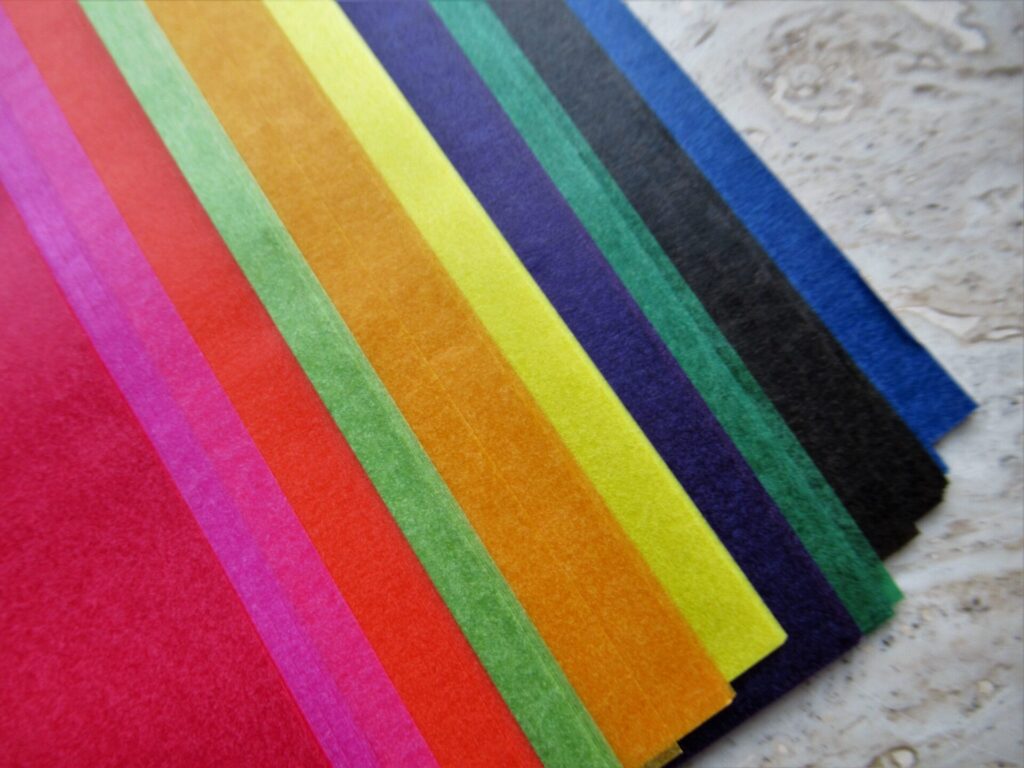
Transparent kite paper (available as larger sheets and as blocks of squares in a rainbow of colours)
Tissue paper can be used as well, but tears and fades more quickly. (For the tutorial steps below I used ordinary printer paper for the sake of clarity only.)
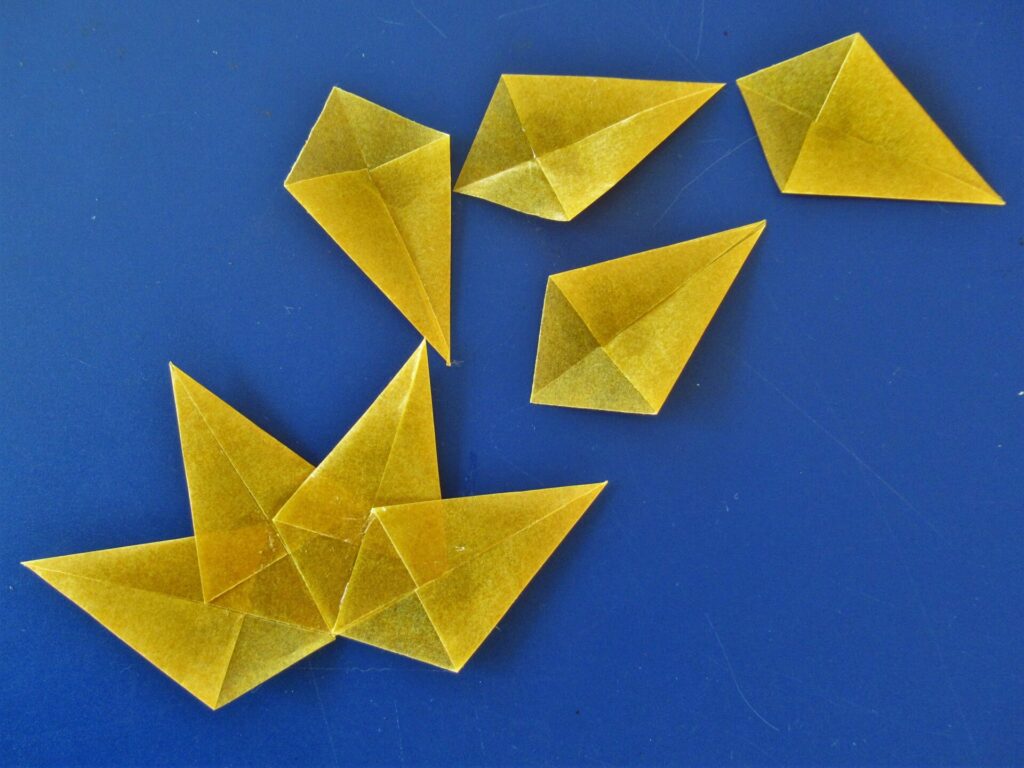
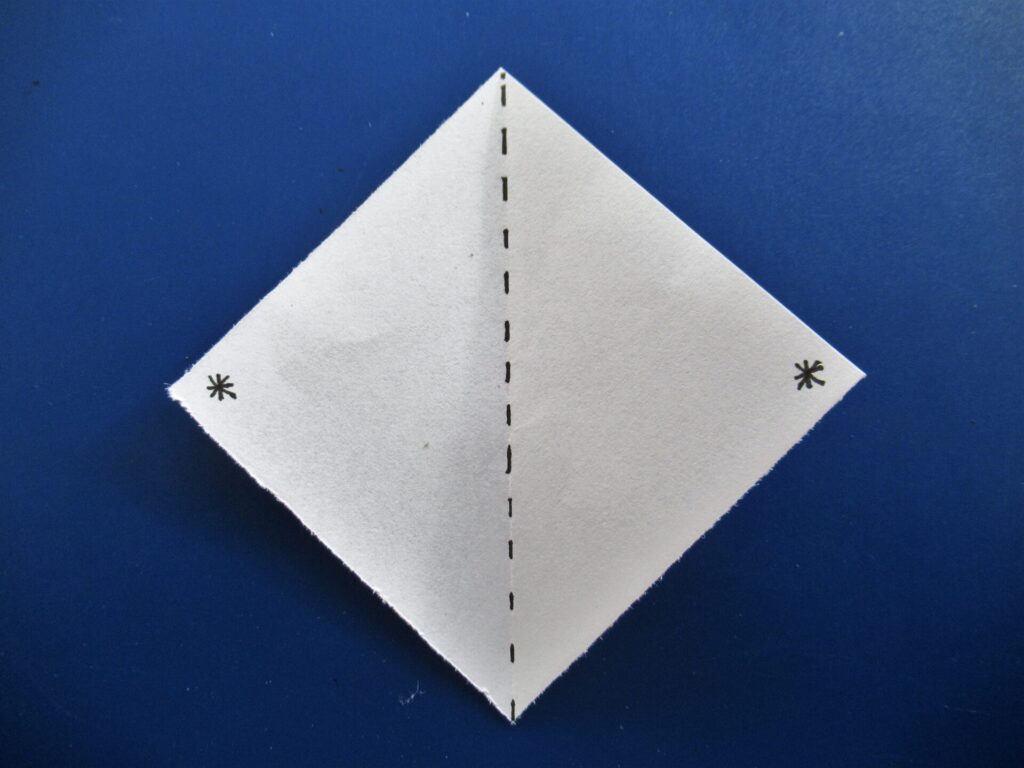
1) For each star, cut eight squares using the paring knife.
The paper in my block measured 16 x 16 cm (6.25 x 6.25”). For a large star I cut two sheets into four squares each (eight 8 x 8 cm squares in total). For a small star I cut half a sheet into eight 4 x 4 cm squares. The size does not really matter, as long as you end up with eight square pieces of paper. Start with a larger star – the smaller ones take a little practice.
2) Fold the paper in half diagonally, so that the points marked with asterisks in the example lie on top of each other. Then open again.
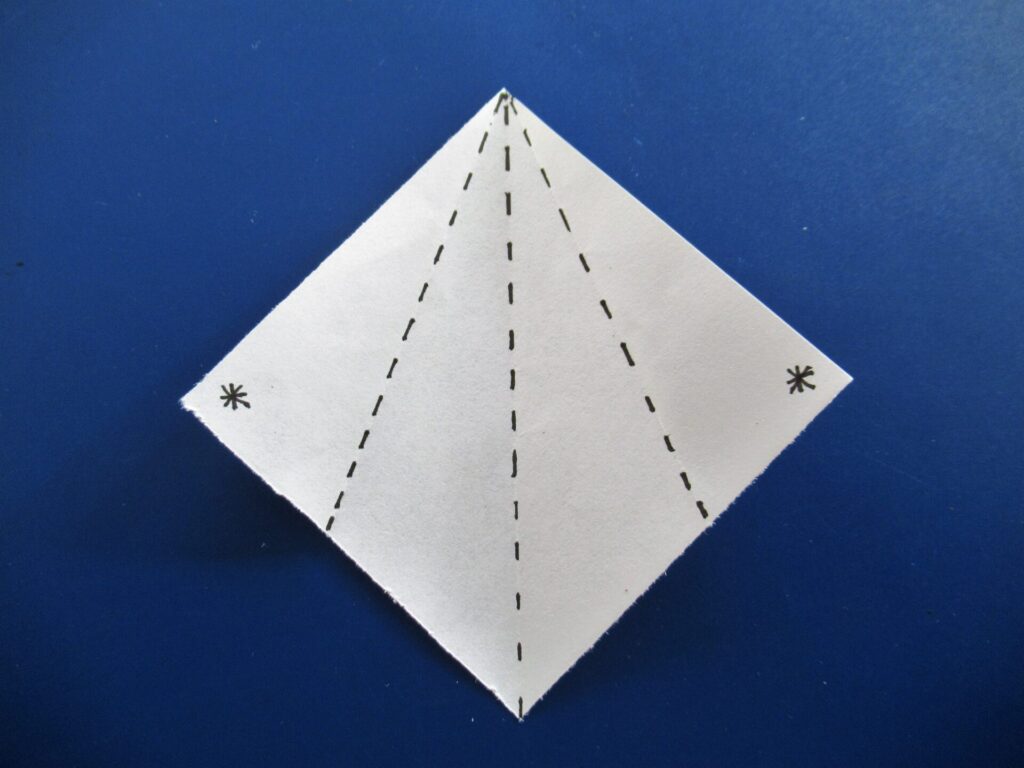
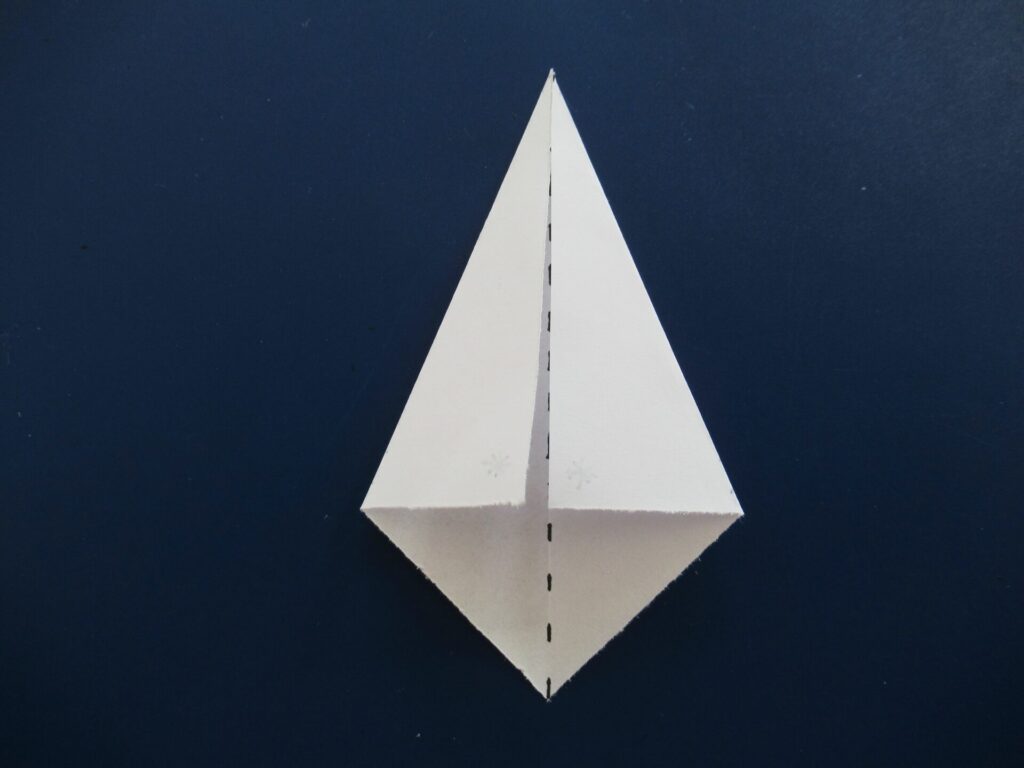
3) Next fold the asterisks toward the line in the middle, along the dashed lines:
You’ll end up with a shape like this:
Make eight of these.
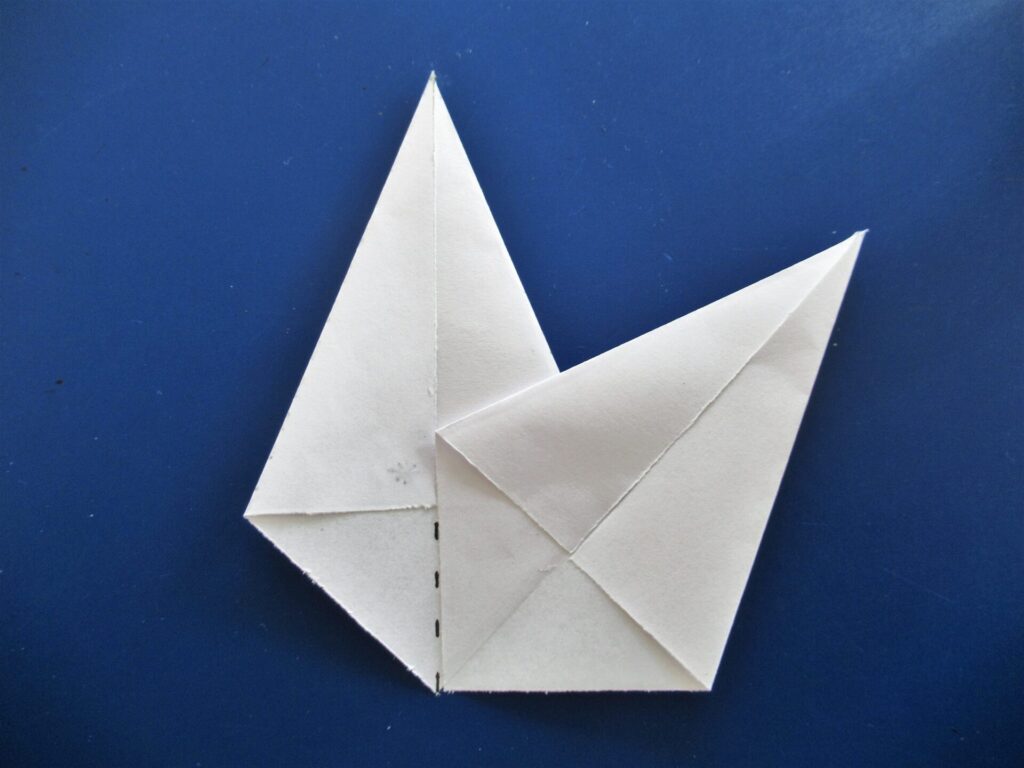
4) Using a small drop of glue, stick the points where the asterisks are in the example in place.
5) Finally assemble the eight points into a star as shown in the picture below, using a little bit of glue where the points overlap.
It’s important to use clear glue or it will show when the light shines through.
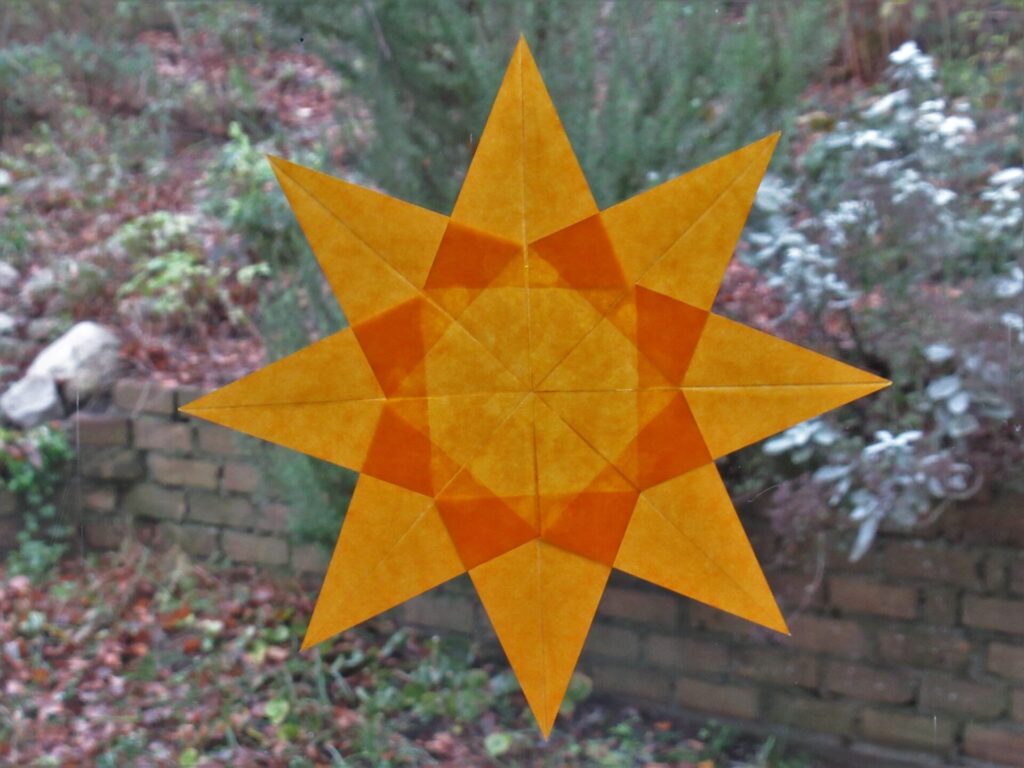
Tadaaah – one transparent paper star!
For a different variation, open the flaps last folded again and then fold them inward, with the imaginary asterisks tucked away inside.
Glue the points together to make a star as before. This simple adaptation immediately gives a much more intricate look:
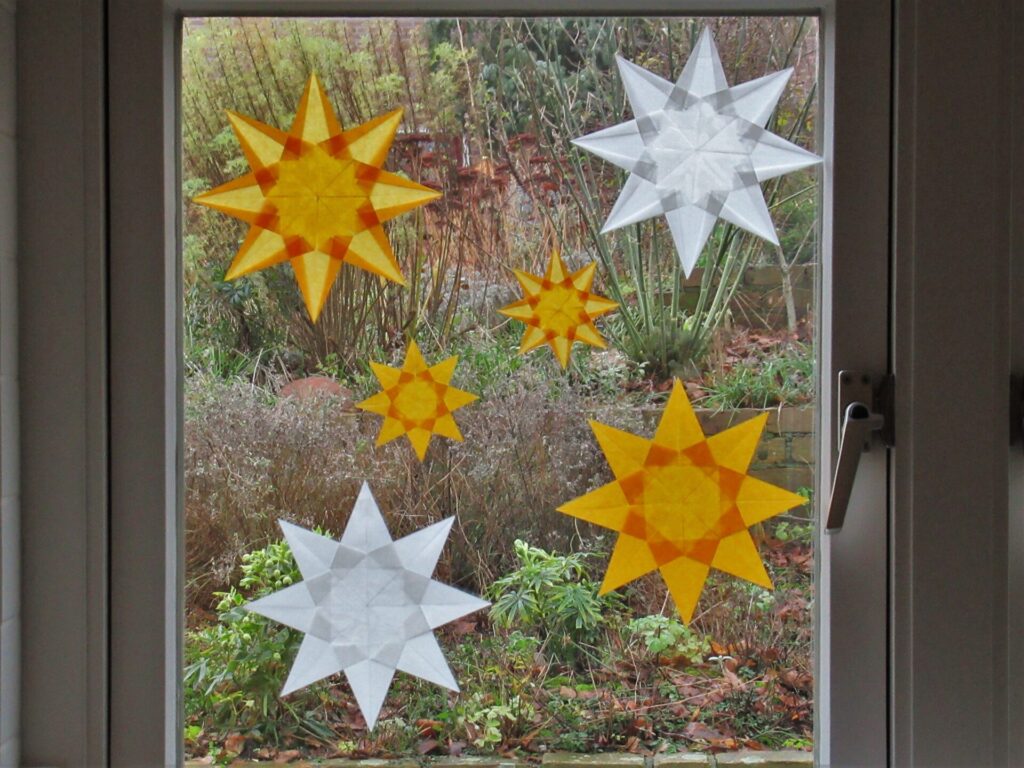
Finished, my larger stars measure approx. 23 cm (9”) from tip to tip, and my smaller ones 11.5 cm (4.5”). Use a small piece of clear tape folded double (or double-sided tape if you have it) to stick stars to a window pane.
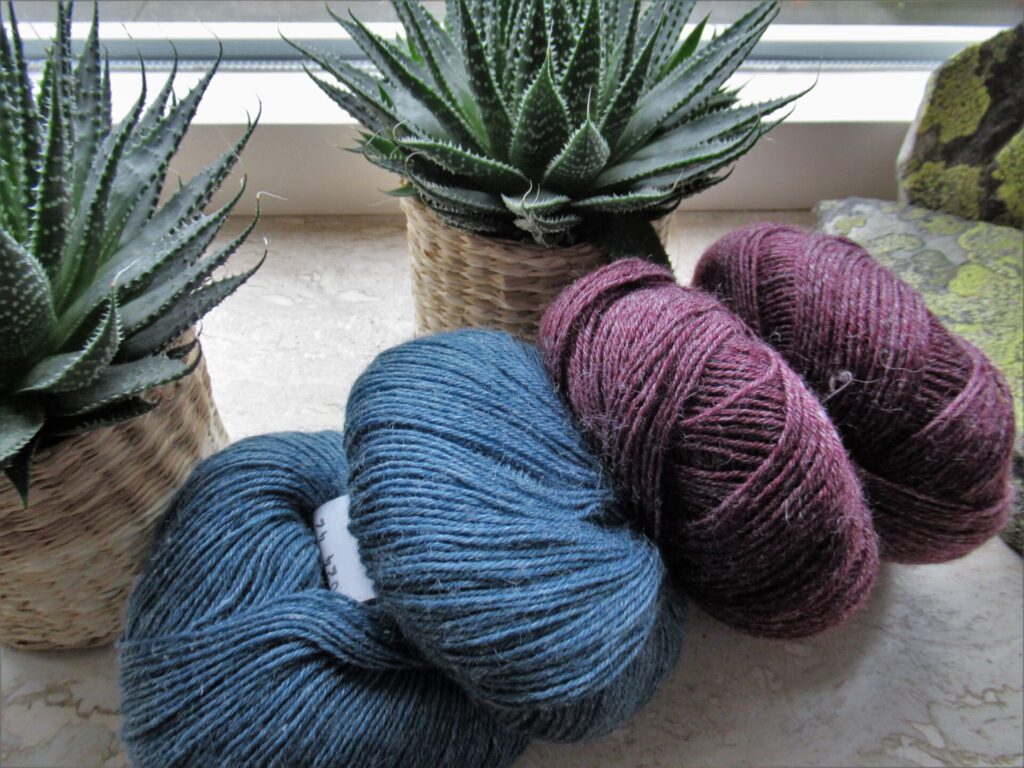
The same friend who taught me to fold stars, recently gave me some sock yarn. She had planned to knit socks with it herself, but realized she would never get round to it. It is a yarn with nettle fibres for strength and durability instead of the usual nylon.
This yarn has been around for a while, but I haven’t used it before. I’m looking forward to giving it a try. And what am I going to use it for? Two pairs of socks for my friend, of course!
Star light, star bright, First star I see tonight, I wish I may, I wish I might, Have the wish I wish tonight.
My wish for you today is that you may have some time to yourself over the coming week, to fold a star, knit a sock, or simply spend some time outside at night stargazing.
Why do we knit? Or rather, why do I knit? (I can only ever speak for myself.) Sometimes it is because I want something to wear that I can’t find in the shops. Other times it is because I want to give someone else a knitted embrace, toasty feet or warm hands. Often it is because I need something to occupy my hands and soothe my mind. Or I see a pattern and think: That is so beautiful – I’d love to make something like that!
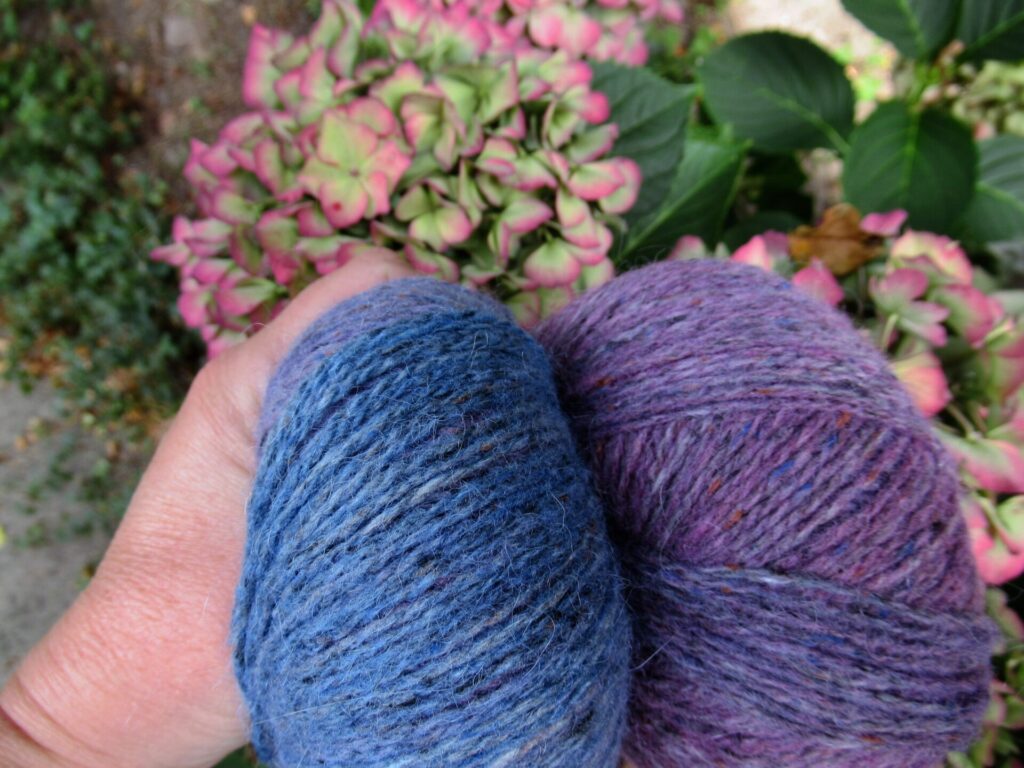
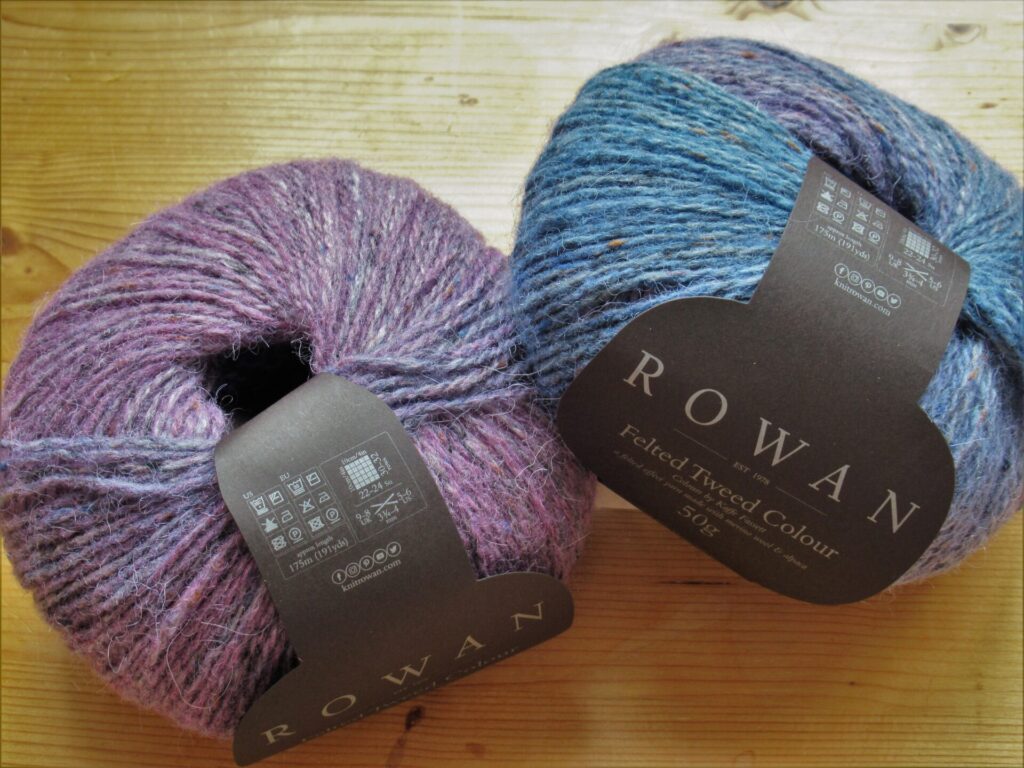
This time it was the yarn that did it. The yarn in the photo above. It is a new Rowan yarn called ‘Felted Tweed Colour’ – a sibling to their all-time favourite ‘Felted Tweed’, but now in a slow gradient of colours. The palette was developed by the famous designer Kaffe Fassett. As soon as I saw it, I thought: Wow, those colours!
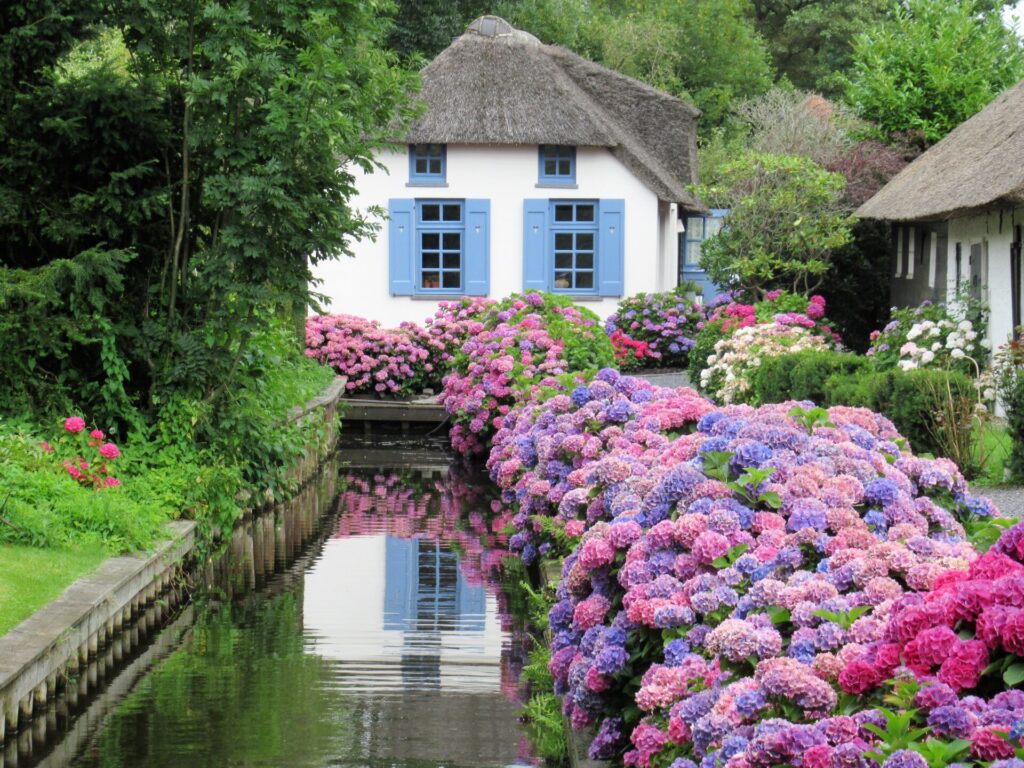
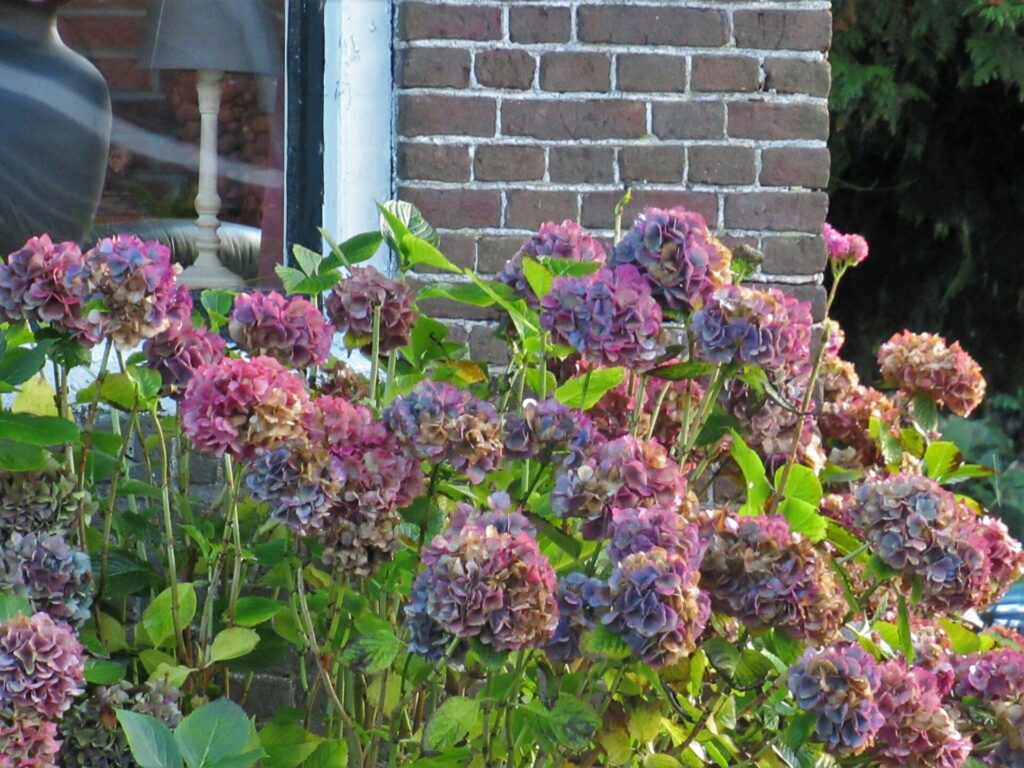
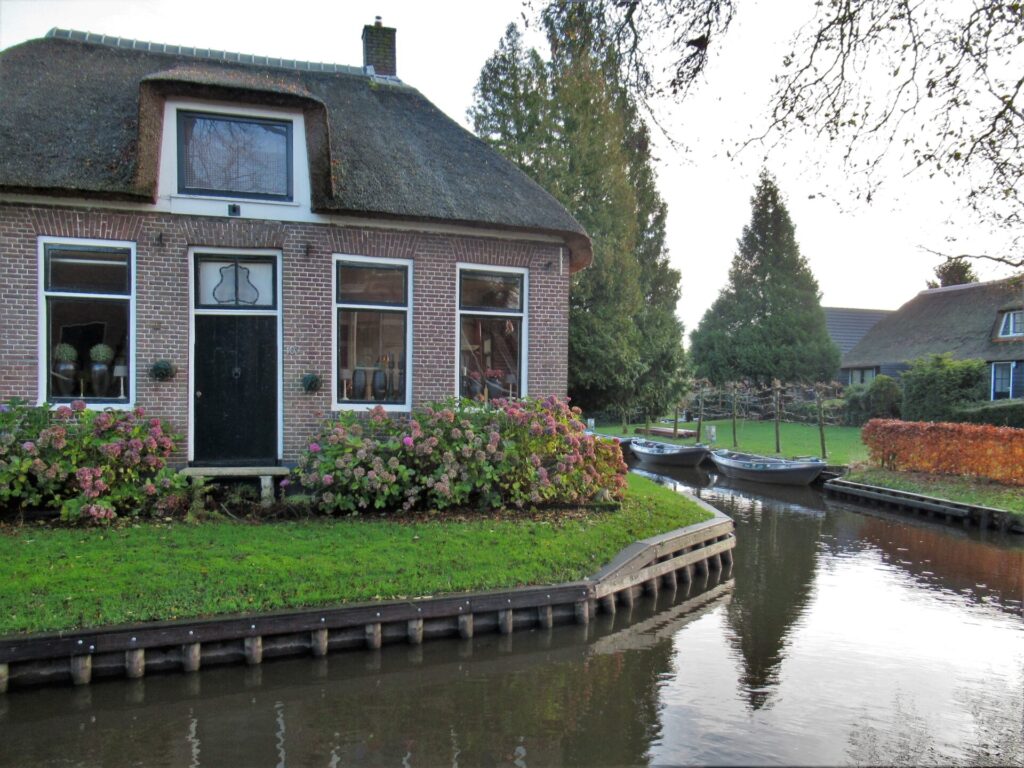
I chose the colourway called ‘Frost’. It doesn’t remind me of frost, snow or ice at all, however. It reminds me of hydrangeas. Maybe you remember my blog post about cycling to Giethoorn this summer, when I took this picture:
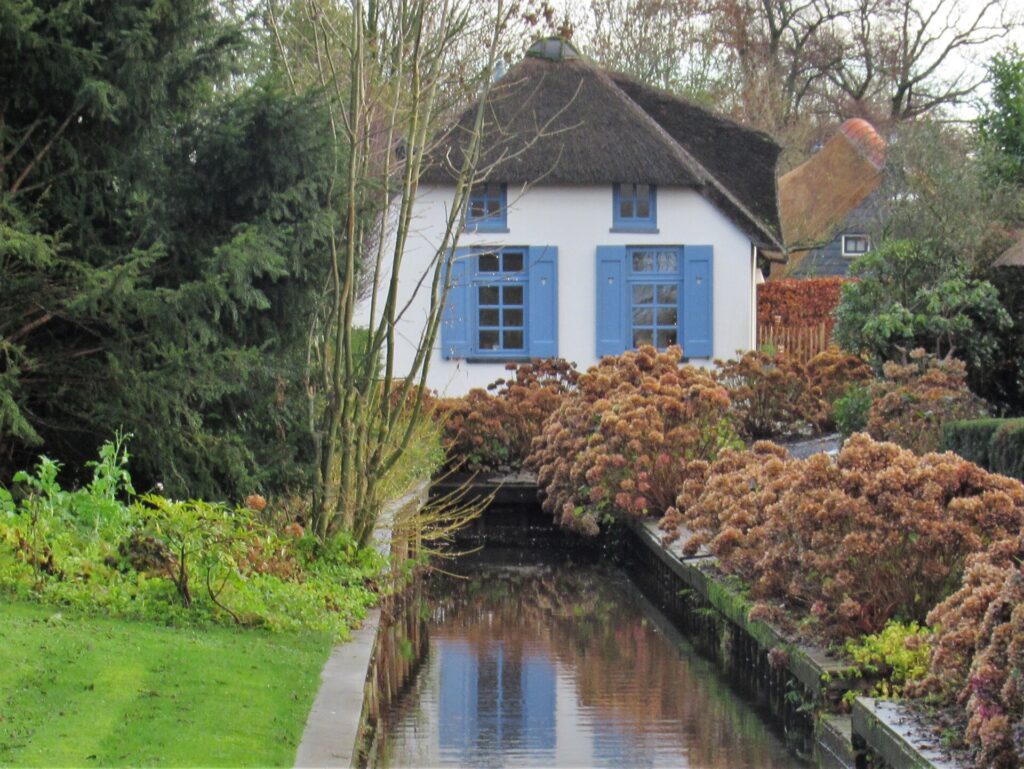
A few days ago, I popped over to Giethoorn again. This is the same spot at this time of the year:
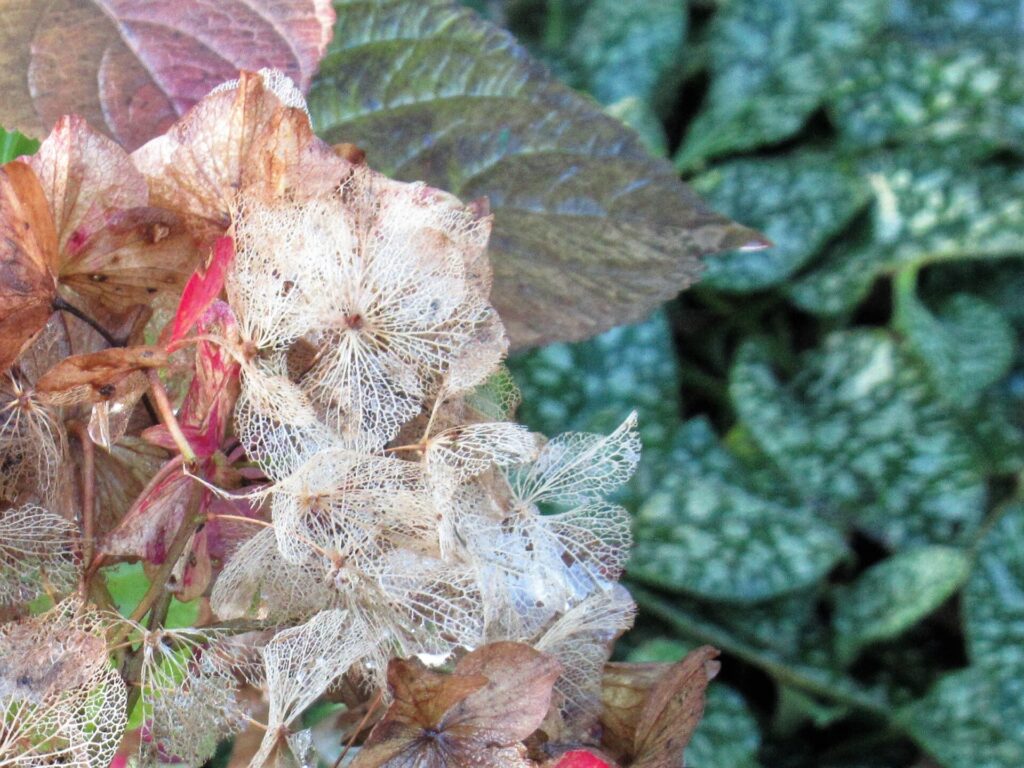
Here the hydrangeas have lost all their colour. In other places there are only lacy skeletons left:
But some hydrangeas have retained their colour and just become more muted than in summer:
It’s these that the ‘Frost’ yarn reminded me of.
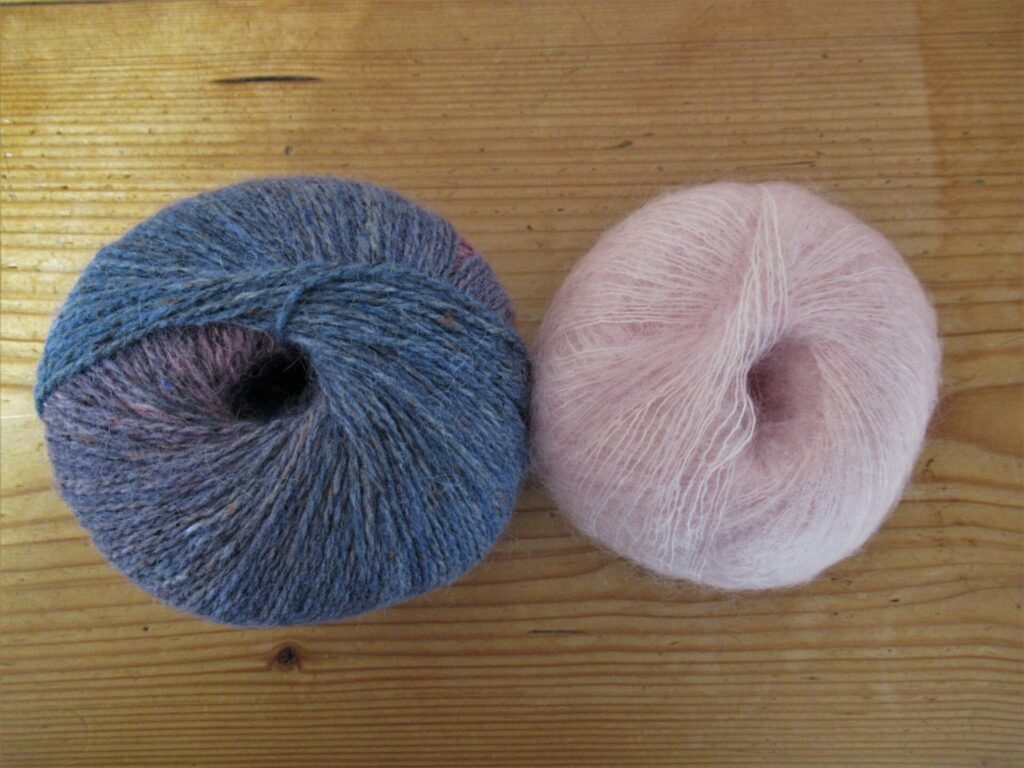
And what did I do with the hydrangea yarn? I combined it with some Kidsilk Haze to knit another Story Lines shawl. At first I thought of using some pale pink from my stash:
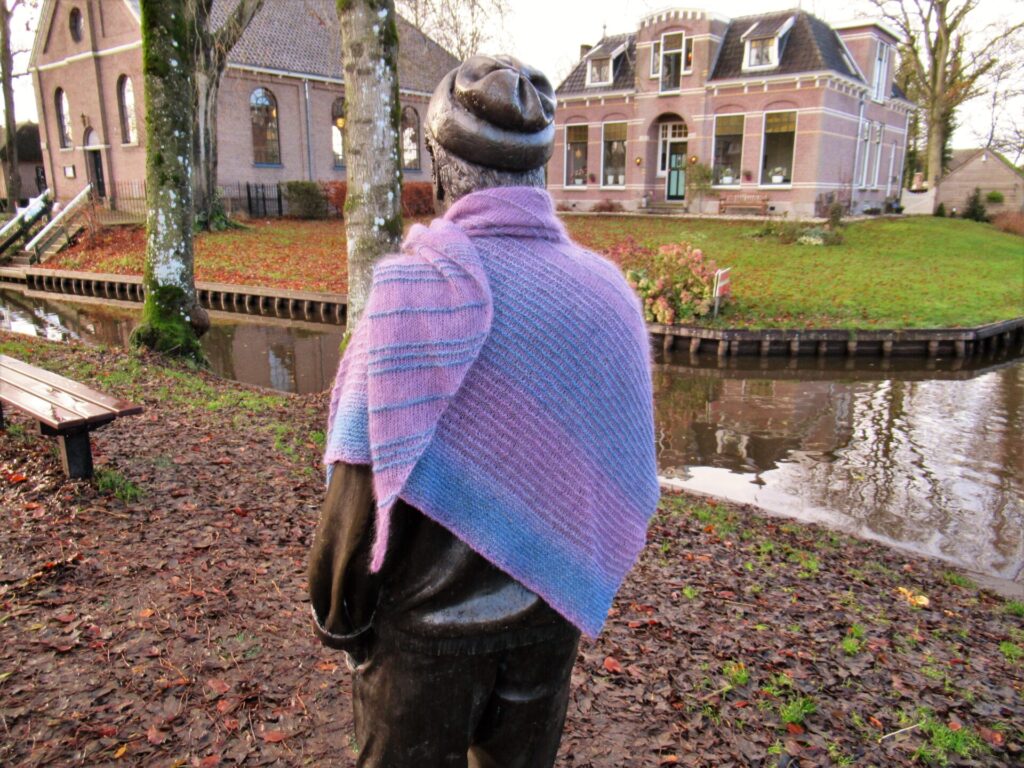
But then I decided that the contrast was too strong and chose a purple shade called Dewberry instead.
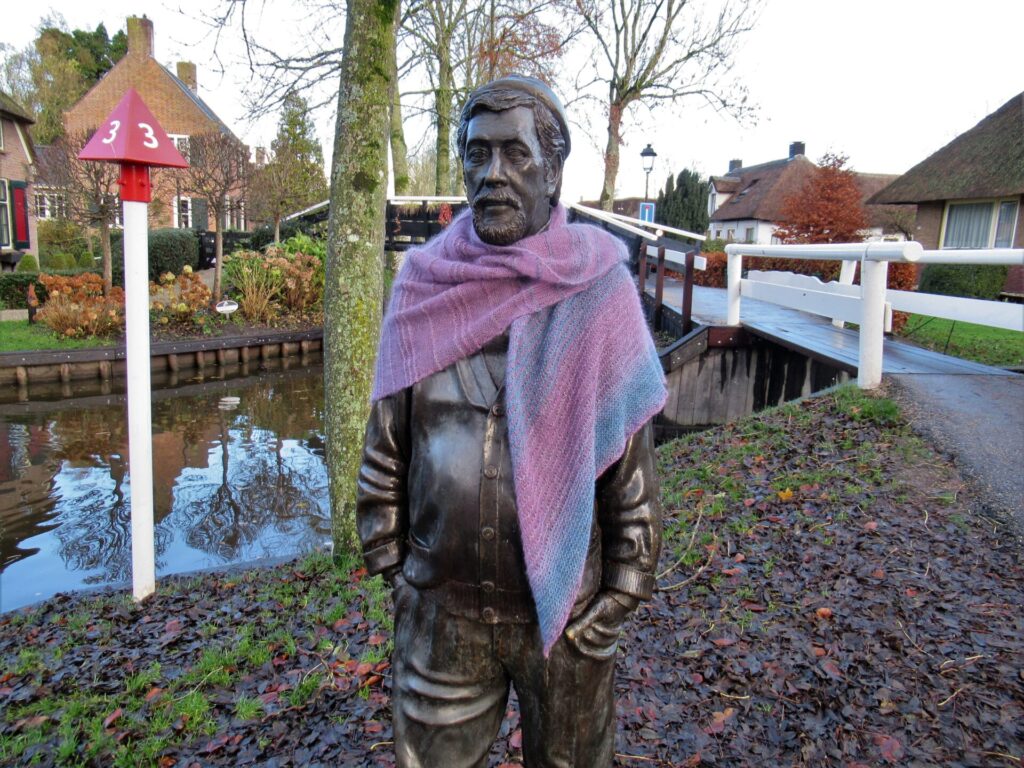
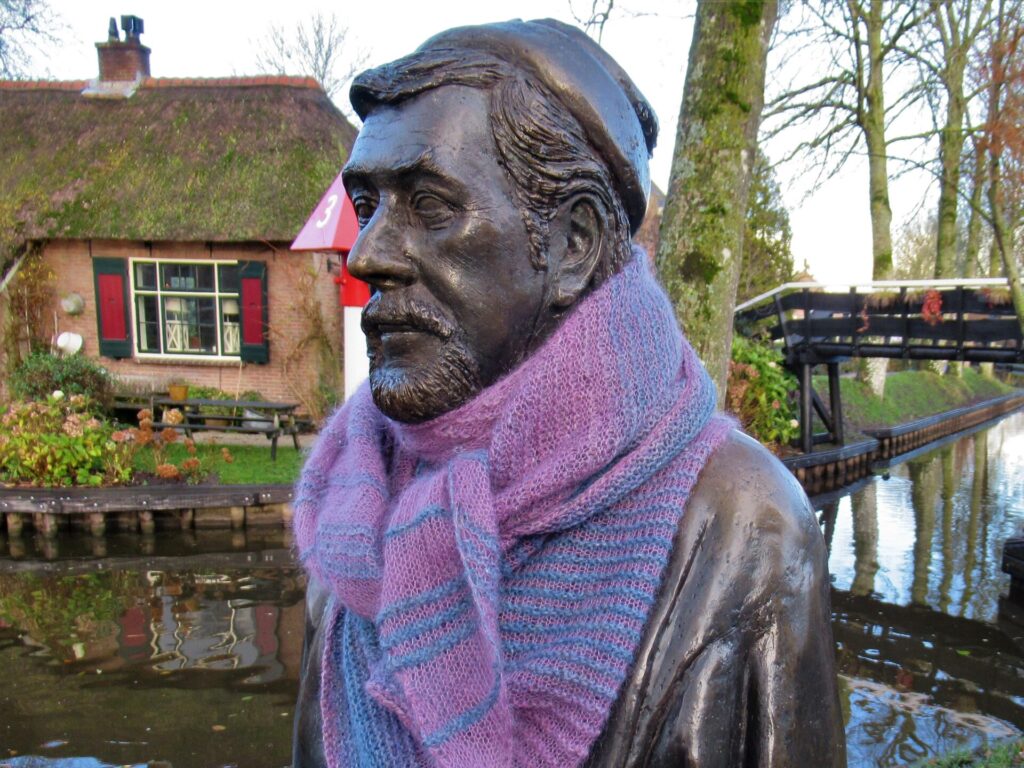
I took the finished shawl along to Giethoorn and asked Albert Mol if he was okay with being my model. Listening carefully I thought I could hear him say: ‘Of course darling. Fabulous idea!’ (Albert was a very gay person in every sense of the word.)
In hindsight I think a little more contrast would have been a good thing. In some places the Felted Tweed is exactly the same shade as the Kidsilk Haze. The stripes are visible, but don’t stand out very much.
The back view below shows how the Felted Tweed Colour yarn moves gradually from one colour to the next, forming wide stripes.
I’ve given this shawl a wider garter stitch band at the end. Neither the Romantic Ruffle nor the Dainty Droplets I used for the other two Story Lines shawls (shown in this blog post) seemed right for this yarn. I used the Basic Bind-off also described in the pattern instead.
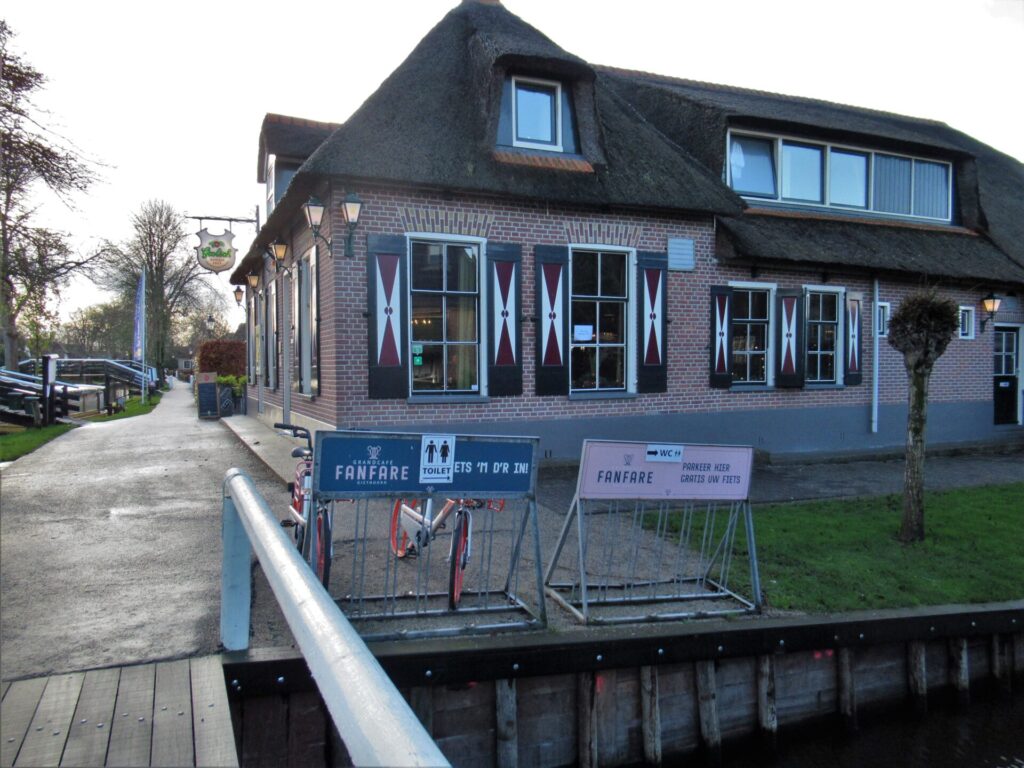
Some of you may remember Albert Mol. For those of you who have never heard of him, he was a Dutch dancer, writer, actor and comedian. Giethoorn has honoured him with a statue because of his role in the 1958 comedy film Fanfare that was shot in the village. As there are many people in Giethoorn going by the name of Mol, I suppose he must have family roots here as well.
Part of the action takes place in Café Fanfare, which hasn’t changed much since then:
Fanfare is about two rivalling local brass bands that both want to win a competition and are prepared to do anything to prevent the other band from winning. It is in black and white and obviously rather old-fashioned, but still great fun.
Just like Café Fanfare, the rest of Giethoorn (called Lagerwiede in the film) is still very much like it was back in 1958, too.
If you feel like watching some fun slow tv on a dreary December day, Fanfare can be viewed here on YouTube, with English subtitles. (Albert Mol plays the role of one of the conductors, much younger than his bronze statue and without beard.)
And in case you’d like to make a similar Story Lines shawl, it takes 2 skeins of Felted Tweed Colour and 2 skeins of Kidsilk Haze. The Story Lines pattern can be found here on Ravelry, and my notes about the hydrangea version here.
I wish you an enjoyable weekend, with something fun to do, watch and/or knit!
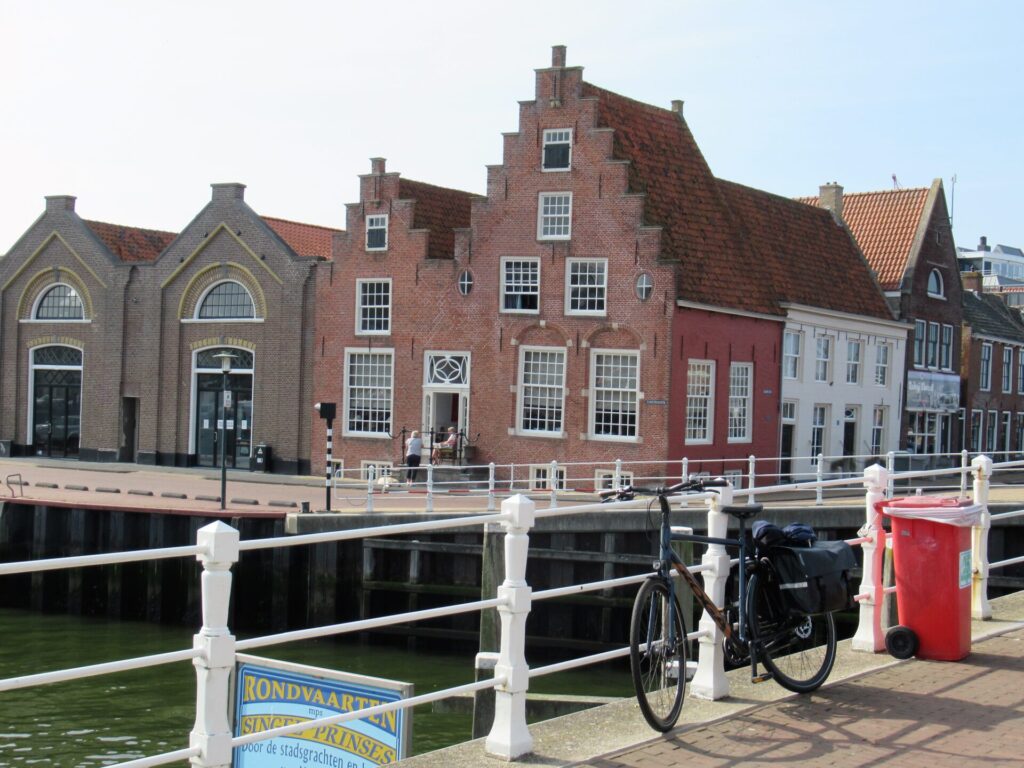
Thinking about knitting projects for the winter months and rummaging through my yarn boxes, I came across some yarn that I bought in Harlingen a while ago. I was going to write about it at the time, but then all kinds of other things cropped up and I never got round to it. Time to rectify that.
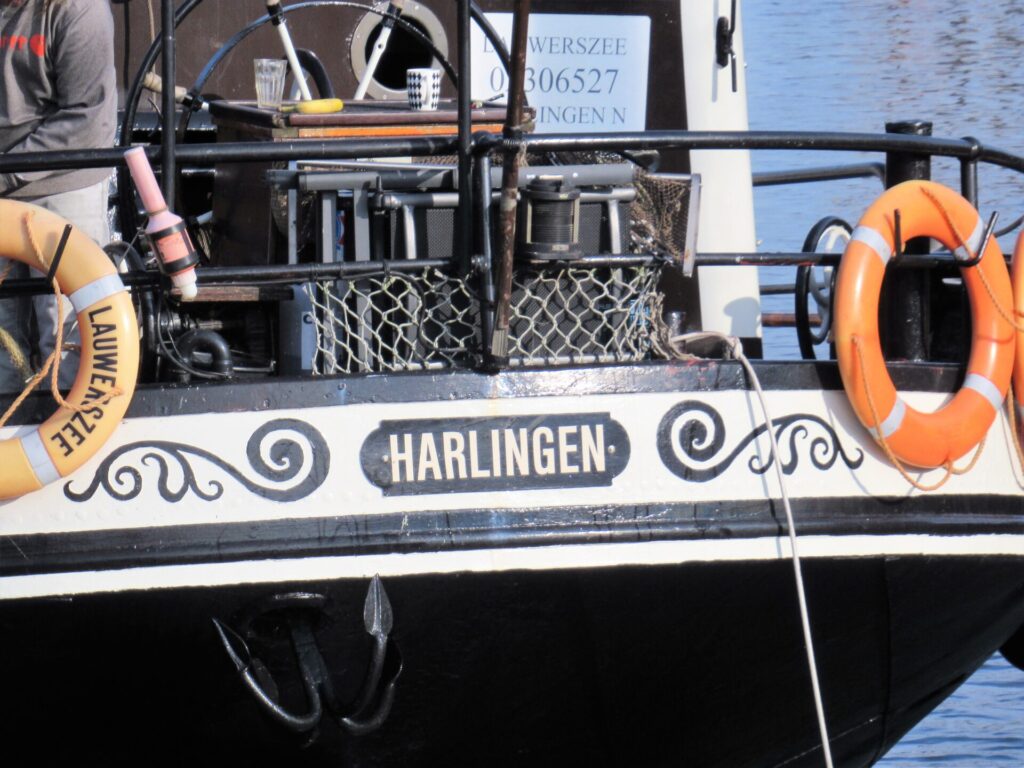
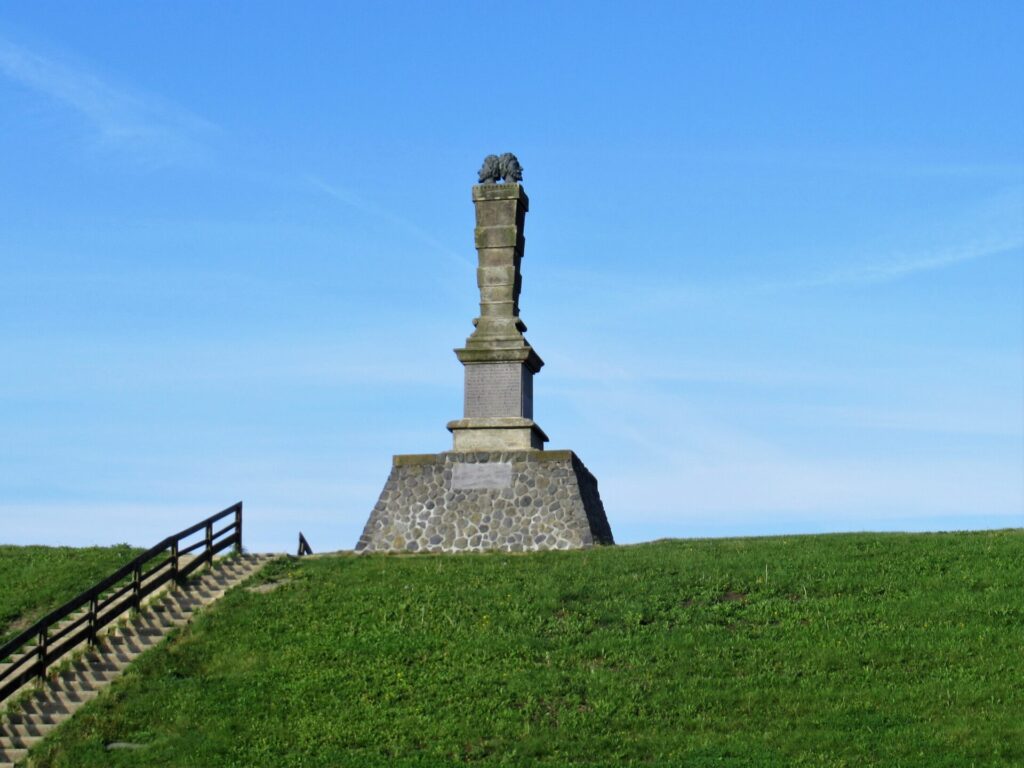
After dropping our charges off at the Harlingen ferry terminal on a glorious day in early autumn, we had the rest of the day to ourselves. As it was still early, we first went for a stroll on the dyke, saying hello to the two-headed stiennen man (stone man).
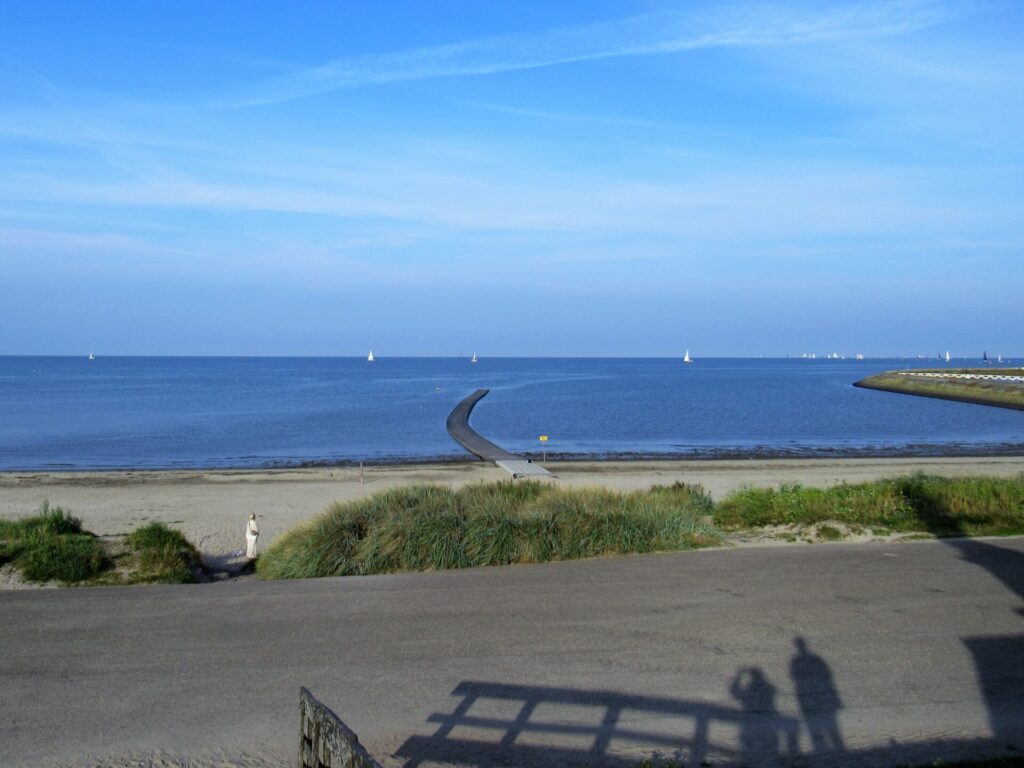
Harlingen (or Harns in Frisian) is the main port of Friesland, situated on the Wadden Sea coast. It was great to look out over the sea for a while.
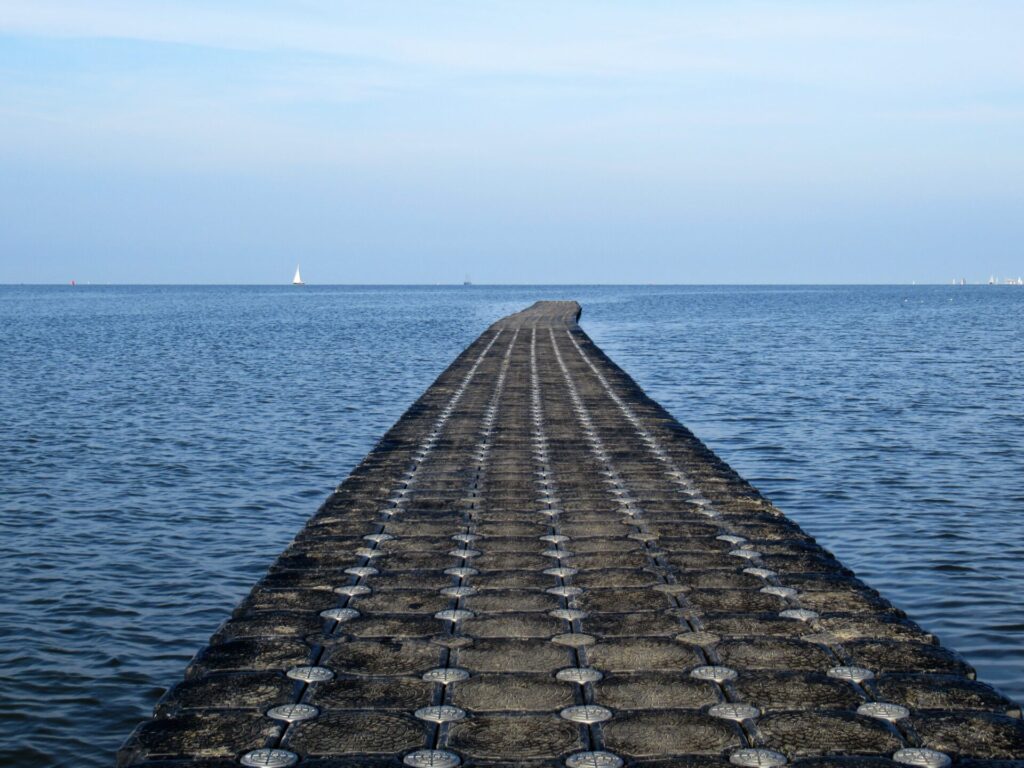
And also to feel it under our feet, stepping onto the floating pontoon that’s there for bathers.
The wide open sky, the fresh air, the great expanse of water – so calming and uplifting. Why don’t we come here more often?
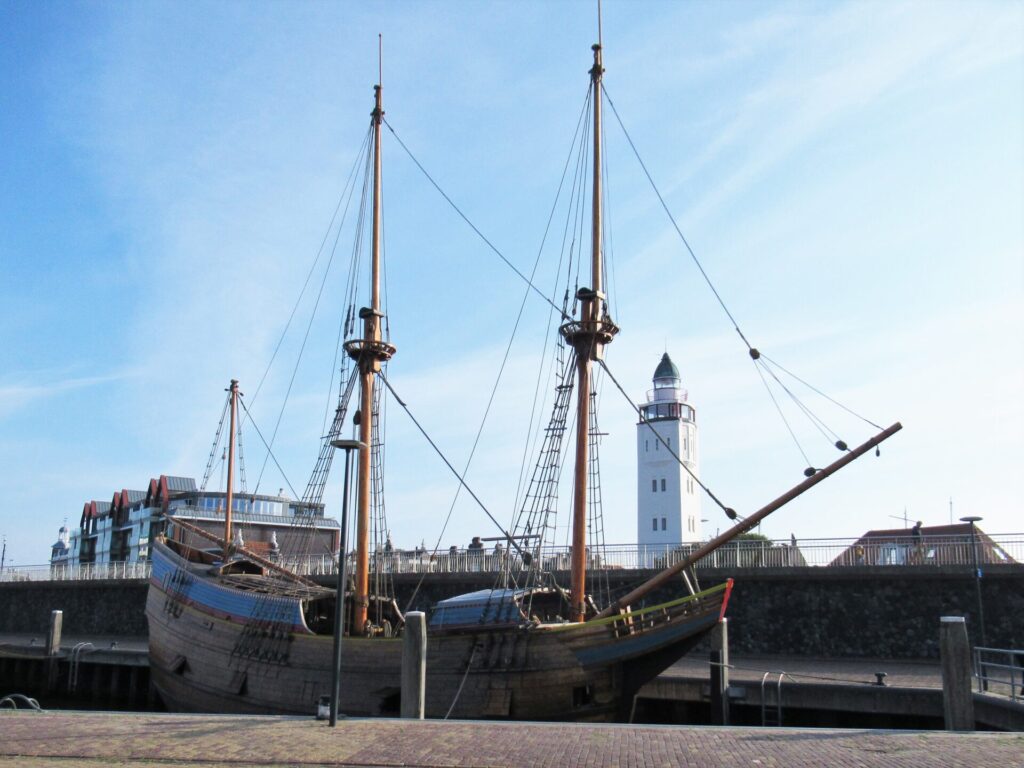
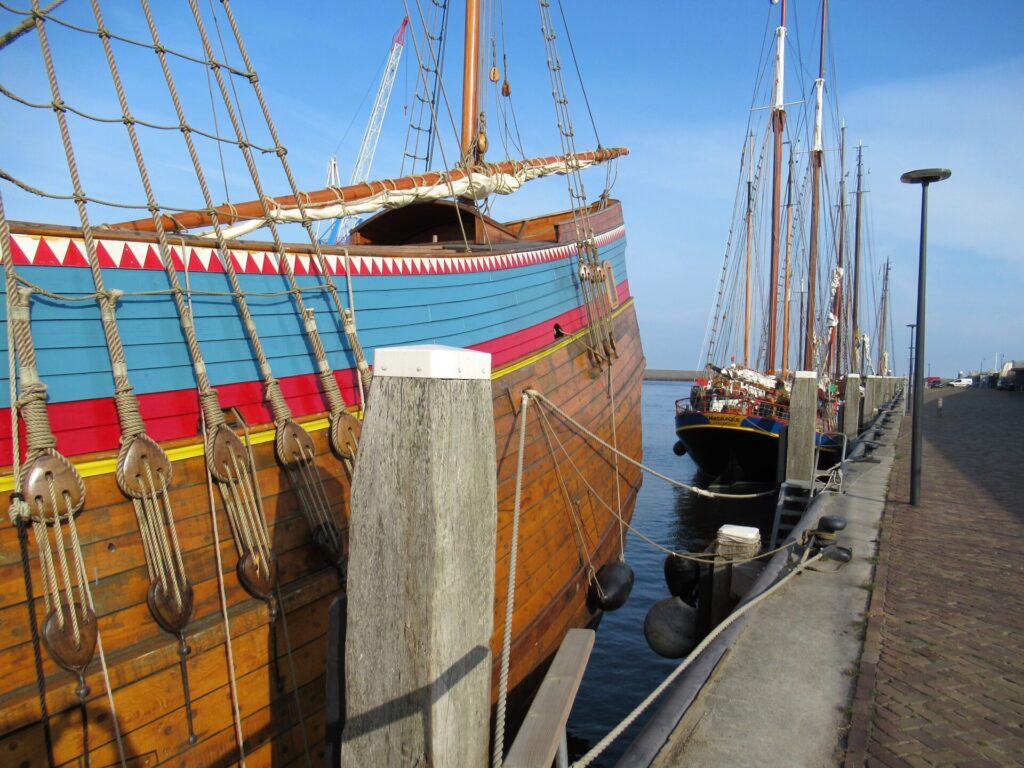
We took our time walking to the city centre via the harbour. I was keen to have a look at the replica of Willem Barentsz’ expedition ship. It set sail in 1596 to discover a new passage to China via the northeast. It is surprisingly small.
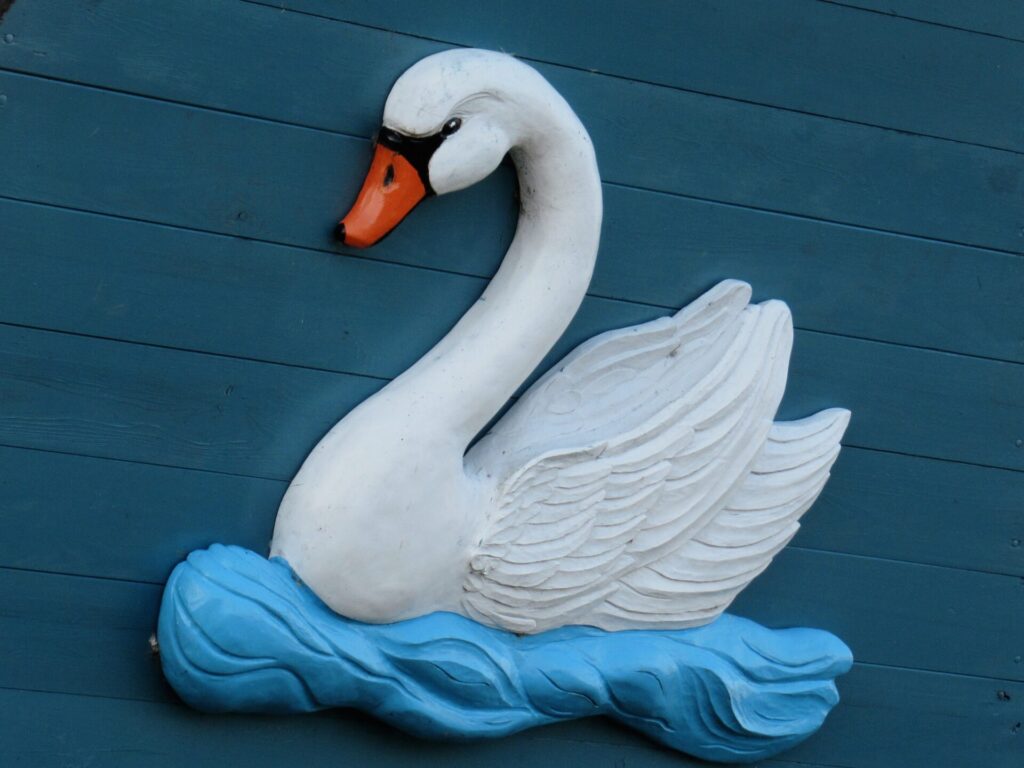
The woodcarving on the prow tells us the ship’s name: de Witte Swaen (the White Swan).
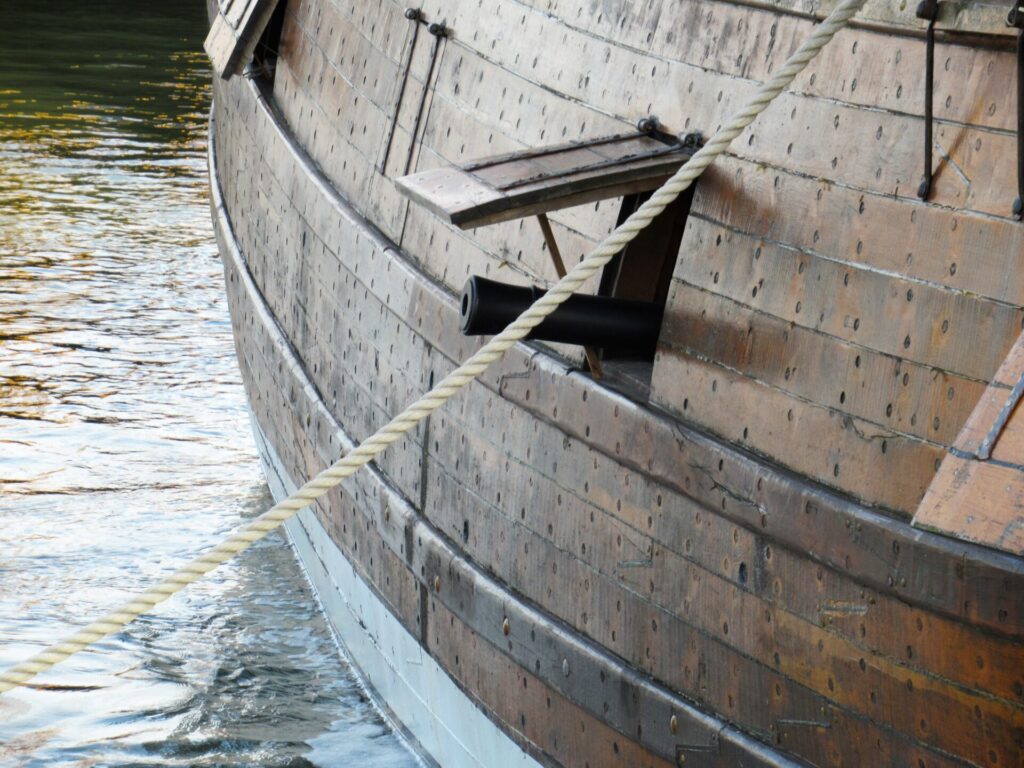
There were cannons on board for protection.
But they could not protect the crew from the greatest danger, the extreme cold. De Witte Swaen got stuck in the ice in the Arctic Ocean. Barentsz and his men were forced to spend the winter on the island of Novaya Zemlya. They built a lodge from driftwood and the wood of their colourful ship.
When they ran out of supplies, the crew decided to try and return in two small open boats. In the end only 12 of them returned. Barentsz himself did not survive. Yeah, it’s quite a story.
Well, let’s get back to the present day and continue on to the city centre.
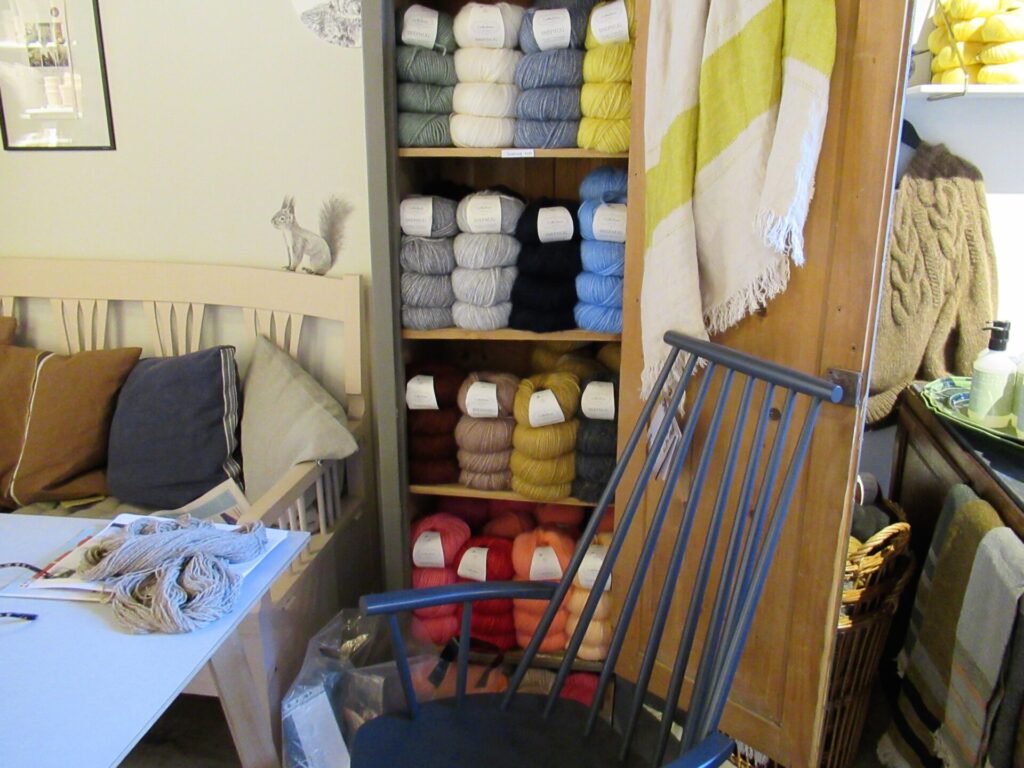
There are many interesting buildings, a museum, a tile factory and lots of lovely shops here, including a wonderful bookshop, but I’m only taking you to one of them – a yarn shop called Atelier Swoop. It is run by mother-in-law/daughter-in-law team Geertje and Beau Ann.
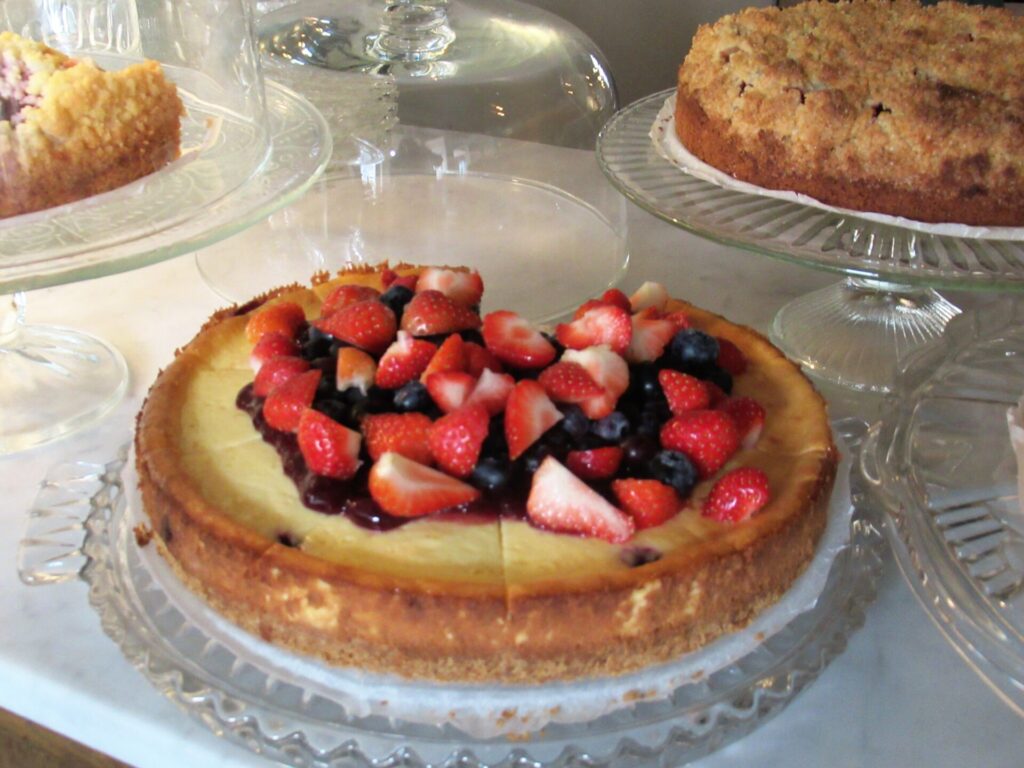
Officially it is a ‘Scandinavian Concept Store’, selling Scandi style gifts and things for the home as well as knitting yarns, antiques and delicious home-made cakes.
(We had to sample these, of course, to make sure they really were delicious – I can now safely vouch that they are.) But to me it is first and foremost a yarn shop. So let’s take a look around at everything that may interest a knitter. The yarns in the shop all come from Denmark.
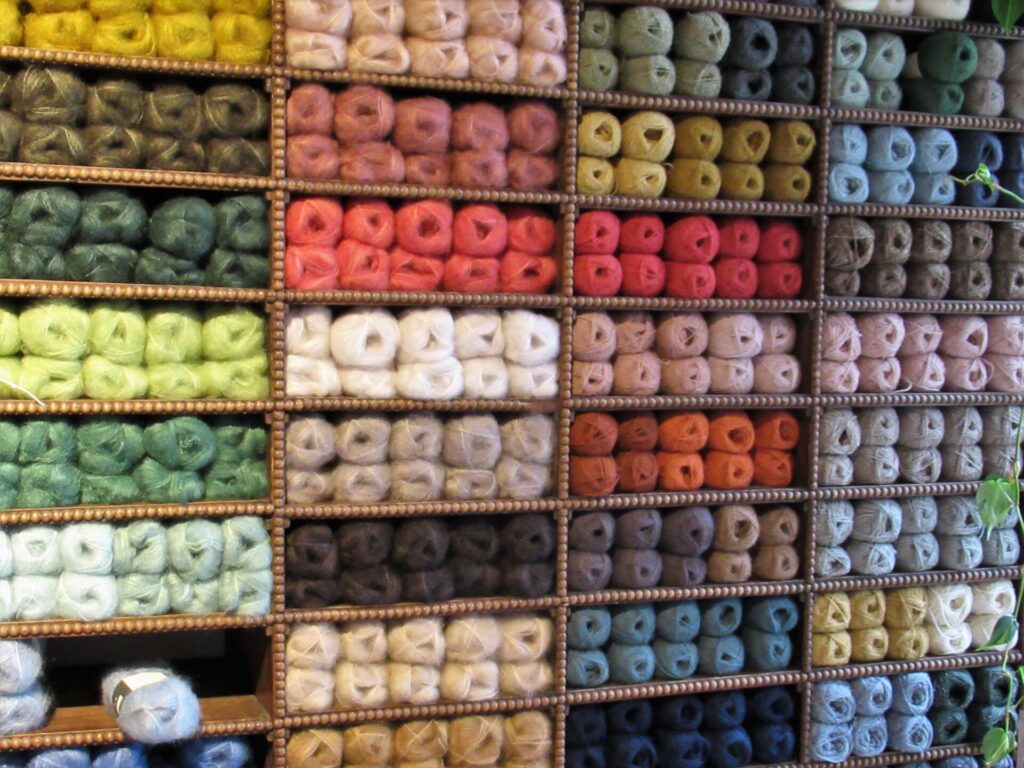
Here is a wall of Isager yarns. If the picture looks fuzzy on the left that’s the fuzziness of the ‘Silk Mohair’ yarn. On the right, Isager’s lace-weight ‘Alpaca 1’.
Here is a close-up of the top of the cabinet, with and adorable little knitted cardi, the ubiquitous dried hydrangeas and some antiques.
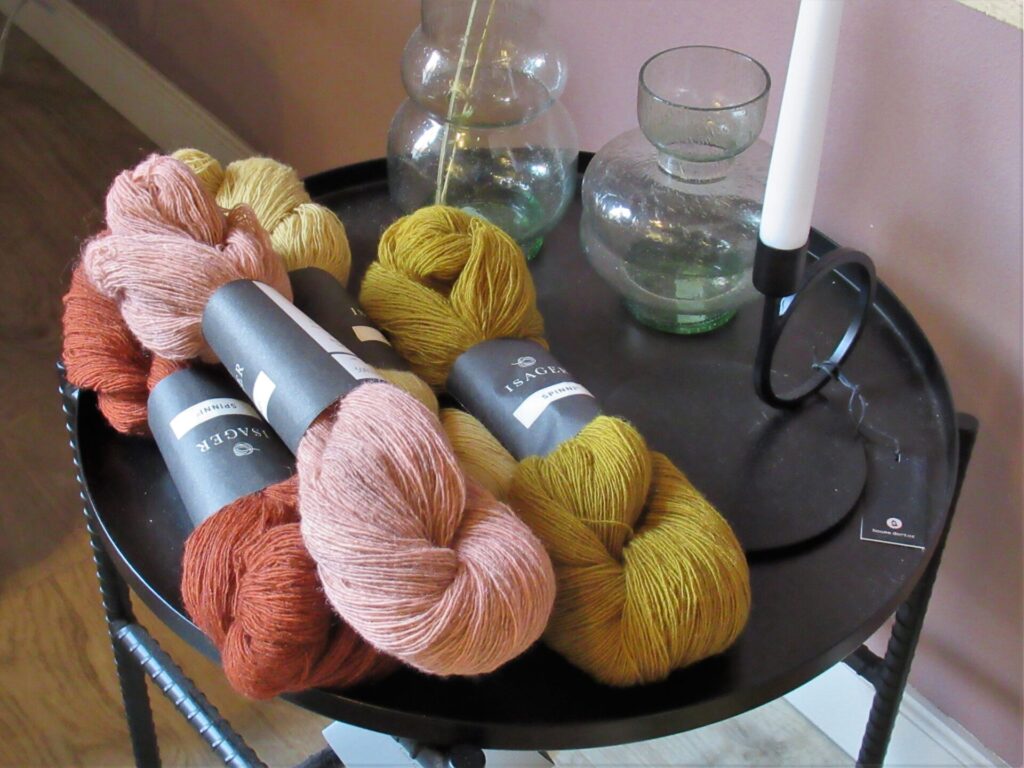
Small displays of yarn are dotted around the shop. This is some Isager ‘Spinni’:
And this is a thicker yarn that may be Isager’s ‘Jensen’ yarn, but I’m not entirely sure.
This cosy corner houses a CaMaRose yarn that really lives up to its name: ‘Snefnug’ (snowflake). It is very, very soft and airy, only much warmer than a snowflake.
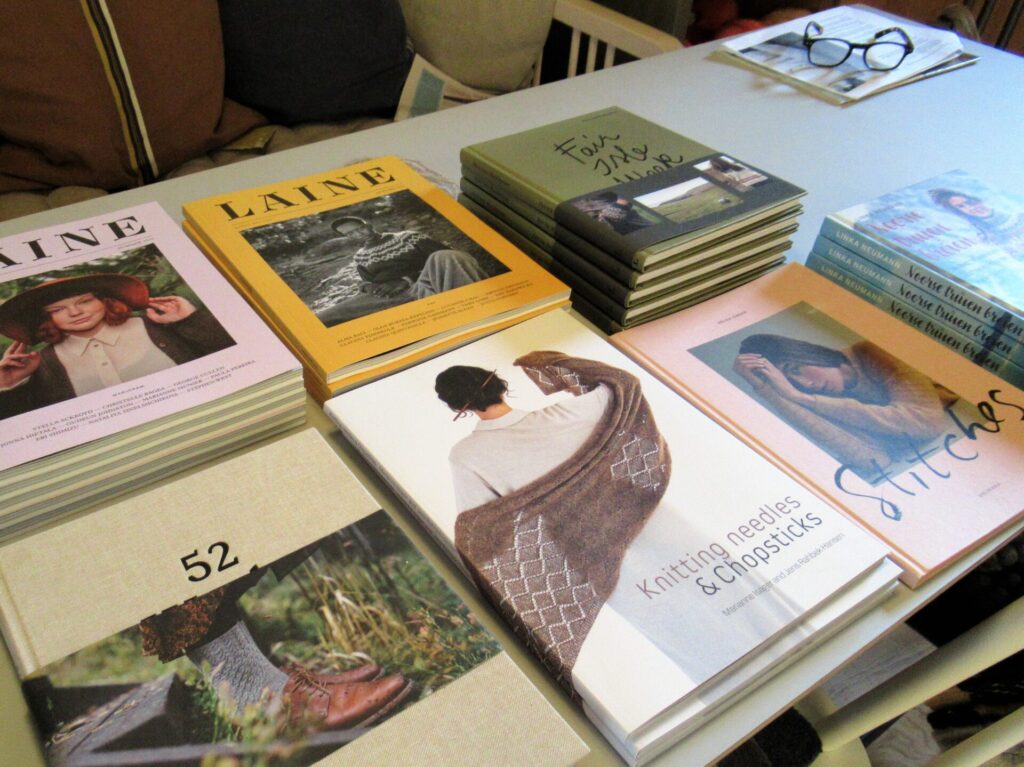
There is also a small but interesting selection of knitting books and magazines, all with a northerly slant.
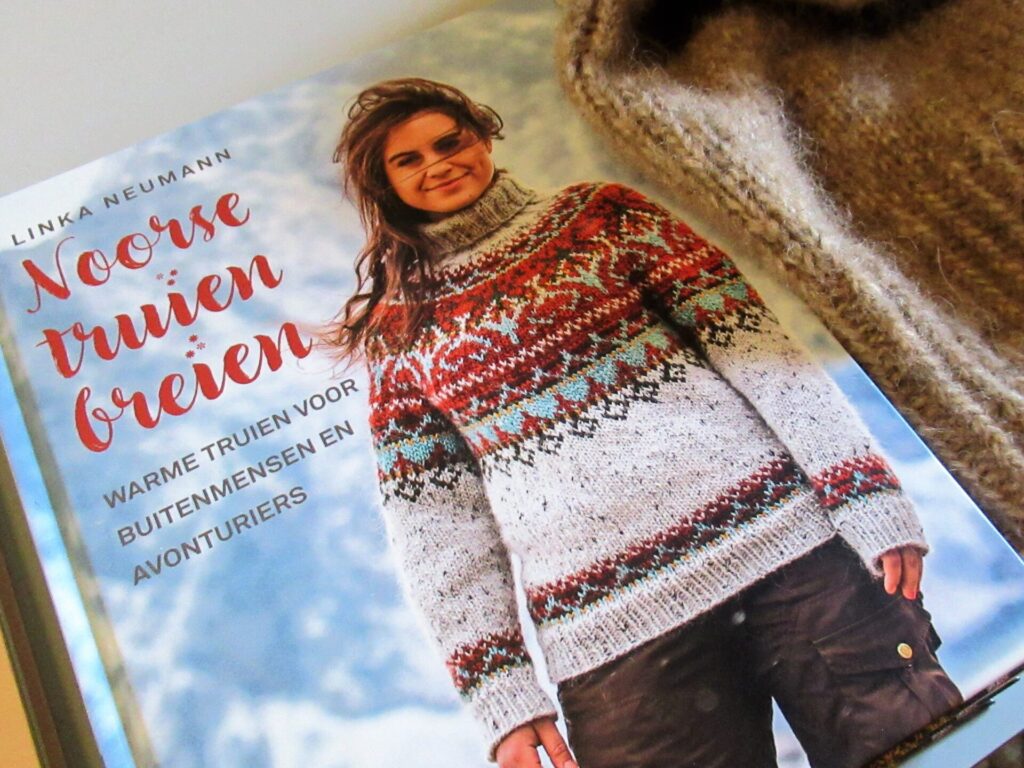
This attractive book is filled with warm outdoorsy colourwork sweaters in Norwegian and Icelandic yarns:
It is by Linka Neumann, and its title is Vilmarks gensere in Norwegian, Noorse truien breien in Dutch, Einfach nordisch stricken in German and Wilderness Knits in English.
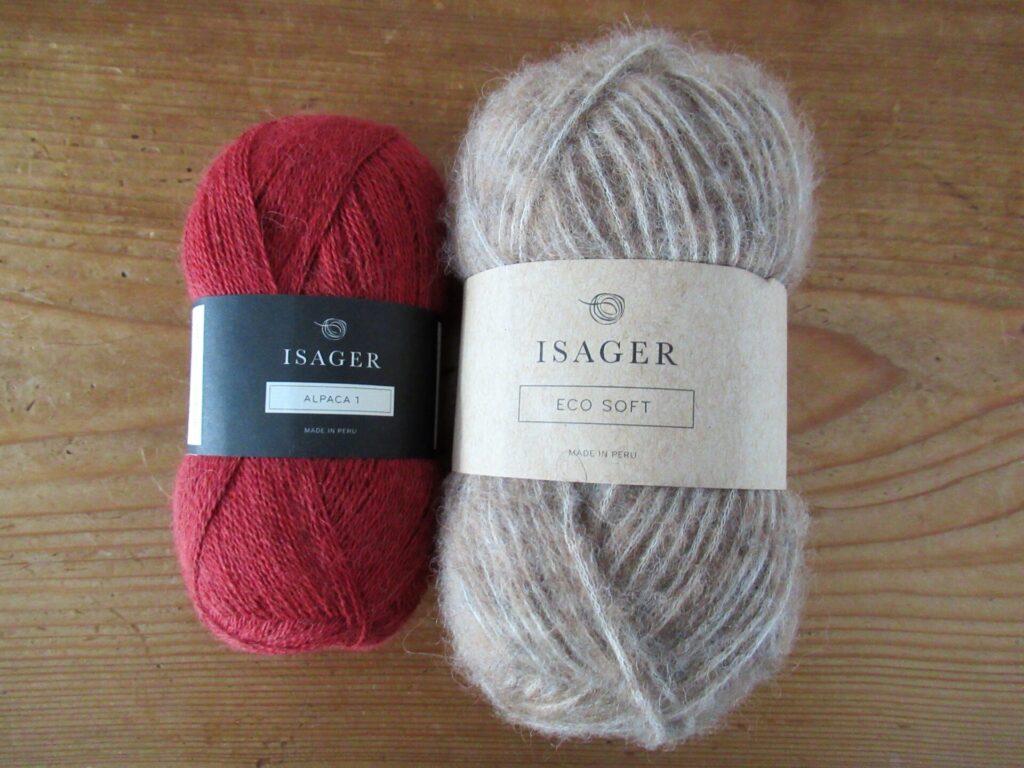
Ah, that was lovely, tasting some delicious cake, browsing around, and chatting with Beau Ann and Geertje. And what did I leave the shop with? Three skeins of Isager Alpaca 1 (left) for a scarf for a friend. And a big bag of Isager Eco Soft (right) for a cardi for our daughter.
More about those in the New Year, I think. First I’d like to finish a few WIPs* and some gifts.
If you’re ever in the area, Harlingen is absolutely worth a visit. Please check out Atelier Swoop’s website (no web shop, brick-and-mortar only) for their opening hours. (In these uncertain times it may be best to contact them first to be on the safe side.) And there is a great website with loads of information about Harlingen here.**
Thanks for visiting Harlingen with me. Hope to see you again soon!
* WIP = Work In Progress ** As you’ll probably know by now, I’m not sponsored in any way. I only write about the things I write about because I think they are worth writing about.
We’ve had a lot of rather gloomy days here lately. I don’t mean gloomy because of the current coronavirus situation, although there is that too, but literally so gloomy that we need to keep the lights on all day.
We haven’t actually had a lot of rain. It’s just that on many days it’s been cloudy and grey.
I don’t really mind, and even enjoy the quiet atmosphere of some of these days. For me, the problem is that there often isn’t enough light to take pictures indoors, while the table on the patio is too wet to spread my knitting out on.
But last Sunday suddenly the sun came out.
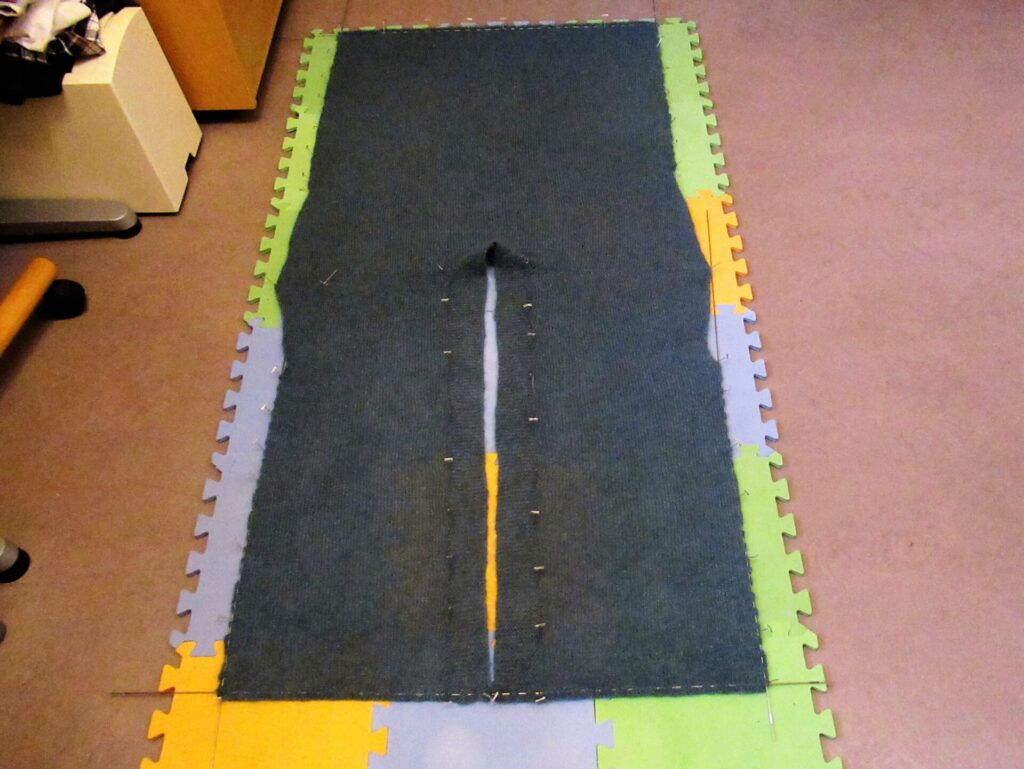
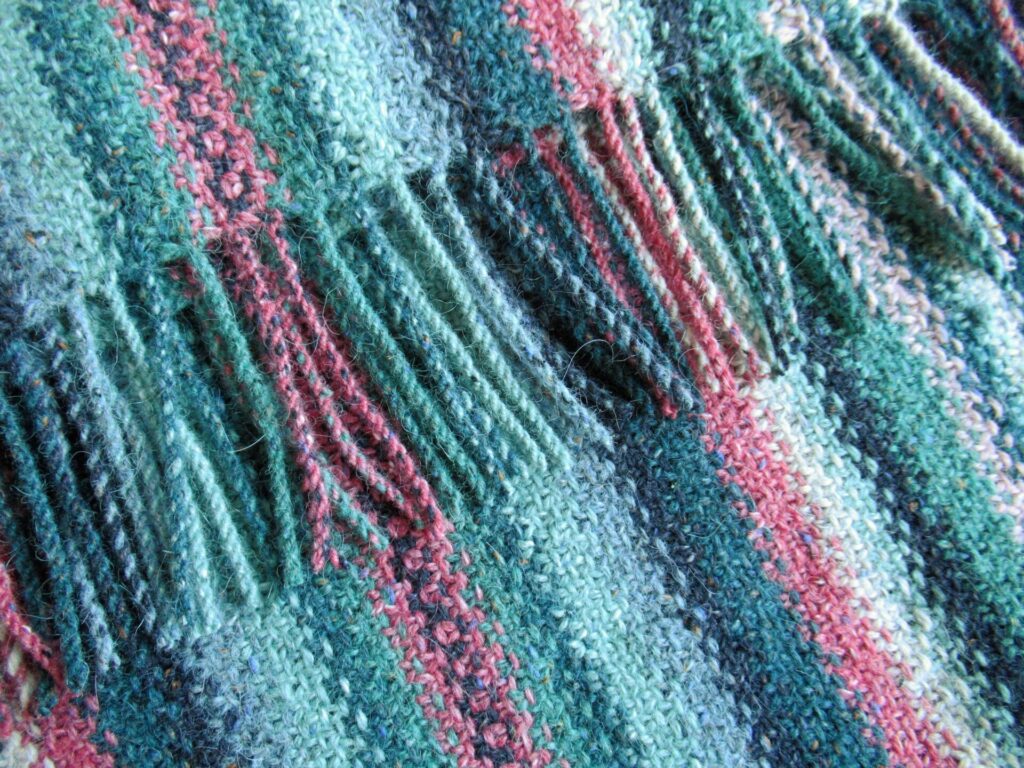
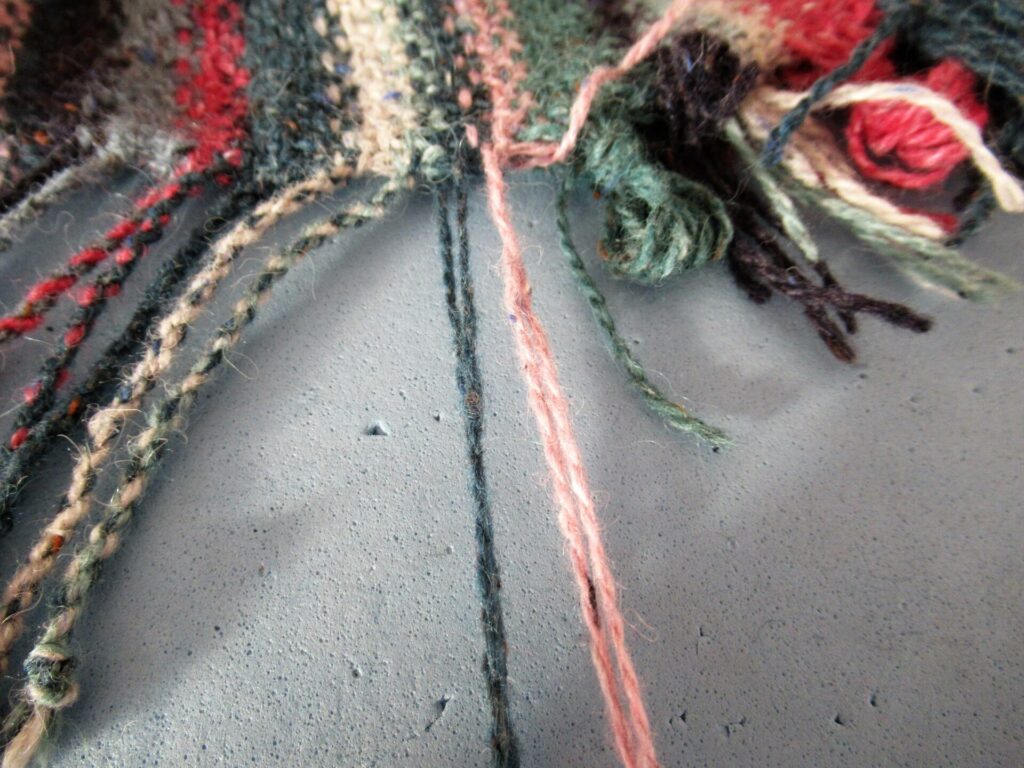
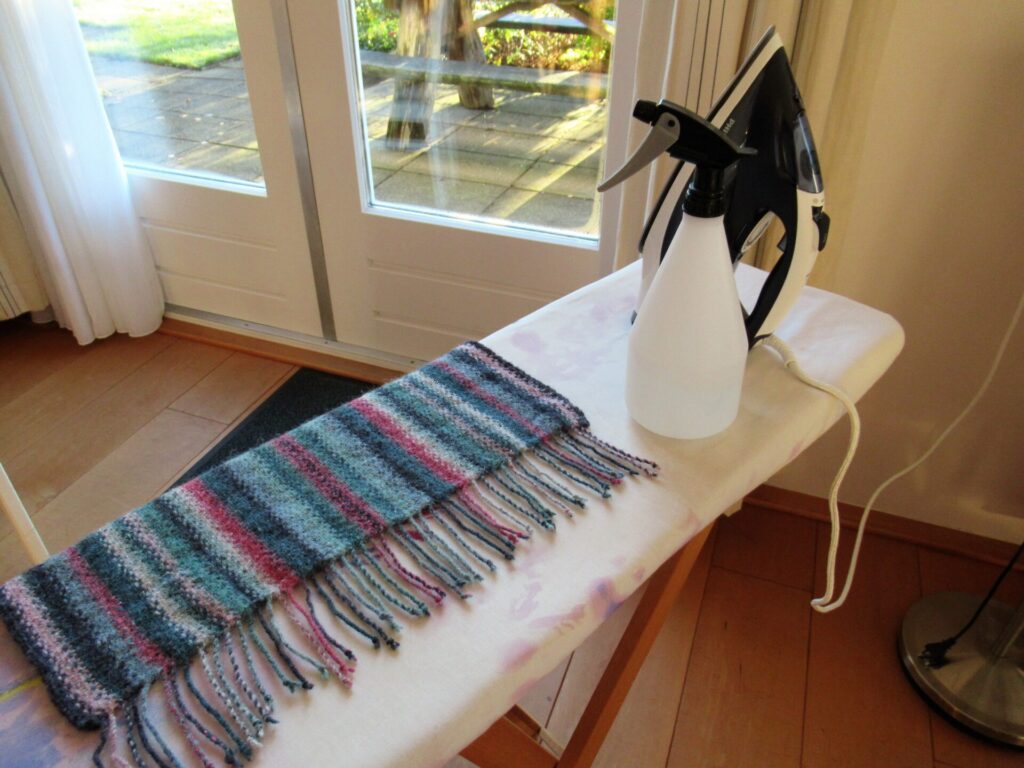
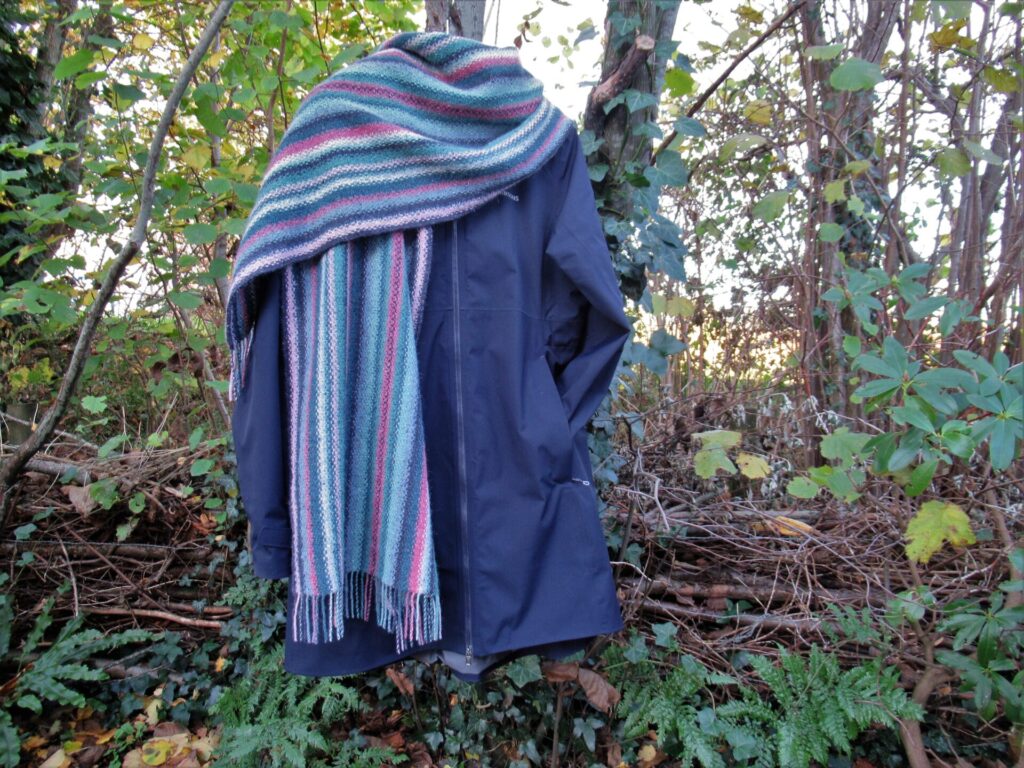
I quickly set to work, because I wanted to show you how to make a twisted fringe. I’d finished knitting my Striped Linen Stitch Wrap. In this project, every row starts and ends with a yarn tail. In the basic pattern these are knotted into a fringe, but a later adaptation has a twisted fringe and that was what I wanted to try.
The yarn I used was Rowan’s Felted Tweed, a blend of lightly felted wool, viscose and alpaca. Because I wasn’t sure if the technique would work for this combination of fibres, I tried it out on a swatch first, and yes, it worked! This is how it’s done step by step.
1) Pin the end of the wrap to blocking mats.
The yarn ends were tied into bundles during the knitting. These are now undone one by one.
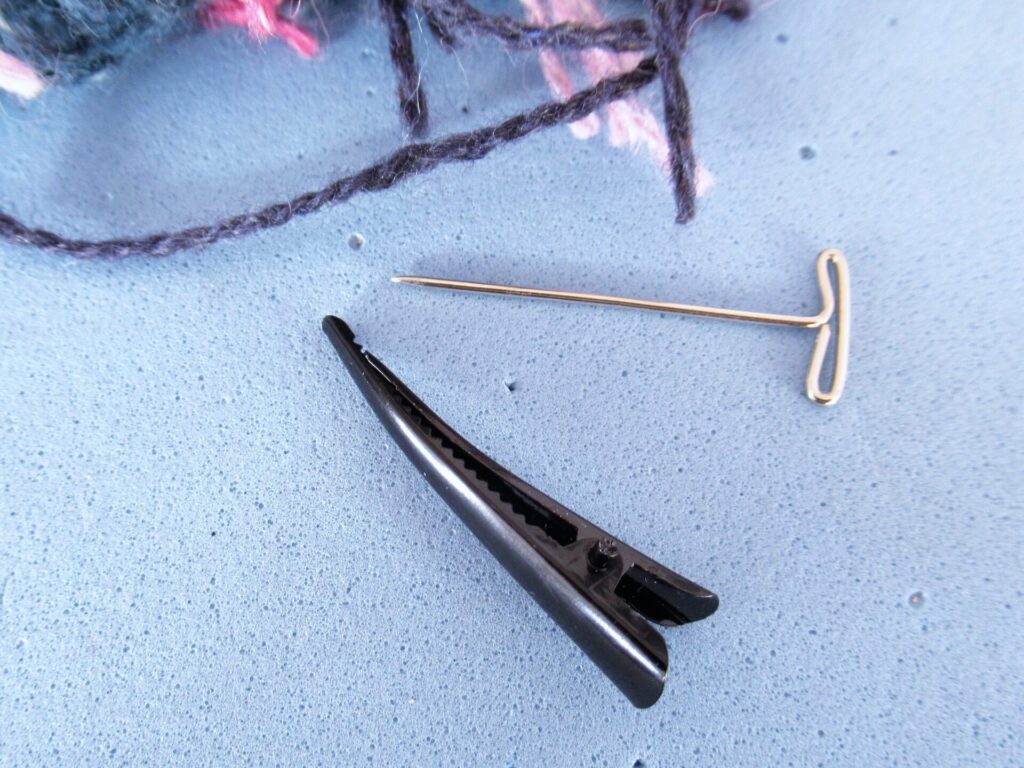
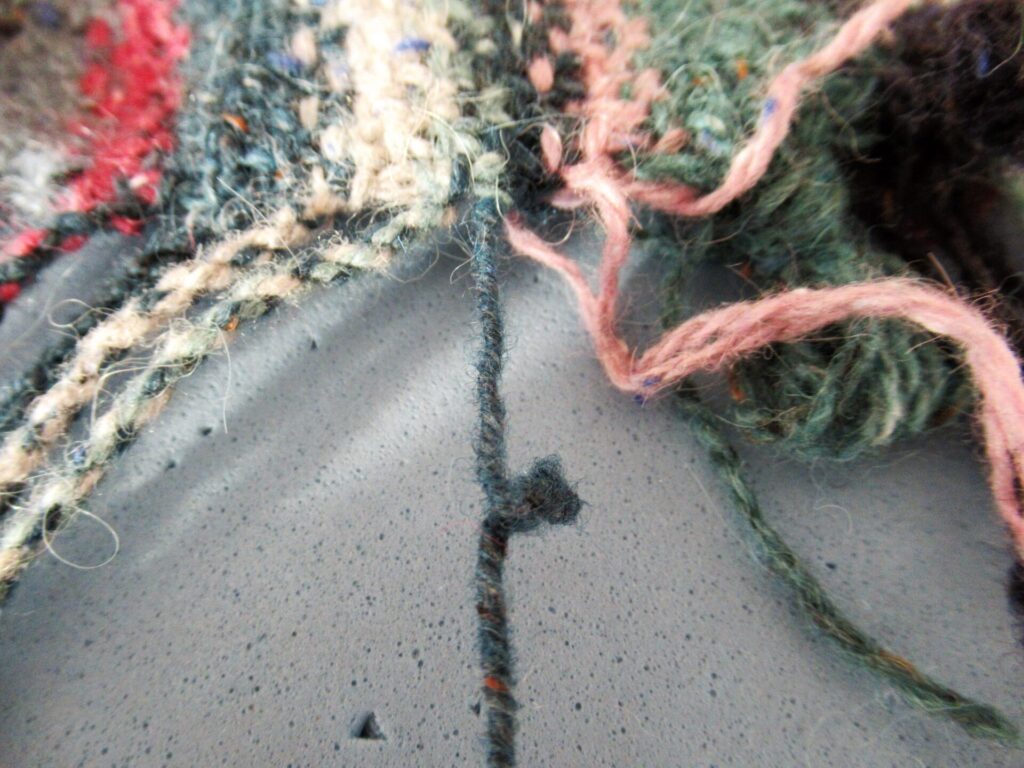
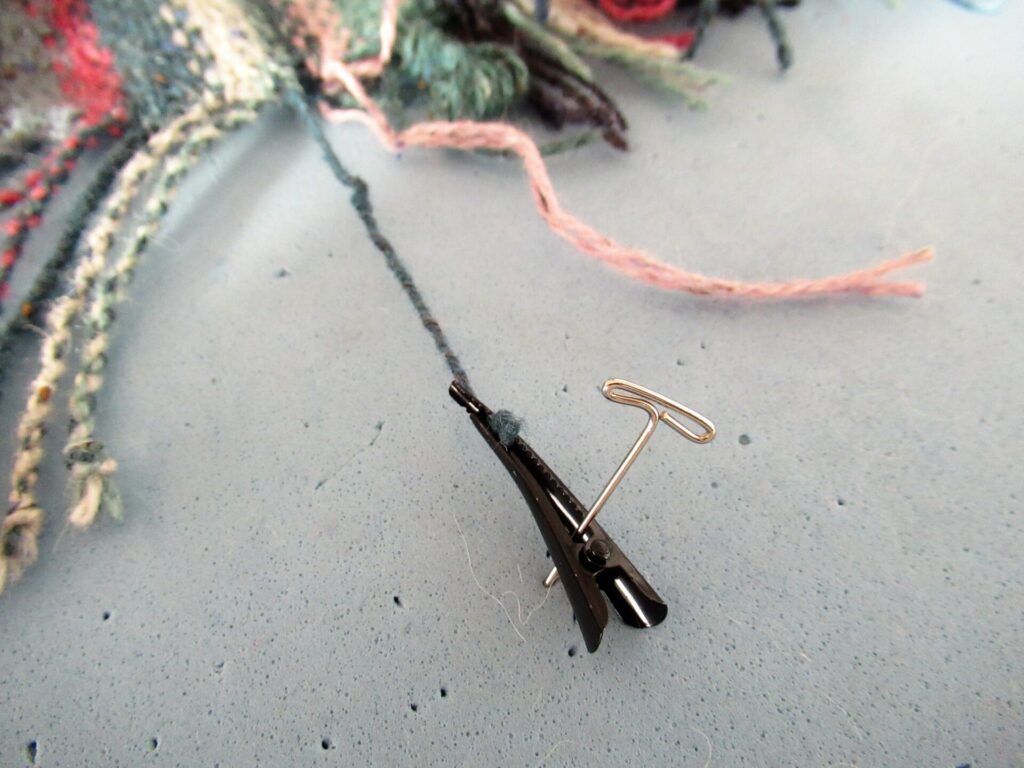
While twisting the ends, they need to be kept in place. The pattern uses a binder clip for this, but as I didn’t have any of those, I used a hair clip and a T-pin.
2) Undo a fringe bundle. Find the next 4 tails (they should be twisted in the order they were knitted).
3) Twist the first 2 tails together in the same direction as the twist of the yarn (i.e. to the right). Continue until they are slightly overtwisted.
4) Secure with a clip and pin onto the blocking mat with a T-pin.
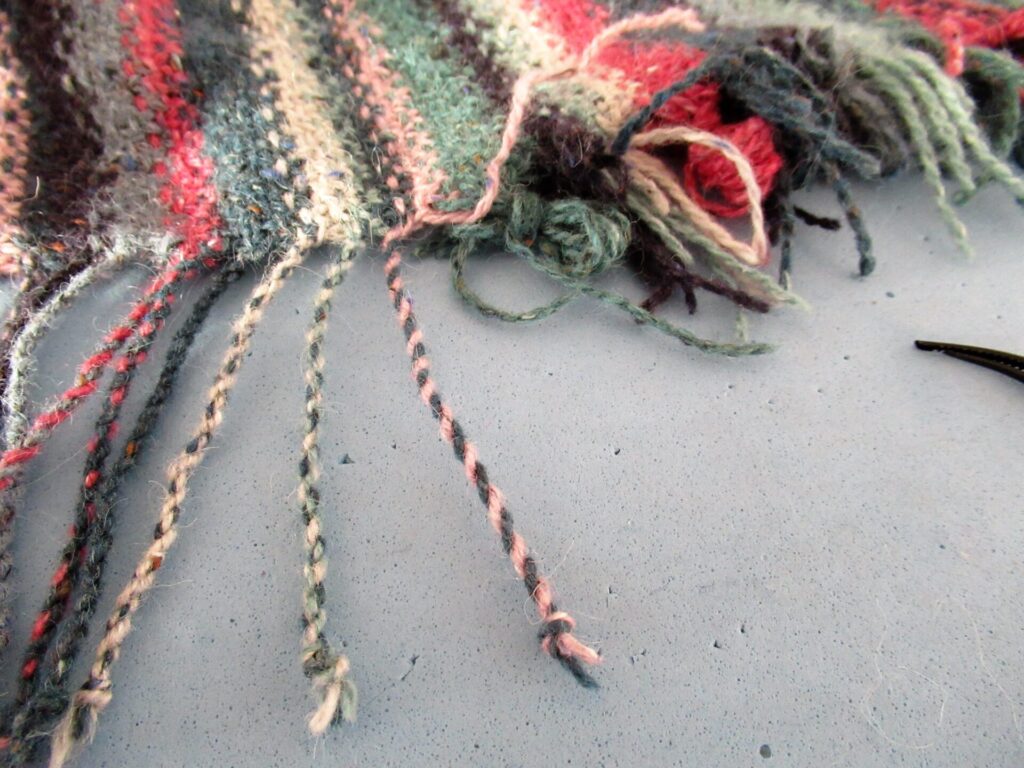
5) Twist the next 2 tails in the same way and hold. Unclip the first 2 twisted tails. Tie both sets of tails together with an overhand knot as close to the ends as possible and let go. They will now twist together. Smooth this twist by passing it between thumb and forefinger several times.
Continue like this until all yarn tails have been twisted. Then repeat steps 1-5 for the other end of the wrap. Remove the wrap from the blocking mats and place it on an ironing board. Comb out the ends so that they are straight and not crossing each other.
6) Spray the fringe with a plant mister.
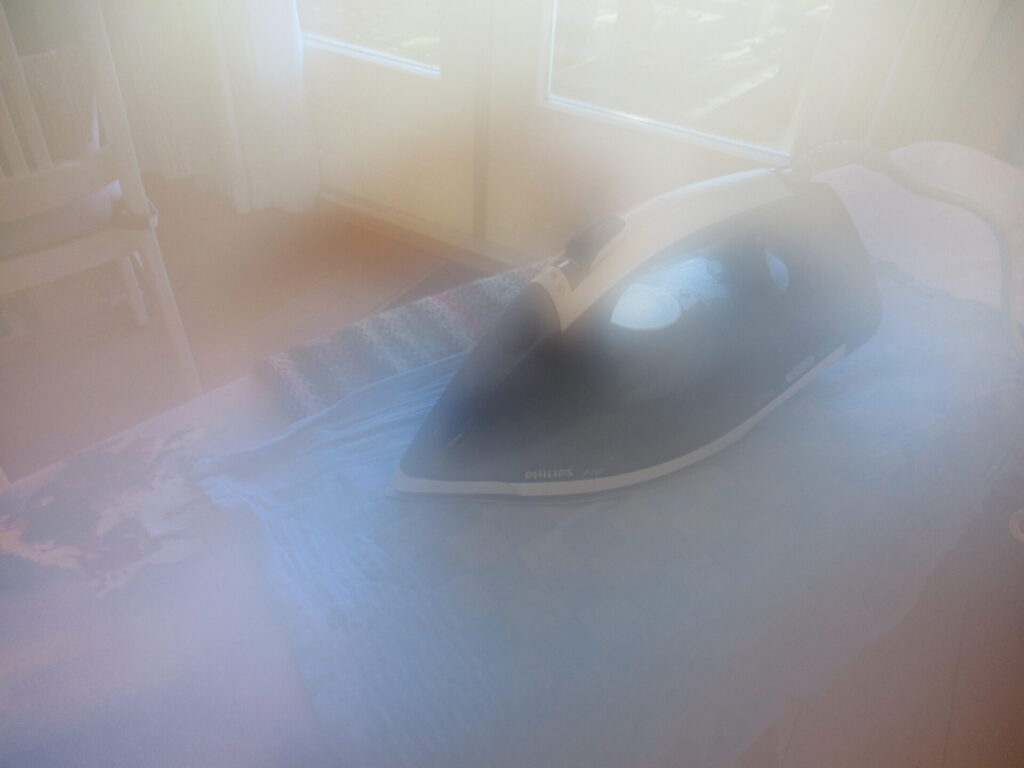
7) Cover it with a clean, moist tea towel. (Make sure it’s an old one that won’t give off any colour.)
8) Then, with the iron on the wool and steam setting, press the fringe with lots of STEAM.
Repeat for the other end of the wrap and leave to dry thoroughly. The tails should now be slightly felted, preventing them from untwisting.
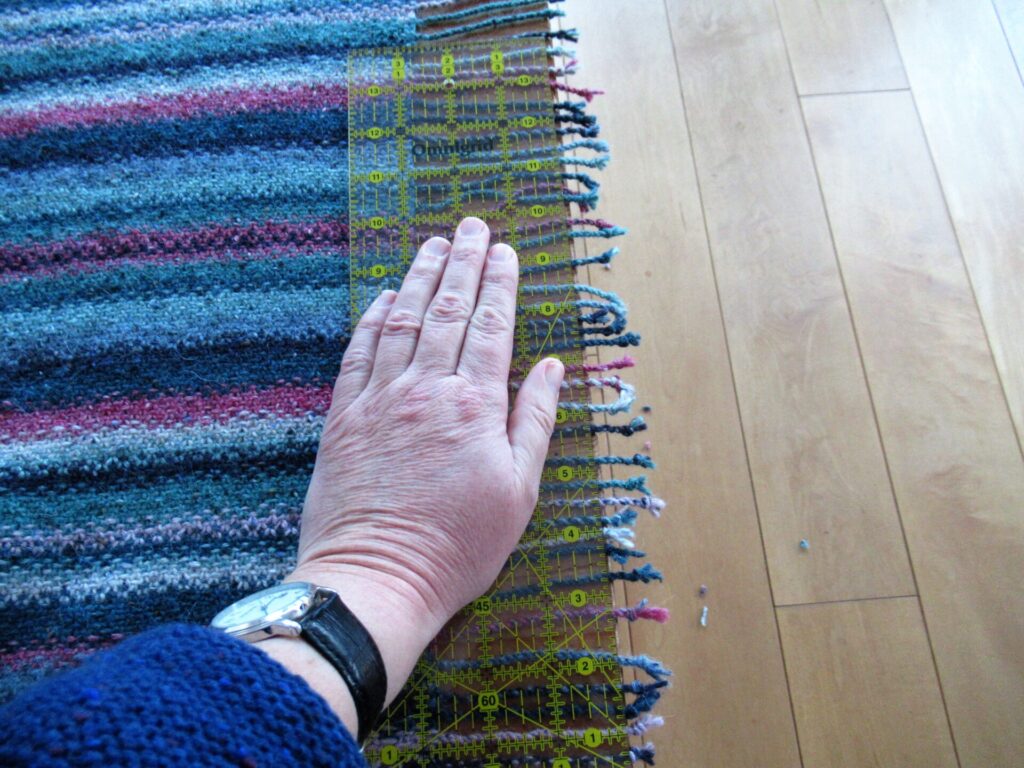
9) Place the wrap with one fringe on the end of a table top. Make sure that the wrap is placed straight and straighten out the tails. Then cut off the knots at the length of the shortest tail.
I used a quilting ruler to make sure I cut the tails off straight.
There, all done! This is a great finish for a scarf or wrap. It’s really lovely to see the colours combined differently in each tiny barber-pole tail.
I’m really happy with this wrap and at the same time slightly sad that it’s finished. Many of the things I knit are for others, but I’m keeping this one. I’ve loved working on it and will miss the soothing rhythm of slipping and knitting, slipping and knitting many, many stitches.
Now I’m hoping for colder weather so that I can wear it. It’s a strange autumn. The pelargoniums and lobelias in our outdoor pots are still flowering and it’s the end of November! Still, we’ve had some night frost…
… and more wintry weather is expected for this weekend.
In case you’d like to knit a wrap like this, the pattern is called Striped Linen Stitch Wrap & Scarf (there is also a smaller scarf version) and can be found here on the designer’s website and here on Ravelry. The free adaptation for the twisted fringe can be found here.
Well, I hope that just looking at this warm wrap with its colourful fringe has warmed and lifted your heart a little. Take care! xxx
Before I embark on the story of Lazy Kate, I’d like to share some news with you. As some of you have already guessed from a few subtle clues in my previous post, I’m going to be a grandmother! It takes some getting used to the idea (how did I suddenly get so old?), but I’m thrilled to bits! And very, very happy for the mum-and-dad-to-be.
I’ve hesitated about talking about it here, as I don’t believe in sharing everything online. But I’d have to lead a strange kind of double life to not talk about it here. (Don’t worry, I won’t talk about it all the time.) It just feels good to know that you know, and not to have to be secretive about it anymore.
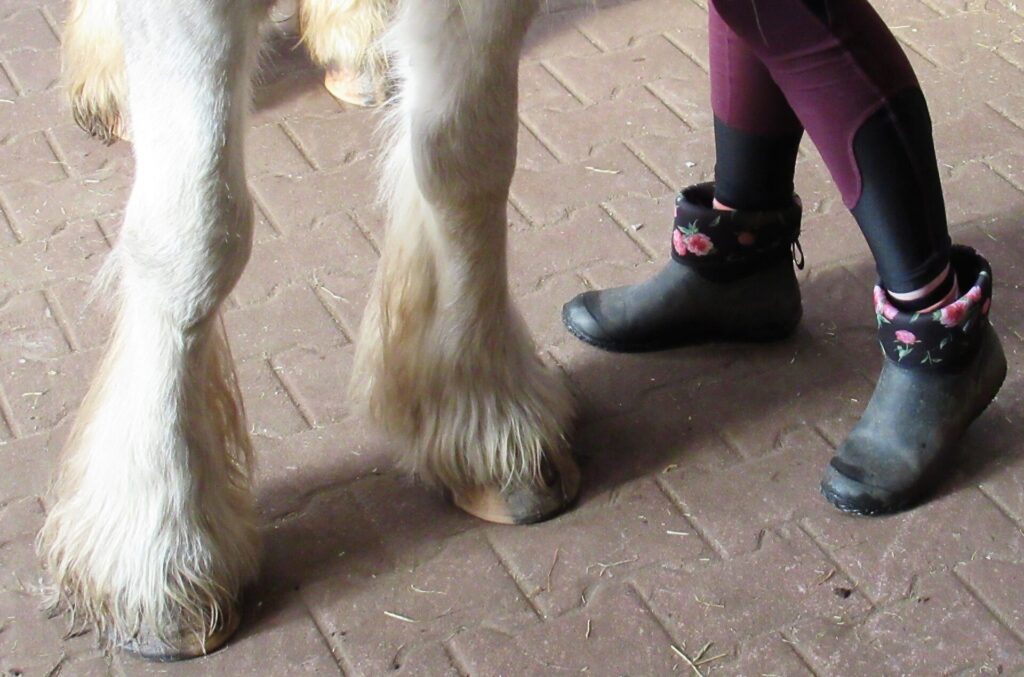
I also don’t feel very comfortable sharing pictures of loved ones online, but I think it’s okay to show our daughter’s feet here, together with those of the other great love of her life beside her husband.
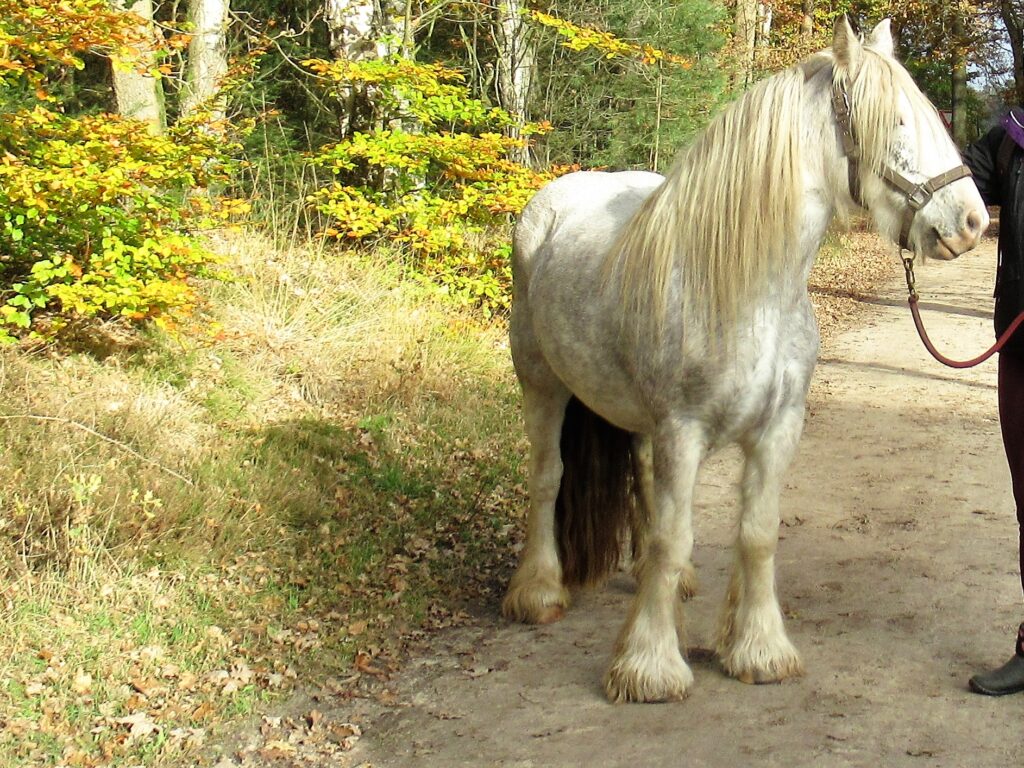
And I think the girl with the big, hairy white feet doesn’t mind if I share a picture here. She loves going for a walk in the woods, rustling through the autumn leaves just as much as we do.
Neither this sweet-tempered pony nor our daugher is called Kate, and neither of them is lazy. So, who is Lazy Kate?
Well, actually this isn’t about who but about what – it is about a lazy kate (with indefinite article and without capitals). For the non-spinners among you: A lazy kate is a thing that holds yarn bobbins and comes in useful when plying several threads together after having spun them. It comes in different shapes and can be a separate box or rack that is placed beside the spinning wheel or it can be integrated.
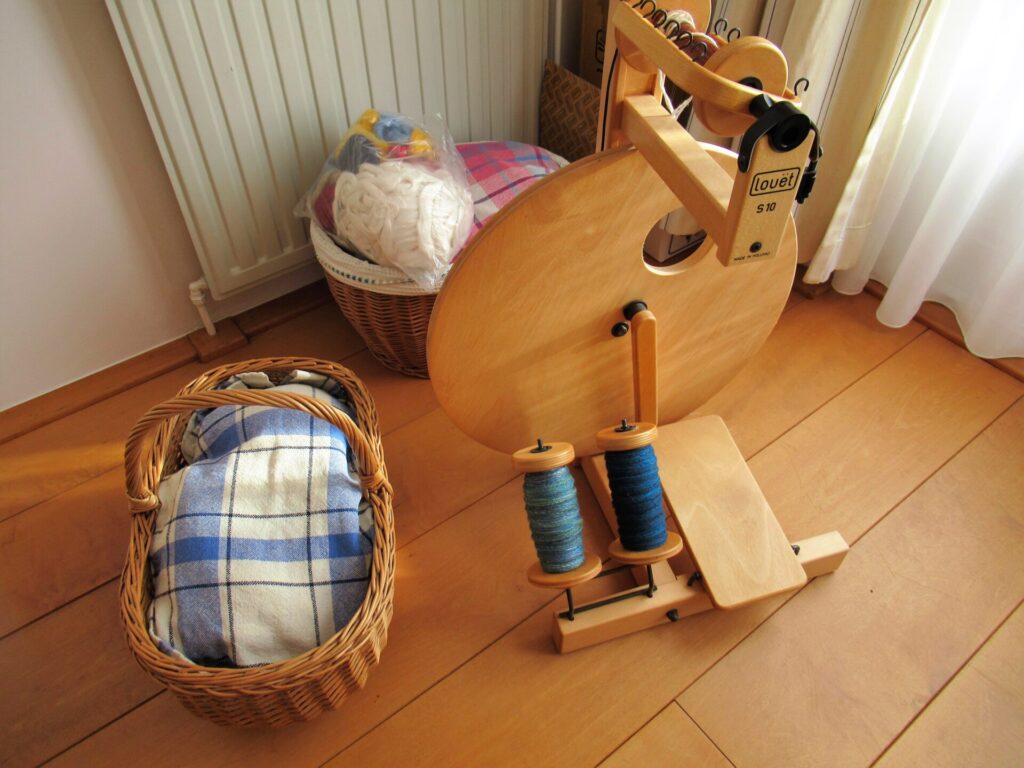
This is my spinning wheel – a 21-year-old Louët S10.
I looked up the receipt and saw that I bought it in March 2000 for 515,00 guilders. Guilders, not euros! Goodness, a different era. It is still functioning just as smoothly as when it was new.
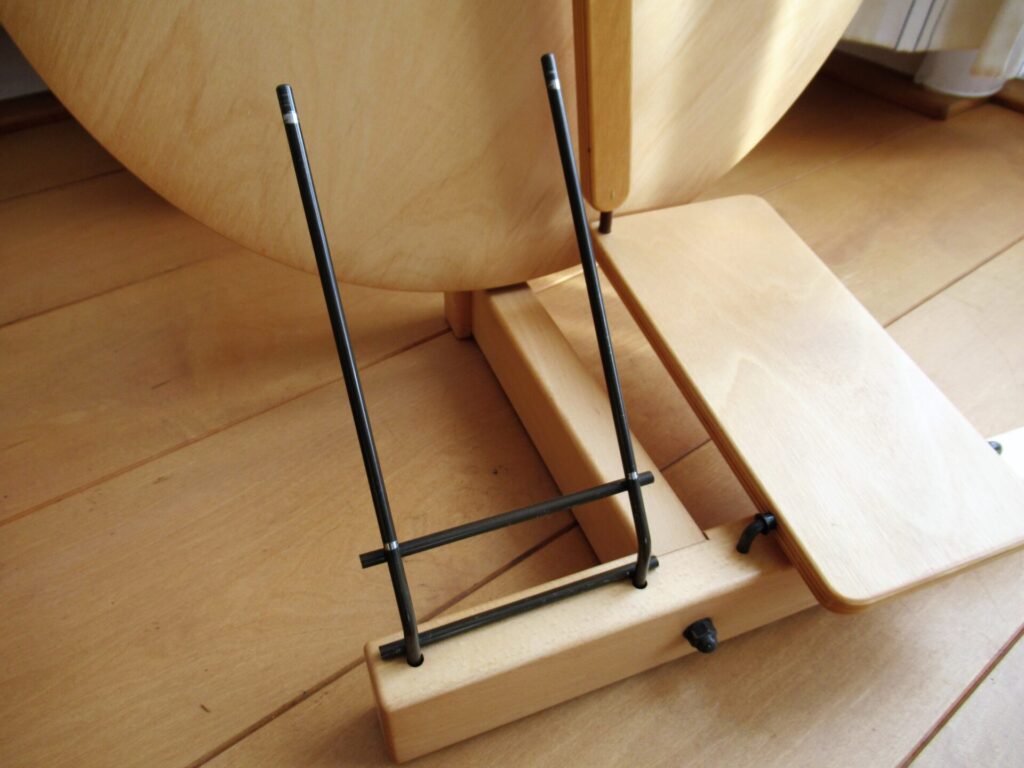
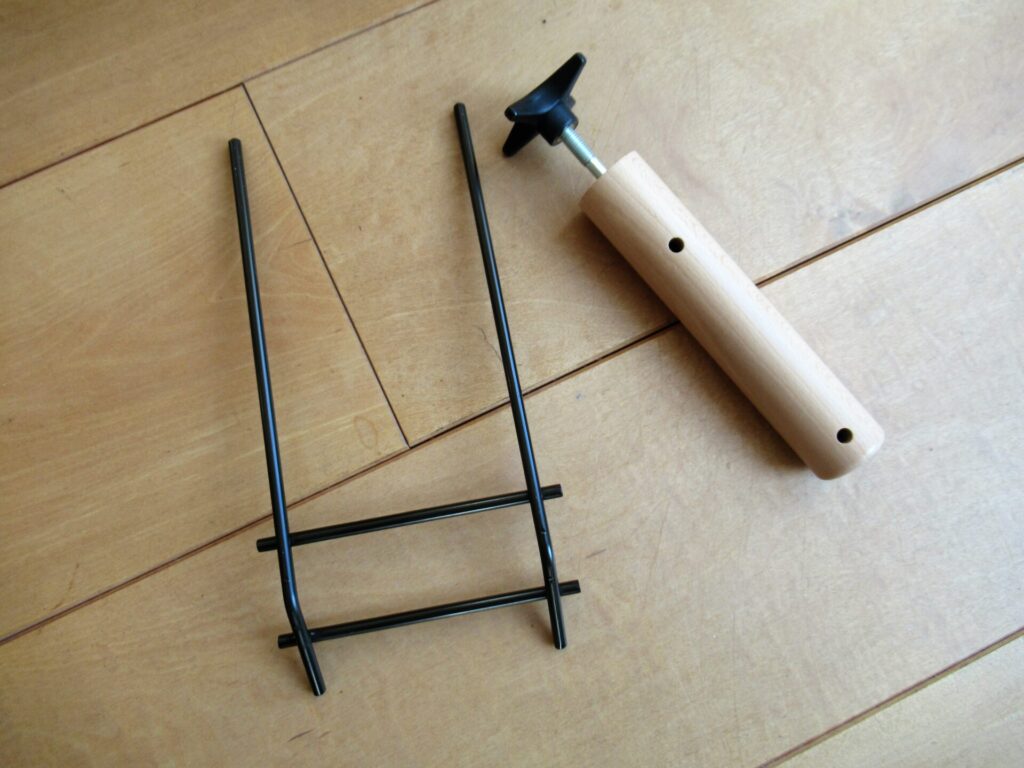
It has an integrated lazy kate – the rack with the two filled bobbins beside the treadle in the picture above. This is what it looks like without the bobbins.
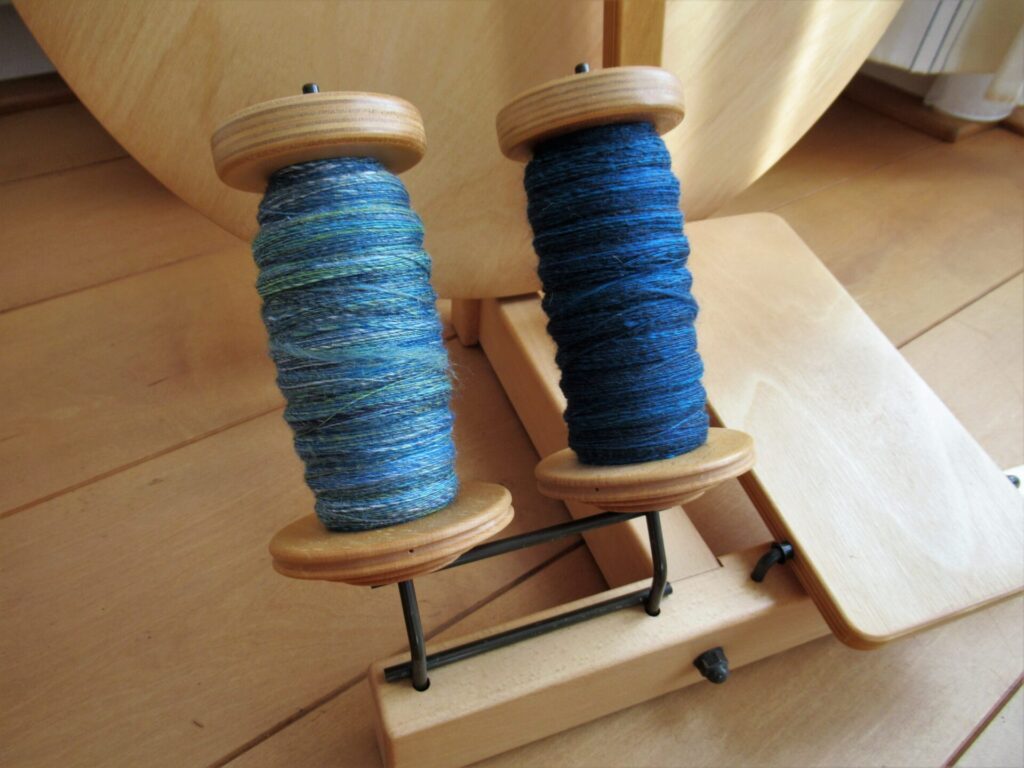
With two bobbins I can make a 2-ply yarn, but the problem is that I now want to make a 3-ply yarn. I could hold the third bobbin on my lap, or place it in a basket or box beside the spinning wheel, but it would be much better to have an additional lazy kate.
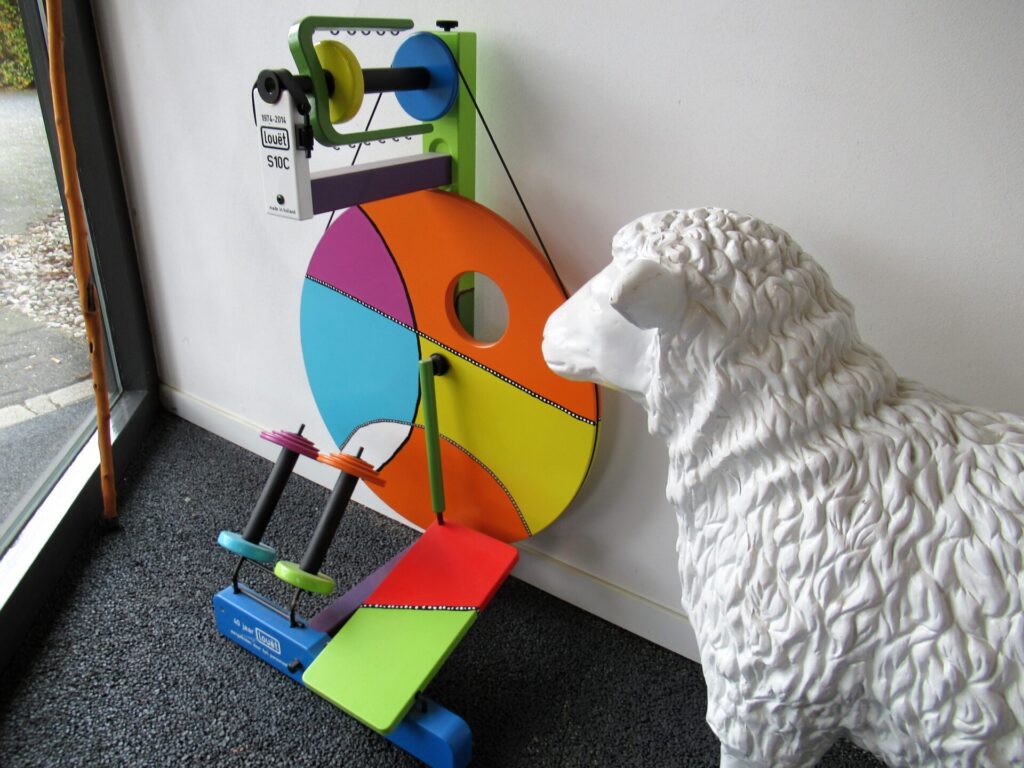
So I decided to order one, and as the Louët spinning wheel factory is just around the corner from the stables where our daughter’s pony lives, I thought I might as well collect it instead of having it delivered. Do come along!
At the entrance there is a spinning wheel very much like mine, only more colourful.
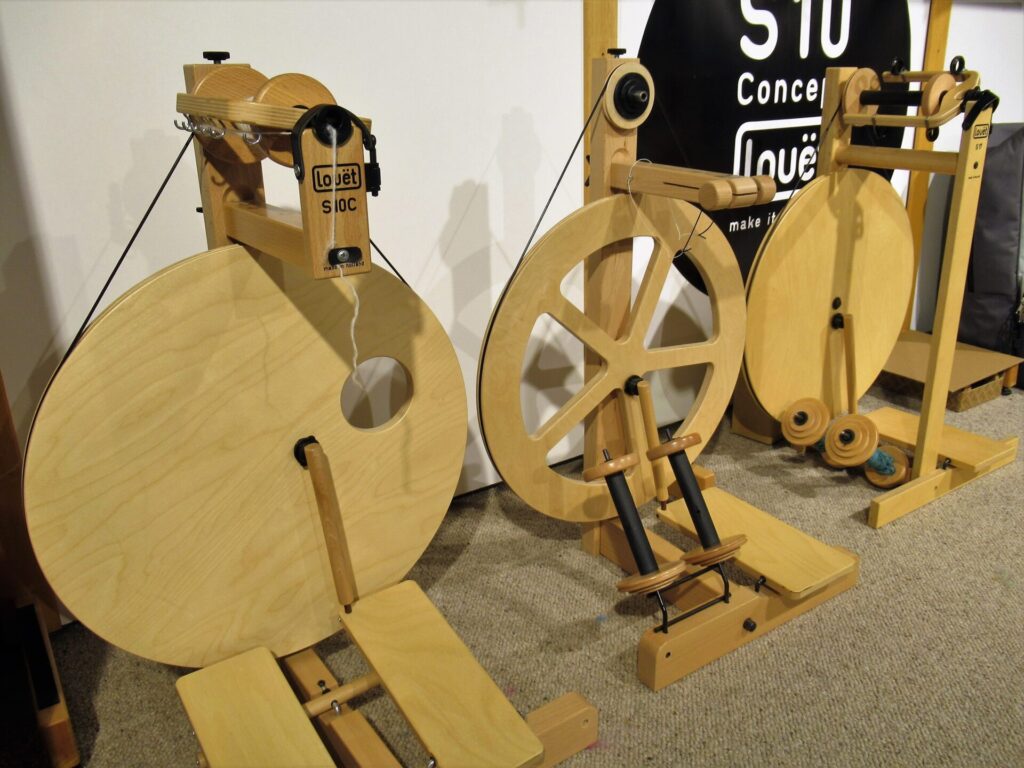
Louët doesn’t have a factory shop, and it isn’t possible to visit the factory itself right now, but we are allowed to take a look around in their upstairs showroom. My spinning wheel is their very first model.
Since then it has evolved and several other models have been added. From what I understand, it is now even possible to have a spinning wheel put together to your own specifications, with single or double treadle, Scotch or Irish tension, etcetera.
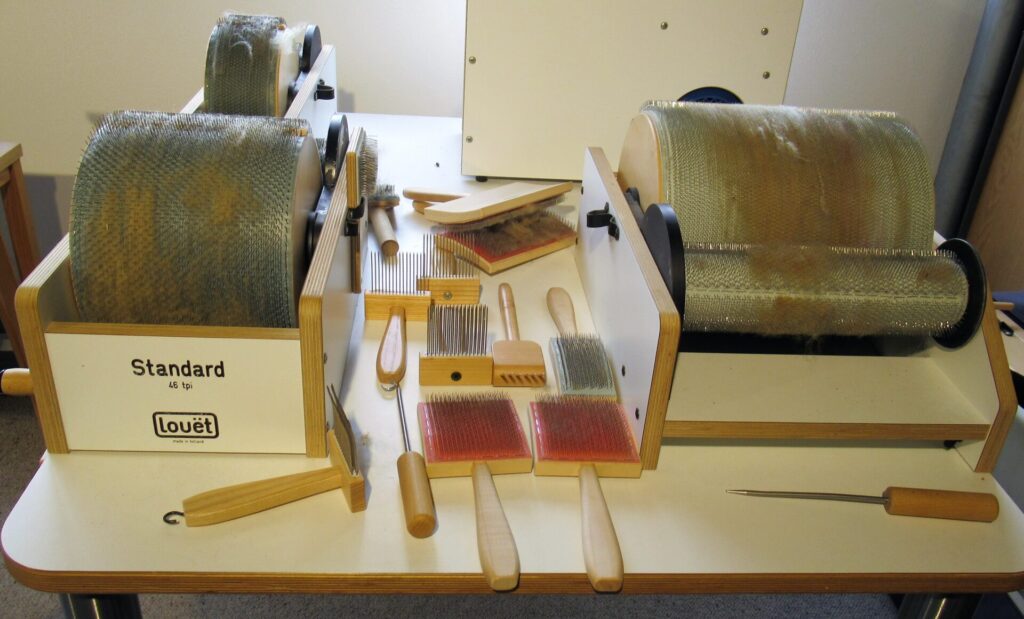
The factory also produces all kinds of tools for fibre preparation, like combs, small and large hand carders, and drum carders.
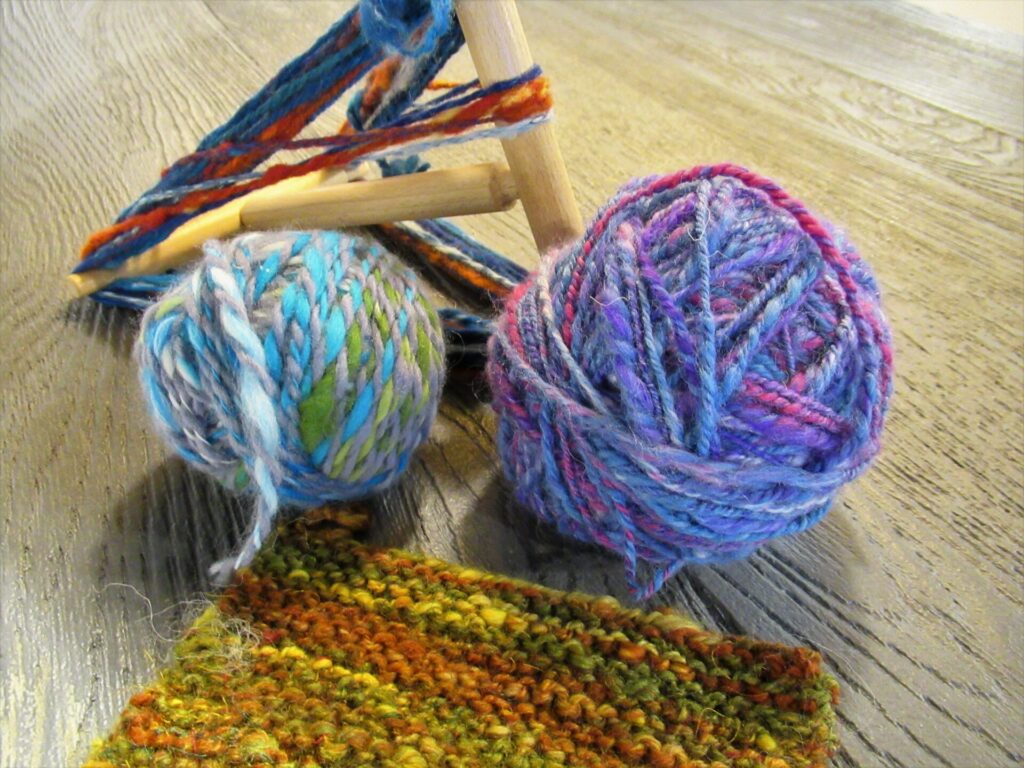
On a shelf there is a niddy noddy, used for making skeins, and some fun hand spun yarns.
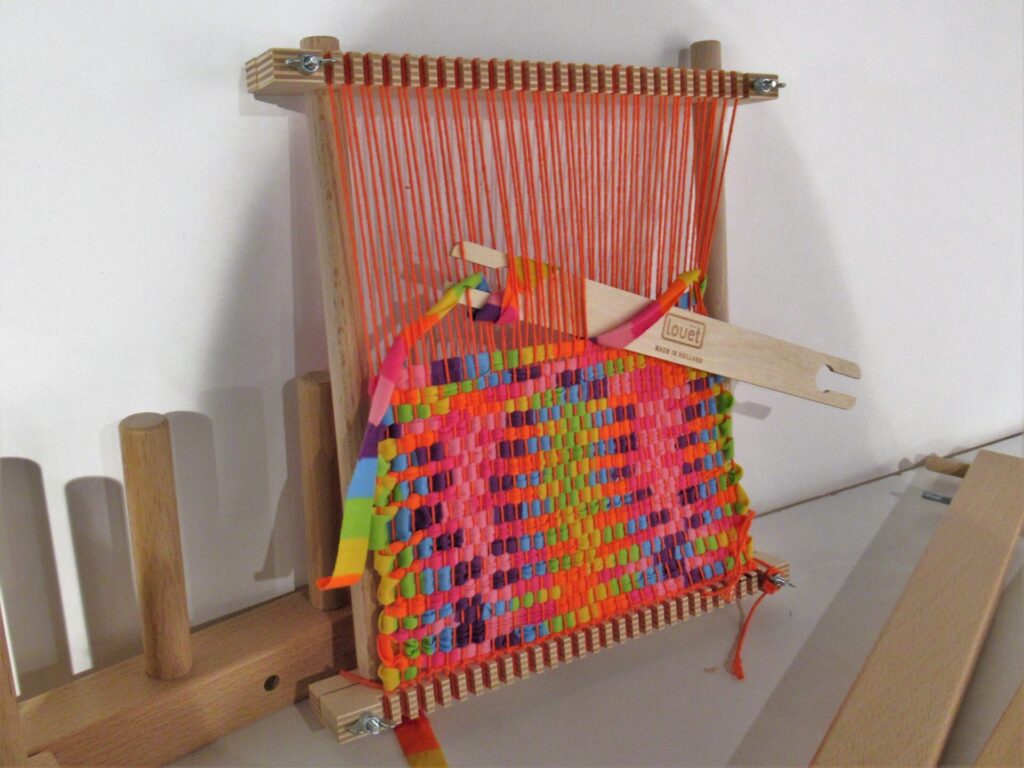
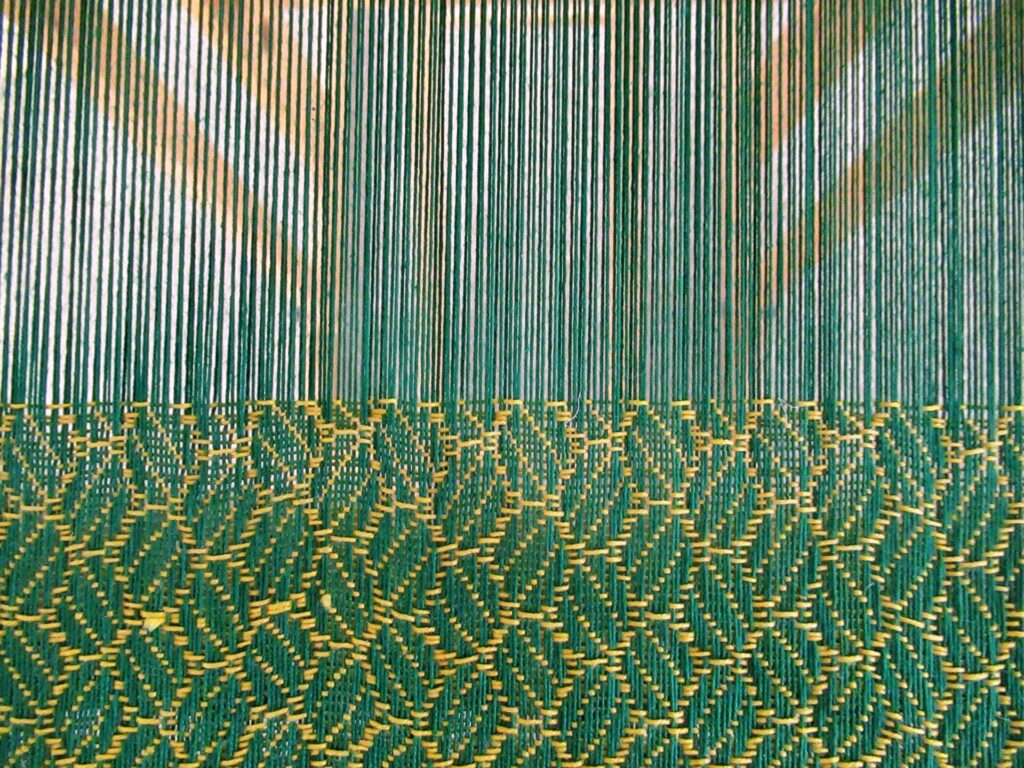
What I didn’t know, is that they also make weaving looms. Here is the very smallest and simplest one.
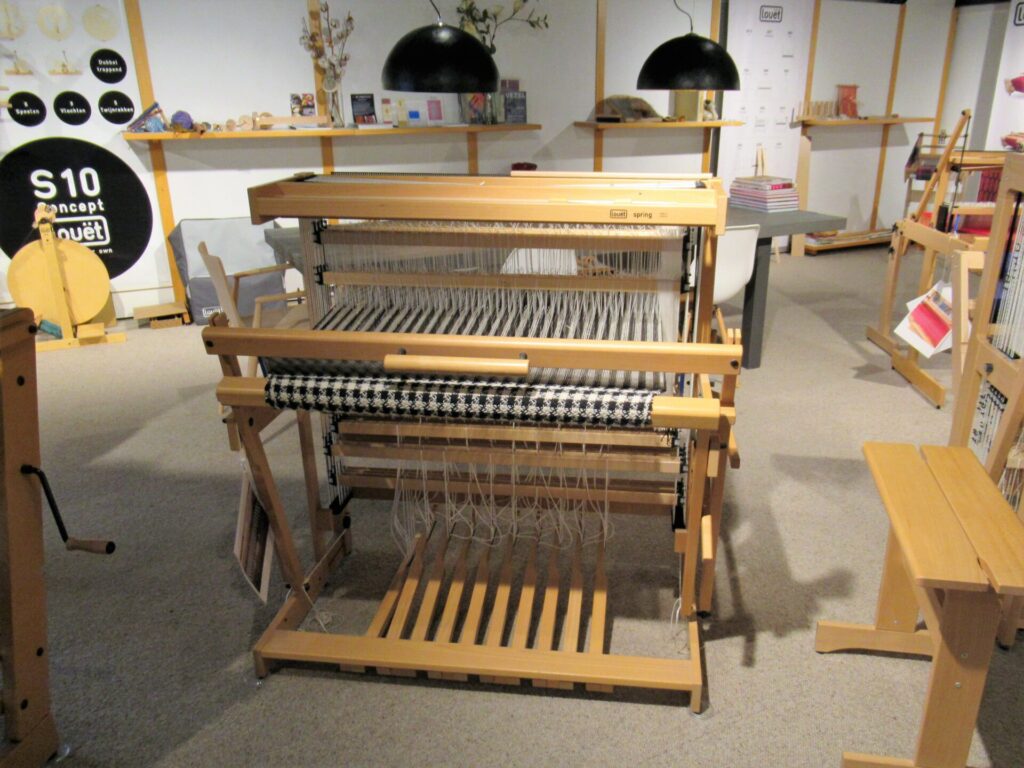
And here is one of the larger and more elaborate looms.
I don’t know anything about weaving, but just looking at the fabrics in progress on the looms is enjoyable, too.
Well, it’s time to collect my lazy kate and the block needed to attach it to my spinning wheel. I hope you’ve enjoyed this little virtual outing. I’ll tell you more about the yarn I’m spinning when there is more to show.
If you’d like more in-depth information about these spinning wheels or looms, please visit the Louët website. And if you’d like some chat about I-don’t-know-what-exactly-yet, please visit me again next week 😉. Bye!